The Eye Exam
- Visual Acuity
- Observation & External Anatomy
- Extra-Ocular Movements
- Visual Fields
- Pupil Exam
- Using the Ophthalmosocpe
- External Structures
- Retinal Exam
Assessment of Visual Acuity:
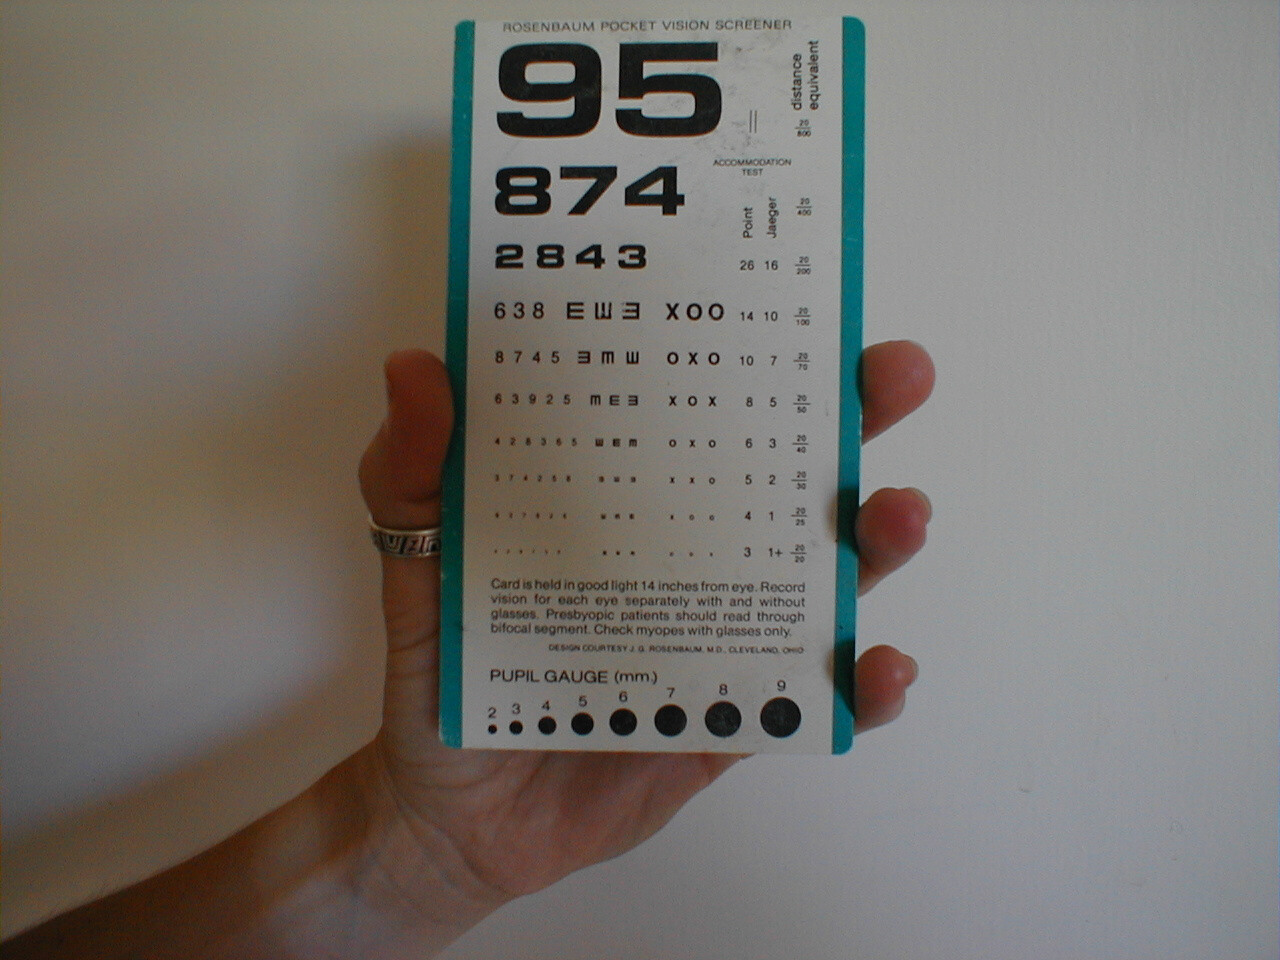
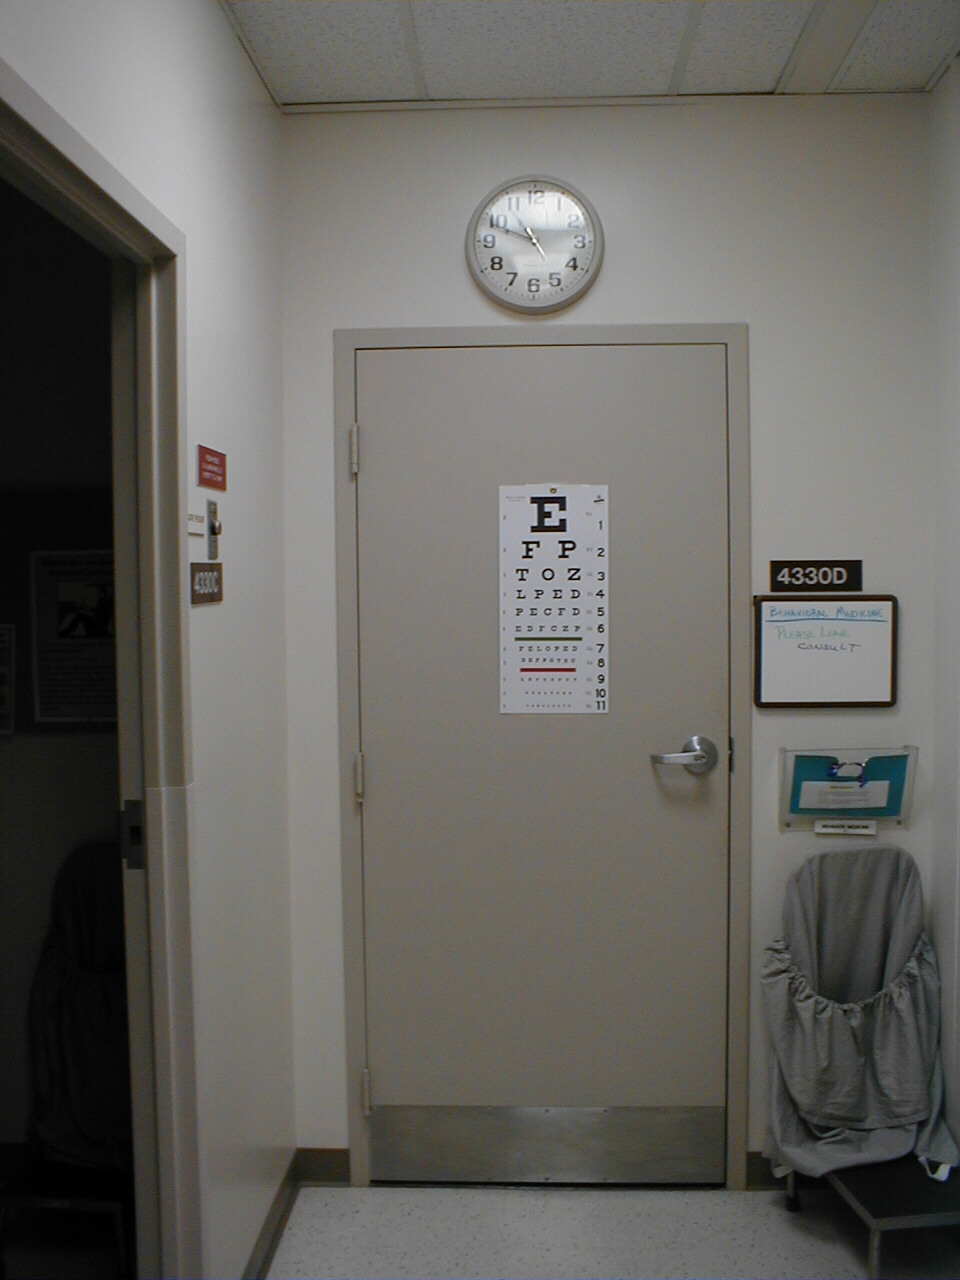
The first part of the eye exam is an assessment of acuity. This can be done with either a standard Snellen hanging wall chart read with the patient standing at a distance of 20 feet or a specially designed pocket card (held at 14 inches). Each eye is tested independently (i.e. one is covered while the other is used to read). The patient should be allowed to wear their glasses and the results are referred to as "Best corrected vision." You do not need to assess their ability to read every line on the chart. If they have no complaints, rapidly skip down to the smaller characters. The numbers at the end of the line provide an indication of the patient's acuity compared with normal subjects. The larger the denominator, the worse the acuity. 20/200, for example, means that they can see at 20 feet what a normal individual can at 200 feet (i.e. their vision is pretty lousy). If the patient is unable to read any of the lines, indicative of a big problem if this was a new complaint, a gross estimate of what they are capable of seeing should be determined (e.g. ability to detect light, motion or number of fingers placed in front of them). In general, acuity is only tested when there is a new, specific, visual complaint.
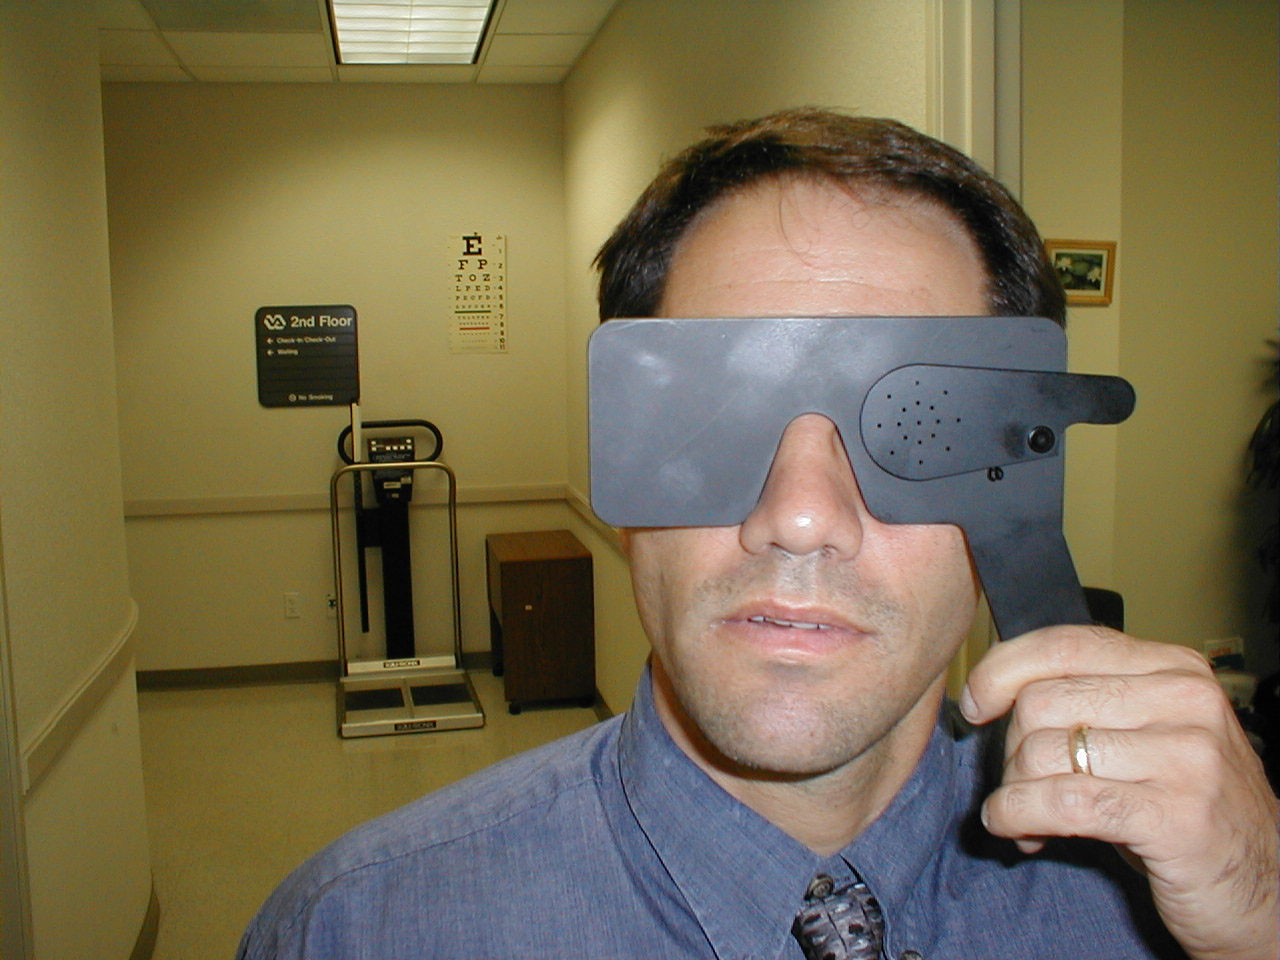
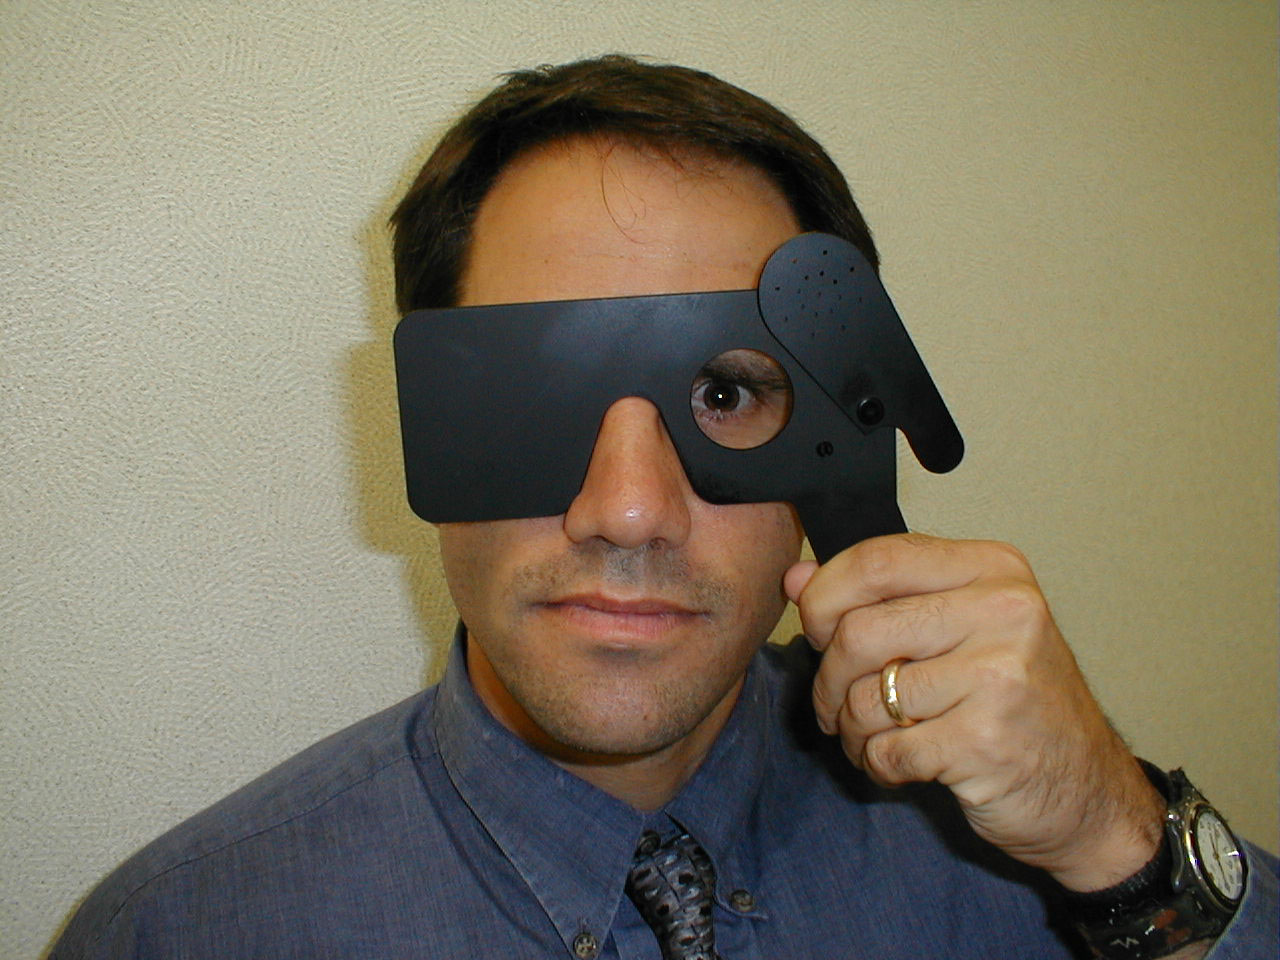
Pinhole Testing: The pinhole testing device can determine if a problem with acuity is the result of refractive error (and thus correctable with glasses) or due to another process. The pinholes only allow the passage of light which is perpendicular to the lens, and thus does not need to be bent prior to being focused onto the retina. The patient is instructed to view the Snellen chart with the pinholes up (below right) and then again with them in the down position (below left). If the deficit corrects with the pinholes in place, the acuity issue is related to a refractive problem.
Observation of External Structures:
- Ocular Symmetry: Occasionally, one of the muscles that controls eye movement
will be weak or foreshortened, causing one eye to appear deviated medially
or laterally compared with the other.

- Eye Lid Symmetry: Both eye lids should cover approximately the same amount
of eyeball. Damage to the nerves controlling these structures (Cranial Nerves
3 and 7) can cause the upper or lower lids on one side to appear lower then
the other.
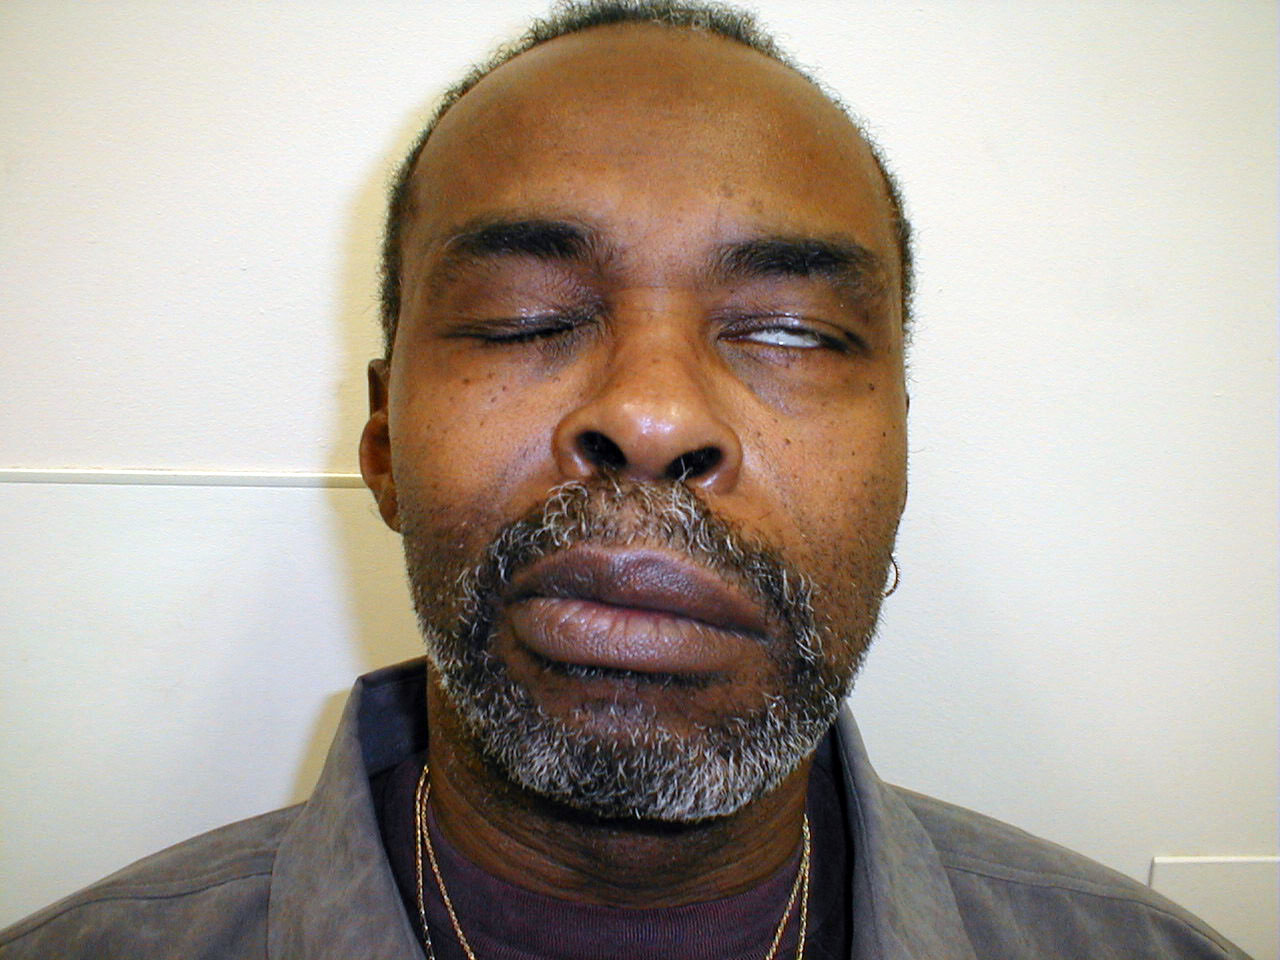 Patient unable to completely close left upper eyelid due to peripheral CN 7 dysfunction.
 - Sclera: The normal sclera is white and surrounds the iris and pupil. In
the setting of liver or blood disorders that cause hyperbilirubinemia, the
sclera may appear yellow, referred to as icterus. This can be easily confused
with a muddy-brown discoloration common among older African Americans that
is a variant of normal.
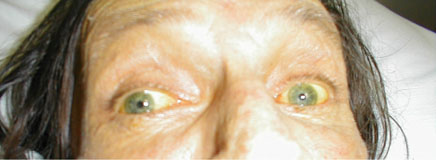
Icteric Sclera
 Muddy Brown Sclera
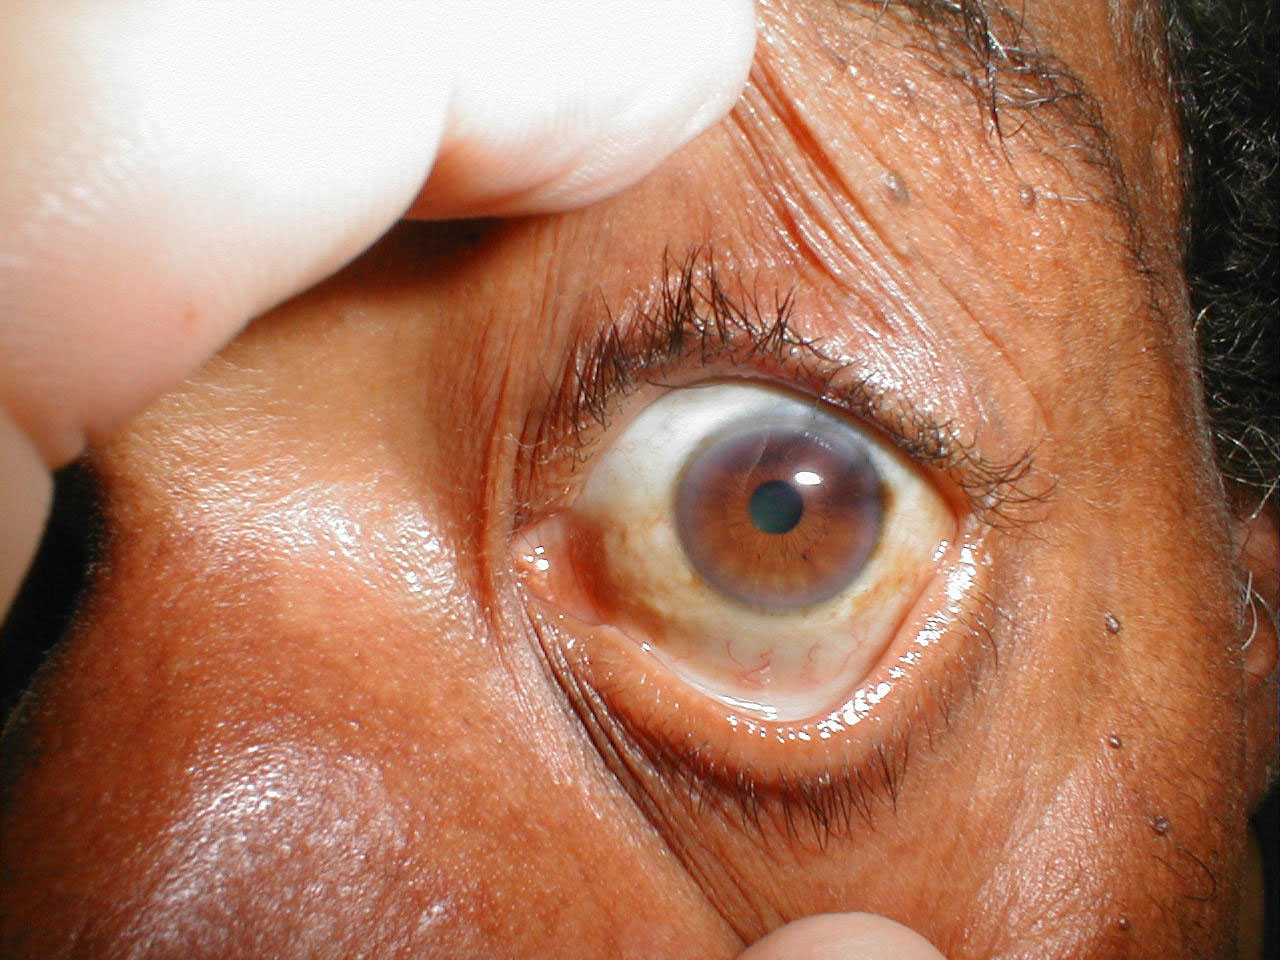
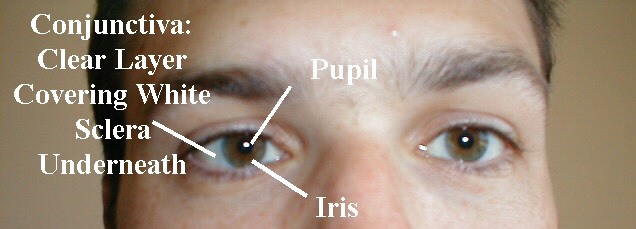
- Conjunctiva: The sclera is covered by a thin transparent membrane known
as the conjunctiva, which reflects back onto the underside of the eyelids.
Normally, it's invisible except for the fine blood vessels that run through
it. When infected or otherwise inflamed, this layer can appear quite red,
a condition known as conjunctivitis. Alternatively, the conjunctiva can appear
pale if patient is very anemic. By gently applying pressure and pulling down
and away on the skin below the lower lid, you can examine the conjunctival
reflection, which is the best place to identify this finding.
Normal Appearing Conjunctival
Reflection, Lower Lid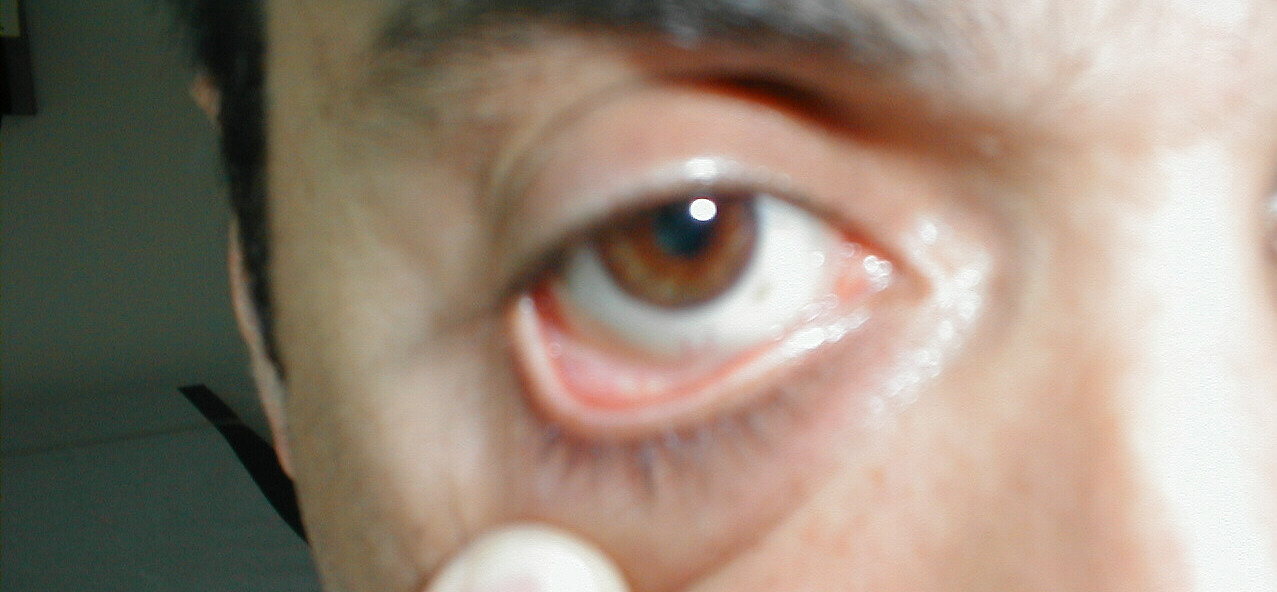 Pale Conjunctiva, due to severe anemia.
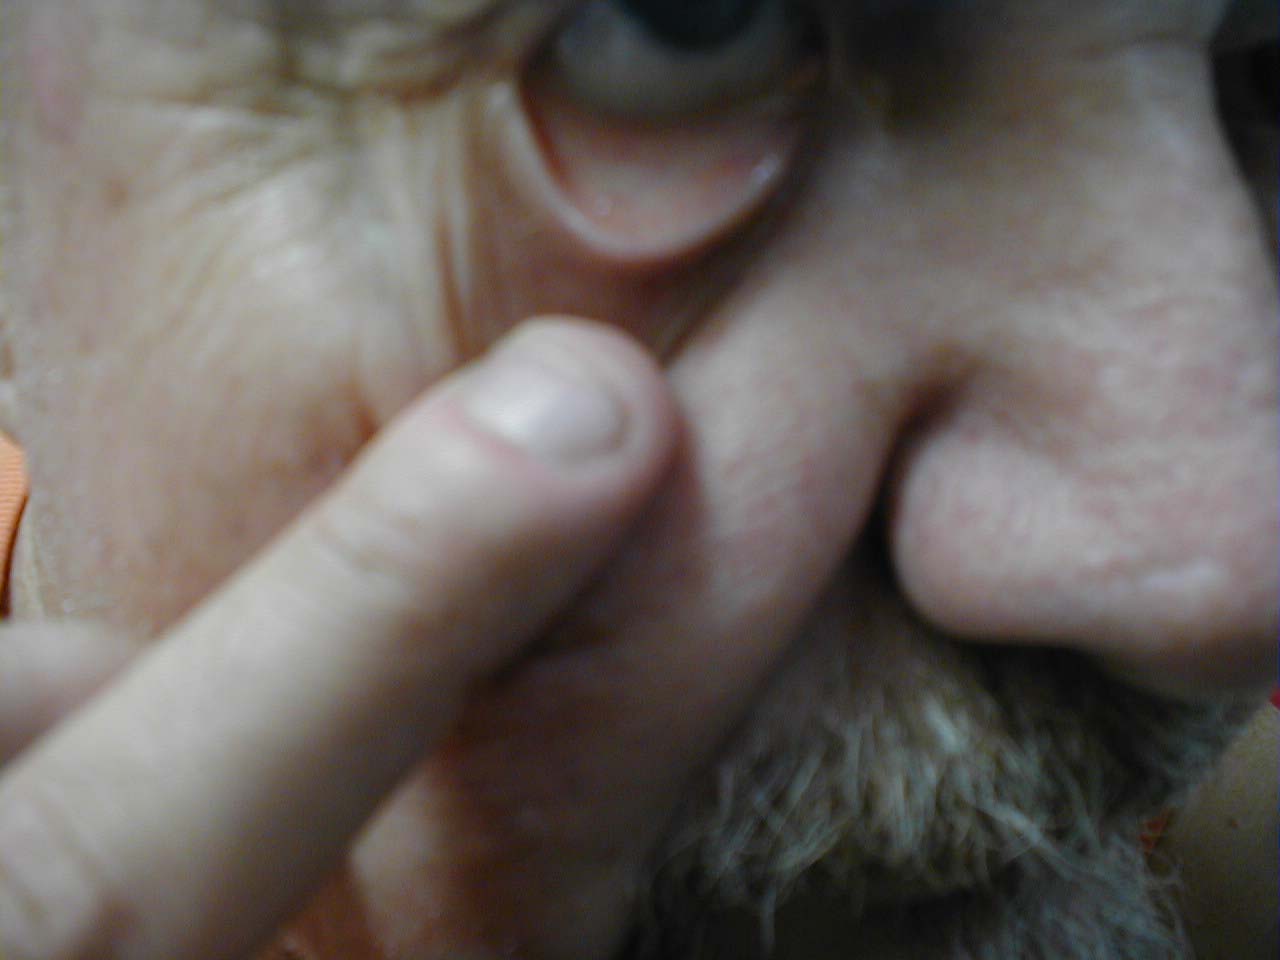 Conjunctivitis
Blood can also accumulate underneath the conjunctiva when one of the small blood vessels within it ruptures. This may be the result of relatively minor trauma (cough, sneeze, or direct blow), a bleeding disorder or idiopathic. The resulting collection of blood is called a subconjunctival hemorrhage. While dramatic, it is generally self limited and does not affect vision.
Subconjunctival Hemorrhage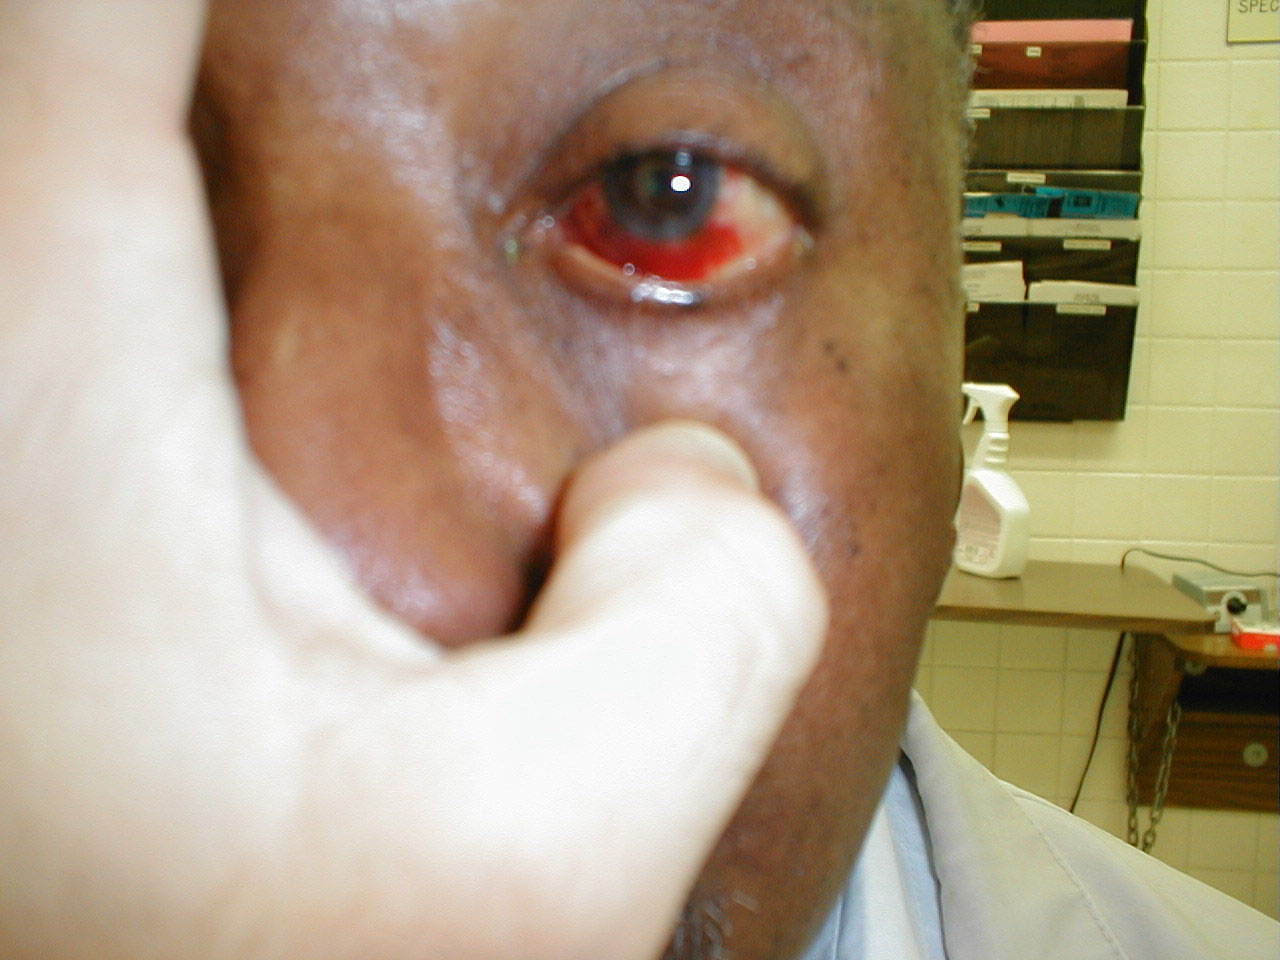
- Pupil and Iris: Normally, both of these structures are round and symmetric.
When performing the rest of the exam, make sure that you are in a comfortable position. The critical maneuver is assuring that the patient is seated at a height such that their eyes are essentially on the same level as your own when you are standing next to them.
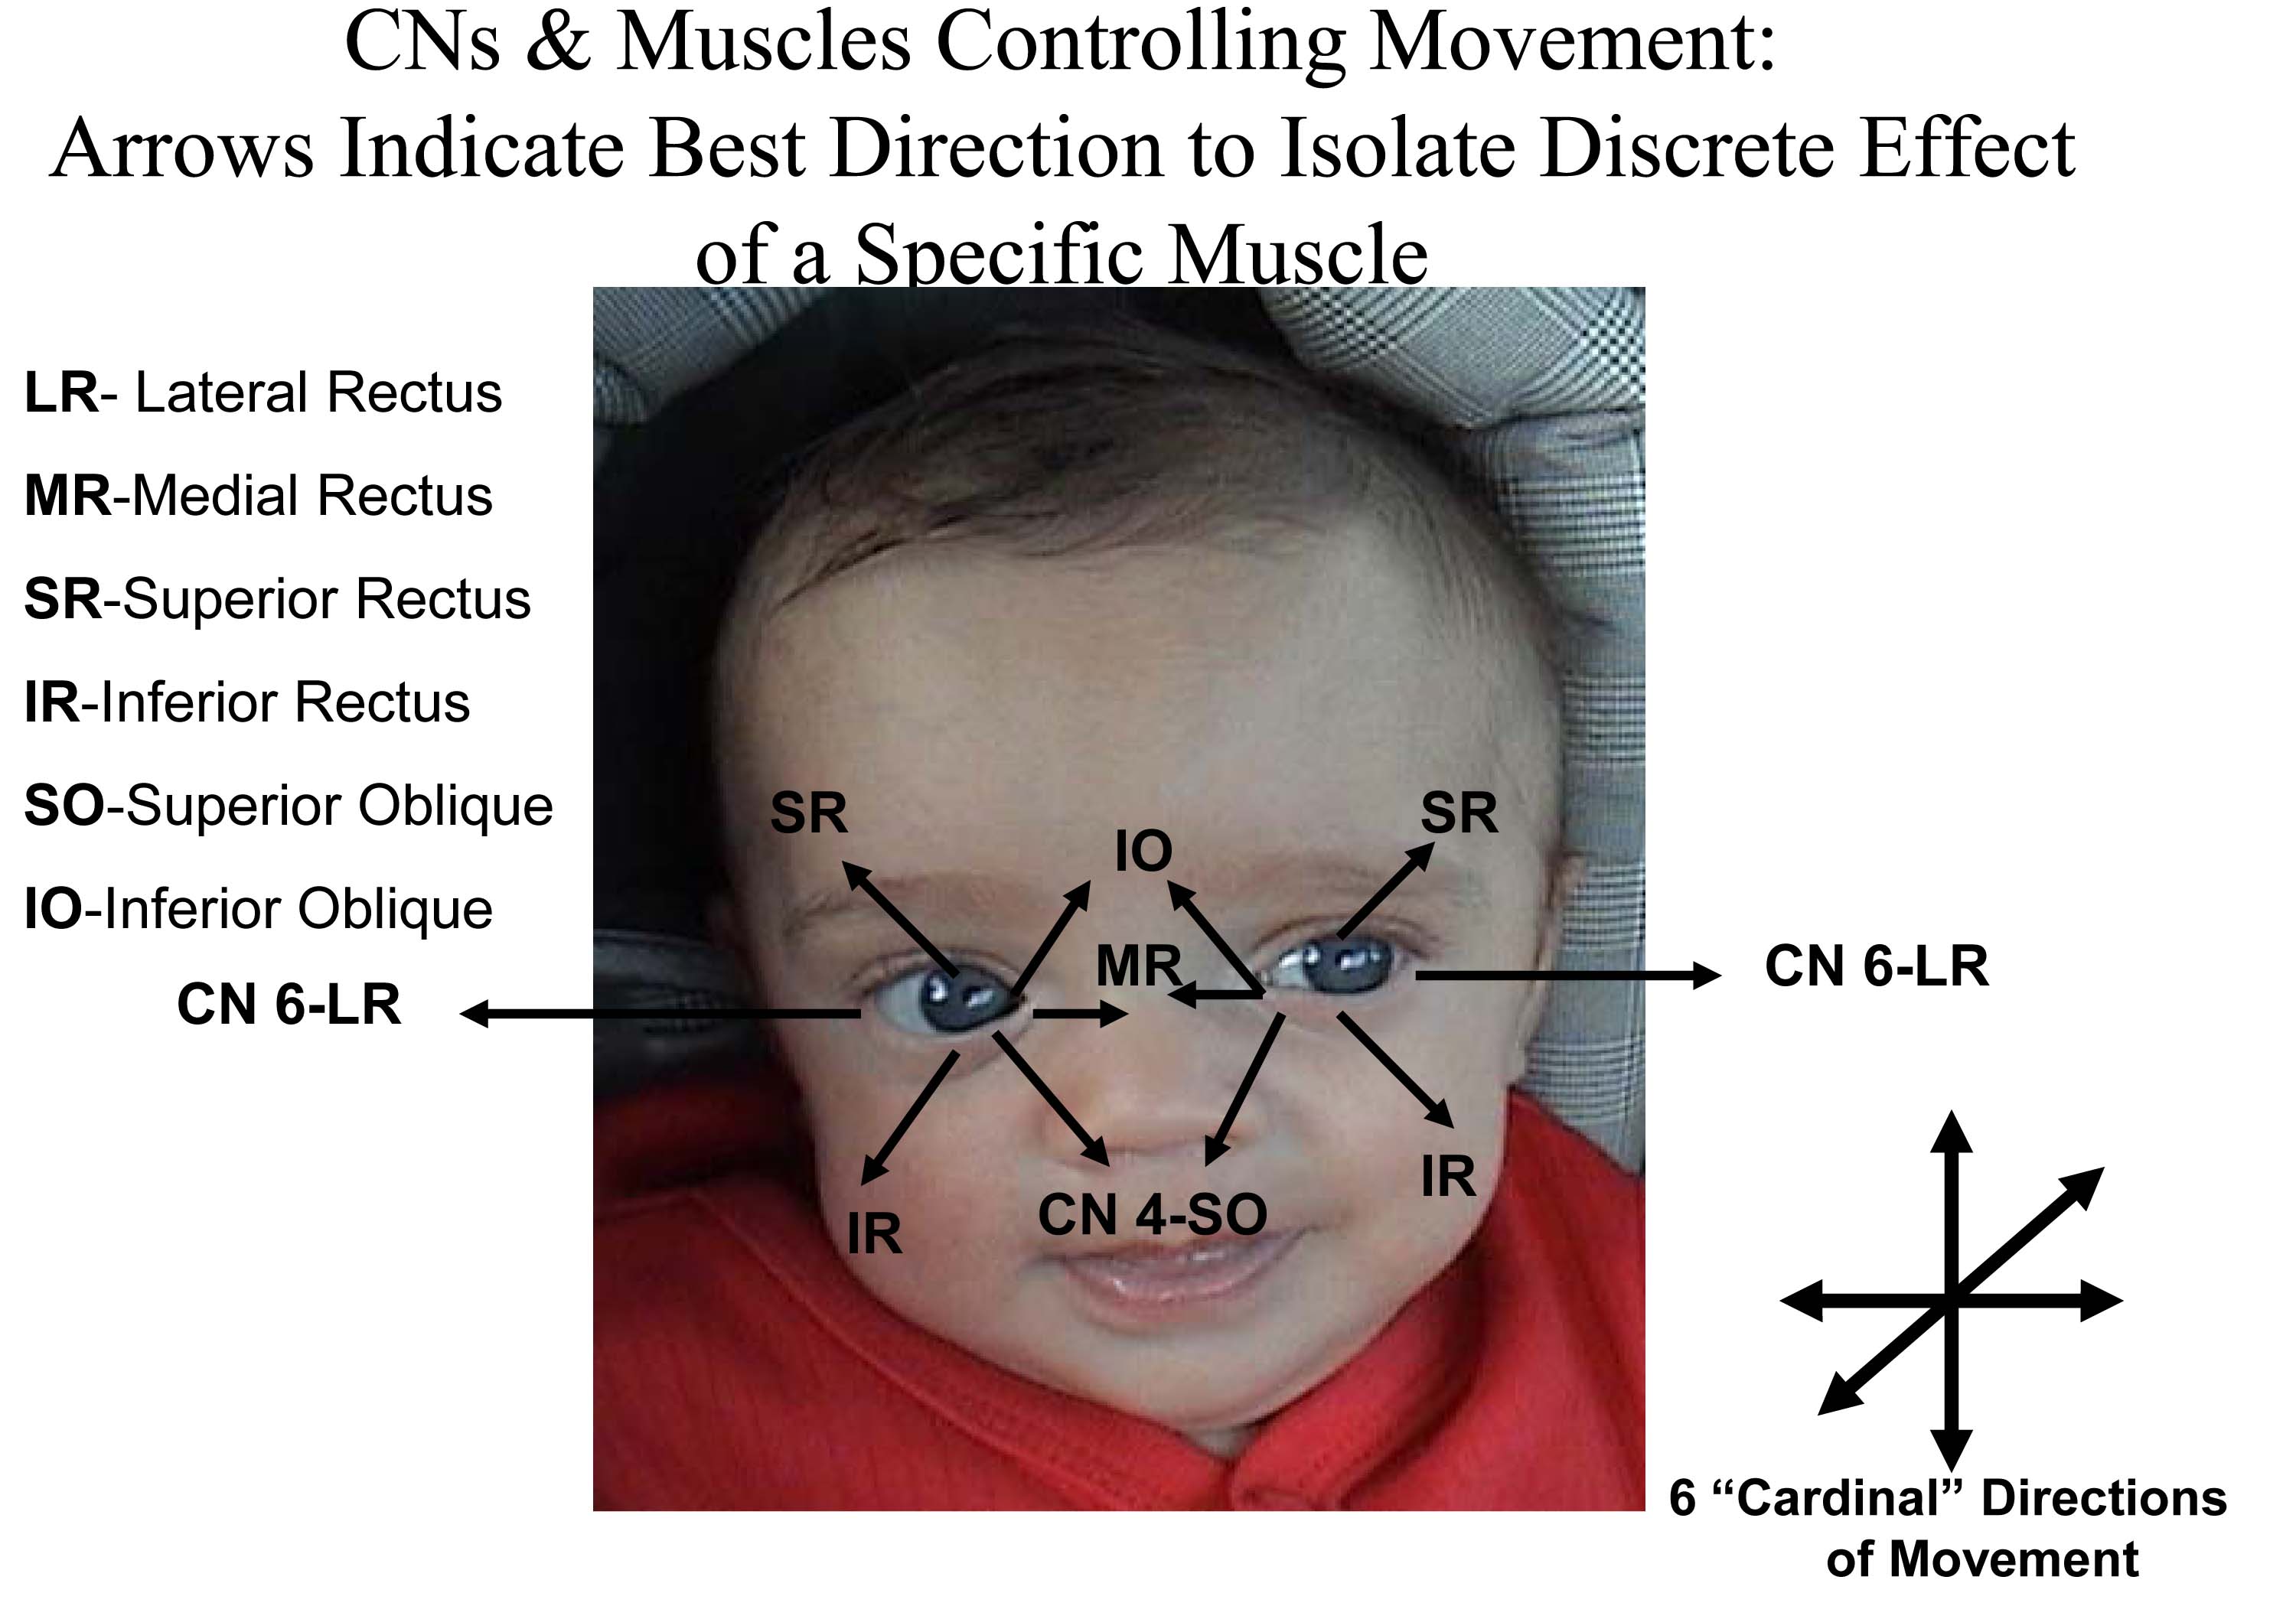
Extraocular movements and cranial nerves:
Normally, the eyes move in concert (e.g. when the left eye moves left, the right eye moves left to a similar degree). The brain takes the input from each eye and puts it together to form a single image. This coordinated movement depends on 6 extraocular muscles that insert around the eye balls, allowing them to move in all directions. Each muscle is innervated by one of 3 Cranial Nerves (CNs): CNs 3 (Oculomotor), 4 (Trochlear) and 6 (Abducens). Movements are described as: elevation (pupil directed upwards), depression (pupil directed downwards), adbduction (pupil directed laterally), adduction (pupil directed medially), extorsion (top of eye rotating away from the nose), and intorsion (top of eye rotating towards the nose). We'll first review the individual Extraocular Muscles (EOMs), then the CNs which innervate them, and lastly functional testing and pathology.

The medial and lateral rectus muscles are described first, as their functions are very straight
forward:
Lateral rectus: Abduction (ie lateral movement along the horizontal plane)
Medial rectus: Adduction (ie. Medial movement along the horizontal plane)
The remaining muscles each causes movement in more than one direction (e.g. some combination of elevation/depression, abduction/adduction, intorsion/extorsion). This is due to the fact that they insert on the eyeball at various angles, and in the case of the superior oblique, thru a pulley. Review of the origin and insertion of each muscle sheds light on its actions (see links @ the end of this section). The net impact of any one EOM is the result of the position of the eye and the sum of forces from all other contributing muscles.
Specific actions of the remaining EOMs are described below. The action which the muscle primarily
performs is listed first, followed by secondary and then tertiary actions.
Inferior rectus: depression, extorsion and adduction.
Superior rectus: elevation, intorsion and adduction
Superior oblique: intorsion, depression and abduction
Inferior oblique: extorsion, elevation and abduction
The muscles, in turn, are innervated by 3 different cranial nerves. Patterns of innervations are
as follows:
Cranial 4 (Trochlear): innervates the superior oblique
Cranial Nerve 6 (Abducens): innervates the lateral rectus
Cranial Nerve 3 (Oculomotor): innervates all the remaining muscles (ie medial rectus, inferior
oblique, superior rectus and inferior rectus).
You can remember this via the mnemonic: "SO-4, LR-6, All the rest 3" (ie Superior Oblique by CN 4, Lateral rectus by CN 6, and all the other EOMs by CN 3).
In the setting of an eye movement problem, isolating which muscle or CN is the culprit can be tricky. When trying to isolate a problem, it can help to check movement in the direction in which that muscle is the primary mover. This can be assessed as follows:
- Superior oblique: Depresses the eye when looking medially
- Inferior oblique: Elevates the eye when looking medially
- Superior rectus: Elevates the eye when looking laterally
- Inferior rectus: Depresses the eye when looking laterally
- Medial rectus: Adduction when pupil moving along horizontal plane
- Lateral rectus: Abduction when pupil moving along horizontal plane
Practically speaking, cranial nerve testing is done such that the examiner can observe eye movements in all directions. The movements should be smooth and coordinated. To assess, proceed as follows:
- Stand in front of the patient.
- Ask them to follow your finger with their eyes while keeping their head in one position
- Using your finger, trace an imaginary rectangle in front of the patient, making sure that your finger moves far enough out and up/down so that you're able to see all appropriate eye movements (i.e. lateral and up, lateral down, medial down, medial up). Hold your finger at the lateral extremes, which can induce a few beats of nystagmus (normal).
- At the end, bring your finger directly in towards the patient's nose. This will cause the patient to look cross-eyed and the pupils should constrict, a response referred to as accommodation.

Interpretation: The eyes should be able to easily and smoothly follow your finger.
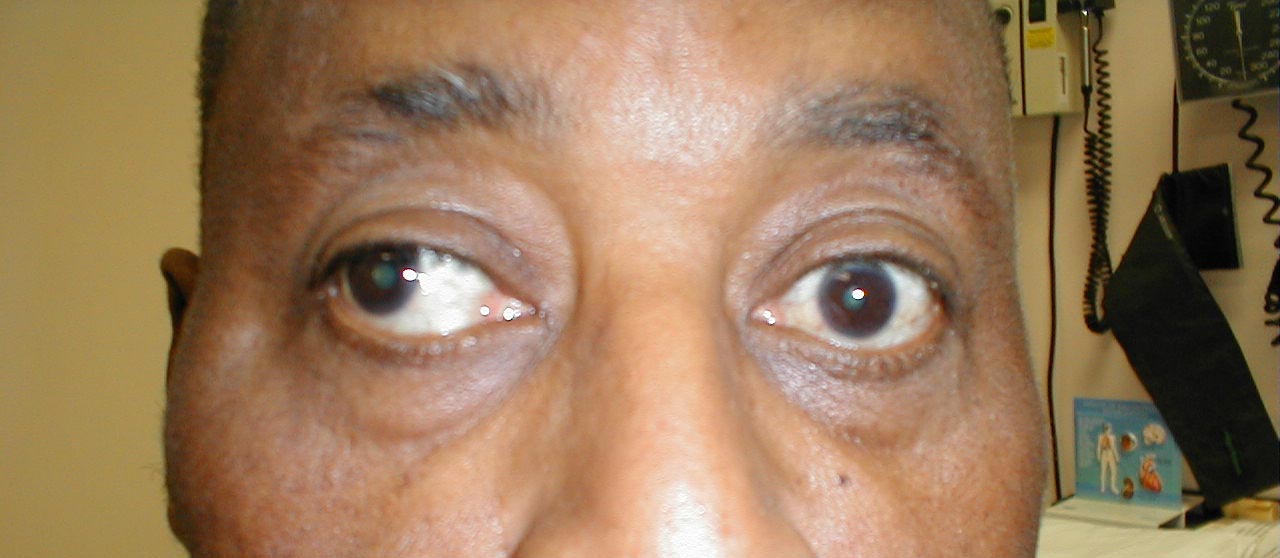
Pathology: Isolated lesions of a cranial nerve or the muscle itself can adversely affect extraocular movement. Patients will report diplopia (double vision) when they look in a direction that's affected. This is because the brain can't put together the discordant images in a way that forms a single picture. In response, they will either assume a head tilt that attempts to correct for the abnormal eye positioning or close the abnormal eye. As an example, the patient shown below has a left cranial nerve 6 lesion, which means that his left lateral rectus no longer functions. When he looks right, his vision is normal. However, when he looks left, he experiences double vision as the left eye can't move laterally. This is referred to as horizontal diplopia.

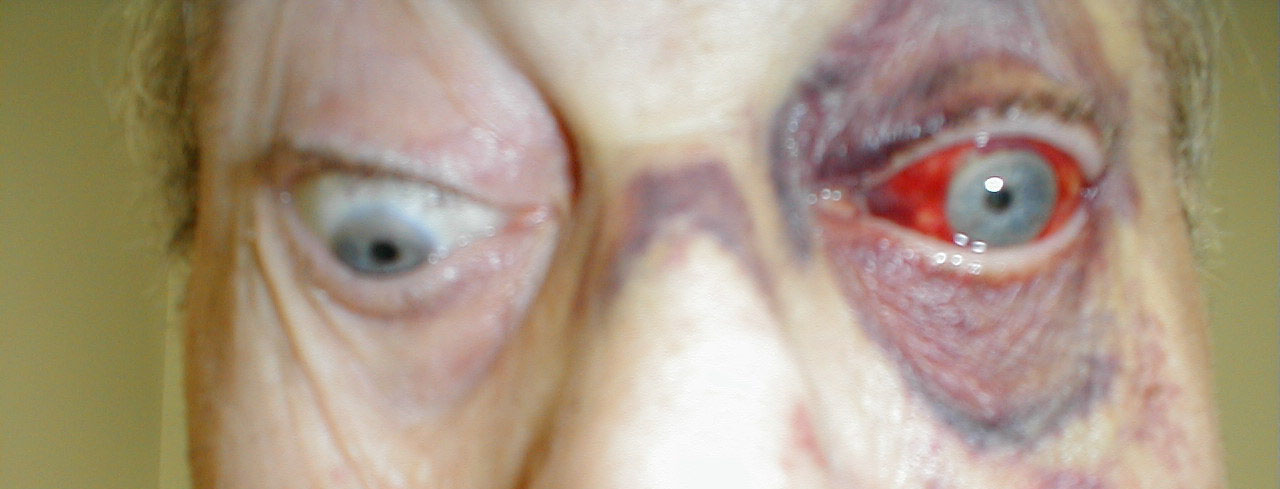
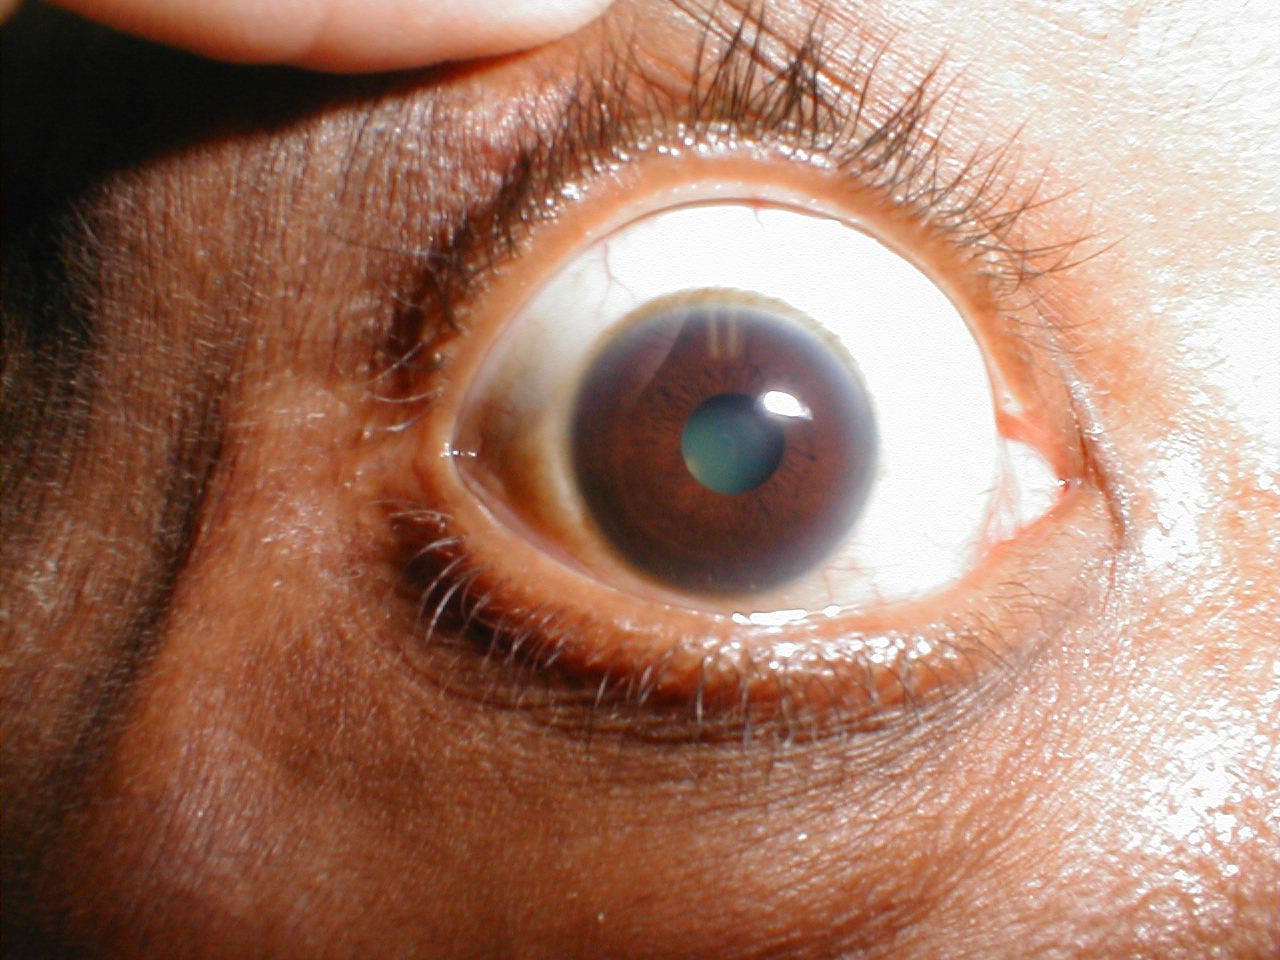
Even with this information, trying to isolate the precise source of the problem can be tricky and subtle, sometimes requiring special testing (not discussed here). In addition, other findings can help localize the source of the problem. In the setting of a CN 3 palsy, the eye will tend to be positioned laterally and downward. This is because the unopposed action of CN 4 and 6 move the eye to this position. In addition, the lid will droop (known as ptosis) as CN3 controls lid elevation (Levator Palpebrae Superioris muscle). As well, the pupil will be dilated, as efferent parasympathetics (controlling constriction) travel with CN 3. This is well demonstrated in the picture below. In addition, the pupil will not respond well to direct or consensual (shined in the opposite eye) light. The unaffected eye will respond normally to light shined in either eye, as afferent impulses travel with CN2 and are unaffected.
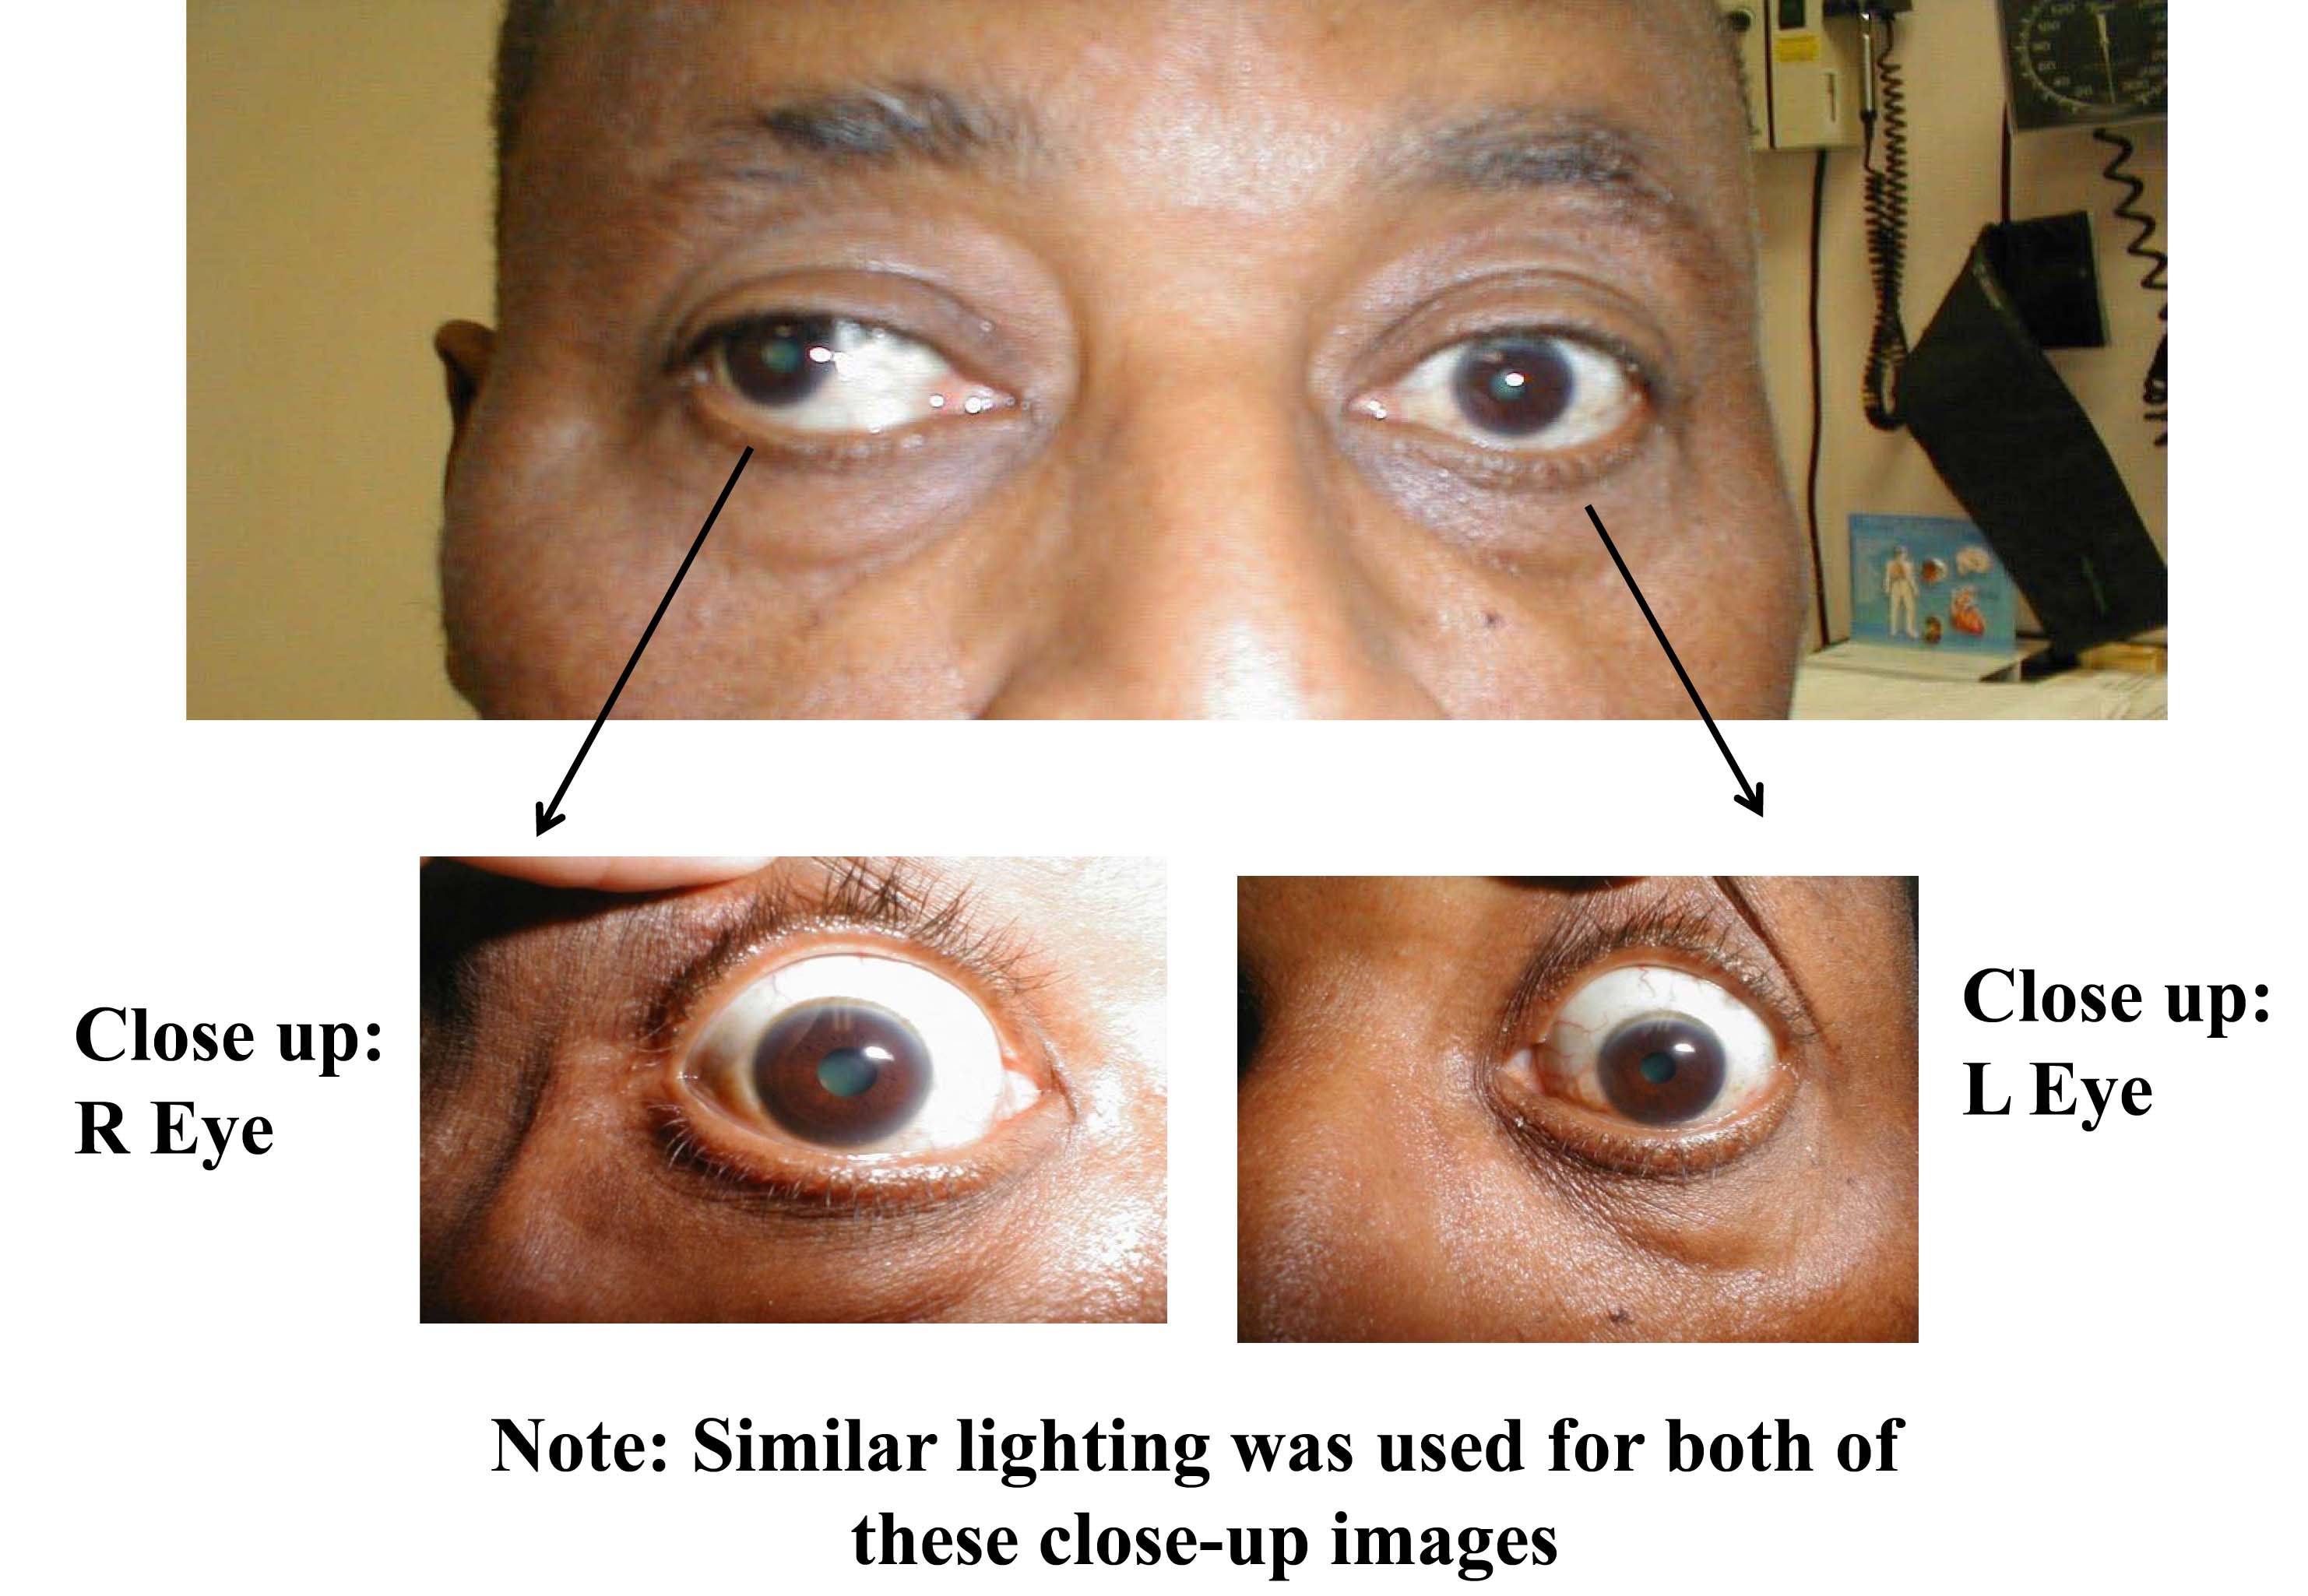
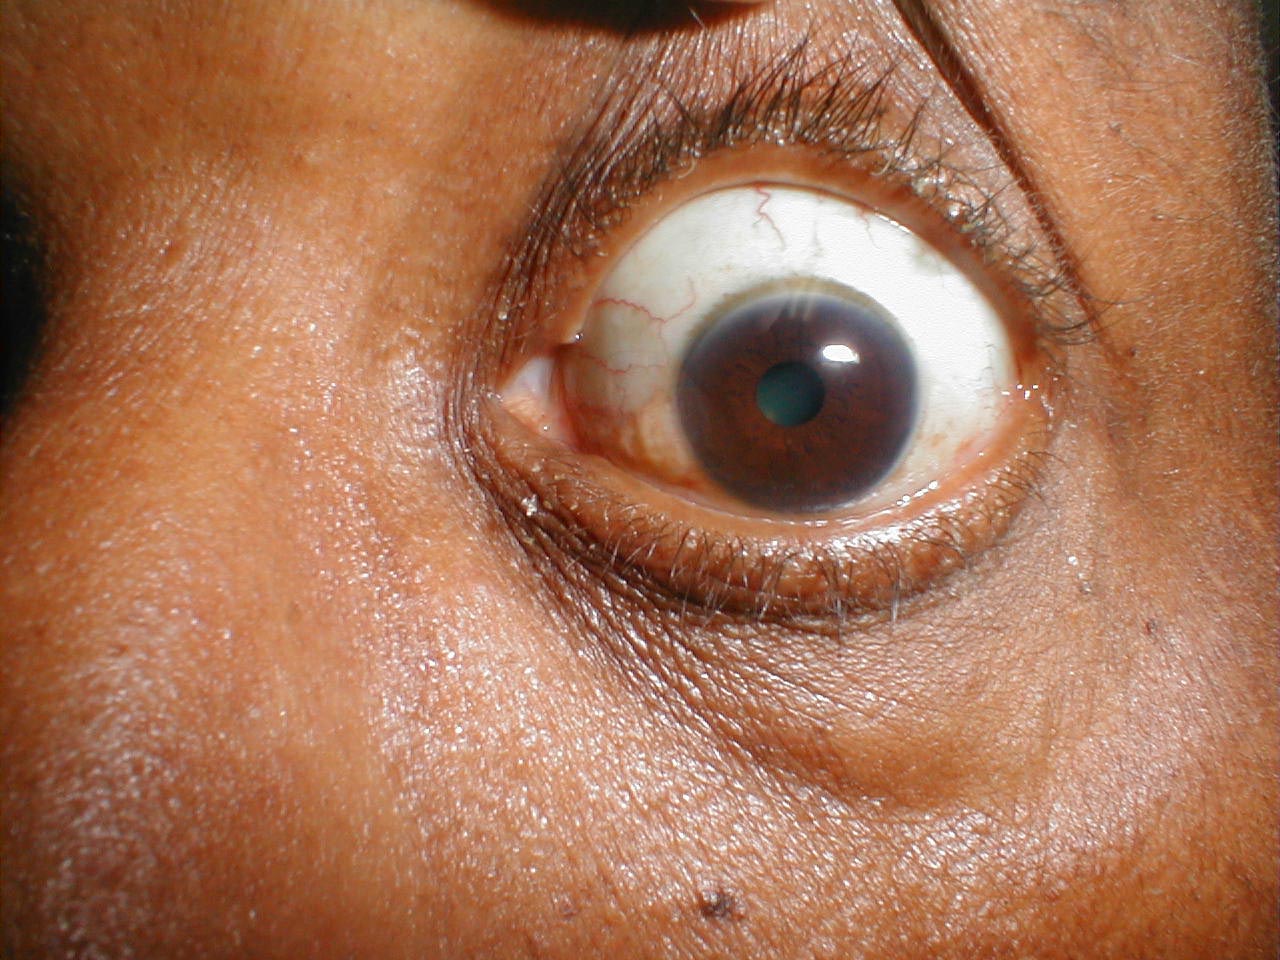
Disorders of eye movement can also be due to problems with the extraocular muscles themselves. For example, pictured below is a patient who has suffered a traumatic left orbital injury. The inferior rectus muscle has become entrapped within the resulting fracture, preventing the left eye from being able to look downward. The scleral blood and peri-orbital echymosis are secondary to the trauma as well.
Nystagmus is rapid, uncontrolled movements of the eye that can occur in the vertical or horizontal direction. The etiology may be related to vestibular disease (central or peripheral), medications or other neurological processes. Clues suggestive of central pathology include: persistence, bidirectional nature, rotational movement, vertical movement, and/or the presence of other neurological findings (e.g. hearing loss). The video below demonstrates persistent vertical and horizontal nystagmus in a patient with Wernicke encephalopathy - which results from acute thiamine (vitamin B1) deficiency. In order to make the diagnosis, two of the following four symptoms and/or findings must be present: confusion, ataxia, ophthalmoplegia and nutritional depletion. It usually develops over days to weeks. Exam may be remarkable for confusion (range from mild to severe), cranial nerve palsy (CN 3, 4, 6--> impaired extra ocular movements), nystagmus, ataxia and peripheral neuropathy.
More on Extraocular movements:http://www.tedmontgomery.com/the_eye/eom.html#top
Dartmouth Neurosciences - Extraocular movments http://www.dartmouth.edu/~dons/part_1/chapter_4.html
Visual fields:
The normal visual field for each eye extends out from the patient in all directions, with an area of overlap directly in front. Field cuts refer to specific regions where the patient has lost their ability to see. This occurs when the transmitted visual impulse is interrupted at some point in its path from the retina to the visual cortex in the back of the brain. You would, in general, only include a visual field assessment if the patient complained of loss of sight; in particular "blind spots" or "holes" in their vision.Visual fields can be crudely assessed as follows:
- The examiner should be nose to nose with the patient, separated by approximately 8 to 12 inches.
- Each eye is checked separately. The examiner closes one eye and the patient closes the one opposite. The open eyes should then be staring directly at one another.
- The examiner should move their hand out towards the periphery of his/her visual field on the side where the eyes are open. The finger should be equidistant from both persons.
- The examiner should then move the wiggling finger in towards them, along an imaginary line drawn between the two persons.The patient and examiner should detect the finger at more or less the same time.
- The finger is then moved out to the diagonal corners of the field and moved inwards from each of these directions. Testing is then done starting at a point in front of the closed eyes. The wiggling finger is moved towards the open eyes.
- The other eye is then tested.
Meaningful interpretation is predicated upon the examiner having normal fields, as they are using themselves for comparison.
If the examiner cannot seem to move their finger to a point that is outside the patient's field don't worry, as it simply means that their fields are normal.
Interpretation: This test is rather crude, and it is quite possible to have small visual field defects that would not be apparent on this type of testing. Prior to interpreting abnormal findings, the examiner must understand the normal pathways by which visual impulses travel from the eye to the brain.
For more information about visual field testing, see the following links:
University of Arkansas, gross anatomy of visual pathway
Using the Ophthalmoscope
This aspect of the exam is, at least initially, quite awkward. Don't worry, it will get easier with practice! Take some time to play with your scope, paying attention to its assembly, on/off mechanism as well as the various lens and light settings which can be utilized. There are a number of different brands on the market and each is a bit different. For the purposes of the general exam, we'll focus on the simplest settings and most basic techniques.

Assessment of Pupils
Assessment for symmetry:
Normal pupils appear symmetric. To assess for symmetry, look directly at the patient's eyes and note whether they are in the same relative position within the eye socket and of equal size and shape. Anisocoria means that the pupils are unequal in size. When this occurs, the examiner has to determine which is the abnormal eye (i.e. could be either the large or small pupil).
Anisocoria where the smaller pupil is abnormal:
Sympathetic nerves traveling to the eye cause dilation of the pupil. Processes interfering with sympathetic innervation thus lead to constriction. Sympathetics also innervate a small muscle in lid, such that sympathetic lesions also cause an element of ptosis. Interruption along the sympathetic chain is called Horner's syndrome, a combination of miosis (pupil appears small), ptosis (droopy eye lid) and anhydrosis (lack of sweating on the affected side – though not commonly assessed). On examination, the affected pupil will appear smaller then it's counterpart, though it should still constrict in response to direct and indirect light. The subsequent dilation phase (when light removed) will be slower than normal. The lid will cover more of the eye on the affected side (ptosis). Acuity should be preserved and the opposite eye should be normal.
It helps if the patient has a picture (e.g. from a license) so that you can compare current to past appearance in order to determine what's new. There are a number of potential causes of Horner's syndrome, each affecting a different place in the sympathetic chain:
- First order neuron lesion: brainstem stroke
- Second order neuron lesion: apical lung tumor, neck trauma, other
- Third order neuron lesion: orbital trauma or inflammation, carotid dissection, other
Prior eye surgery, trauma, or injury to pupilary dilators/constrictors can result in chronic anisocoria. In these instances, the history should be revealing and there should be no associated acute symptoms.
Finally, it's worth noting that pupils can differ in size by <4mm and still be normal. This is called physiologic anisocoria, in which case the finding is chronic and no other impairments are identified.
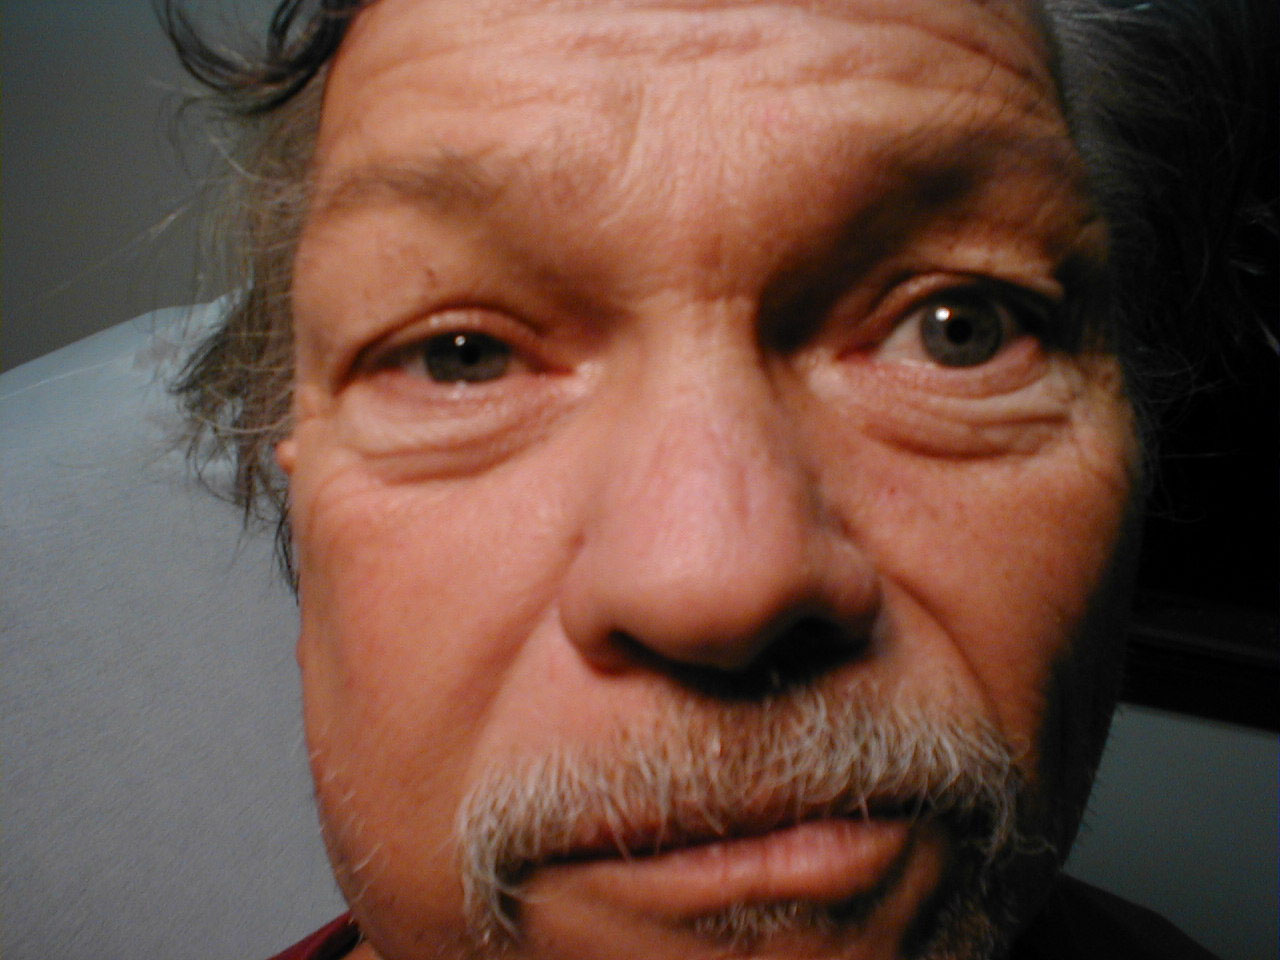
Anisocoria where the larger pupil is the abnormalone:
Parasympathetics travel with CN3 and cause pupillary constriction. Lesions affecting the parasympathetics result in dilation and may impair other CN3 functions, including: extra ocular movements (all muscles except lateral rectus and superior oblique) and raising the eyelid (levator palpebrae muscle). A third nerve lesion will often cause the eye to appear “down and out” (deviated laterally and downward), with impaired movement, dilated and minimally or non-reactive pupil, and ptosis. Depending on the cause, all of these findings may not be present (e.g. pupillary function can be spared while positioning and movement are affected). Symptoms can include double vision (impaired eye alignment), light sensitivity (from dilation), blurry vision, and headache depending on the underlying cause. The unaffected eye should be normal.
Potential causes of a dilated pupil and their associated findings:
- Stroke affecting CN3: Patient often have the typical atherosclerotic risk factors of: hypertension, diabetes, smoking family history, hyperlipidemia, atrial fibrillation, or known vascular disease. The onset of symptoms is usually acute and may include other deficits depending on the location of the stroke.
- Tumor directly affecting CN3: This can be either a metastatic lesion or a primary CNS tumor compressing CN3. Patients will often have other dysfunction based on the degree to which CNS structures are affected and/or symptoms related to the primary tumor if the lesion is a met.
- Aneurysm (posterior communicating artery most common): As the aneurysm grows, it compresses CN3. Patients will typically have a sudden and severe headache from associated sub-arachnoid hemorrhage if the aneurysm is leaking/ruptured, which is a clinical emergency. If this hasn't yet occurred, there may only be the CN3 related findings. Pupillary dilation is almost always present.
- Infection, trauma, bleeding, tumor or anything that increases intracranial pressure can lead to herniation. As the parasympathetics travel along the outside of CN3, they're very vulnerable to increased pressure, leading to a dilated and unresponsive (aka “blown”) pupil on the side that is herniating. Patients will typically have grave neurologic deficits, obvious trauma, and decreased level of consciousness (i.e. this isn't a subtle process).
- Cavernous sinus thrombosis: This is an uncommon problem, associated with infection of teeth/sinuses that spreads to the cavernous sinus. As CN 3, 4 and 6 all travel thru this sinus, they can be adversely affected in the setting of thrombosis. Symptoms may include the acute development of headache, fever, double vision, and seizures. Examination may be remarkable for proptosis, a red eye with dilated pupil, and impaired extra-ocular movements (specific deficits based on the affected CNs). The opposite eye should be normal.
- Adies (tonic) pupil: This is the result of loss of parasympathetics to muscles of pupillary constriction. It can be idiopathic or related to injury, infection, tumor or other. Affected patients will have a unilateral dilated pupil and note difficulty focusing on objects. On exam, the pupil will be dilated and poorly/unreactive to direct or indirect light. Subtle pupillary constriction may be noted when viewing close objects. Eye movement should be normal and the opposite eye is unaffected.
- Physiologic anisocoria: Normal pupils can differ in size by <.4mm. The finding is chronic and eye function/pupillary response to light will be normal.
- Instillation of dilating drops into one eye will cause anisocoria. In this case, history should be revealing. Inadvertent exposure of one eye to anticholinergics can occur when nebulizers are used with a poor fitting mask. This will cause the exposed pupil to be dilated.
- Prior eye surgery, trauma, or injury to pupillary dilators/constrictors. History should be revealing and there should be no acute symptoms.
Both pupils too big or small
Both pupils dilated- Systemic exposure to cocaine or other sympathomimetics. Systemic exposure to parasympatholytics, like atropine.
- Instillation of dilating drops into both eye will cause bilateral dilation. In this case, history should be revealing. Inadvertent exposure of both eyes to anticholinergics can occur when nebulizers are used with a poor fitting mask. This will cause both pupils to dilate.
- Prior eye surgery, trauma, injury to pupillary dilators/constrictors; history should be revealing; license/other pix to assess stability/newness is helpful; shouldn't have acute symptoms.
- Systemic exposure to narcotics. Parasympathetic over activity as with organophosphate toxicity
- Argyll-Robertson Pupils: interruption of fibers in mid-brain that respond to light. This can occur with neurosphyillis, neuro lyme disease, neurosarcoid, or other unusual disorders. On exam, both pupils appear small, won't dilate in the dark, and won't constrict with direct or indirect light. Subtle constriction can be seen in response to viewing near objects and subtle dilation occurs when viewing far objects.
- Prior eye surgery, trauma, injury to pupillary dilators/constrictors, in which case history should be revealing. Comparing their current appearance to a license/other picture is very helpful in determining stability/newness is helpful.
Assessing Pupillary Response to Light:
The normal pupil constricts when exposed to bright light, known as
the
direct response. In addition, light presented to the opposite eye
also
causes constriction, which is referred to as the consensual
response.
Constriction is due to the fact that stimulation of the afferents
(i.e.
sensory nerves, carried with CN 2) in one eye will trigger efferent
(i.e. motor, carried with CN 3) activation and subsequent
constriction
of the pupils of both eyes. To assess pupillary response to light,
proceed as follows:
- Turn down the light in your exam room, which will make the pupils dilate a bit.
- Observe the pupils. Normally, they should appear equal, round and symmetric in their positioning within the orbit.
- Instruct the patient to look towards a distant area in the room (e.g. the corner where the wall and ceiling meet) while keeping both of their eyes open. You may need to gently remind them throughout the exam to continue looking in that direction as it is very difficult to examine a roving eyeball. Do not ask them to focus on a specific object as this may lead to pupillary constriction.
- Turn on your ophthalmoscope and adjust the light intensity to mid-range power. The cone of light produced should be a white, medium sized circle.
- Then assess whether each pupil constricts appropriately in
response to direct and indirect stimulation as follows:
- Shine a light in one eye and note that the pupil constricts (direct response).
- Then, shine a light in the opposite eye while looking at the first eye, noting again whether pupillary constriction occurs (consensual response).
Abnormal Response To light: The Relative Afferent Pupillary Defect (RAPD; Marcus-Gunn
Pupil)
A number of pathologic processes can affect the afferent limb (travels respond to light directed
toward the affected eye.
To assess for an RAPD, proceed as follows:
- At baseline, both pupils should appear symmetric. This is because the afferents from the non-affected eye are responding appropriately to ambient light.
- Shine your light in the affected eye. No or minimal constriction will occur.
- Then swing the light to the unaffected eye. It should constrict normally.
- Then swing the light back to the affected eye, which will now appear to dilate in response to direct light. This is because it's no longer receiving signals from the normal eye to constrict. As the affected eye can't respond to direct light, it appears to dilate.
- In order to confirm this response, you'll need to swing the light back and forth between the 2 eyes several times.
- If you perform the swinging light assessment on a normal person, the pupils will consistently appear small.
There are an array of pathological processes that can cause an RAPD, including the following:
- Optic neuritis: This is an auto-immune disorder, linked to multiple sclerosis (MS). 15-20% of patients with MS will present with optic neuritis. And 50% of those with MS will develop optic neuritis at some point during the course of their illness. Patients typically report the onset of unilateral blurry vision over hours to days. This is often accompanied by dull pain that's worse with eye movement. If the patient is known to have MS, they will likely have other CNS deficits. Exam of the affected eye will reveal decreased acuity, an abnormal optic disc in 1/3 of patients and often an RAPD.
- Retinal artery occlusion: This can occur as a result of local thrombosis (associated with typical atherosclerotic risk factors), an embolic event (e.g. from carotid stenosis or atrial fibrillation) or carotid dissection (often associated with flexion extension injury to the neck). Patients will note abrupt, painless, unilateral loss/diminution of vision, that is sometimes described as a “curtain dropping” in front of their eye. Examination of the eye may reveal decreased acuity, an RAPD, relatively pale retina, and sometimes a retinal cherry-red spot.
- Giant cell/temporal arteritis (GCA): This is a vasculitis that disrupts arterial inflow to the optic nerve. It occurs more commonly in women than men, and almost all patients are > 50 (risk continues to go up with age). 50% of those with GCA will have a history of polymyalgia rheumatic (PMR), while 20% of those with PMR will develop GCA. Because this is a vasculitis, patients tend to have both local and systemic symptoms, including: fever, headache, muscle aches, jaw claudication, weight loss, and scalp pain. The visual loss is usually unilateral and progressive (unless treatment is started promptly), with the other symptoms predating the visual ones by weeks (or longer). Exam is notable for decreased acuity, sometimes scalp/temporal artery tenderness, edematous optic nerve, pale retina, and sometimes an RAPD. In order to preserve vision, it's essential to promptly diagnosis and treat this condition (high dose steroids).
- Rarely, severe retinal disease can cause an RAPD
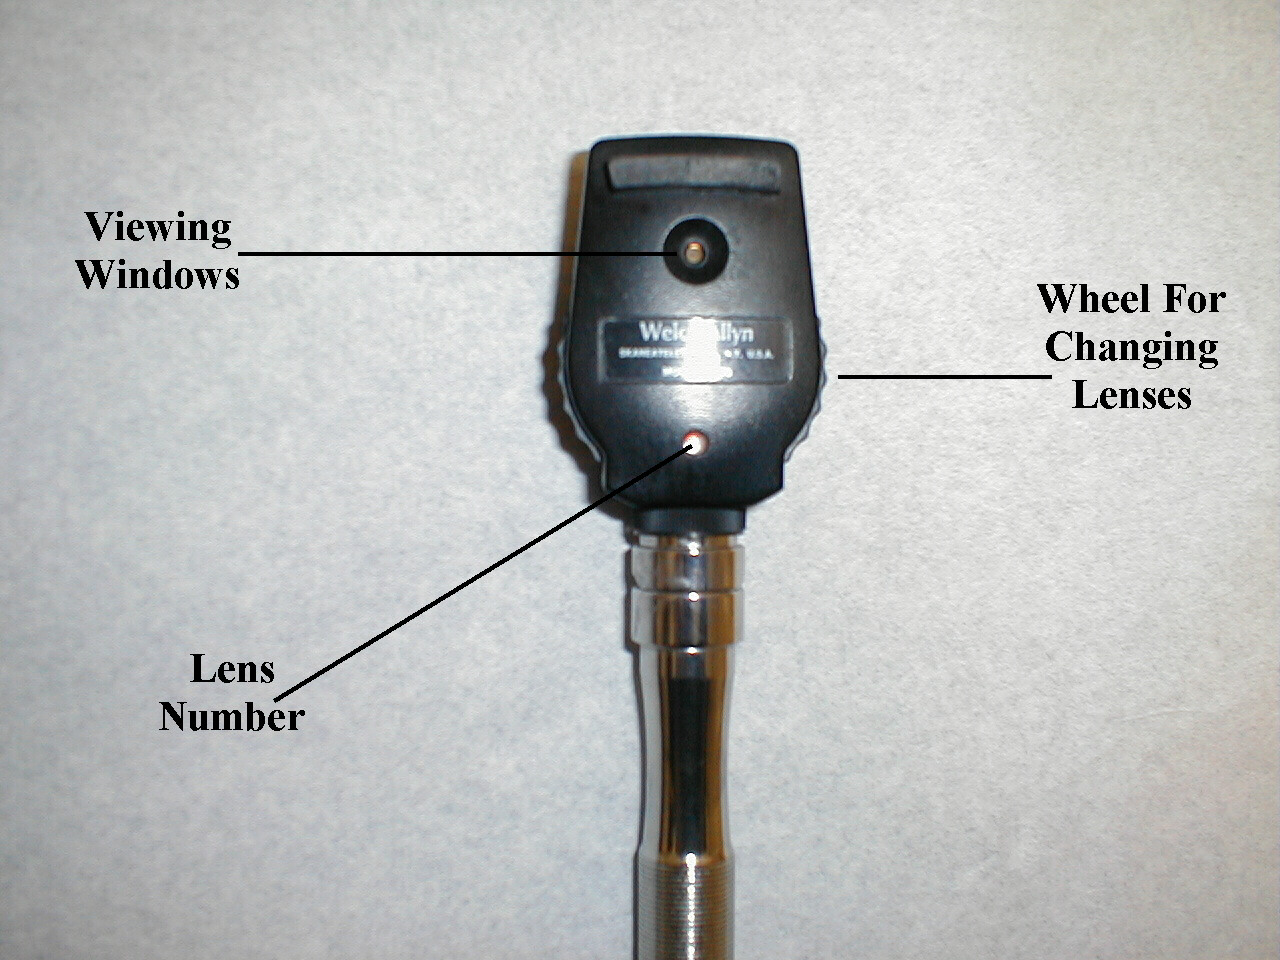
Closer Exam of the Outer Structures of the Eye:
- Every opthalmoscope has a mechanism for changing the viewing lens. These lenses vary in their ability to bend light and are numbered and color coded. The specific lens that allows you to see something in focus will vary with your distance from that structure as well as the refractive error of both your eyes and the patients. To better examine the sclera, conjunctiva, pupil, cornea or iris, start with the lens identified by a green 4 or 6.
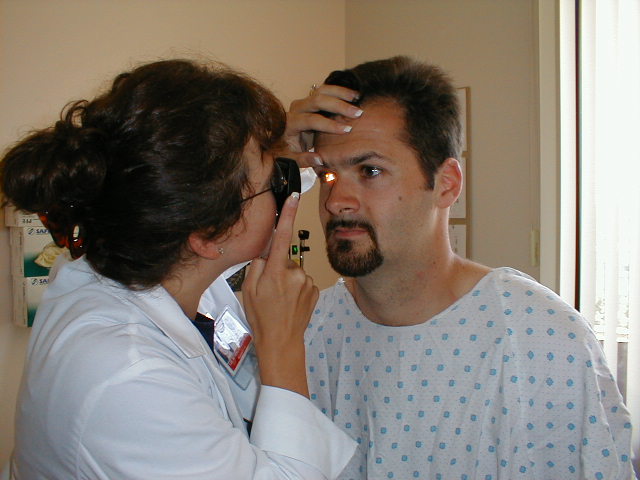
- Now grasp the handle with your right hand (the following instructions are for examining the patient's right eye) such that your middle finger is resting on the lower, front aspect of the head of the opthalmoscope.
- Bring your right eye up to the viewing window. While you can either wear or remove your own glasses, the patient's should be taken off. It's OK to leave contacts in place.
- Take your left hand and place it on the patient's forehead and gently apply upward traction on the top lid with your thumb. This will "remind" them not to blink and let you know their precise location. Obviously, try not to poke them in the eye with this finger! Alternatively, you can place your left hand on the patient's shoulder as a means of keeping track of their location. Try to keep both of your eyes open when performing the exam as you might find it quite tiring to continually squint with the non-examining eye.
- Start approximately 15 cm from the patient and approach from about 15 or 20 degrees to the left of center. When you look through the viewing window, the outer structures of the eye should come into sharp focus. If not, slowly move closer or further from the patient until these structures become clear. It takes a bit of experimentation to find the lens that is right for any given distance, so make lens changes slowly by rotating the adjustment wheel. There is no magic way of guessing which lens will allow the sharpest view.
*Most clinicians don't perform a detailed examination of the outer structures of the eye if the patient has neither obvious abnormalities nor complaints referable to this region.
Viewing the Fundus (the retina and associated structures):
- Repeat steps 1 thru 5 as above. Adjust the lens selection wheel so that 0 appears in the display window.
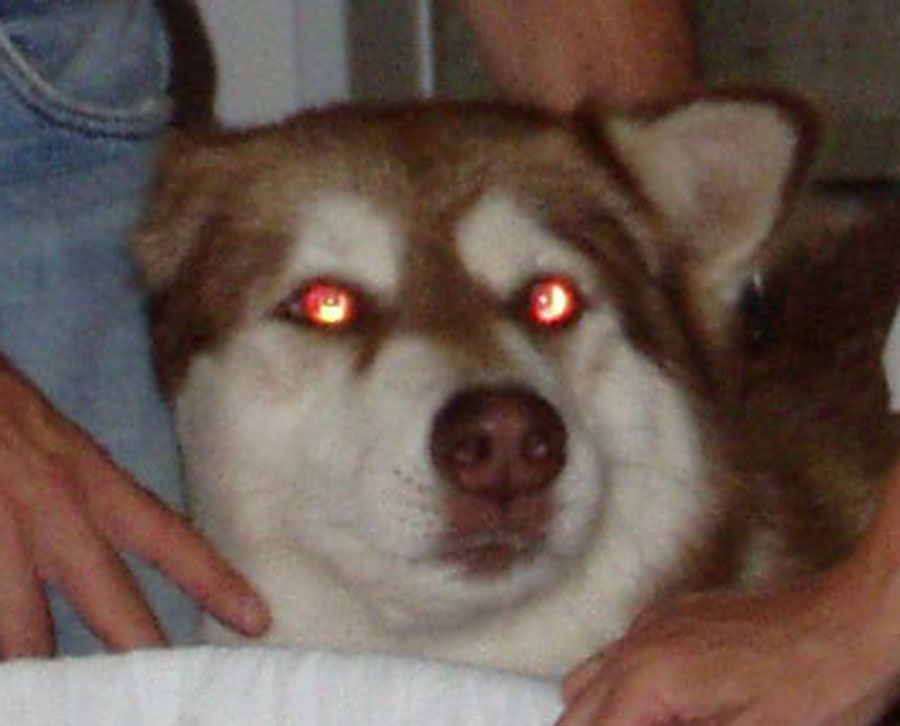
Red Reflex
- Look through the viewing window at the patient's pupil, using your right eye to examine their right eye. You should see a sparkly, orange-red color known as the red reflex. This is caused by light reflecting off of the retina and is the same phenomenon that produces red eyes in flash photographs. Occasionally, the translucent structures which allow light to pass unimpeded from outside the eye to the retina become opacified and the red reflex is lost. In adults, this is most commonly associated with cataracts, a process caused by clouding of the lens.
(Picture Courtesy of Ray Kelly)
- In order to see the fundus in greater detail, you will need to move very close to the patient, analogous to looking through a key hole (i.e. the closer you are, the more you'll see). Your middle finger, the one resting on the low front of the head piece, should be on or near the patient's cheek. Starting with the 0 lens in place, rotate the adjustment wheel counter clockwise. If you change lenses too quickly, you'll probably whizz right by the one that gives the sharpest picture, so be patient. In the event that this does not bring anything into focus, trying rotating the adjustment wheel in the opposite direction. It doesn't really matter what number lens is required to achieve the clearest view. Again, this will vary with the refractive error of both you and the patient. The numbers are simply provided for reference. Thus, while you may be able to see the fundus of some patients with the green numbers still visible, you will need red 8 or 10 to visualize the same region in a different person. Once you're close in and have the retina in clear view, you should only need to change the lens one or two clicks in order to keep all structures in focus as you scan across.
- You will only be able to see a relatively small segment of the retina at any one time. Your initial view will probably be of blood vessels on a random patch of retina (see below).
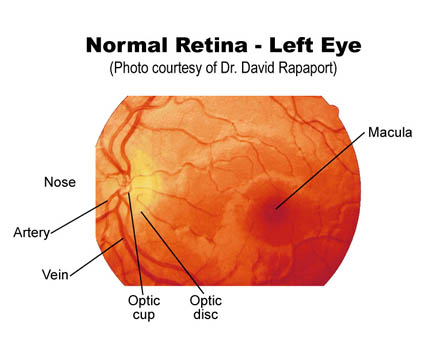
- When you first visualize the retina, you will note branching blood vessels. The bigger, darker ones are the veins and the smaller, brighter red structures the arteries. Changes in the appearance of the arteries (copper wiring) as well as alterations in the arterial-venous crossing pattern (a-v nicking) occur with atherosclerosis and hypertension respectively (see any text for pictures). These vessels are more obvious in the superior and inferior aspects of the retina, with relative sparing of the temporal and medial regions.
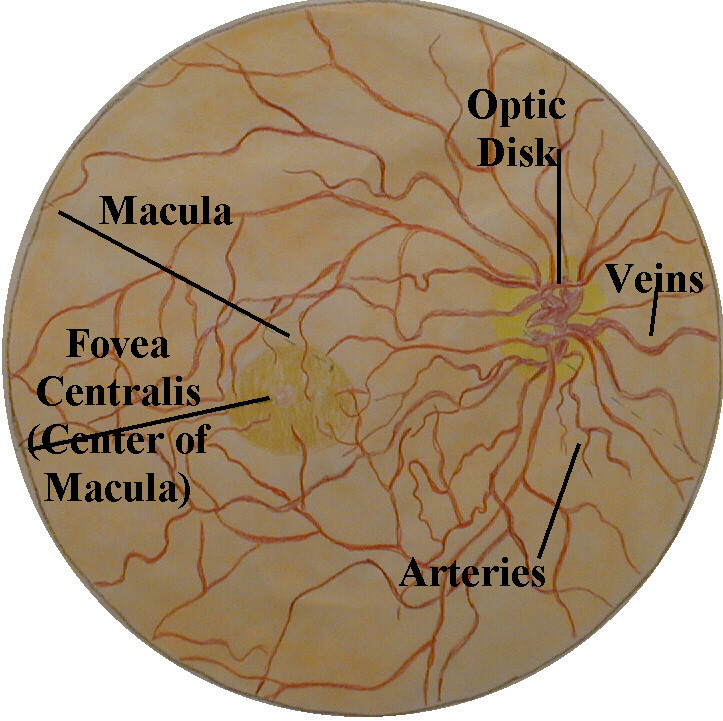
- Imagine that the blood vessels are the branches of a tree. Follow them in a direction that leads to less branching (i.e. towards the trunk). This will direct you towards the optic disc, the point at which the vessels enter the retina along with the head of the optic nerve. The edges of this round disc are sharp and well defined in the normal state. It should be a bit more yellow/orange when compared to the rest of the retina. At the center of the disc is the optic cup, a distinct circular area from which the blood vessels actually emerge. The disc is not located in the exact center of the retina but rather towards its medial/nasal aspect. Measurements in the eye are made using disc size as a measuring device (e.g. a finding may be described as being at 2 O'clock, 2 disc diameters from the center of the disc). If you are unable to locate the disc after following the vessels in one direction, simply head the other way.
- The macula is a region located lateral to the optic disc. It looks somewhat darker then the rest of the retina and, as opposed to the disc, has no distinct borders. The macula provides the sharpest vision. It can be best visualized by asking the patient to stare directly at the light of the opthalmoscope while you remain focused on a fixed area of the retina.
- You will not be able to visualize the entire retina at any one time (approximately one disc diameter should be visible). To view different areas, you'll have to shift the angle with which you peer through the pupil. This requires very small movements. Try to examine the entire structure systematically, looking up, down, left and right. You will undoubtedly have to remind the patient to continue looking straight ahead, else the fundus will be in continual motion and you will have no chance of finding anything. It's also a good idea to periodically give the patient a break (particularly if the exam is taking a while), allowing them to blink in the dark before resuming.
They'll point the way to the optic disc...
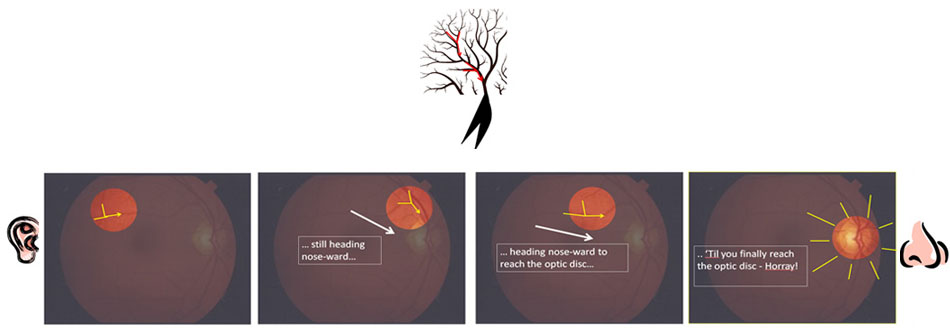
(Picture Courtesy of Ray Kelly)
In order to view the patient's left eye, grasp the scope in your left hand and use your left eye; then repeat the process described above.
If possible, try to avoid eating garlic, onions or other strong smelling food. If you are "dependent" on these substances, invest in a box of tic-tacs for use during the exam!
It is much easier to examine the retina after the pupil has been pharmacologically dilated. In actual practice, however, most providers, with the exception of optometrists and ophthalmologists, do not routinely perform dilated eye exams. This is because dilation takes time and is a bit uncomfortable for the patient as it causes increased light sensitivity that lasts for several hours. Additionally, a non-dilated view of the retina is adequate for a general exam in which the patient has no specific ophthalmologic complaints. Take advantage of any opportunity to perform an examination through a dilated pupil as this is a great way of learning. Make use of additional reference texts, paying particular attention to color photos depicting variants of normal as well as the findings associated with common disease states.