Male Genital And Rectal Exam
Preparing and Positioning the Patient:
This is generally the last part of the complete physical examination. While it may cause the patient (and perhaps you) some embarrassment as well as discomfort, it provides important information and should not be skipped. Explain to the patient what you are going to do (and why) and then proceed.
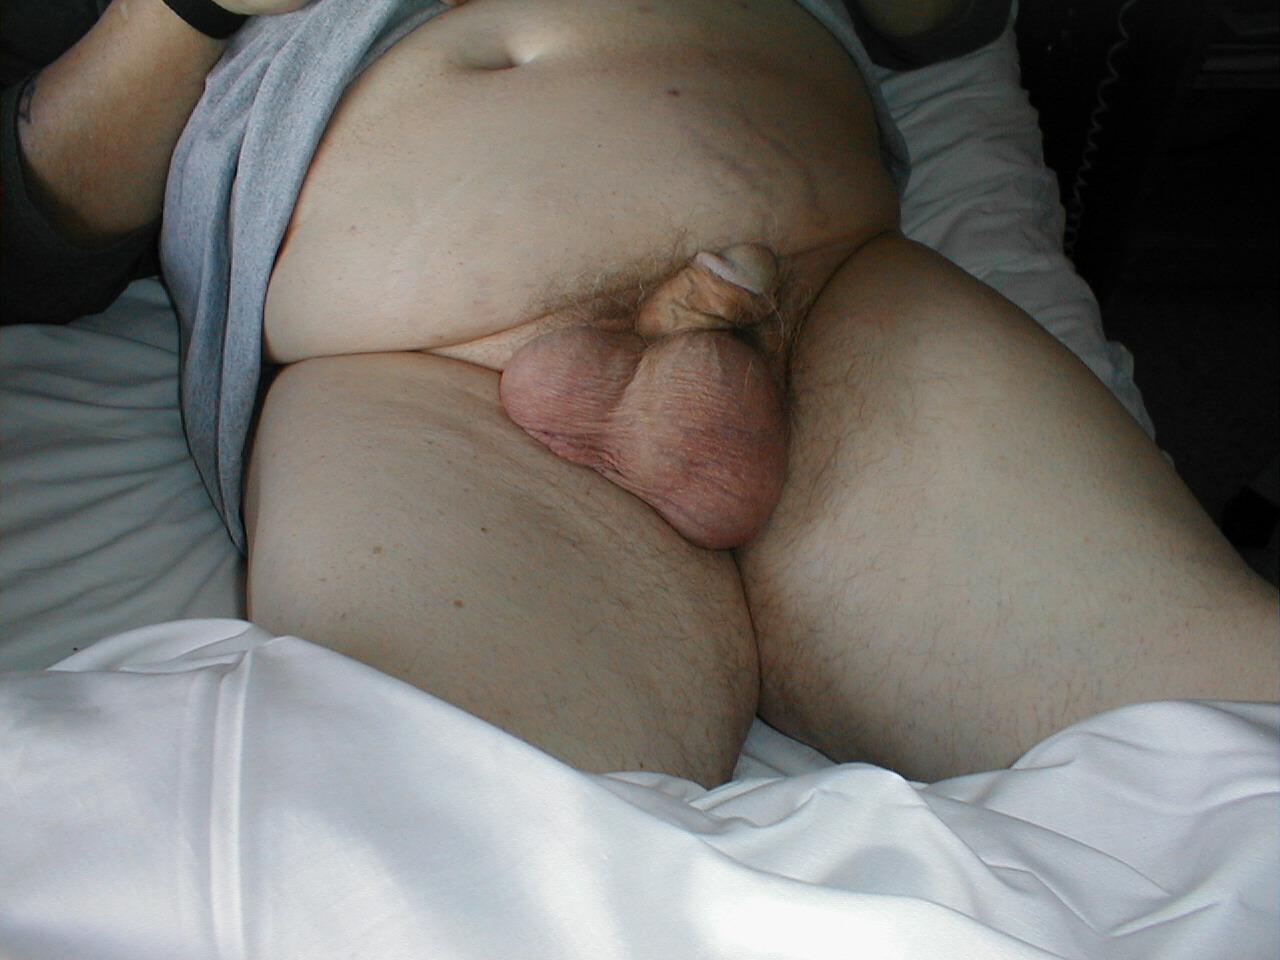
If they have not already done so, ask the patient to remove their underwear. I believe that this examination is easier to perform and yields more information if it is done with the patient standing while you are seated in front of them. In this position, it is easier to examine the testes, evaluate for inguinal hernias and perform the rectal exam. However, if the patient is unable to stand/unsteady on their feet, it can be performed while they lie on the exam table.
The Genital Exam:
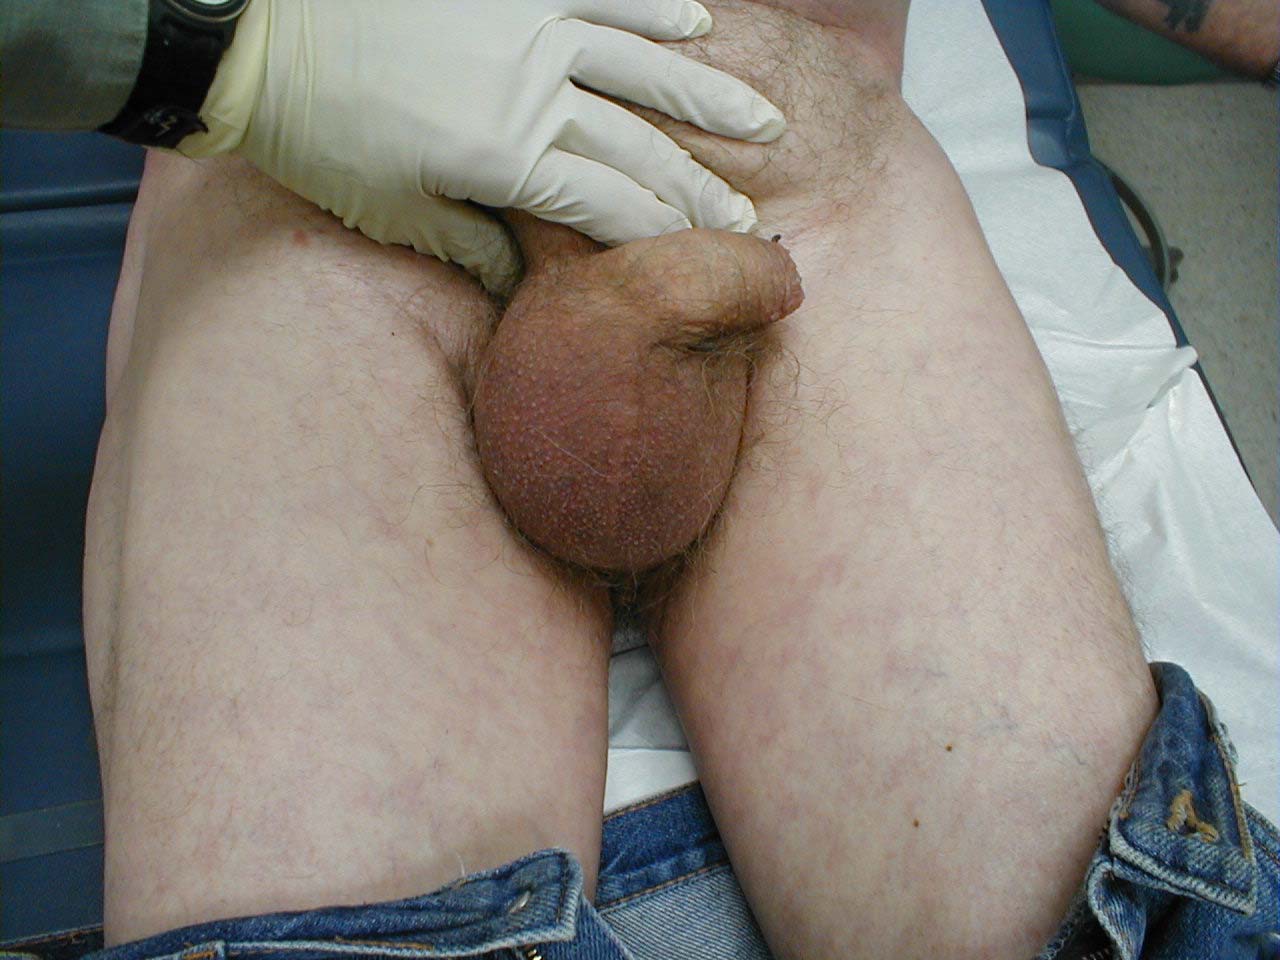
Have the patient stand in front of you and raise their gown to the level of the umbillicus, exposing the entire genital region. Put on a pair of gloves prior to beginning. The gloves do not have to be sterile.
Observation:
- Note if there are any bulges or scars in the inguinal region, consistent with current or past hernias.
- Any obvious penile or scrotal abnormalities?
- Any obvious skin abnormalities on the penis, scrotum or surrounding areas?
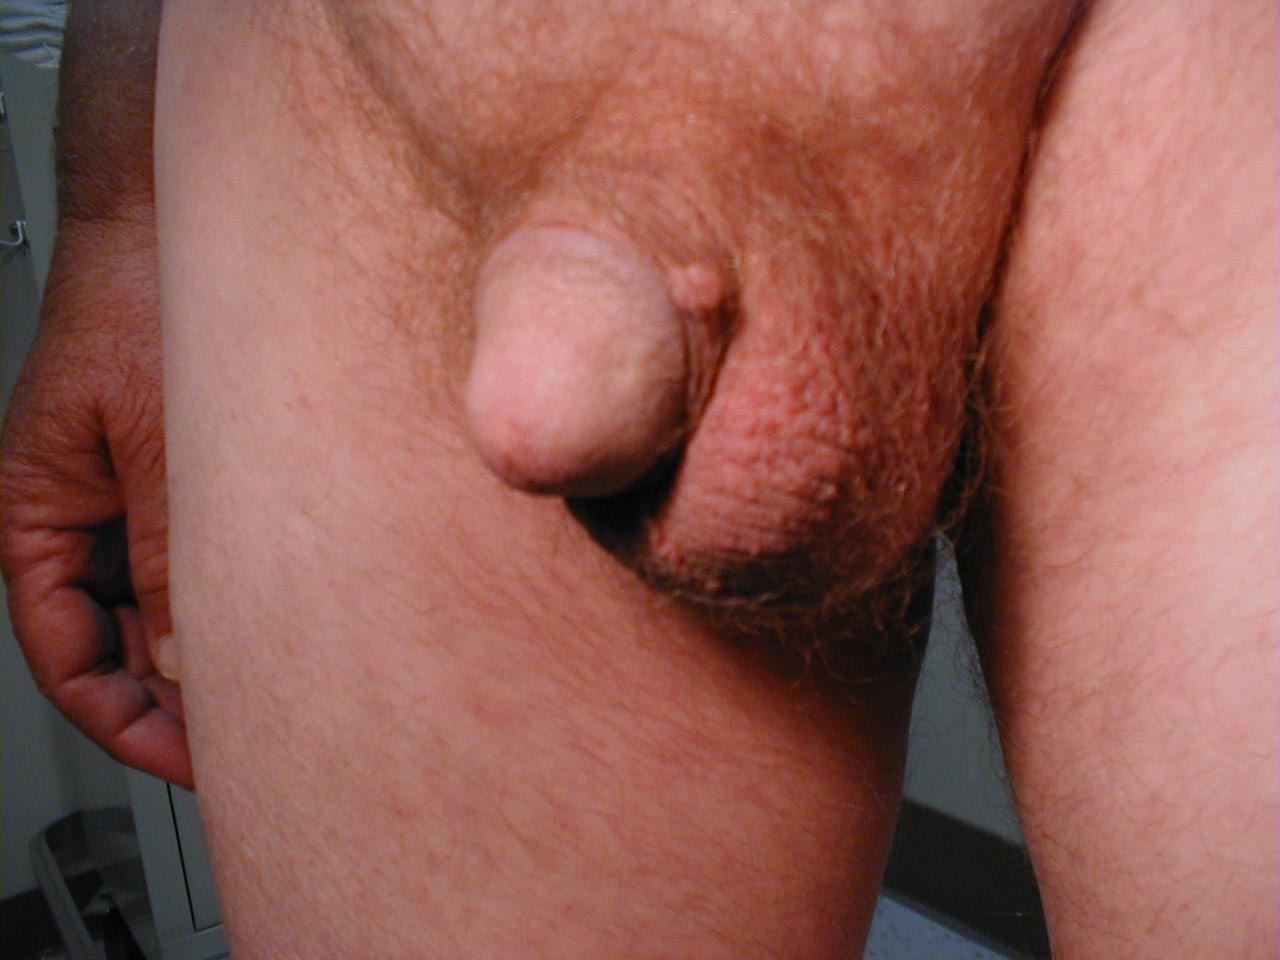
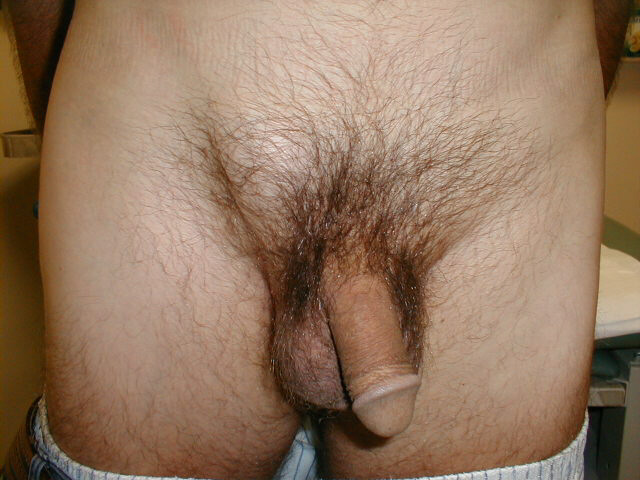
The Penis:
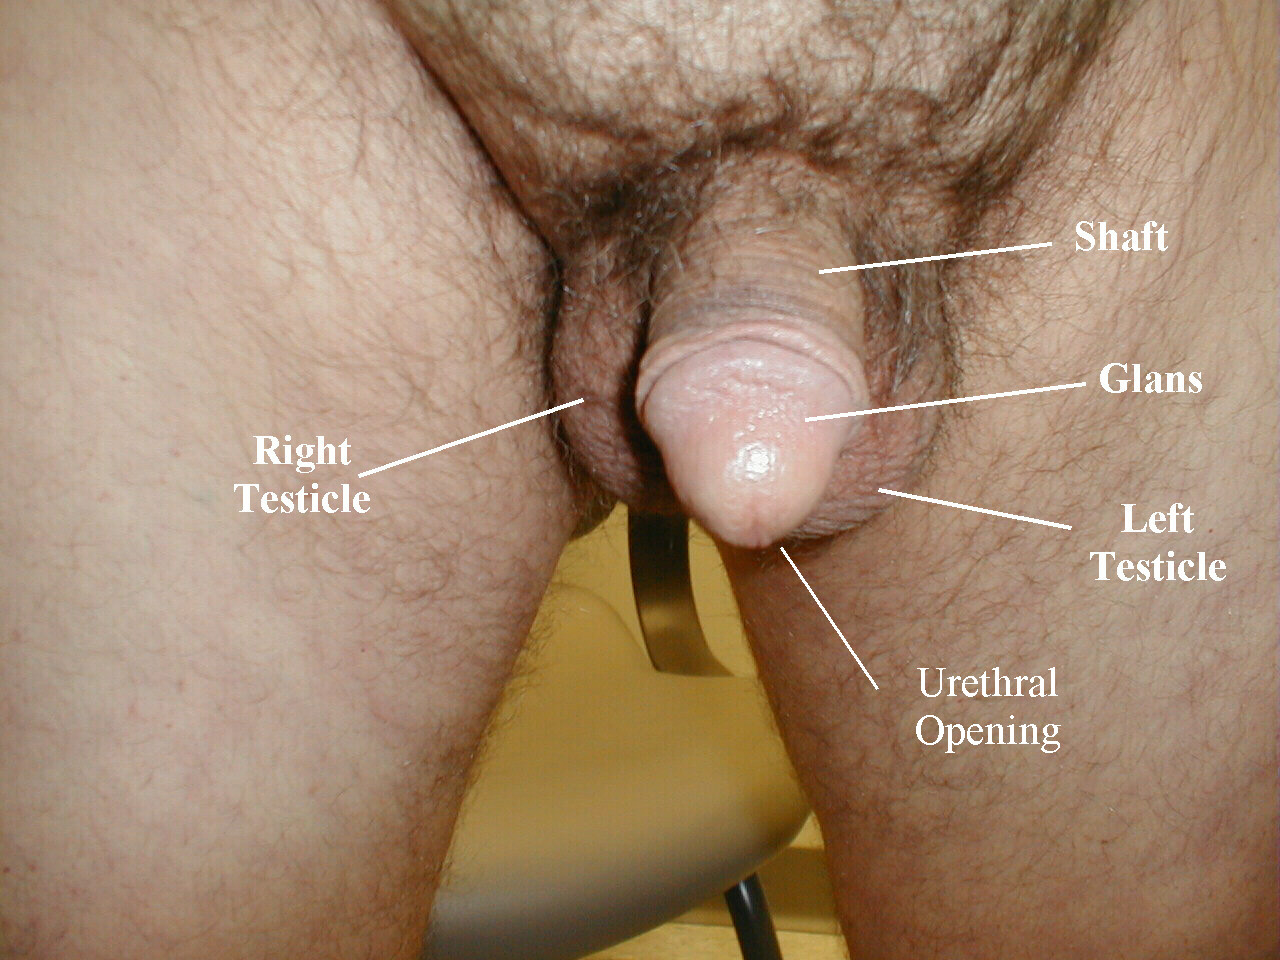
- First examine the glans (i.e. the head) of the penis. If the patient is
uncircumcised, draw back the foreskin so that you can look at the glans in
its entirety. Make sure that you return the foreskin to its normal position
at the end of the exam, else it can cause severe venous and arterial obstruction,
leading to necrosis of the head of the penis, a condition referred to as paraphymosis.
Occasionally you will be unable to retract the foreskin from the head of the
penis, referred to as phymosis.
Paraphymosis: Picture on left demonstrates edematous foreskin which has become trapped behind
the head of the penis. Picture on right demonstrates foreskin in appropriate position covering head of penis.
This was achieved by applying steady pressure to the head of the penis, reducing edema, which then
allowed repositioning of foreskin. Note that patient has Foley catheter inserted. Phymosis:Scarred down foreskin which can not be retracted over head of penis.
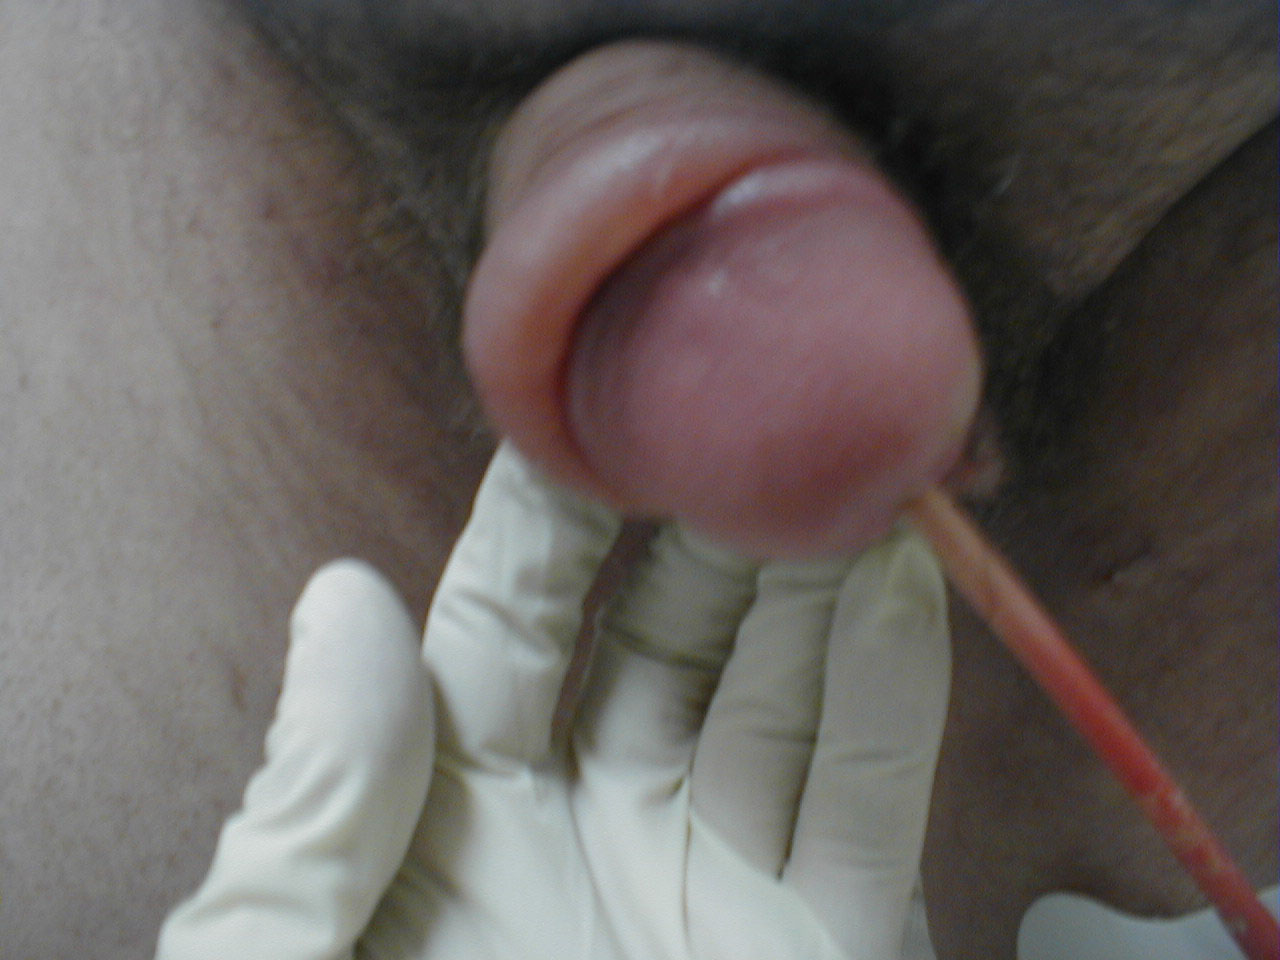
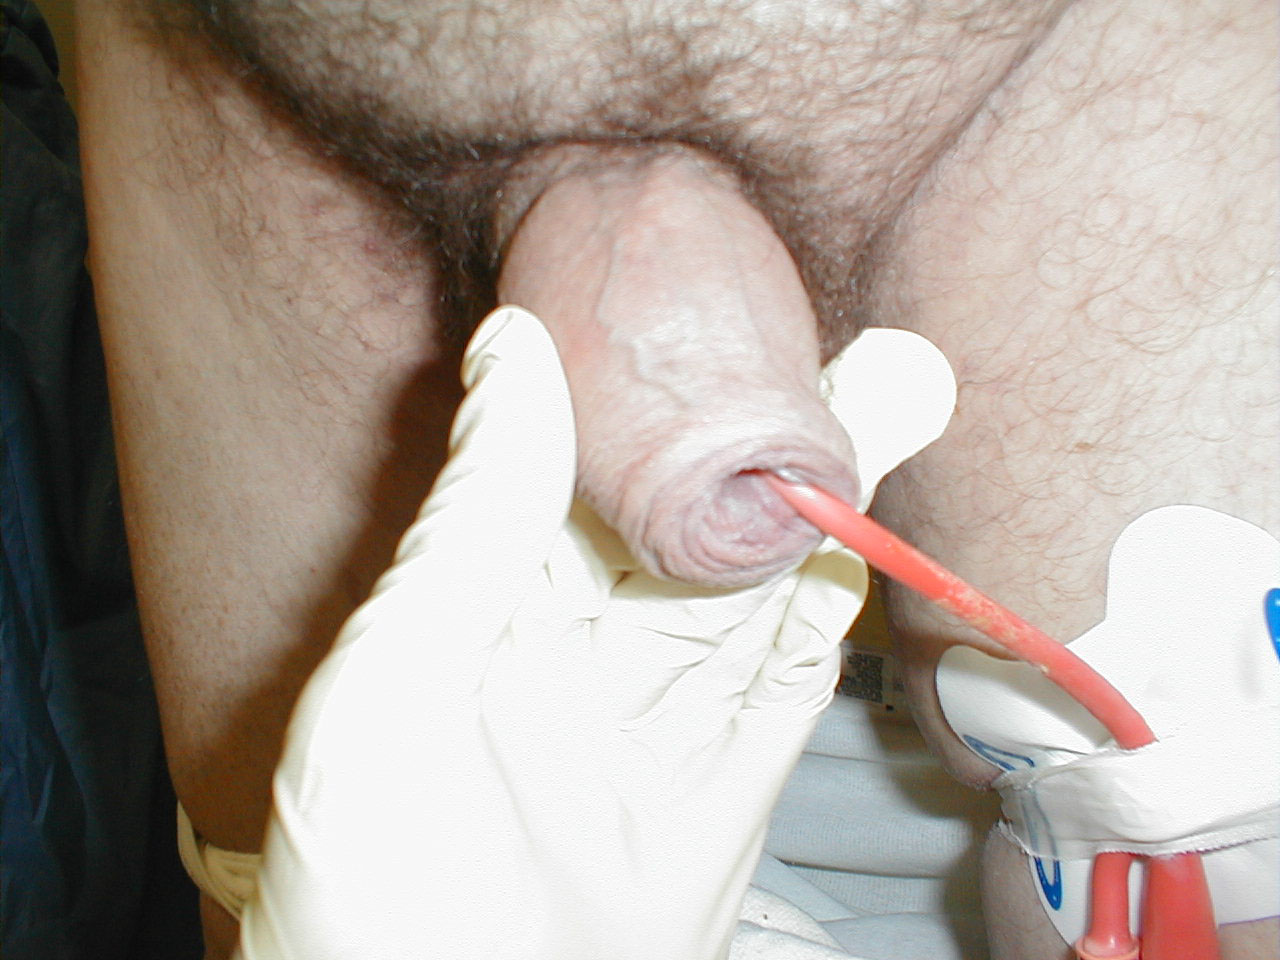
 - Look at the opening of the urethra. Make note of whether it is more or less at the tip of the penis, on the top-side (known as epispadias) or on the bottom-side (hypospadias). Check for any obvious milky discharge suggestive of urethritis, a condition most commonly caused by the sexually transmitted diseases Gonorrhea and Chlamydia.
- Feel along the shaft of the penis. Are there any underlying firm areas? Any unusual curvature to the normally straight penis? Occasionally, fibrosis occurs along the shaft, which causes palpable plaques and penile curvature.
- Examine at the base of the penis/amidst the pubic hair for any skin abnormalities
(e.g. pigmented areas, ulcers, vessicles etc.). You will obviously look harder
if the patient complains of seeing/feeling something in that region.
For additional information see: Digital DDx: Penile Mass, Ulcer or Discharge
 Penile Condyloma:Growth at edge of glans due to HPV infection.
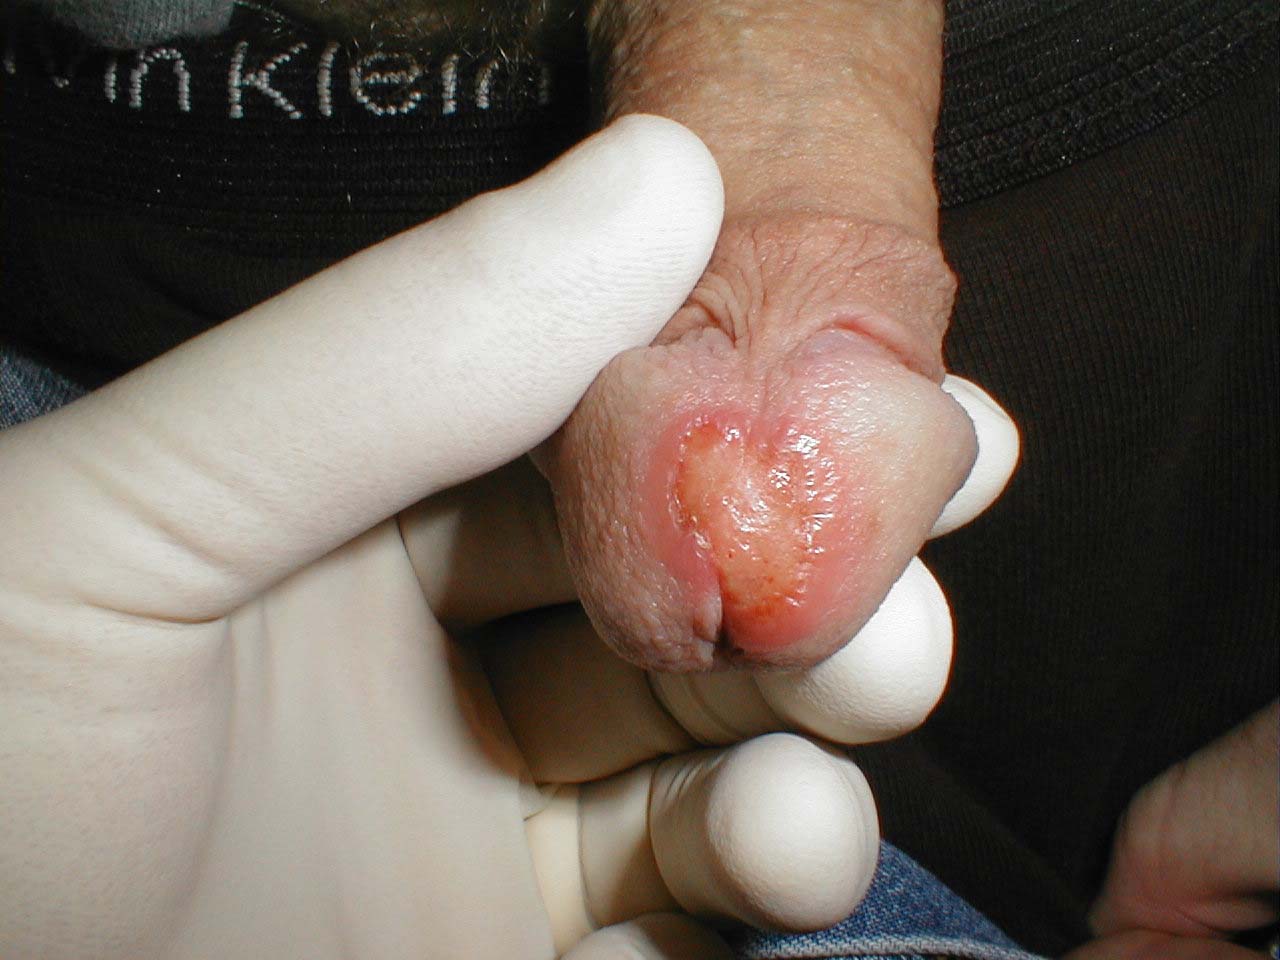 Syphilitic Ulcer
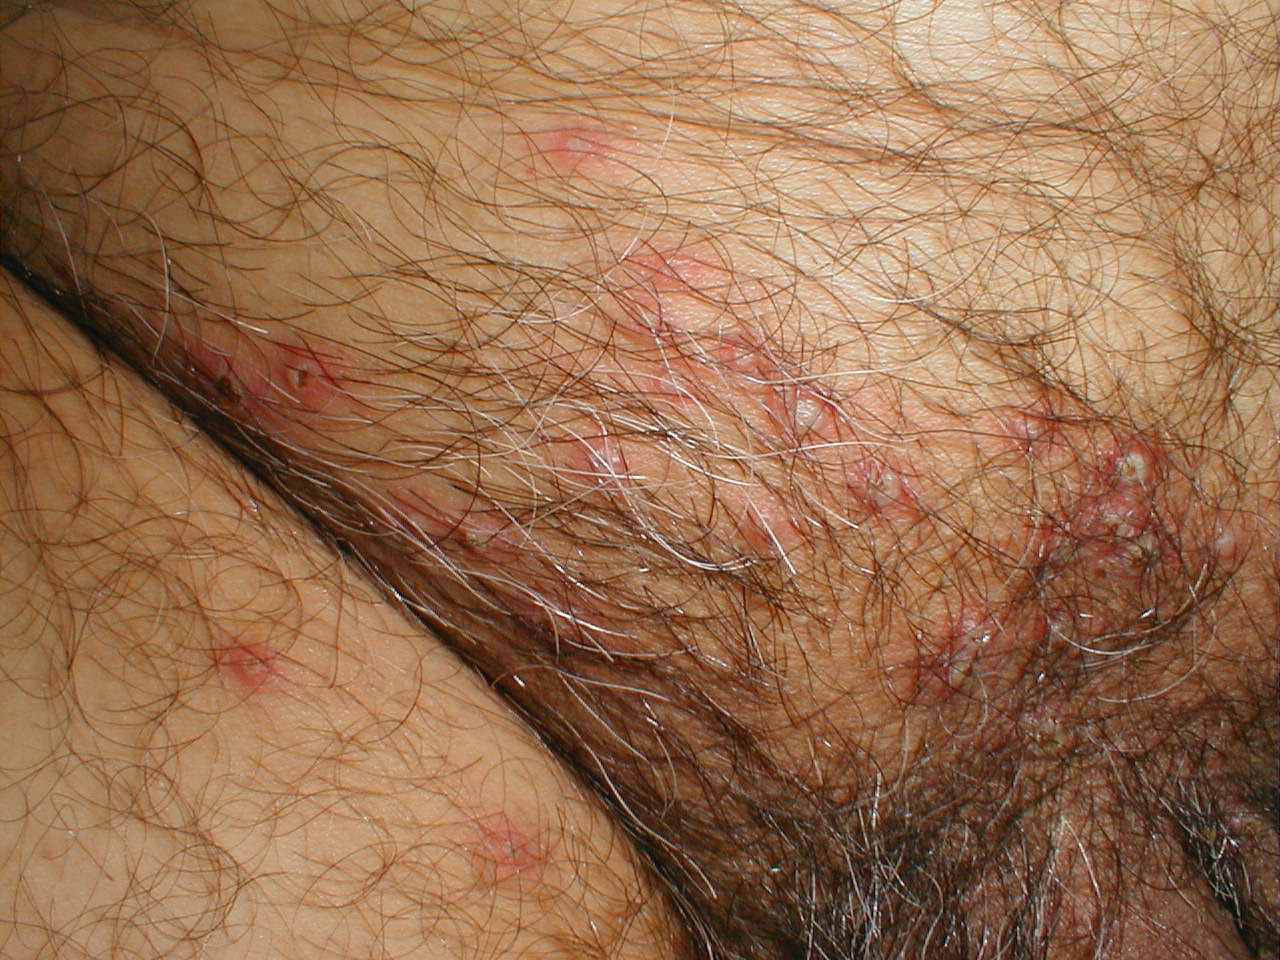 HSV Vessicles
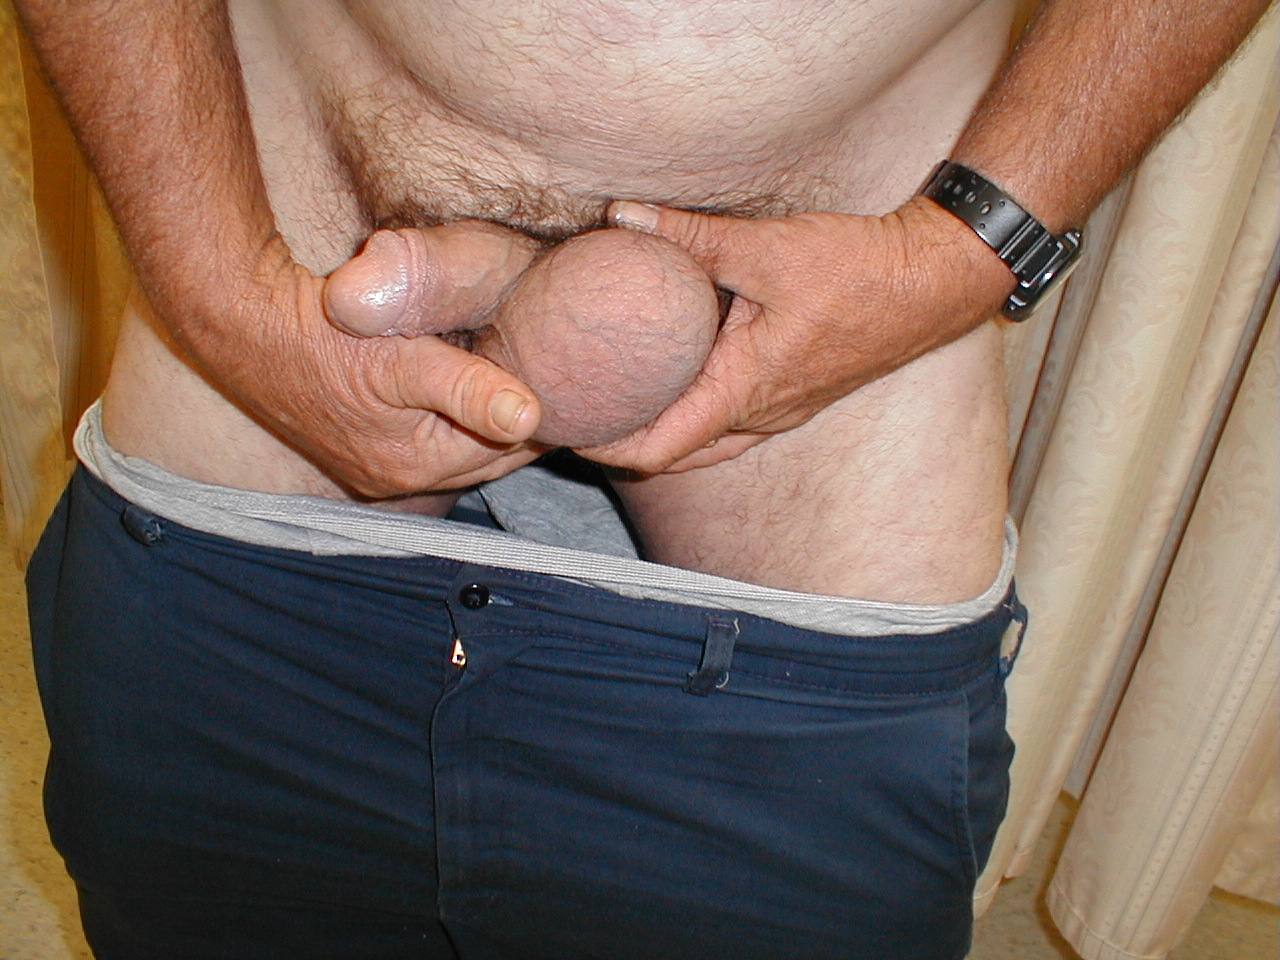
Testicular Exam:
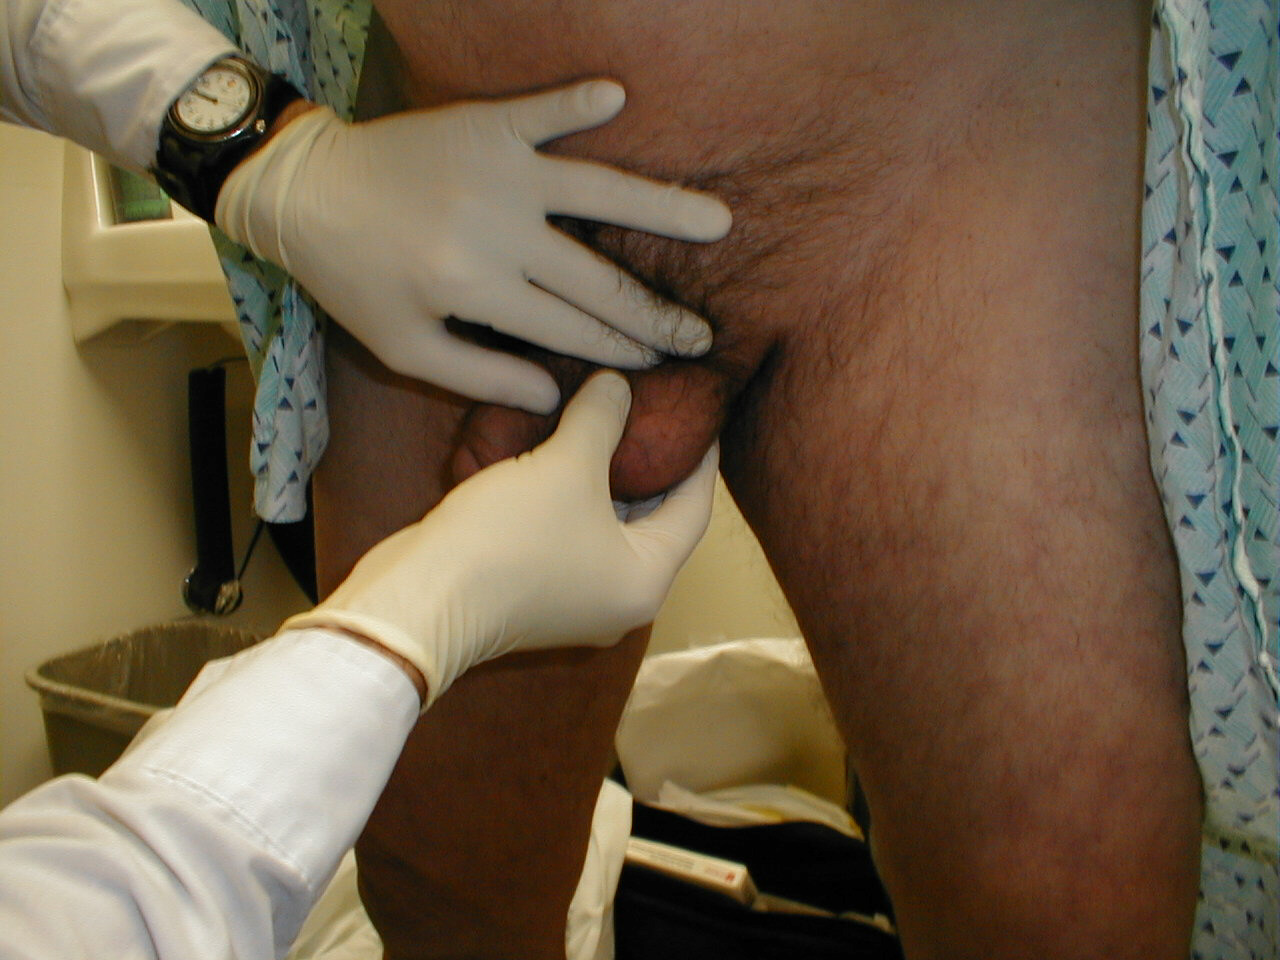
- In general, the left testis lies a bit lower in the scrotum then the right. The testes should appear as 2 discrete swellings, although if the room is particularly cold, they may retract a bit up towards the inguinal canal (more of problem in pediatric then adult medicine).
- Gently feel the testes, palpating the tissue between the thumb and next
2 fingers of your examining hand. Each should be of the same consistency and
size. If there is a significant size discrepancy (or complete absence of one
of the testes) ask the patient if this has always been the case. They may
have had one surgically removed... or perhaps suffer from a congenitally undescended
testis. The patient should be able to relate whether he was ever able to feel
both testes or if anyone has ever told him that he has a testicular abnormality.
If there appears to be a single testis, carefully examine the inguinal canal
(see below) for evidence of a discrete swelling that could represent the location
of an undescended testis. Make careful note of any discrete lumps or bumps
within the body of the testis. The presence of a firm nodule would be worrisome
for testicular malignancy. Occasionally, the entire testis feels enlarged.
This is most commonly caused by a hydrocele, which is a collection of fluid
that fills a potential space surrounding the testis. Hydroceles have a characteristic
texture that is different from that of testicular tissue. You can also distinguish
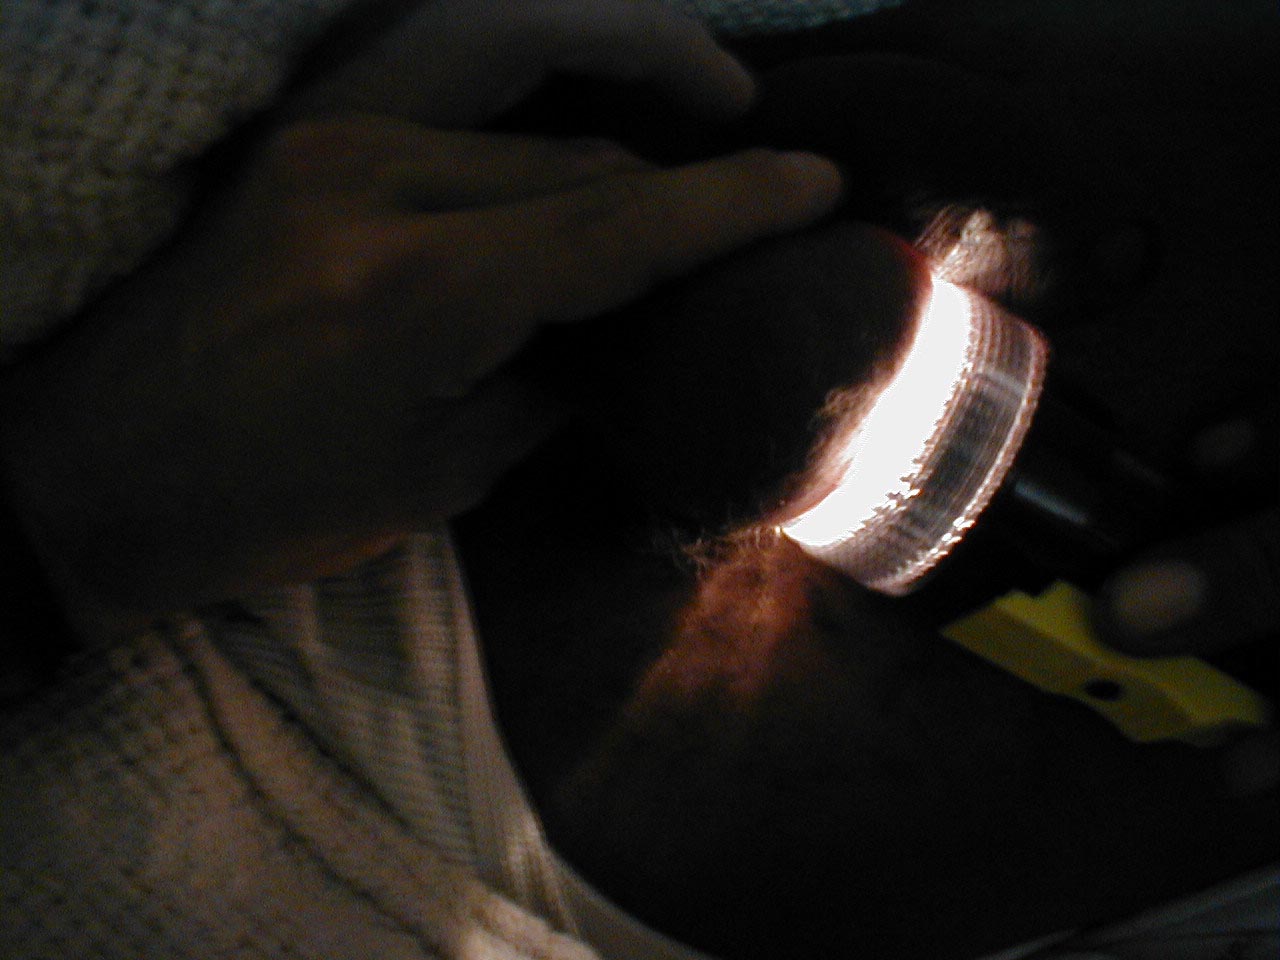
them from the body of the testis by trans-illumination. To do this, shut off
the lights in the exam room and place a flash light on the scrotum, directly
over the area in question. A hydrocele will allow the transmission of light,
while testicular tissue will not.
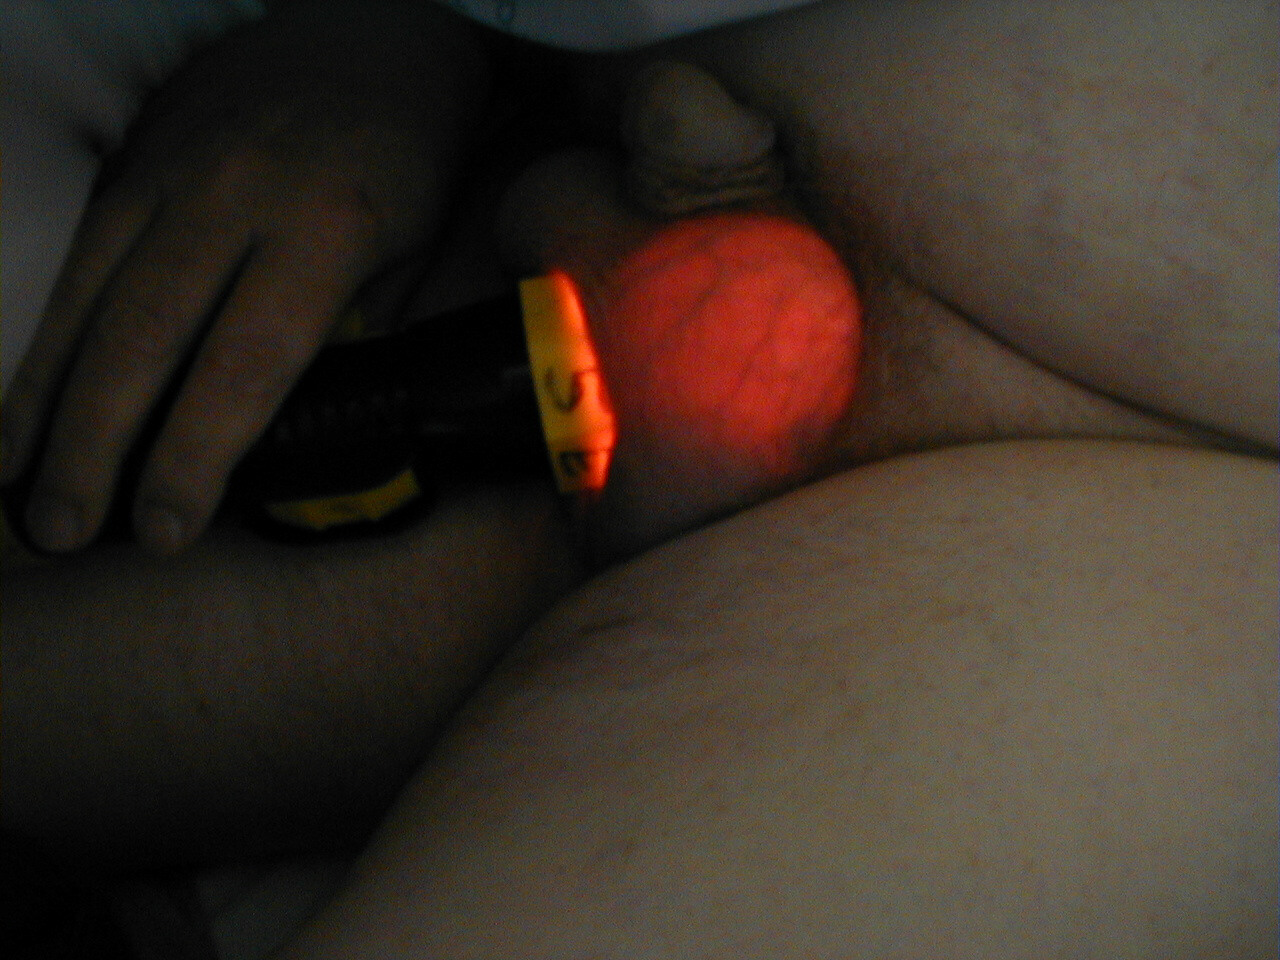 Testicular enlargement caused by hydrocele.
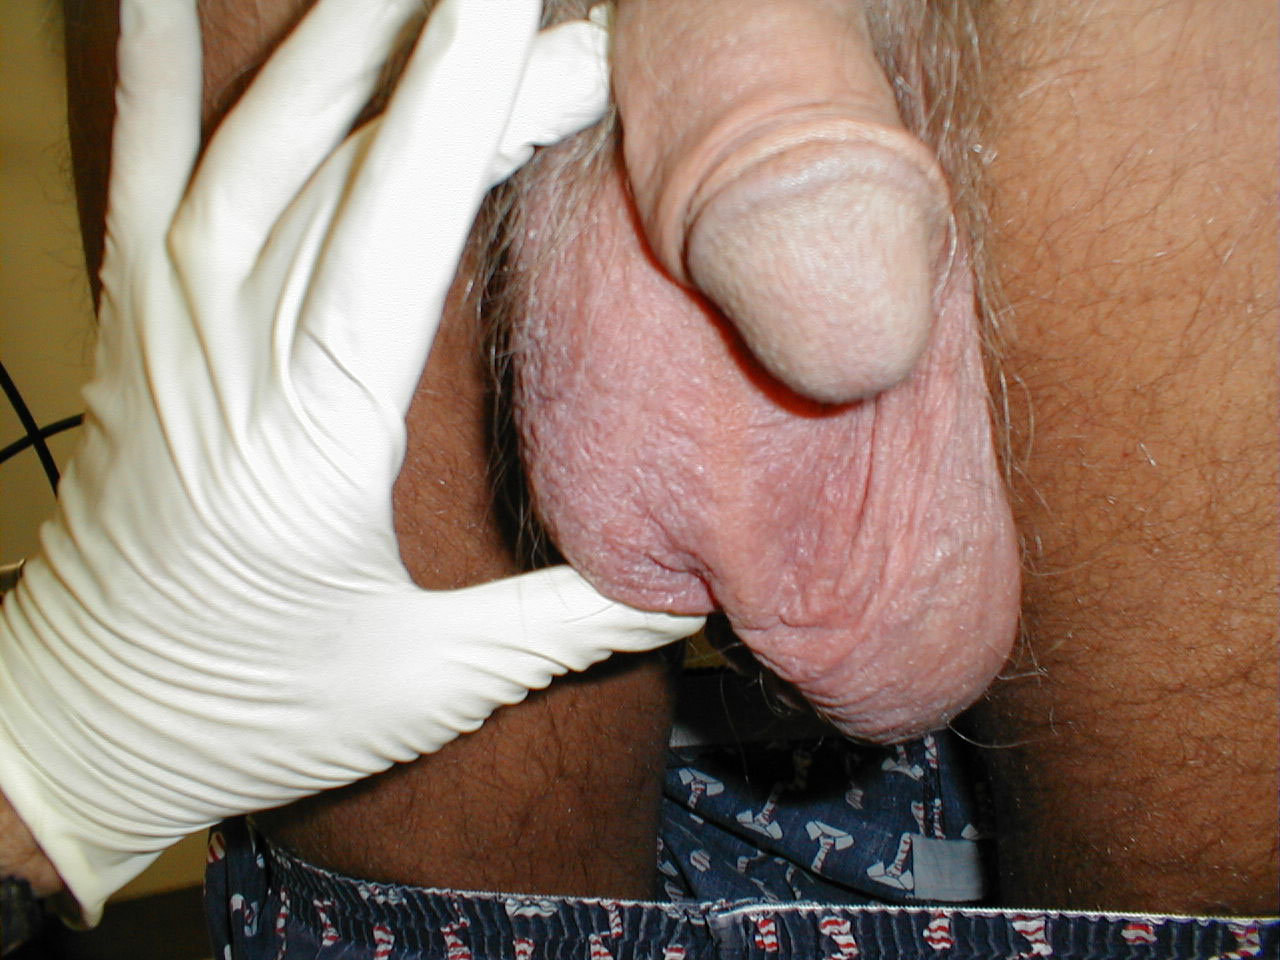
Orchitis: Picture on left demonstrates testicular enlargement caused by infection within the body of the testis.
The inflammation has spread from the testis to the skin of the scrotum, with resulting edema causing fewer skin folds over the right testicle compared with the left. No transillumination is seen (picture on right) as the inflamed testis does not allow the passage of light (as opposed to hydrocele shown above, which readily conducts light). This is not always the case, as sometimes orchitis will cause a "reactive hydrocele" to form, which will transilluminate. - The epididymis is a discrete structure which lies towards the top and back of each testis.
- If there is any testicular pain, it may be easier to perform the exam while
the patient is supine.
For additional information see: Digital DDx: Testicular Mass or Pain
Diagram of male genital anatomy.
Assessment of the spermatic cord structures:
- The vas deferens, testicular artery/vein, ilio-inguinal nerve, lymphatics and fatty tissue make up the spermatic cord, a structure that runs from the epididymis up through the inguinal canal. The vas can be distinguished from the rest of these stuctures as it lies along the posterior aspect of the bundle and feels firm and wire-like. You will normally be unable to specifically identify the remaining structures.
- Identify any discrete swellings within this collection of tissues. If present, note their relationship to the testes and inguinal canal. Dilated veins, referred to as a varicocele (feels like a bag of worms... really!), will be palpable throughout the length of the cord structures.
- If you detect a diffuse swelling amidst the cord structures or note the inguinal canal area
to be protuberant, the patient probably has an inguinal hernia. The following examination,
however, should be performed on all male patients, regardless of whether you suspect any
underlying abnormality. Before palpating this region, have the patient bear down (i.e.
valsalva) or cough (though have them turn their heads first so they don't expectorate into
your hair) while you look at the inguinal region. Both of these maneuvers increase
intra-abdominal pressure, forcing intestines/omentum/peritoneal fluid through any defect
which may exist and making a hernia more apparent.
Right Inguinal Hernia
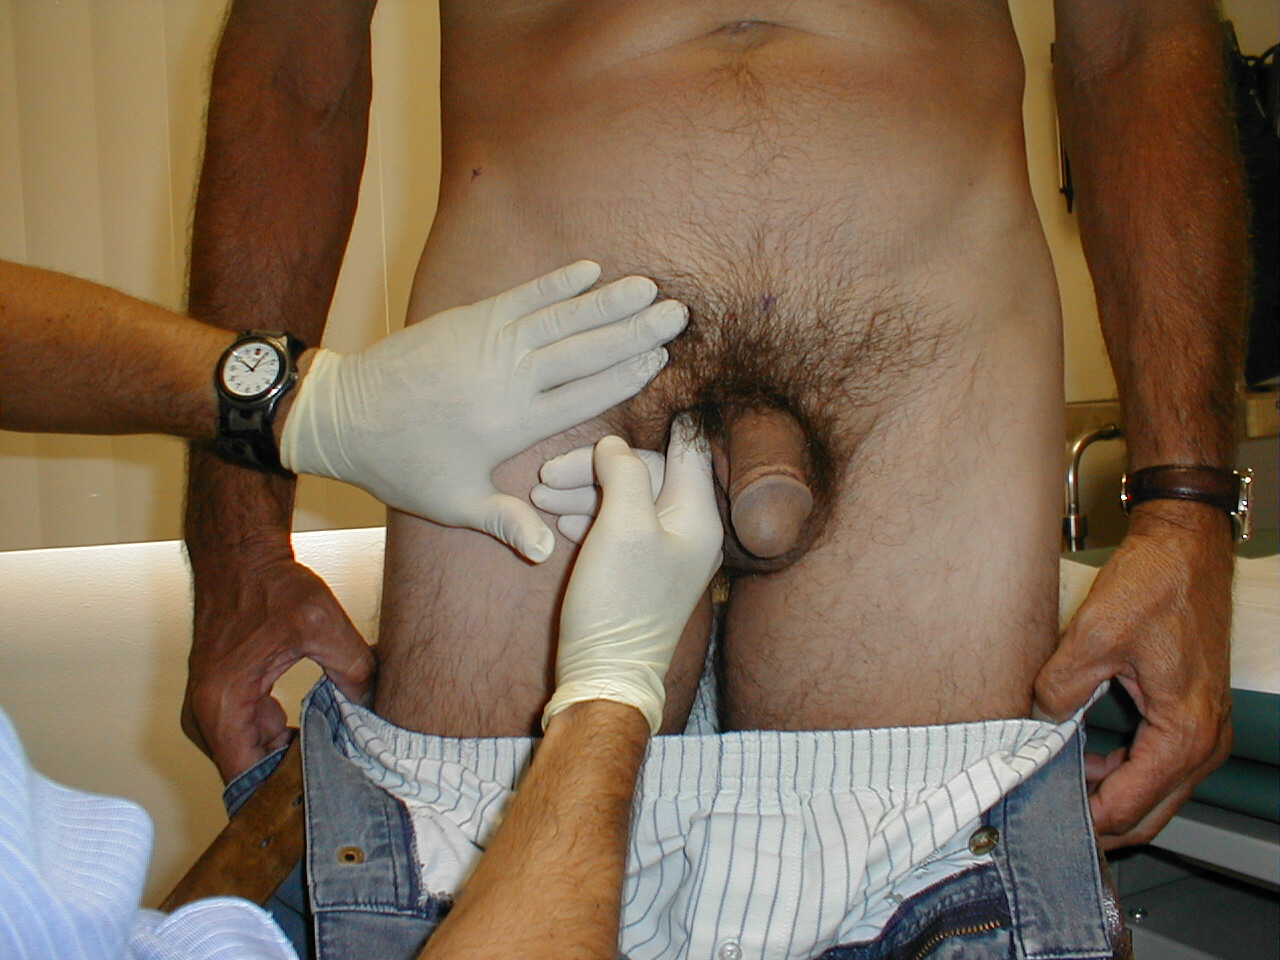
- If you are examining the right inguinal region, place the index finger of your right hand
along the spermatic cord, inverting the scrotal skin as you trace the cord to where it
emerges from the external ring of the inguinal canal. You may be able to put the tip of your
finger into this narrow opening. Put the fingers of your left hand over the inguinal canal,
which runs obliquely towards the patient's anterior-superior iliac crest, or on top of any
noticeably swollen area. Have the patient repeat the above maneuvers that increase
intra-abdominal pressure and note if you can feel, with either hand, any bulging tissue that
would be consistent with a hernia.
Hernia Exam
- Exam of the left inguinal area is done in the same way, though hand positioning is reversed. Hernias are generally non-tender and there should be no evidence of acute inflammation (i.e. skin edema or redness). If present, it suggests incarceration/strangulation of the entrapped contents, the most dreaded complication of a hernia, and constitutes a surgical emergency.
- Inguinal hernias come in all sizes. Distinguishing direct from indirect hernias on the basis
of exam is rather difficult and not clinically important as both should generally be
repaired and the final determination can be made at the time of surgery. Some hernias will
be barely palpable by the index finger placed in the external ring of the inguinal canal.
Others can be quite massive. In this setting, it may be difficult to distinguish the cord
structures or testis from the contents of the hernia, though give it a try. The testis
should be located at the bottom of the scrotum.
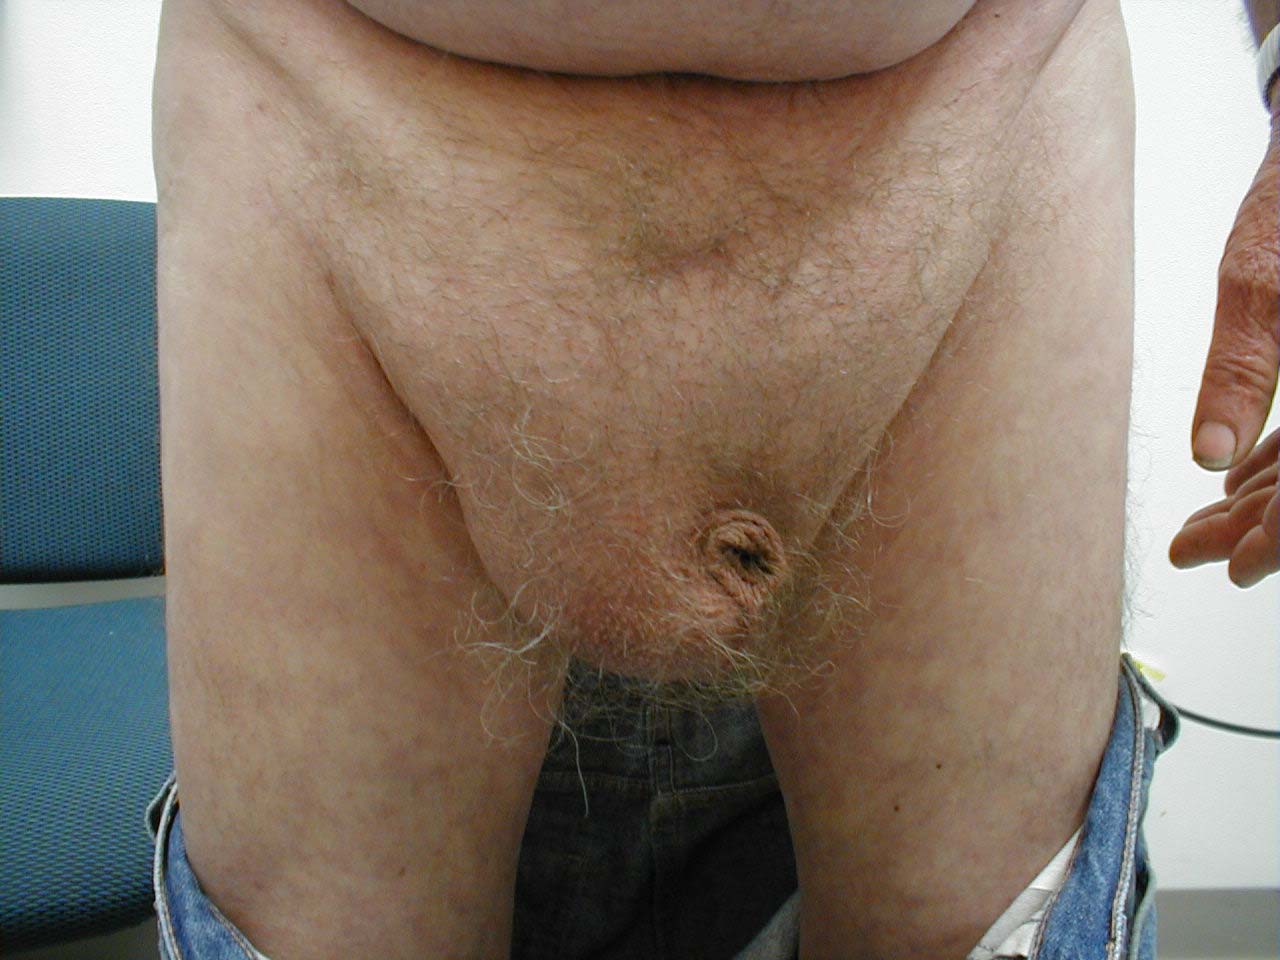
Large right inguinal hernia: Prominently seen in picture on left. Picture on right demonstrates appearance in same patient after manual reduction.
- Auscultation on top of a hernia may allow the detection of bowel sounds, which can be useful information if you are unsure as to the nature of an inguinal bulge.
- In the event that the patient is unable to stand, the above examination can be performed as
described with the patient supine. This may actually be a better position for evaluating the
inguinal canal if you are concerned that it may contain a discrete mass, as in the case of a
suspected undescended testicle.
For additional information see: Digital DDx: Testicular Mass or Pain
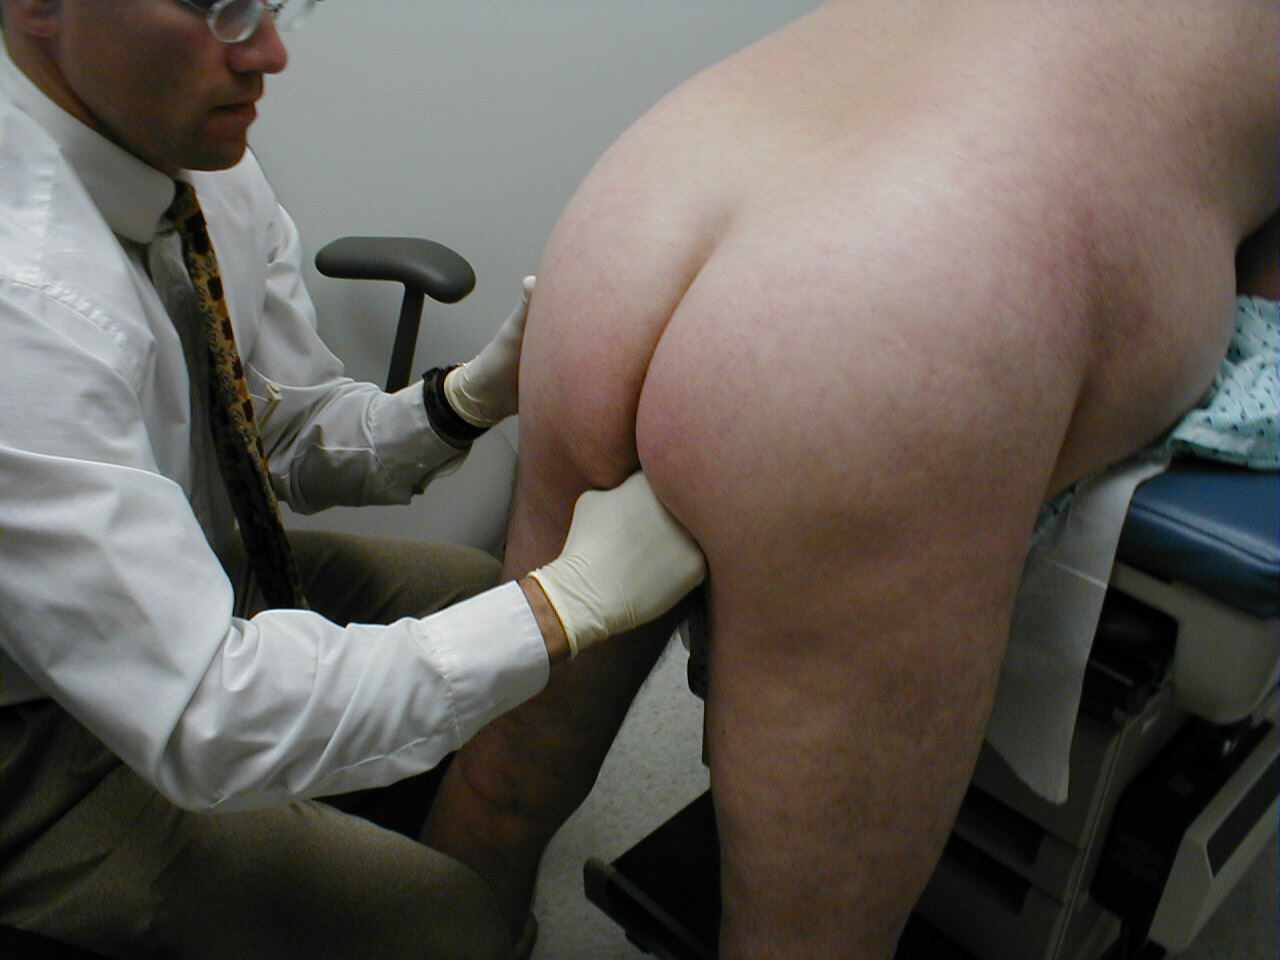
Rectal/Prostate Exams:
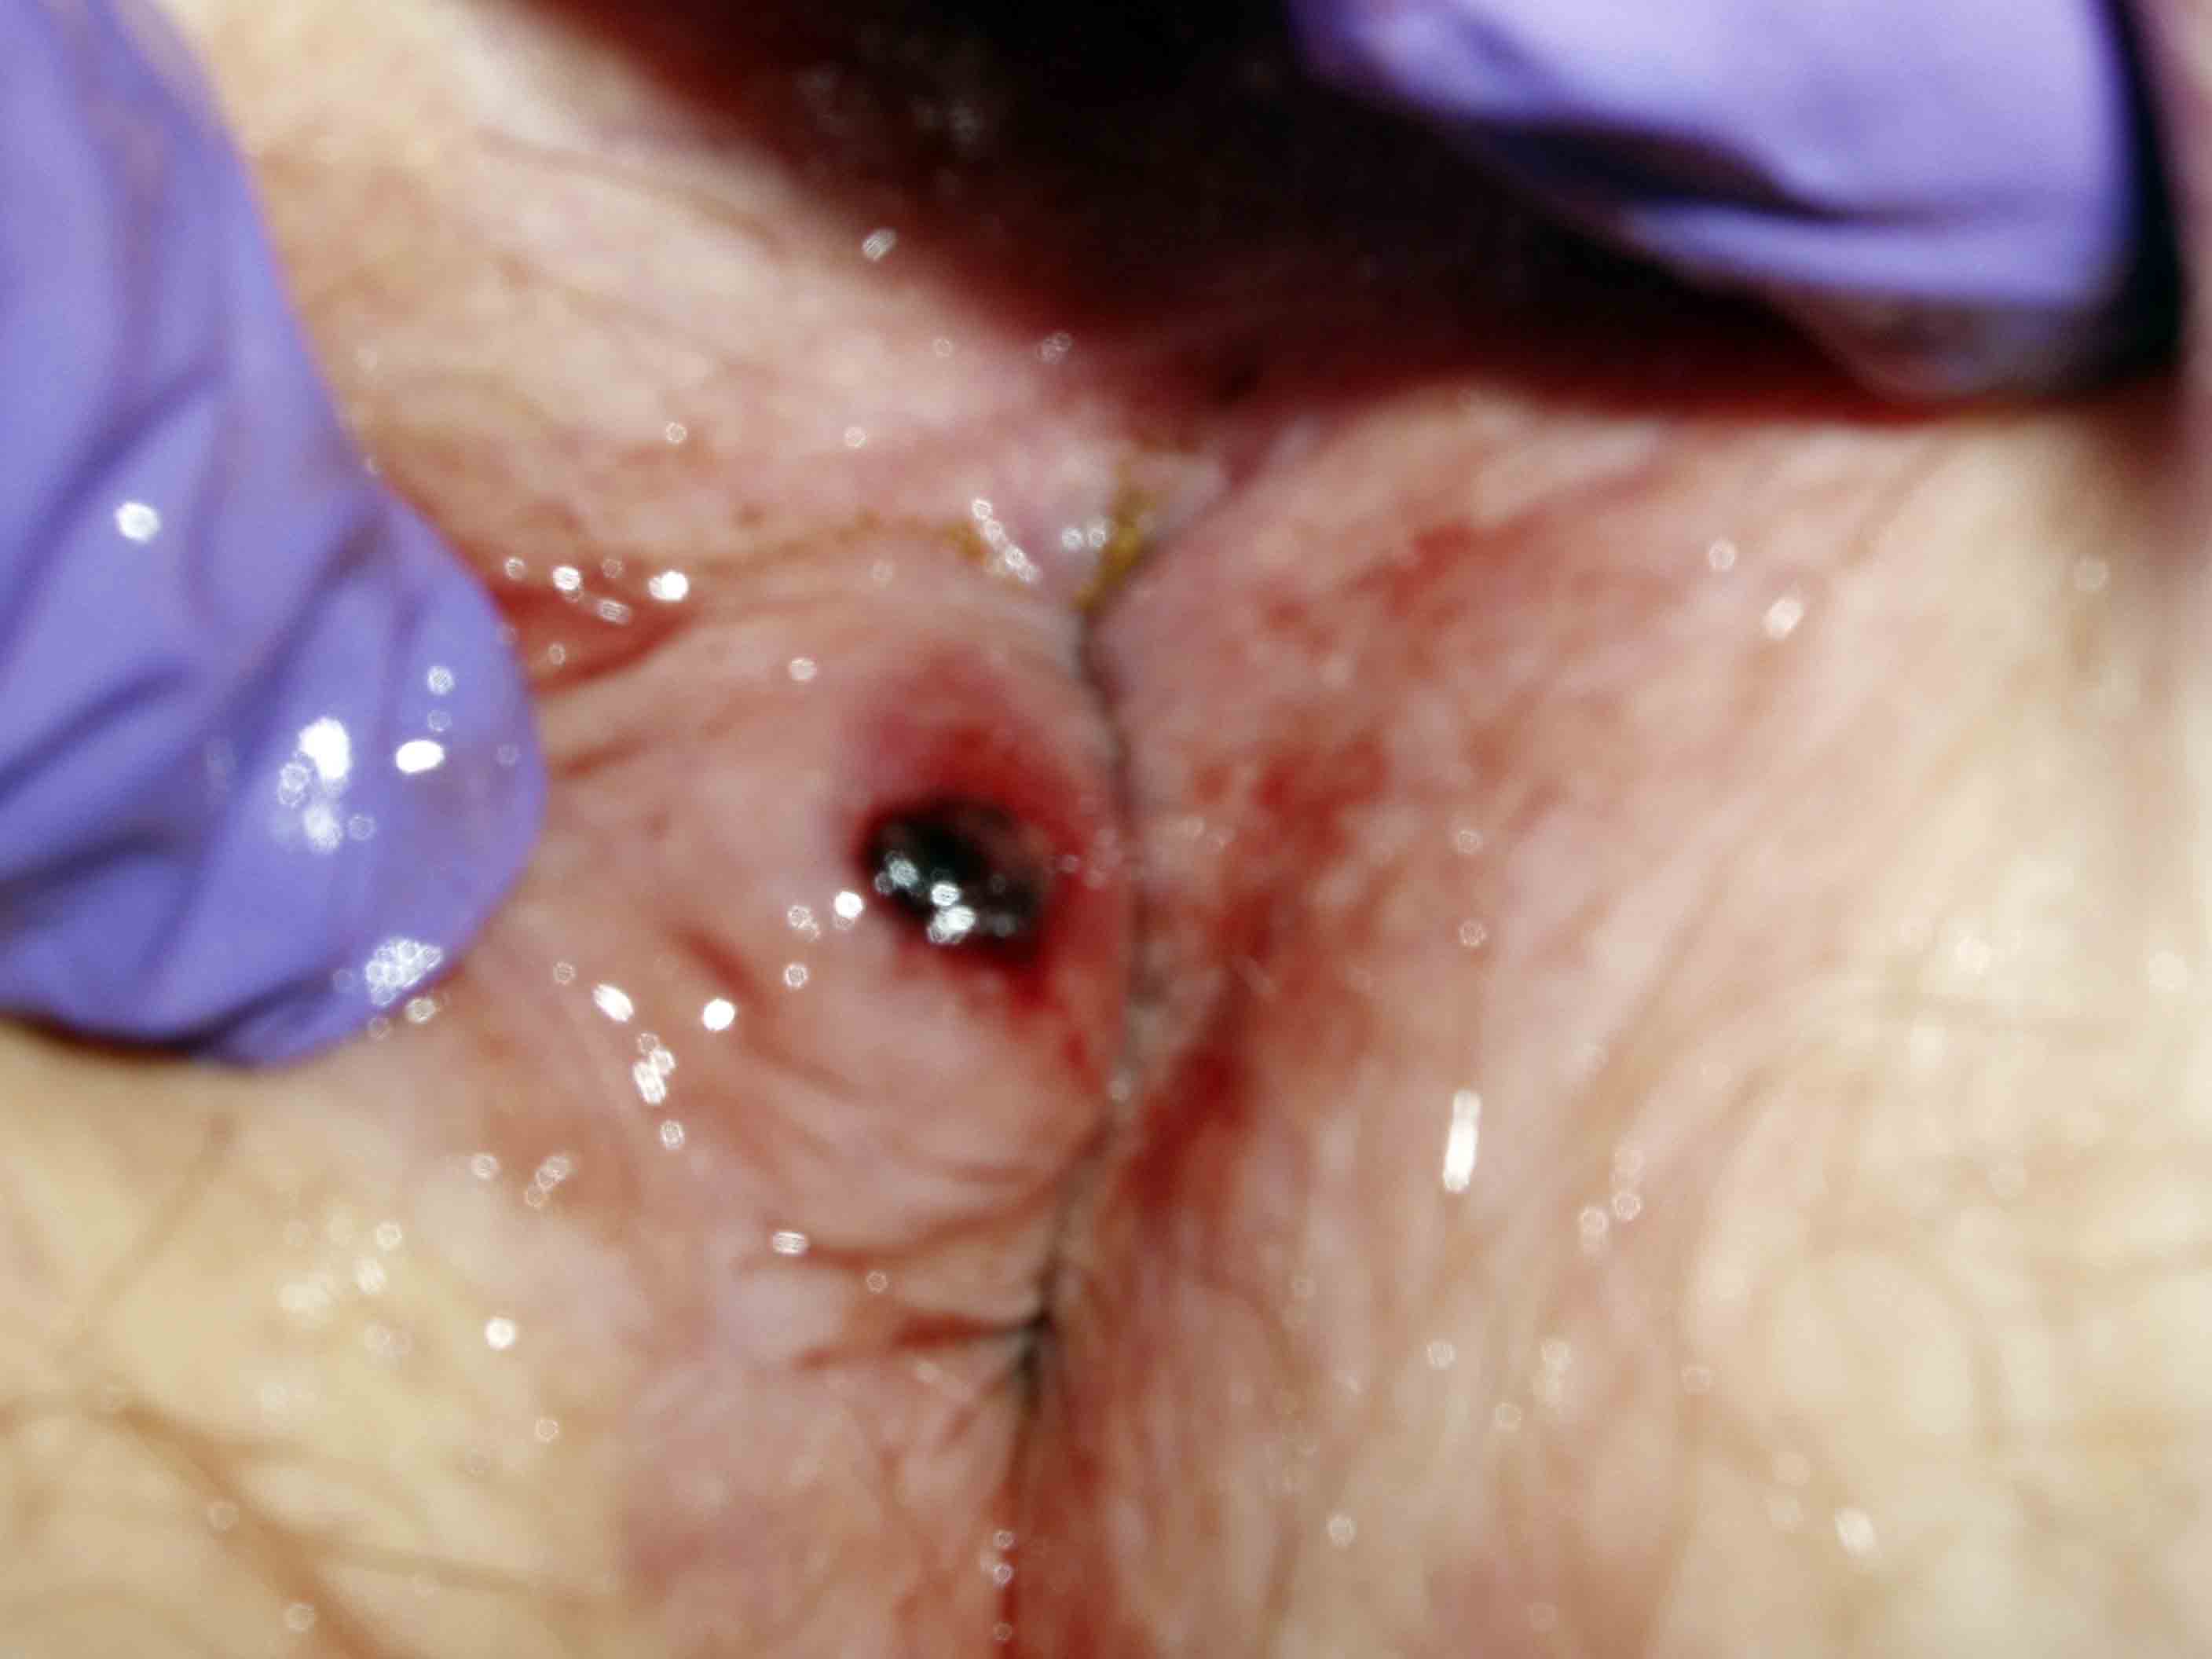
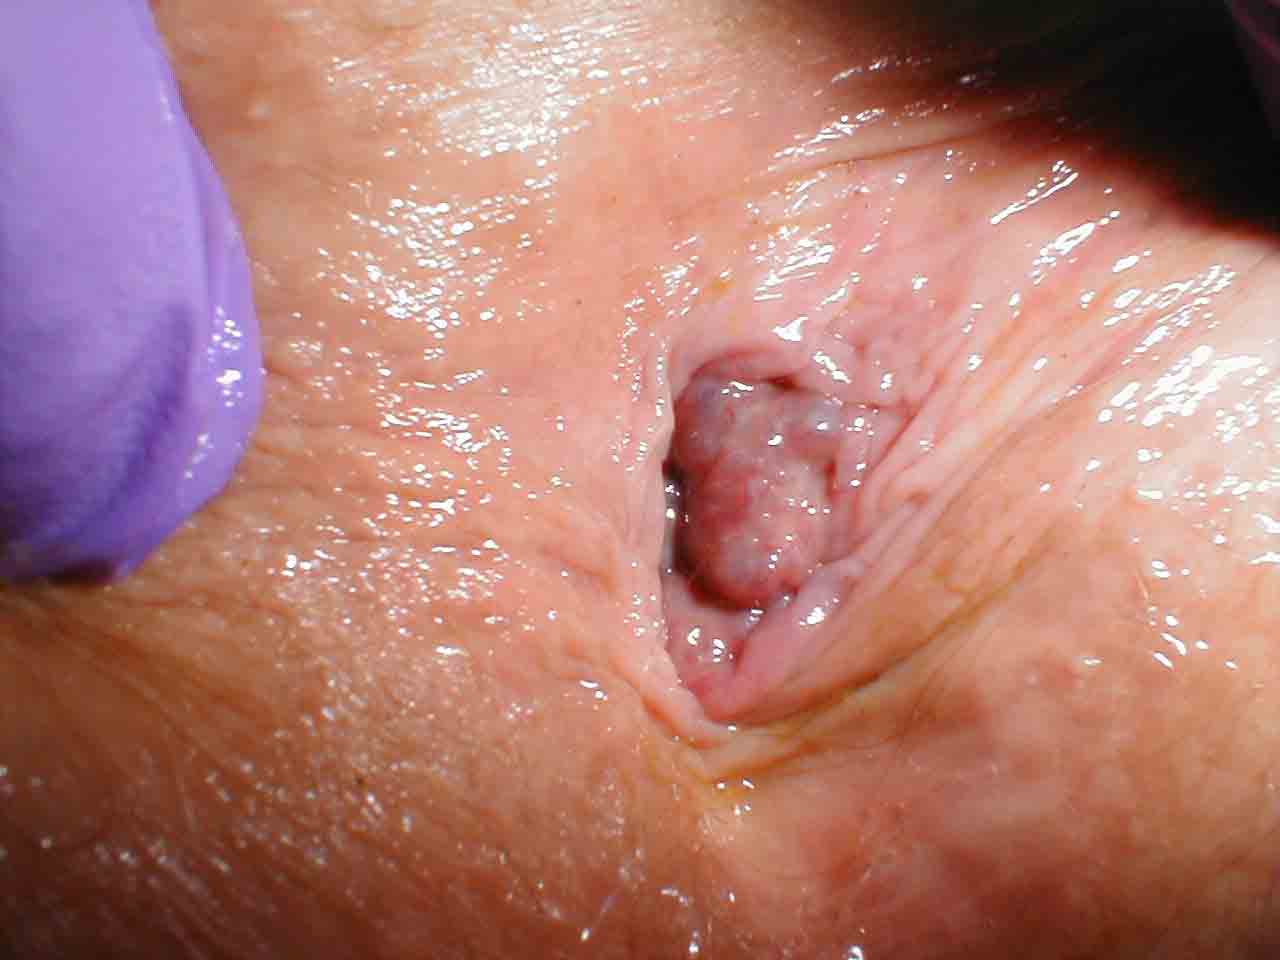
Have the patient turn around and instruct them to rest their chest on the exam table. This gives you an opportunity to perform the exam while providing the patient with something to lean against for support. You can remain seated. Separate the cheeks of the buttocks and look at the peri-anal area. Make note of any skin abnormalities, bleeding sites, fissures or hemerrhoids.

The digital rectal exam can provide information about several important organ systems, including:
- Gross inspection of the stool. Is there obvious evidence of blood, which generally implies that the bleeding site is close to the anus? Does the stool appear black/tarry, which occurs when blood released from an upper intestinal source is digested and passed thru the entire alimentary canal? In such cases it will also have a characteristic odor. Normal appearing stool should be tested with a special agent designed to detect hemoglobin (see below). This is referred to as checking for occult blood (i.e. blood that would not otherwise be identifiable). In these cases, the source of bleeding is most frequently within the colon, although it can be from anywhere in the GI tract.
- Palpation upwards, posteriorly, and laterally will allow you to feel for rectal based masses.
- Feeling anteriorly will allow you to examine the prostate gland.
For additional information see: Digital DDx: Anorectal Symptoms
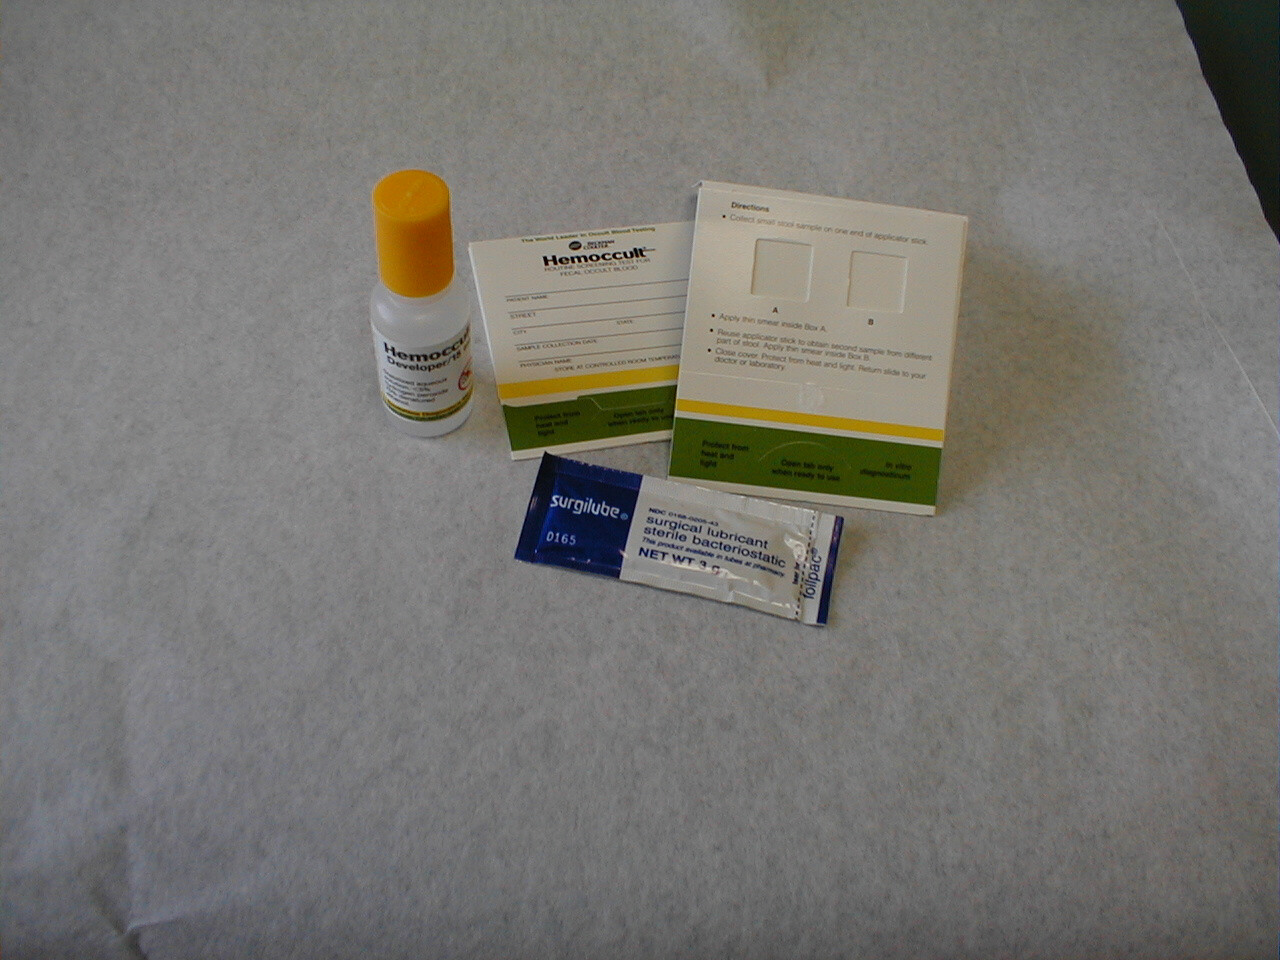
Before proceeding, provide the patient with a box of tissue paper that they can use for cleaning themselves at the end of the exam. Open a stool guiac card and place it on the exam table next to the patient. Then:
- Put a lot of lubricant (a.k.a. surgi-lube) on the index finger of your right hand.
- Tell the patient that you are going to place your finger in their rectum. Remember, this is a delicate aspect of the exam, and the patient often feels quite vulnerable. Thus, it's a good idea to talk them through each step.
- Place your well lubricated index finger against their anus, but do not yet insert it into the rectum.
- Ask the patient to bear down as if they are trying to have a bowel movement. This helps to relax their external sphincter and should decrease discomfort. As they bears down, gently push forward until you have placed the entire finger within the anal canal. Pay attention to the following:
- As your finger enters, make note if you hit any resistance. You may run into some stool,
which should easily move out of the way. A mass (e.g. a large rectal tumor) will not move.
If
this occurs, do not force your finger forward.
- By gently rotating your hand, you can use the pad of your index finger to feel to the left, right and then directly backwards (i.e. towards yourself) and along the sacrum. Make note of any irregularities/masses. What you encounter will vary with the clinical situation. You might, for example, feel a fluctuant collection in a patient with a pelvic abscess associated with a perforated appendix.
- Orient your finger so that it is directed anteriorly (i.e. toward the patient's umbillicus).
It should now be resting on the prostate gland, which is palpated through the wall of the
rectum. Make note of the following:
- The prostate has two lobes with a cleft running between them. Can you feel each lobe distinctly? Do they feel symmetric? Are their any discretely firm areas (referred to as nodules)? Normal prostatic tissue feels more or less like the tip of your nose. Anything firmer is suspicious for malignancy. If you feel a firm area, check and see if the prostate is freely mobile or if it feels fixed to the pelvis, which can occur via direct extension of a malignancy.
- Does the prostate gland feel big? You will obviously have no idea until you have had
an opportunity to examine many to get a sense of the range of normal. In general you
should be able to get you finger over the top of the gland. This may be difficult
if:
- the patient is obese/has large glutteal cheeks,
- you have small fingers
- they have a big prostate
- Any pain on palpation, which is suggestive of prostatic infection? Does the gland feel swollen? Again, this is a very subjective finding which is only apparent after examining many normal prostates. It occurs in the setting of infection. Try to have the patient distinguish between the discomfort of the exam in general from any pain specifically produced by pushing on the prostate.
- Assessment of rectal tone. This can be done either at the beginning or the end of the examination. In certain diseases of the central or peripheral nervous system, innervation of the sphincters that help maintain rectal continence may be affected (e.g. in the setting of sacral nerve root compression associated with a tumor) and muscular tone can be diminished or absent. There is a certain subjective tightness that you will notice when you enter the rectum with your finger. You can further assess external sphincter tone by asking the patient to try to hold on to your finger with their rectum (granted, this is an odd request), allowing you to feel the contraction of this muscle.
- Exam of the stool. There is usually some stool in the rectal vault that will coat your
finger at the end of the exam. Inspect it after you withdraw your hand, looking for red or
digested blood as described above. Take the stool guiac card that you have placed on the
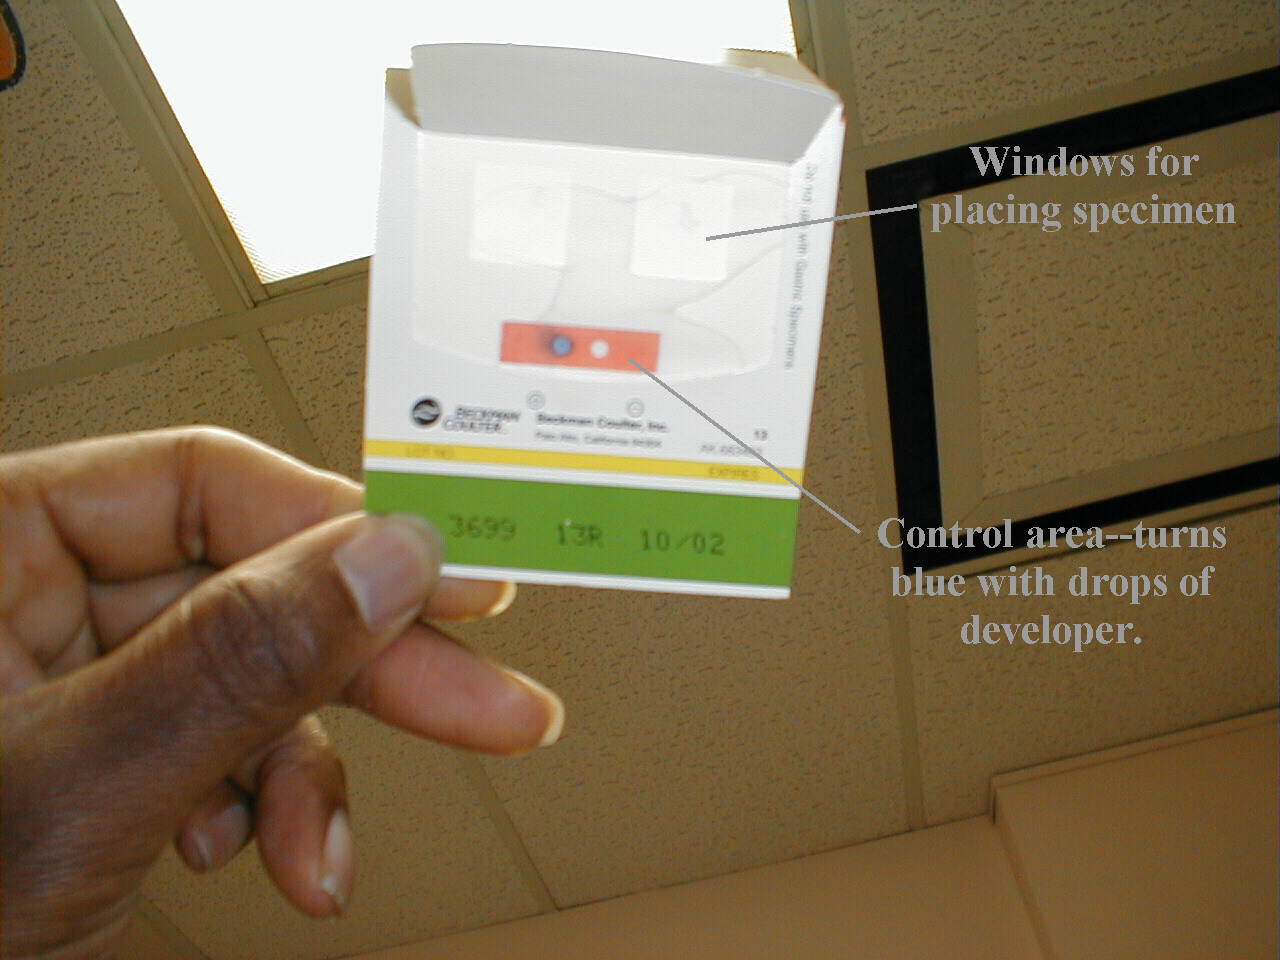
table prior to beginning the exam and put a small smear of stool in each of the windows.
Then turn the card over and open the back. Place a drop of developer on the back side of
each window as well as over the control spot. The control will turn blue, the color
indicating hidden hemoglobin. If you are having a difficult time convincing yourself that
there is truly some blue present within the specimen, take the card and hold it up so that
light passes through the windows, accentuating any color changes.
Guaiac Testing Equipment
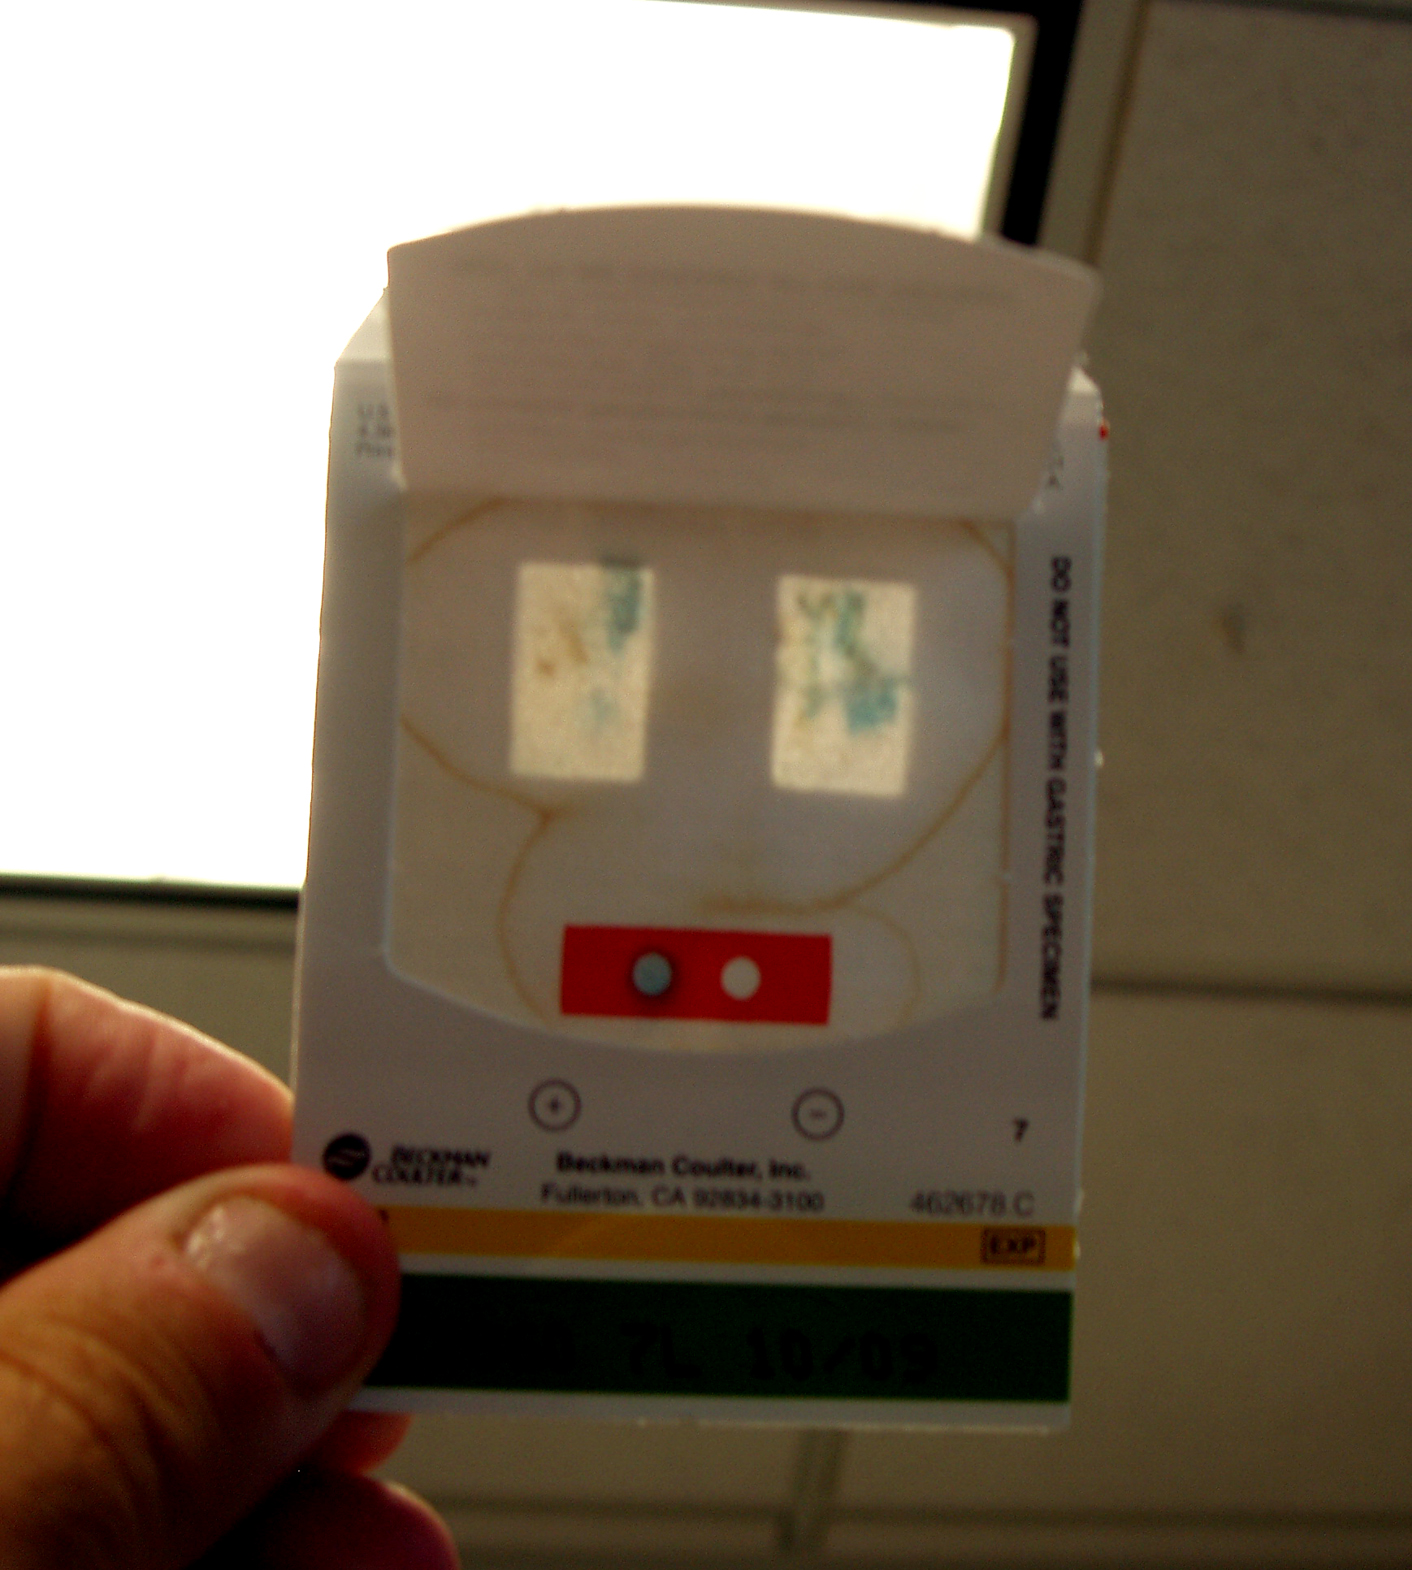 Guaiac Positive (Note blue coloration in boxes)
As you are evaluating the stool, allow the patient to wipe themselves off with the tissue paper that you made available to them earlier. It is generally a nice idea to pull the curtain and give them some privacy while they clean up and dress. To remove your stool-covered glove, take the index finger of your left hand (which should still be clean) and place it under the cuff of the right glove. Then pull that glove down towards your fingers, inverting it in the process.
In the event that the patient cannot stand, this examination can be performed with the patient lying on the exam table. Place them on their side, with knees tucked up towards their chest. Their back should be as close to the edge of the table (i.e. as close to you) as possible. The remainder of the exam is performed as described above. You may either sit or stand.