Head and Neck Exam
Lymph Nodes:
The major lymph node groups are located along the anterior and posterior aspects of the neck and on the underside of the jaw. If the nodes are quite big, you may be able to see them bulging under the skin, particularly if the enlargement is asymmetric (i.e. it will be more obvious if one side is larger then the other). To palpate, use the pads of all four fingertips as these are the most sensitive parts of your hands. Examine both sides of the head simultaneously, walking your fingers down the area in question while applying steady, gentle pressure. The major groups of lymph nodes as well as the structures that they drain, are listed below. The description of drainage pathways are rough approximations as there is frequently a fair amount of variability and overlap. Nodes are generally examined in the following order:
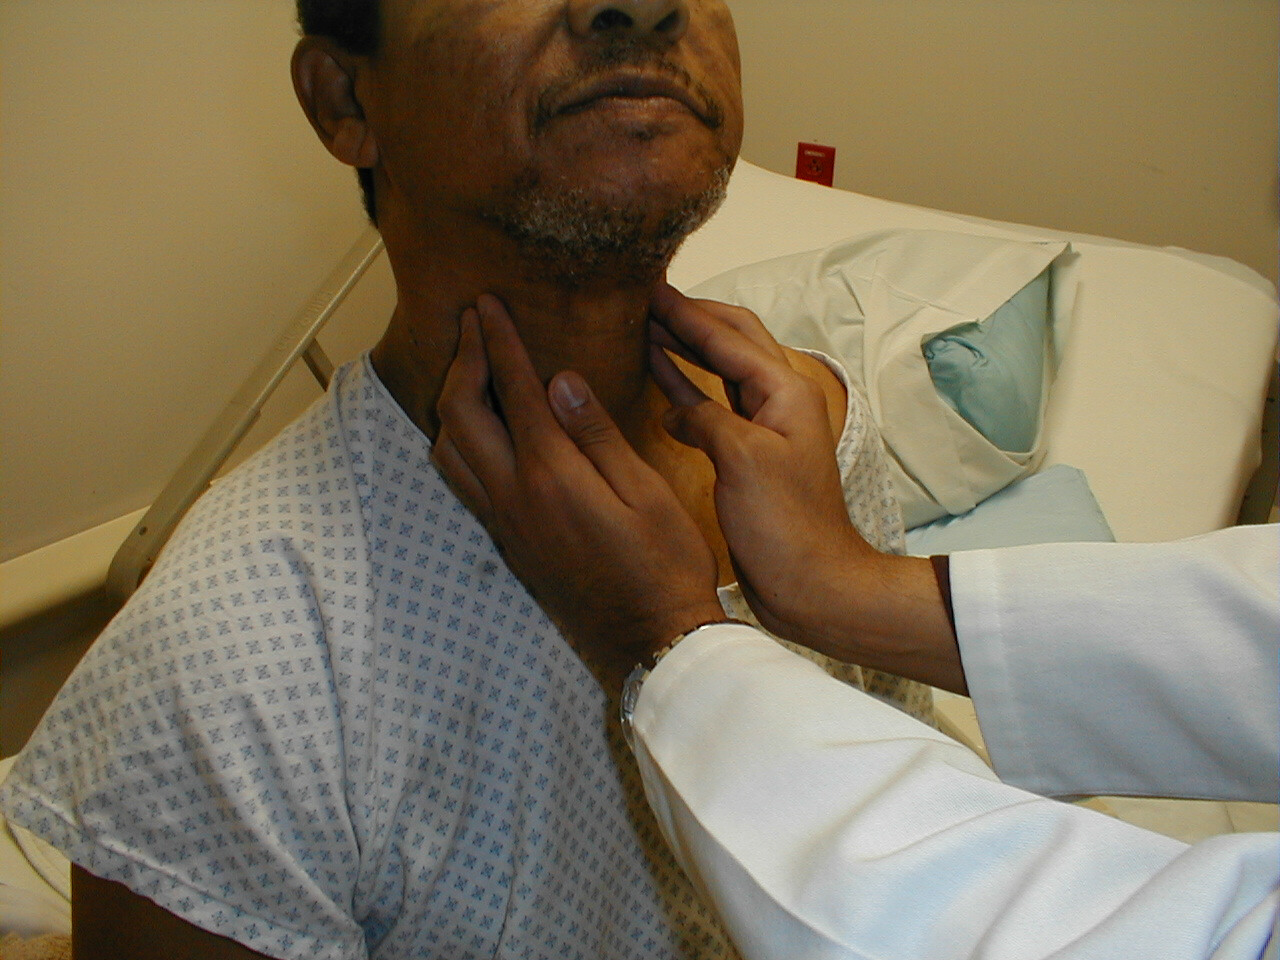
- Anterior Cervical (both superficial and deep): Nodes that lie both on top of and beneath the sternocleidomastoid muscles (SCM) on either side of the neck, from the angle of the jaw to the top of the clavicle. This muscle allows the head to turn to the right and left. The right SCM turns the head to the left and vice versa. They can be easily identified by asking the patient to turn their head into your hand while you provide resistance. Drainage: The internal structures of the throat as well as part of the posterior pharynx, tonsils, and thyroid gland.
- Posterior Cervical: Extend in a line posterior to the SCMs but in front of the trapezius, from the level of the mastoid bone to the clavicle. Drainage: The skin on the back of the head. Also frequently enlarged during upper respiratory infections (e.g. mononucleosis).
- Tonsillar: Located just below the angle of the mandible. Drainage: The tonsilar and posterior pharyngeal regions.
- Sub-Mandibular: Along the underside of the jaw on either side. Drainage: The structures in the floor of the mouth.
- Sub-Mental: Just below the chin. Drainage: The teeth and intra-oral cavity.
- Supra-clavicular: In the hollow above the clavicle, just lateral to where it joins the sternum. Drainage: Part of the throacic cavity, abdomen.
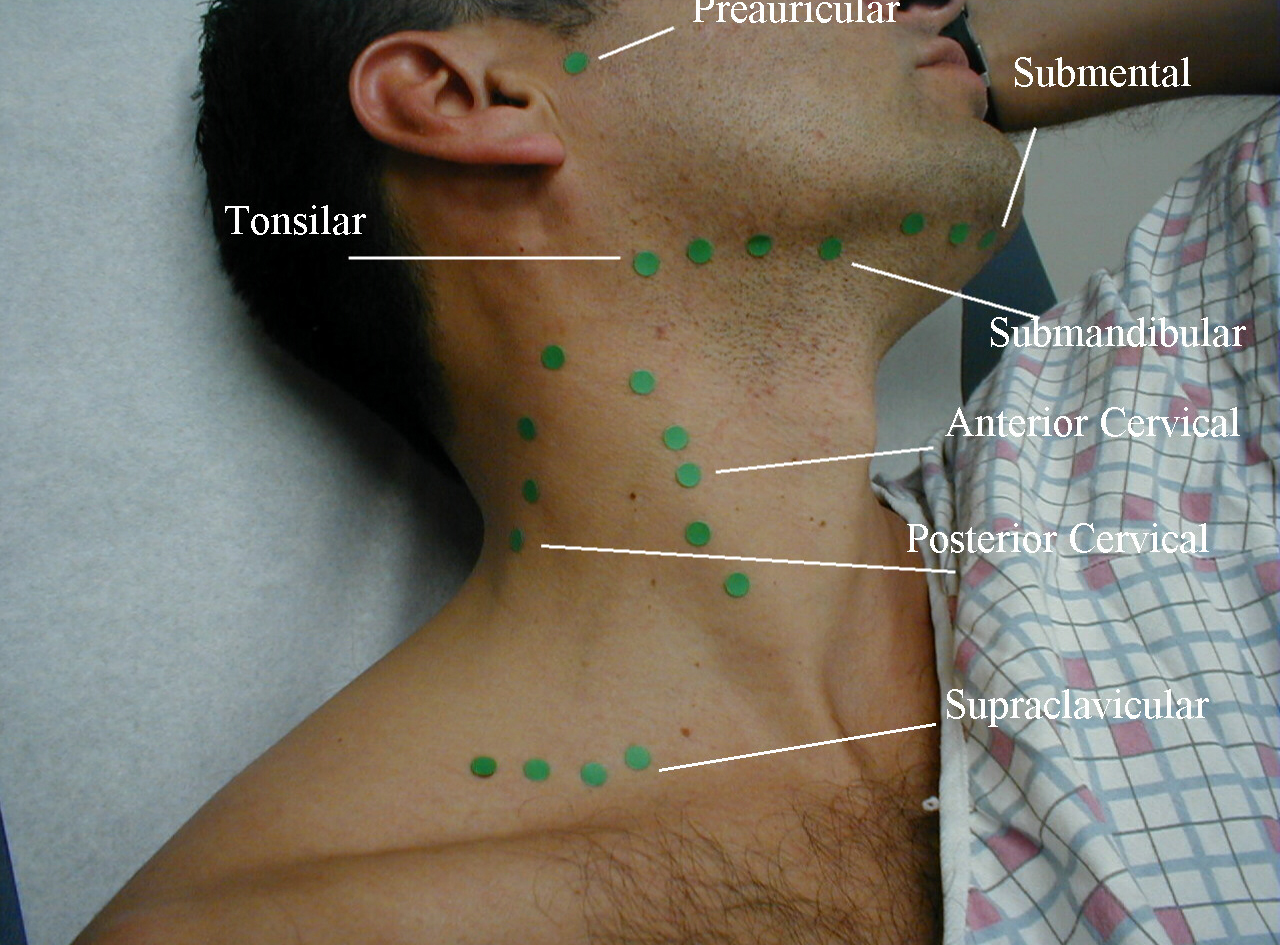
A number of other lymph node groups exist. However, palpation of these areas is limited to those situations when a problem is identified in that specific region (e.g. the pre-auricular nodes, located in front of the ears, may become inflamed during infections of the external canal of the ear).
What are you feeling for? Lymph nodes are part of the immune system. As such, they are most readily palpable when fighting infections. Infections can either originate from the organs that they drain or primarily within the lymph node itself, referred to as lymphadenitis. Infected lymph nodes tend to be:
- Firm, tender, enlarged and warm. Inflammation can spread to the overlying skin, causing it to appear reddened.
If an infection remains untreated, the center of the node may become necrotic, resulting in the accumulation of fluid and debris within the structure. This is known as an abscess and feels a bit like a tensely filled balloon or grape (a.k.a. fluctuance). Knowledge of which nodes drain specific areas will help you search efficiently. Following infection, lymph nodes occasionally remain permanently enlarged, though they should be non-tender, small (less the 1 cm), have a rubbery consistency and none of the characteristics described above or below. It is common, for example, to find small, palpable nodes in the submandibular/tonsilar region of otherwise healthy individuals. This likely represents sequelae of past pharyngitis or dental infections.
Malignancies may also involve the lymph nodes, either primarily (e.g. lymphoma) or as a site of metastasis. In either case, these nodes are generally:
- Firm, non-tender, matted (i.e. stuck to each other), fixed (i.e. not freely mobile but rather stuck down to underlying tissue), and increase in size over time.
The location of the lymph node may help to determine the site of malignancy. Diffuse, bilateral involvement suggests a systemic malignancy (e.g. lymphoma) while those limited to a specific anatomic region are more likely associated with a local problem. Enlargement of nodes located only on the right side of the neck in the anterior cervical chain, for example, would be consistent with a squamous cell carcinoma, frequently associated with an intra-oral primary cancer.
Diffuse upper airway infections (e.g. mononucleosis), systemic infections (e.g. tuberculosis) and inflammatory processes (e.g. sarcoidosis) can all cause lymphadenopathy (i.e. lymph node enlargement). HIV infection can also cause adenopathy in any region of the body, including head/neck, axilla, epitrochlear, inguinal and other areas where there are lymph nodes. In these settings, the findings can be symmetric or asymmetric. Historical information as well findings elsewhere in the body are critical to making these diagnoses. Furthermore, it may take serial examinations over the course of weeks to determine whether a node is truly enlarging, suggestive of malignancy, or responding to therapy/the passage of time and regressing in size, as might occur with other inflammatory processes."
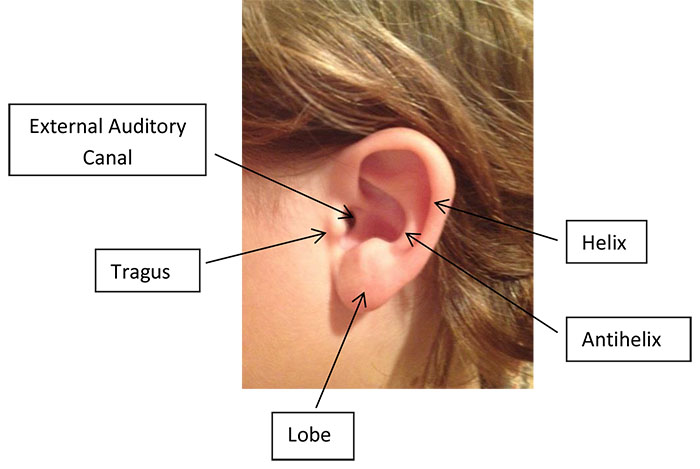
The Ear
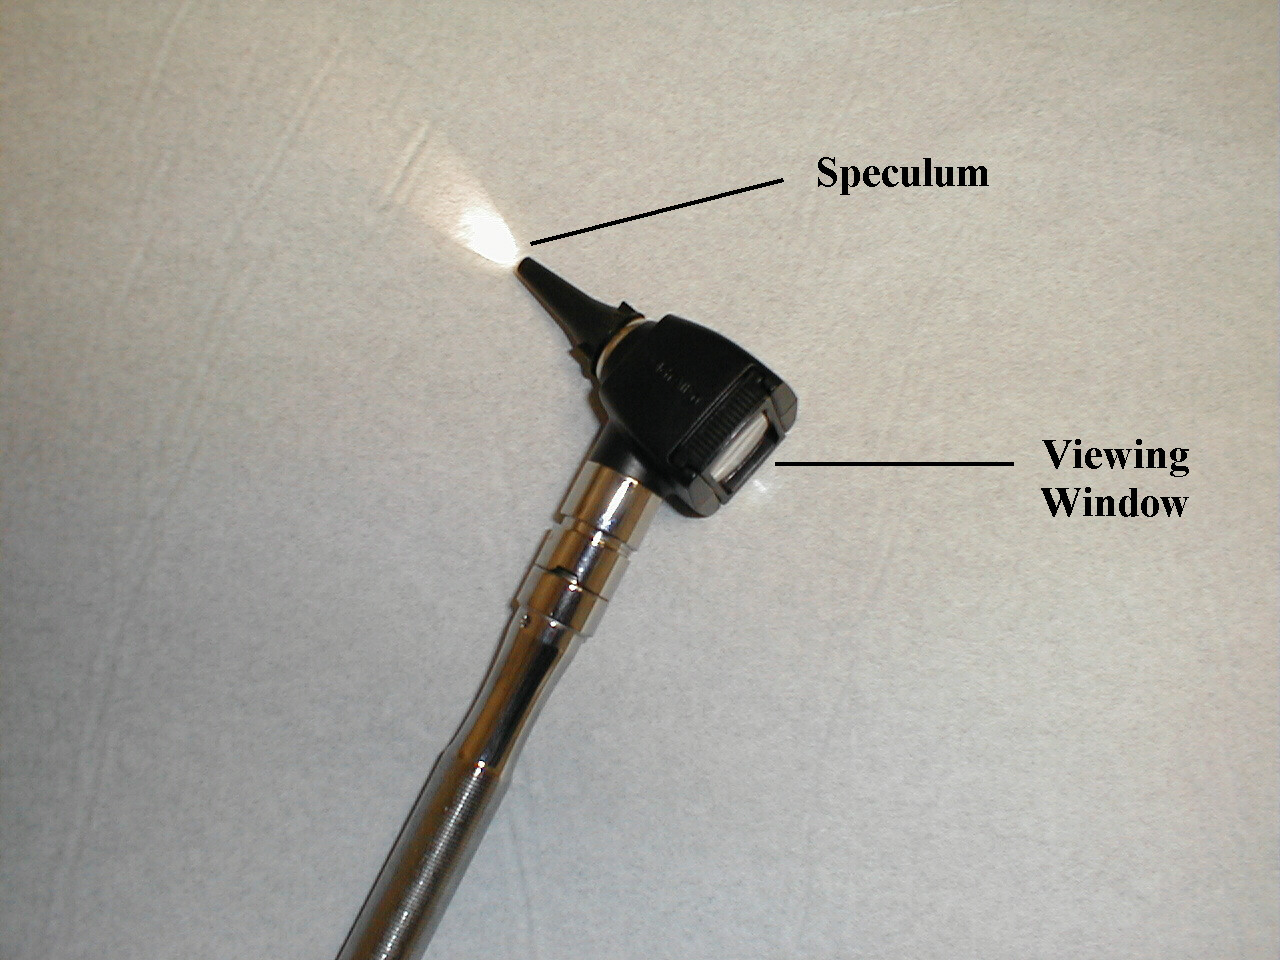
- Put the otoscopic head on your oto-opthalmoscopic. It should easily twist into position.
- Turn on the light source.
- Place one of the disposable specula on the end of the scope.
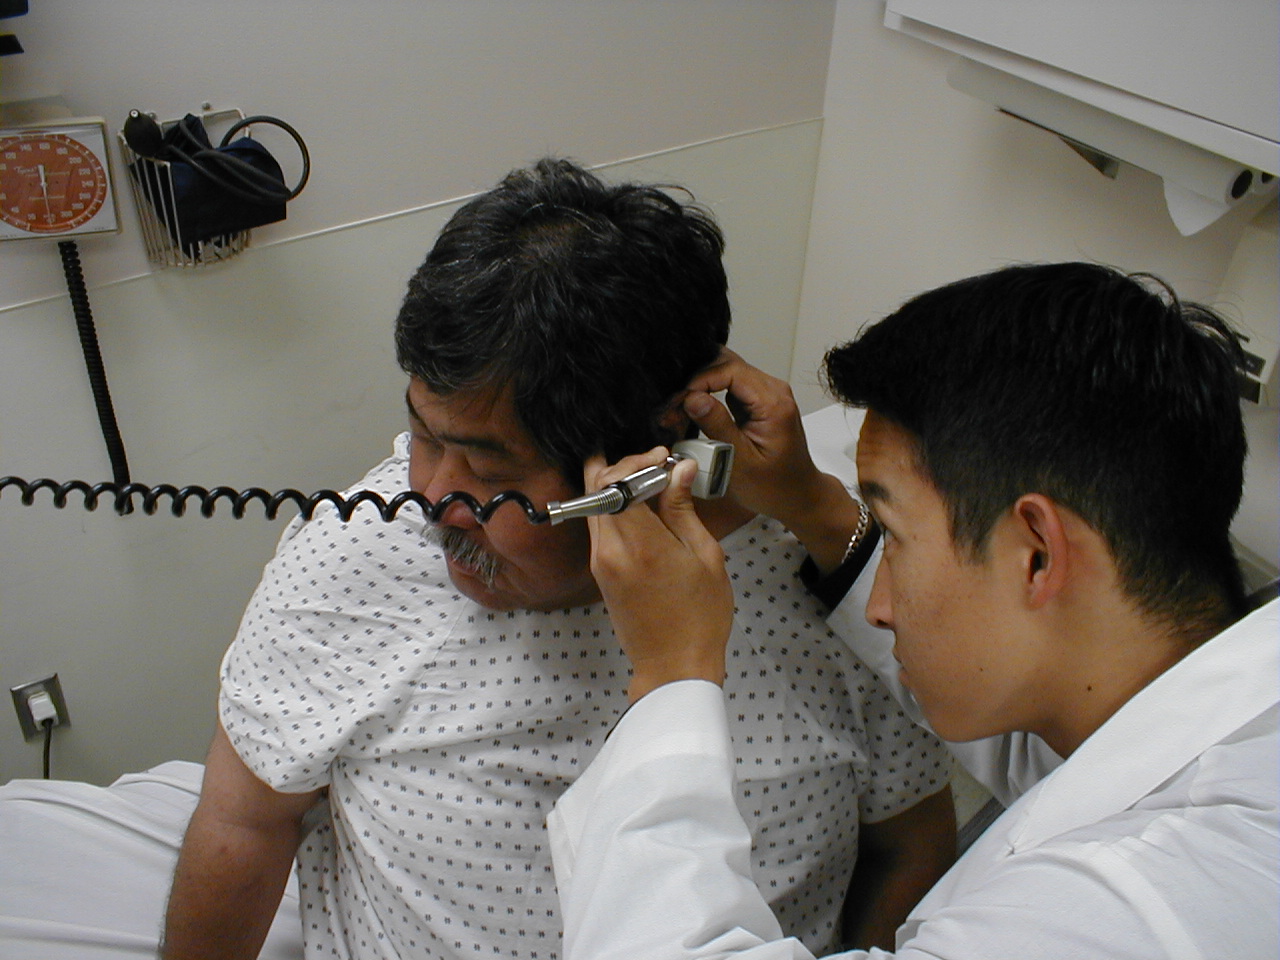
- Grasp the scope so that the handle is either pointed directly downward or angled up and towards the patient's forehead. Either technique is acceptable. The scope should be in your right hand if you are examining the right ear.
- Place the tip of the specula in the opening of the external canal. Do this under direct vision (i.e. not while looking through the scope).
- Gently grasp the top of the left ear with your left hand and pull up and
backwards. This straightens out the canal, allowing easier passage of the
scope.
 Otoscopic Examination
 - Look through the viewing window with either eye. Slowly
advance the scope, heading a bit towards the patient's nose but without
any up or down angle. Move in small increments. Try not to wiggle the scope
too much as the external canal is quite sensitive. I find it helpful to
extend the pinky and fourth fingers of my right hand and place them on the
side of the patient's head, which has a stabilizing effect. As you advance,
pay attention to the appearance of the external canal. In the setting of
infection, called otitis externa, the walls becomes red, swollen and may
not accommodate the speculum. In the normal state there should be plenty
of room. If wax, which appears brownish, irregular and mushy, obscures your
view, stop and go to the other side. Do not try to extract it until/unless
you have had specific training in this area! There are pharmacologic means
of softening wax, which may then be easily irrigated from the canal.
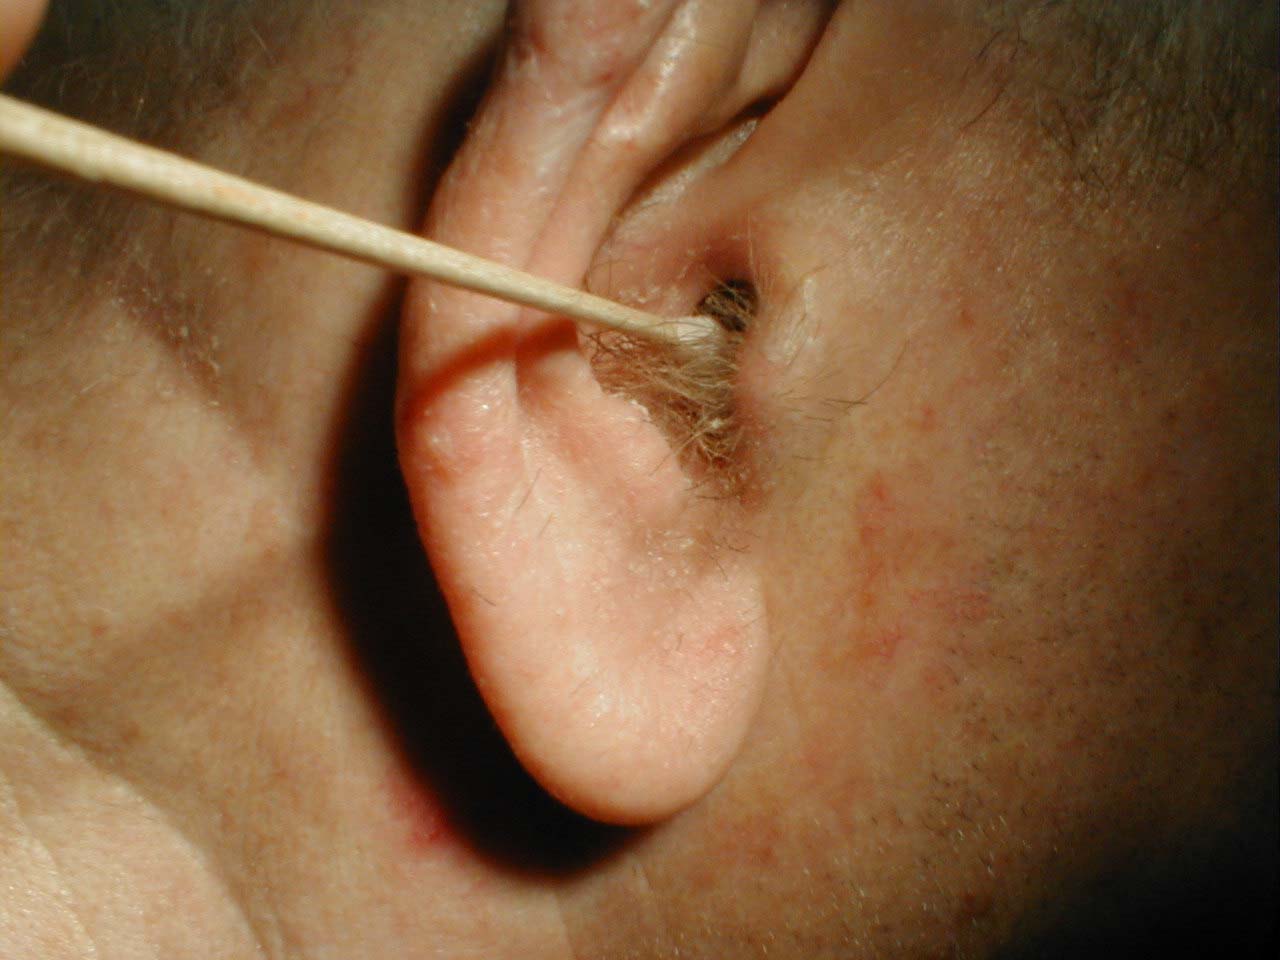
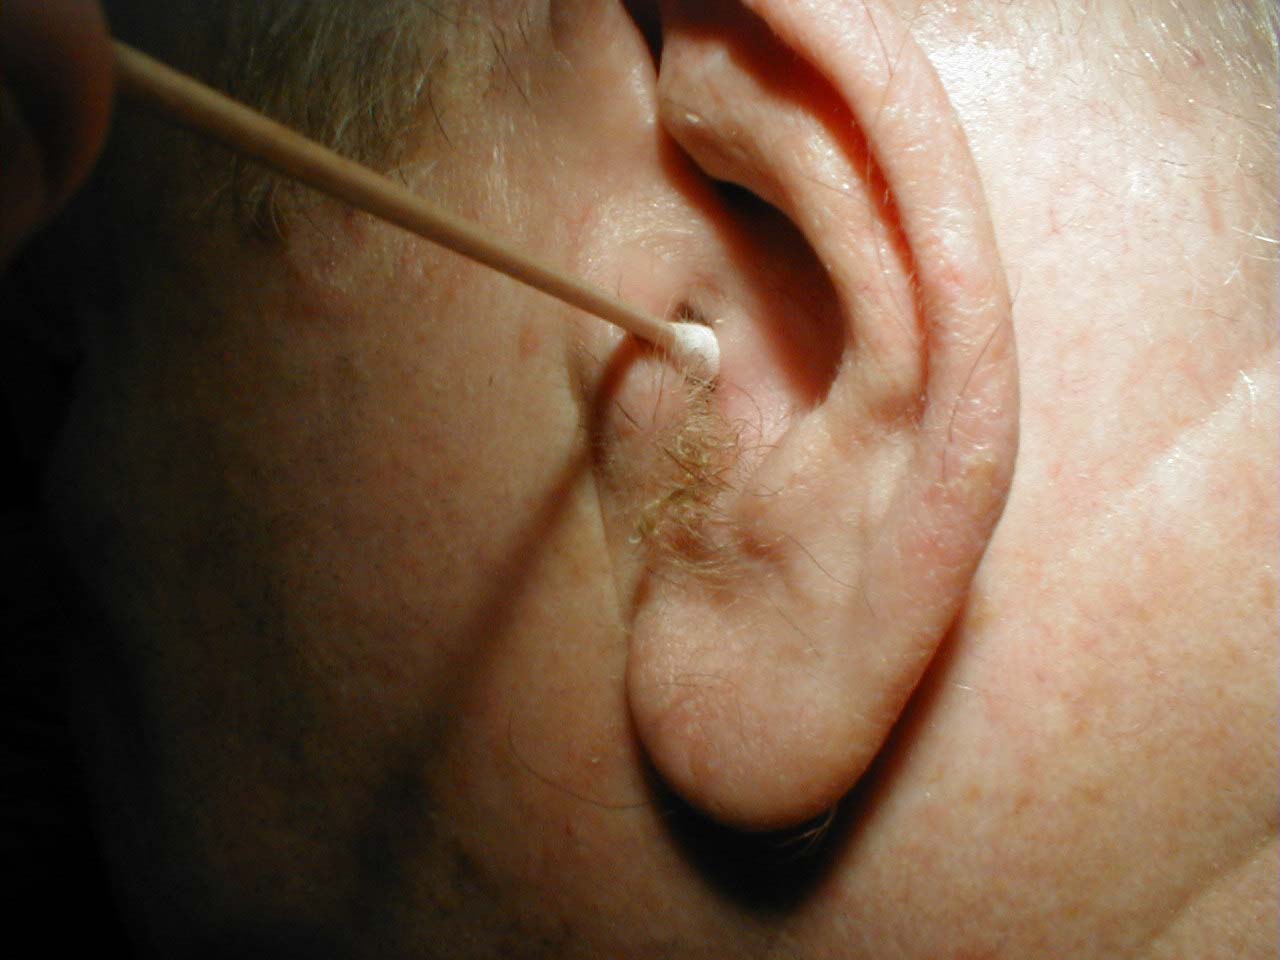 Otitis Externa:Swelling due to infection in the external canal of the left ear (picture on right) limits the space around the Q-Tip. Picture on left is of normal ear for comparison.
After moving ahead a few centimeters, you should see the tympanic membrane (a.k.a. ear drum). Pay particular attention to:
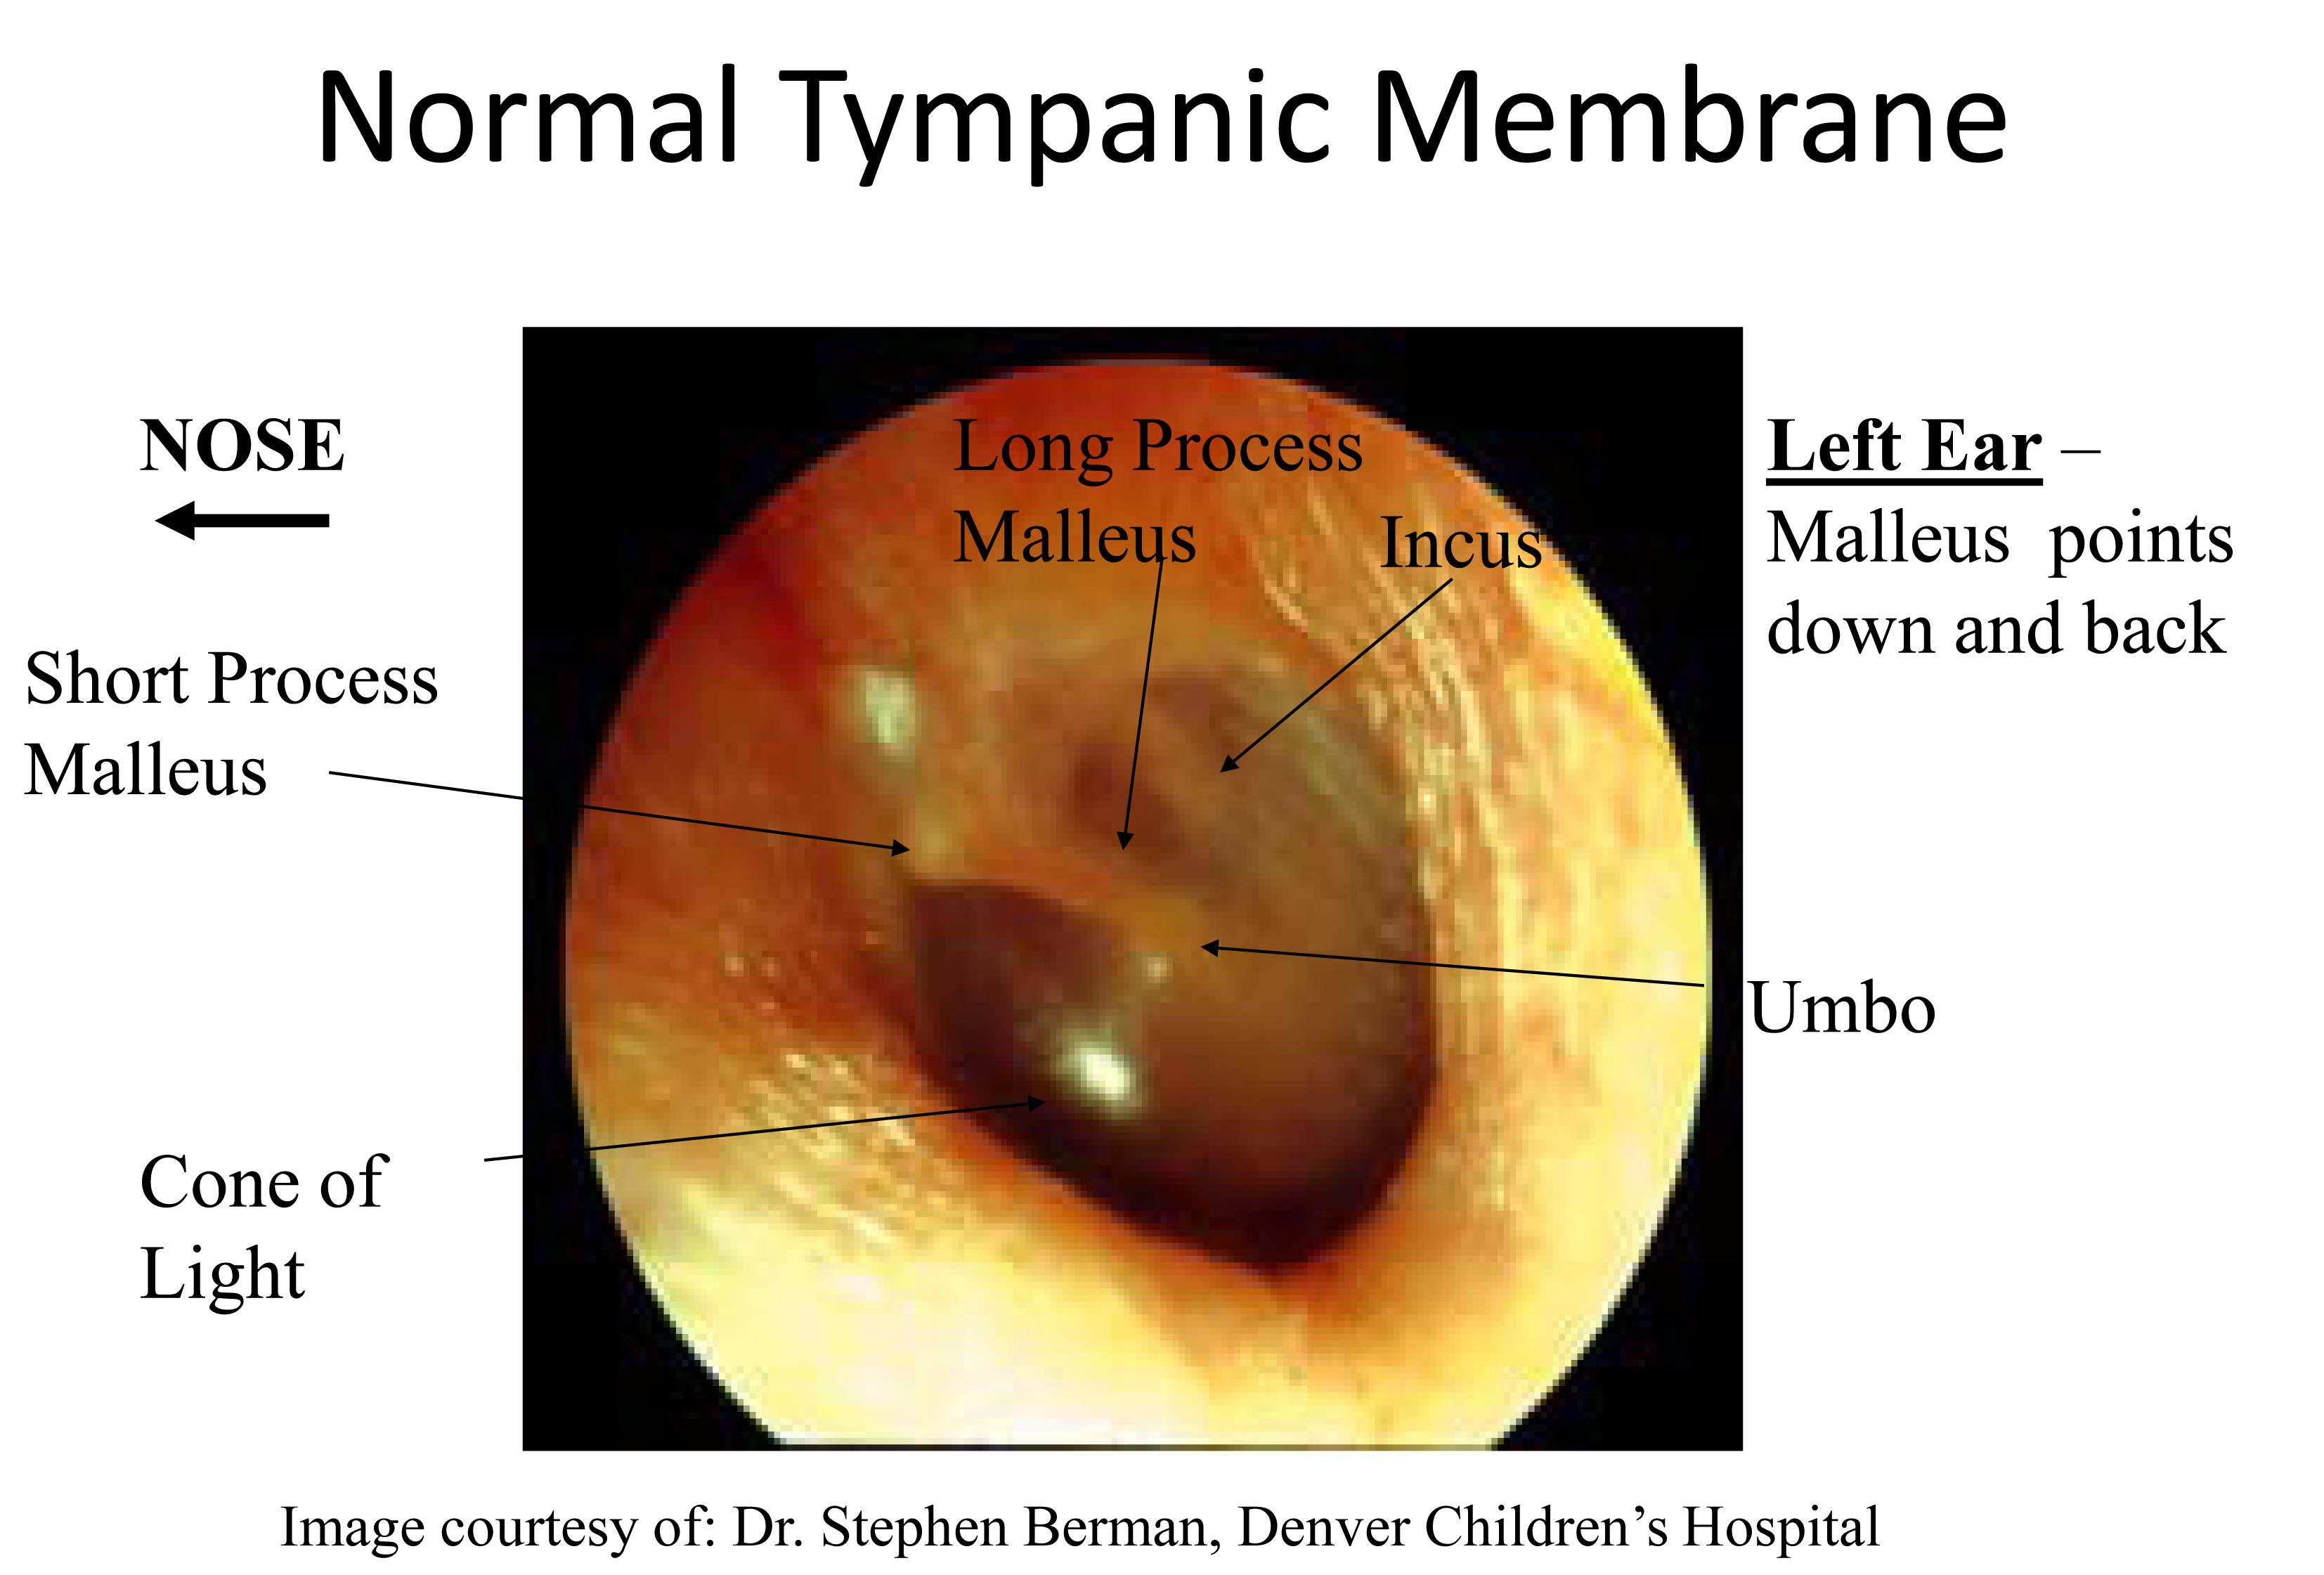
- The color: When healthy, it has a grayish, translucent appearance.
- The structures behind it: The malleous, one of the bones of the middle ear, touches the drum. The drum is draped over this bone, which is visible through its top half, angled down and backwards. The part that is closest to the top of the drum is called the lateral process, and is generally most prominent. The tip at the bottom-most aspect is the umbo.
- The light reflex: Light originating from your scope will be
reflected off the surface of the drum, making a triangle that
is visible below the malleous.
- In the setting of infection within the middle ear (known as otitis media, the most common pathologic process affecting this area), the drum becomes diffusely red and the light reflex is lost. The malleous also appears less prominent and you may be able to see a line caused by fluid collecting behind the drum. This is called a middle ear effusion and can cause the drum to bulge outwards.
- There is a valve on your scope that allows the attachment of a small, compressible bulb. Place the bulb in the palm of the hand which is not holding the scope. With this device, you can squirt small puffs of air (known as pneumatic otoscopy) at the tympanic membrane. The normal membrane moves, which can be appreciated by the examiner. Effusions prevent this from occurring. Ask an experienced examiner to demonstrate as this is quite awkward at first and it's difficult to appreciate the movement.
- Move to the other side of the body and examine the left ear. Hand position is reversed.
Detecting Conductive v. Sensorineural Deficits: As with acuity, these tests would only be performed if the patient complained of hearing loss. Transmission of sound can be broken into two components:
- Conduction: The passage of sound from outside to the level of the 8th cranial nerve. This includes transmission of sound through the external canal and middle ears.
- Sensorineural: The transmission of sound through the 8th nerve to the brain.
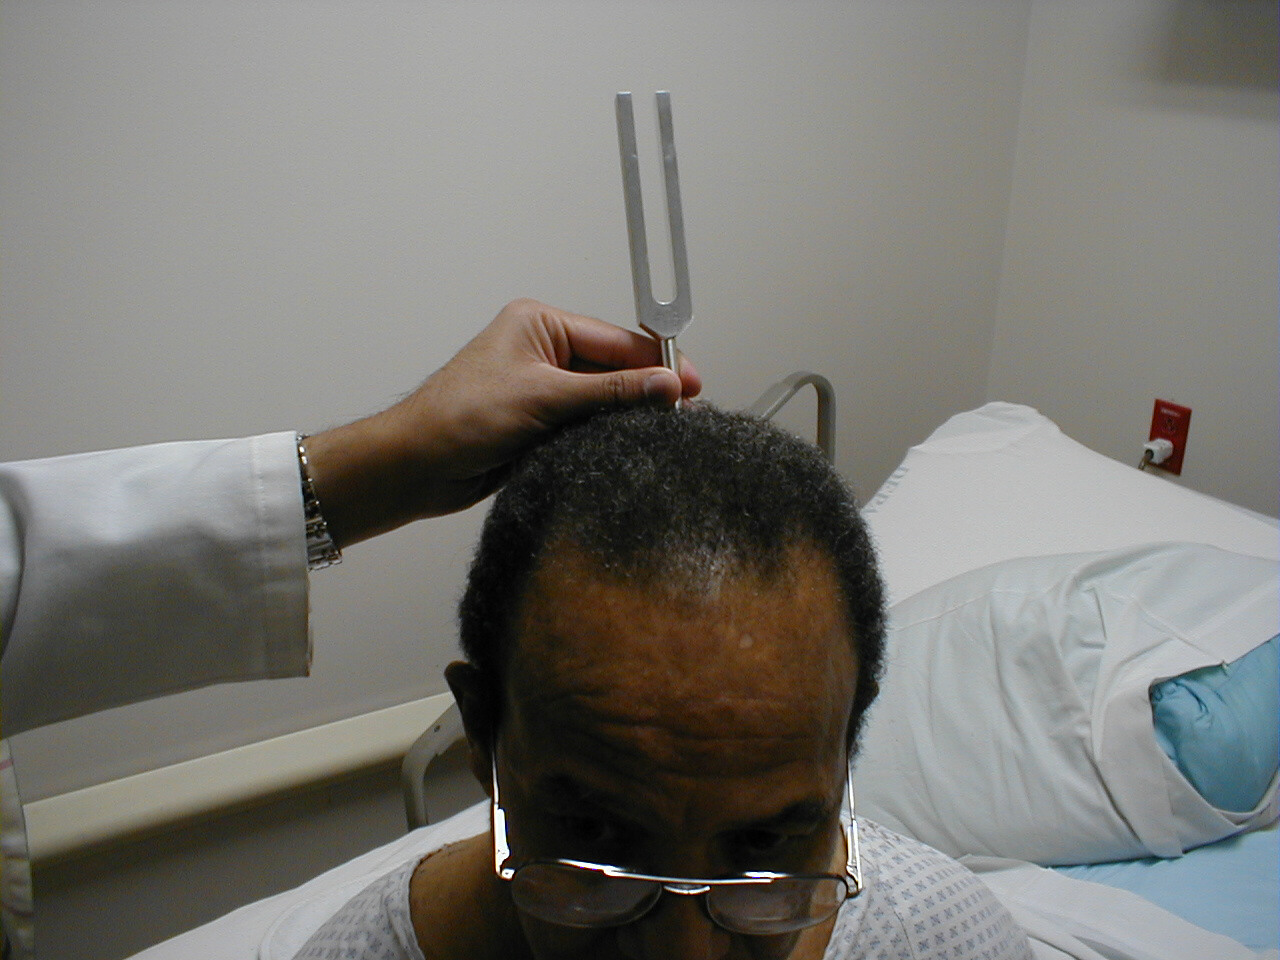
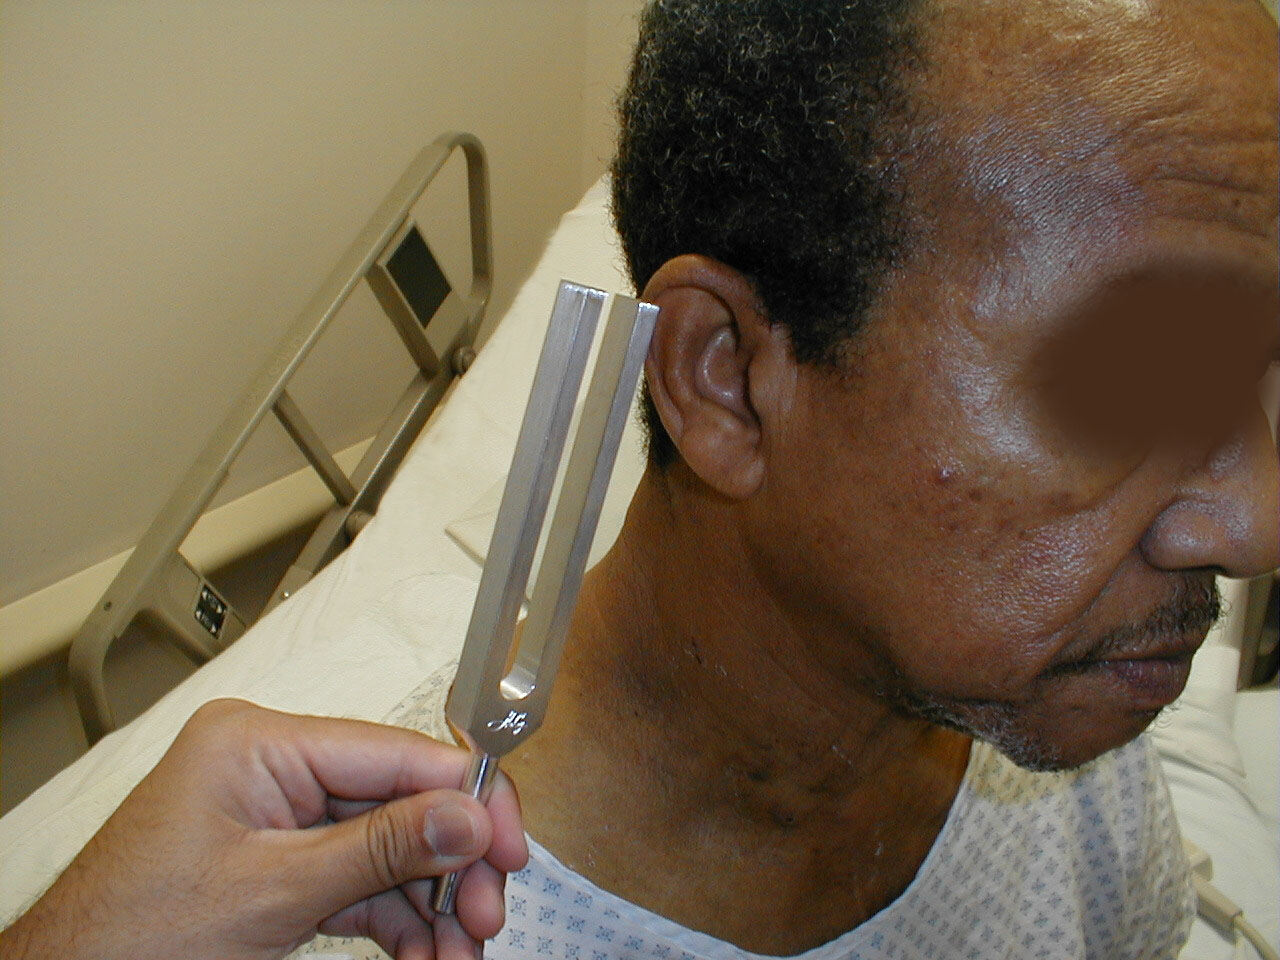
Weber: Grasp the 512 Hz tuning fork by its stem and get it to vibrate by either striking the tines against your hand or by "snapping" the ends between your thumb and middle finger. Then place the stem towards the back of the patient's head, on an imaginary line equidistant from either ear. The bones of the skull will transmit this sound to the 8th nerve, which should then be appreciated in both ears equally. Remind the patient that they are trying to detect sound, not the buzzing vibratory sensation from the fork. If there is a conductive deficit (e.g. wax in the external canal), the sound will be heard better in that ear. This is because impaired conduction has prevented any competing sounds from entering the ear via the normal route. You can create a transient conductive hearing loss by putting a finger in one ear. Sound transmitted from the tuning fork will then be heard louder on that side. In the setting of a sensorineural abnormality (e.g. an acoustic neuroma, a tumor arising from the 8th CN), the sound will be best heard in the normal ear. If sound is heard better in one ear it is described as lateralizing to that side. Otherwise, the Weber test is said to be mid-line.
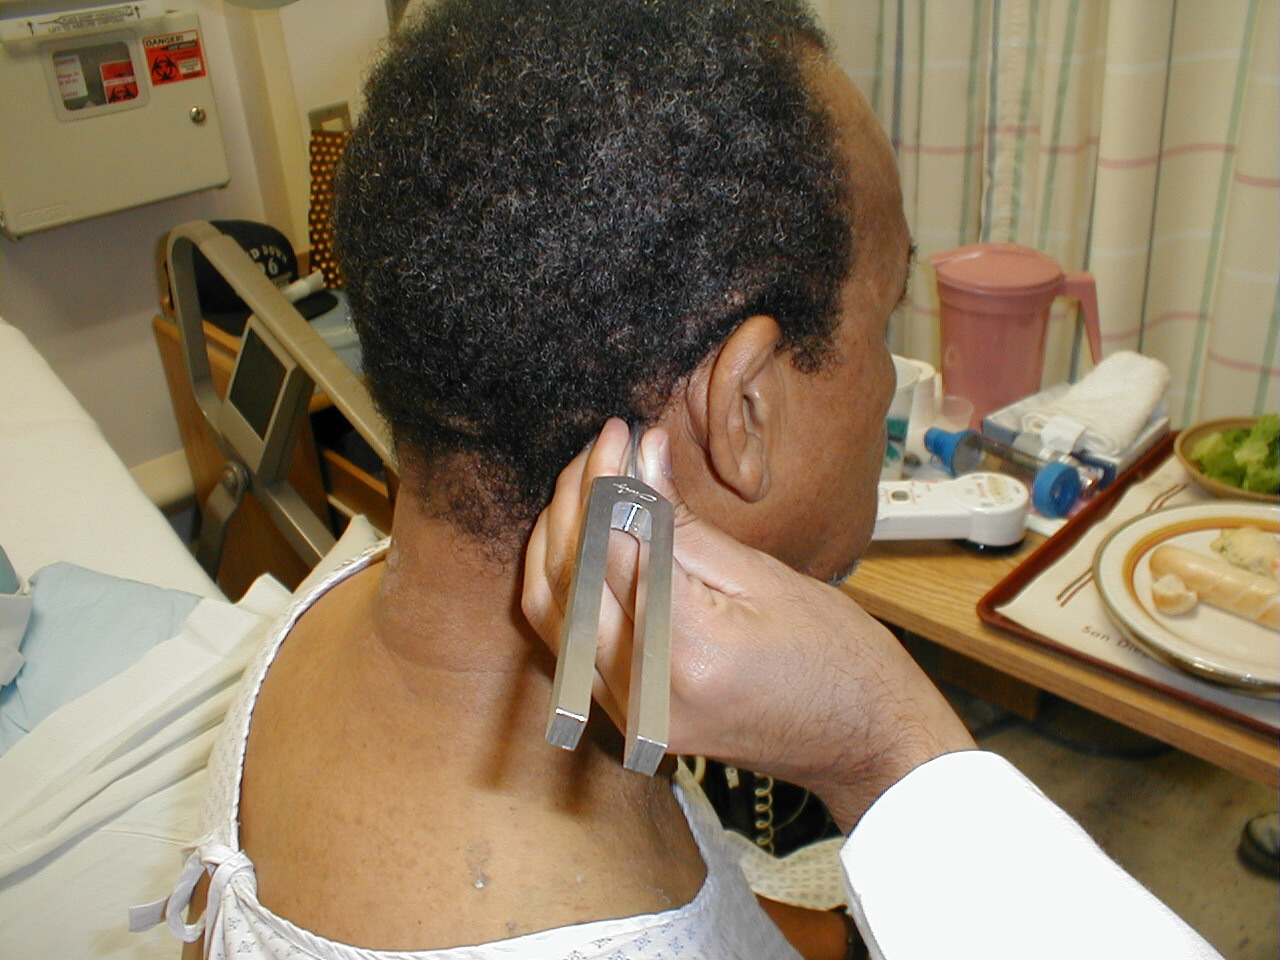
Rinne: Strike the same tuning fork and place the stem on the mastoid bone, a bony prominence located just behind and below the ear. Bone conduction will allow the sound to be transmitted and appreciated. Instruct the patient to let you know as soon as they can no longer hear the sound. Then place the tines of the still vibrating fork right next to, but not touching, the external canal. They should again be able to hear the sound. This is because, when everything is functioning normally, transmission of sound through air is always better then through bone. This will not be the case if there is a conductive hearing loss (e.g. fluid associated with an infection in the middle ear), which causes bone conduction to be greater then or equal to air. If there is a sensorineural abnormality (e.g. medication induced toxicity to the 8th CN), air conduction should still be better then bone as they will both be equally affected by the deficit.
The Nose
In the absence of symptoms, this exam is generally omitted. First check to see if the patient is able to breathe through either nostril effectively. Push on one nostril until it is occluded and have them inhale. Then repeat on the other side. Air should move equally well through each nares. To look in the nose, have the patient tilt their head back. Push up slightly on the tip of the nose with the thumb of your left hand. Place the end of the speculum (it's OK to use the same one from the ear exam) into the nares under direct vision. Now look through the viewing window, noting:
- The color of the mucosa. It can become quite reddened in the setting of infection.
- The presence of any discharge as well as its color (clear with allergic reactions; yellowish with infection).
- The middle and inferior turbinates, which are shelf-like projections along the lateral wall. Any polypoid growths, which may be associated with allergies and obstructive symptoms?
- The other nostril is examined in a similar manner.
- Loss of smell (anosmia) is a relatively common problem, though often undiagnosed.
In patients who make mention of this problem, olfaction can be crudely assessed
using an alcohol pad sniff test as follows:
- Ask the patient to close their eyes so that they don't get any visual cues.
- Occlude each nostril seqeuentially, making sure that they can move air adequately thru both.
- Occlude one nostril and then present an unknown item with distinctive aroma, asking the patient to inform you when they are able to detect its smell.
A patient should be able to detect the odor of substances with distinctive aromas at a distance of 10 cm. Typically coffee, mint or wintergreen oil are used.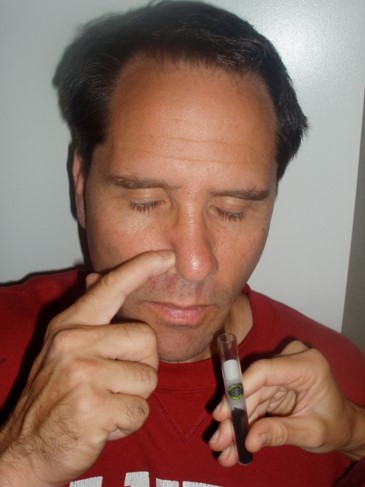 Using coffee grounds to assess sense of smell.
Evaluation of Frontal and Maxillary Sinuses
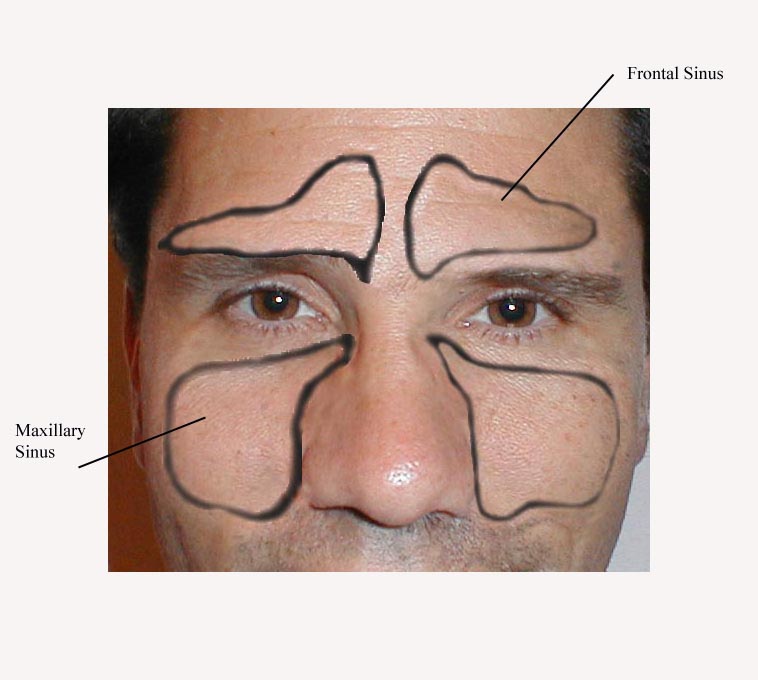
The head and face contain a number of sinuses, open cavities that communicate with the upper airway. They function to warm and cleanse air before it travels down to the lungs. They may also help to reduce the total weight of the skull. In normal health, these sinuses cannot be appreciated on examination and cause no symptoms. Inflammatory states, in particular those caused by allergy or infection, produce symptoms and findings that may be detected during examination. Symptoms associated with sinusitis include: nasal congestion, nasal discharge, facial pain, fever, and pain on palpation of the maxillary teeth. The frontal and maxillary sinuses are the two that can be indirectly examined. Examination for sinusitis should include the following:
- Examination of the nasal mucosa for colored discharge as described above. This is due to the fact that the maxillary sinuses drain into the nose via a passageway located under the middle turbinate.
- Directly palpate and percuss the skin overlying the frontal and maxillary sinuses. Pain suggests underlying inflammation.
- Dim the room lights. Place the lighted otoscope directly on the infraorbital
rim (bone just below the eye). Ask the patient to open their mouth and look
for light glowing through the mucosa of the upper mouth. In the setting of
inflammation, the maxillary sinus becomes fluid filled and will not allow
this transillumination. There are specially designed transilluminators that
may work better for this task, but are not readily available.
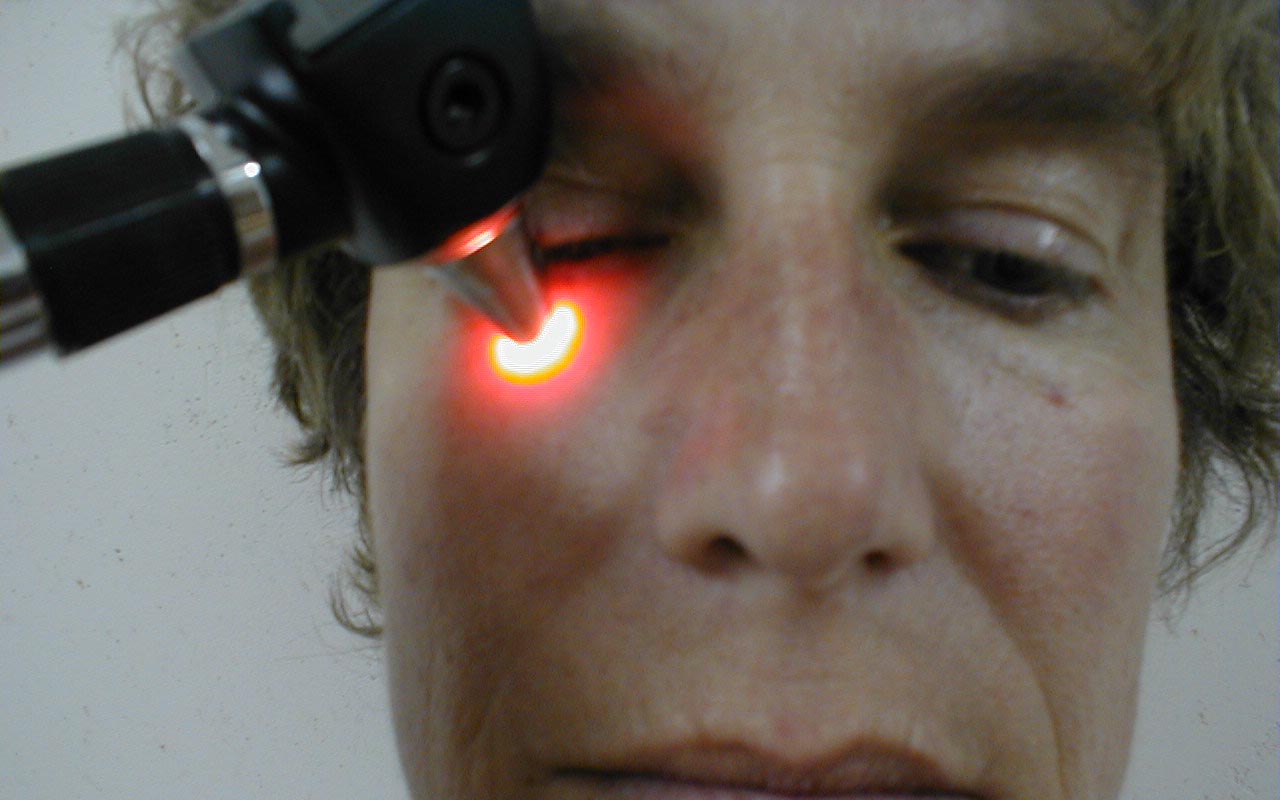
 Transillumination of the right maxillary sinus
 - Using a tongue depessor, tap on the teeth which sit in the floor of the maxillary sinus. This may cause discomfort if the sinus is inflamed.
The Oro-Pharynx

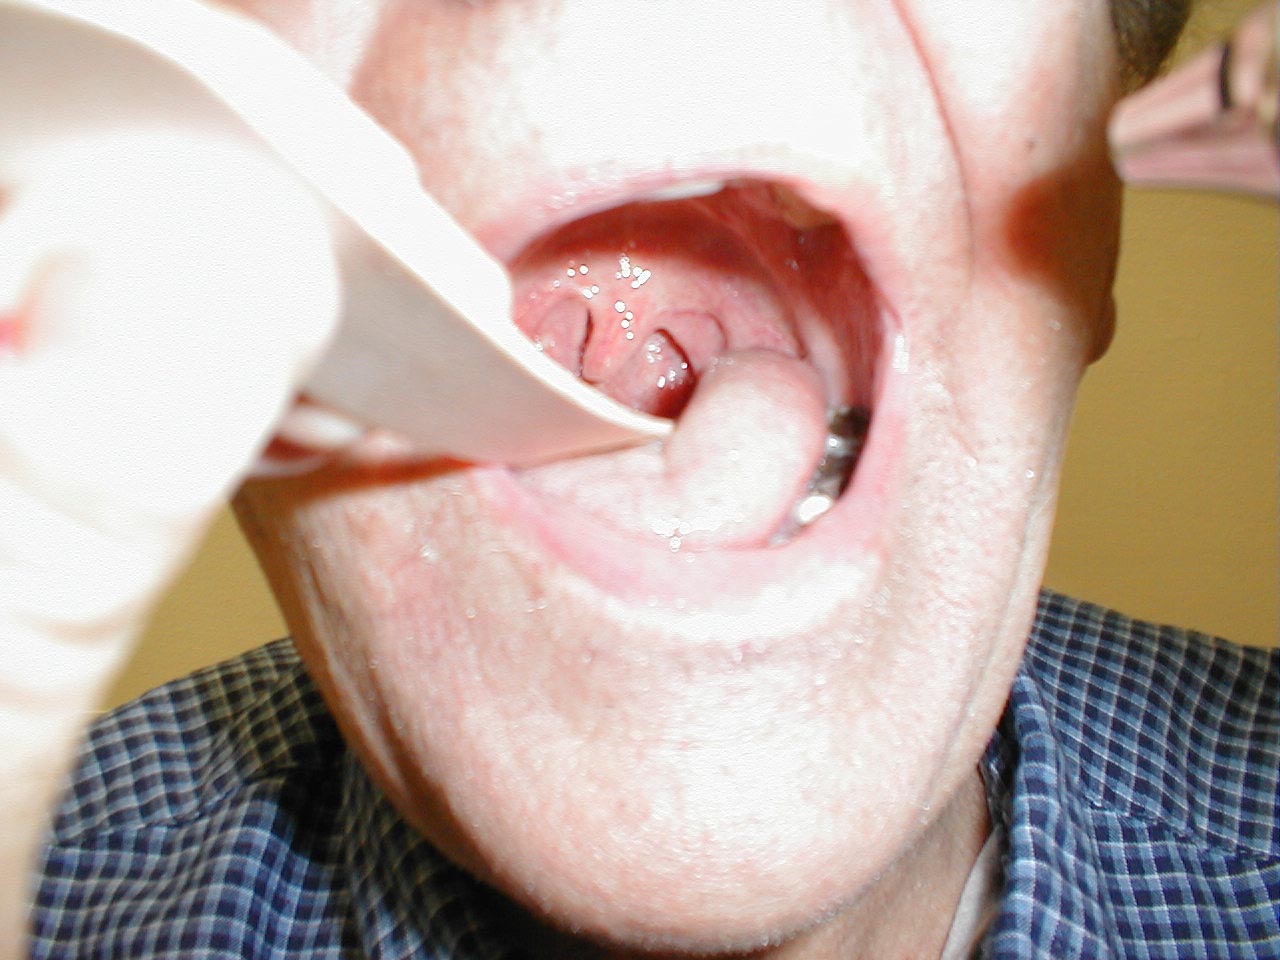
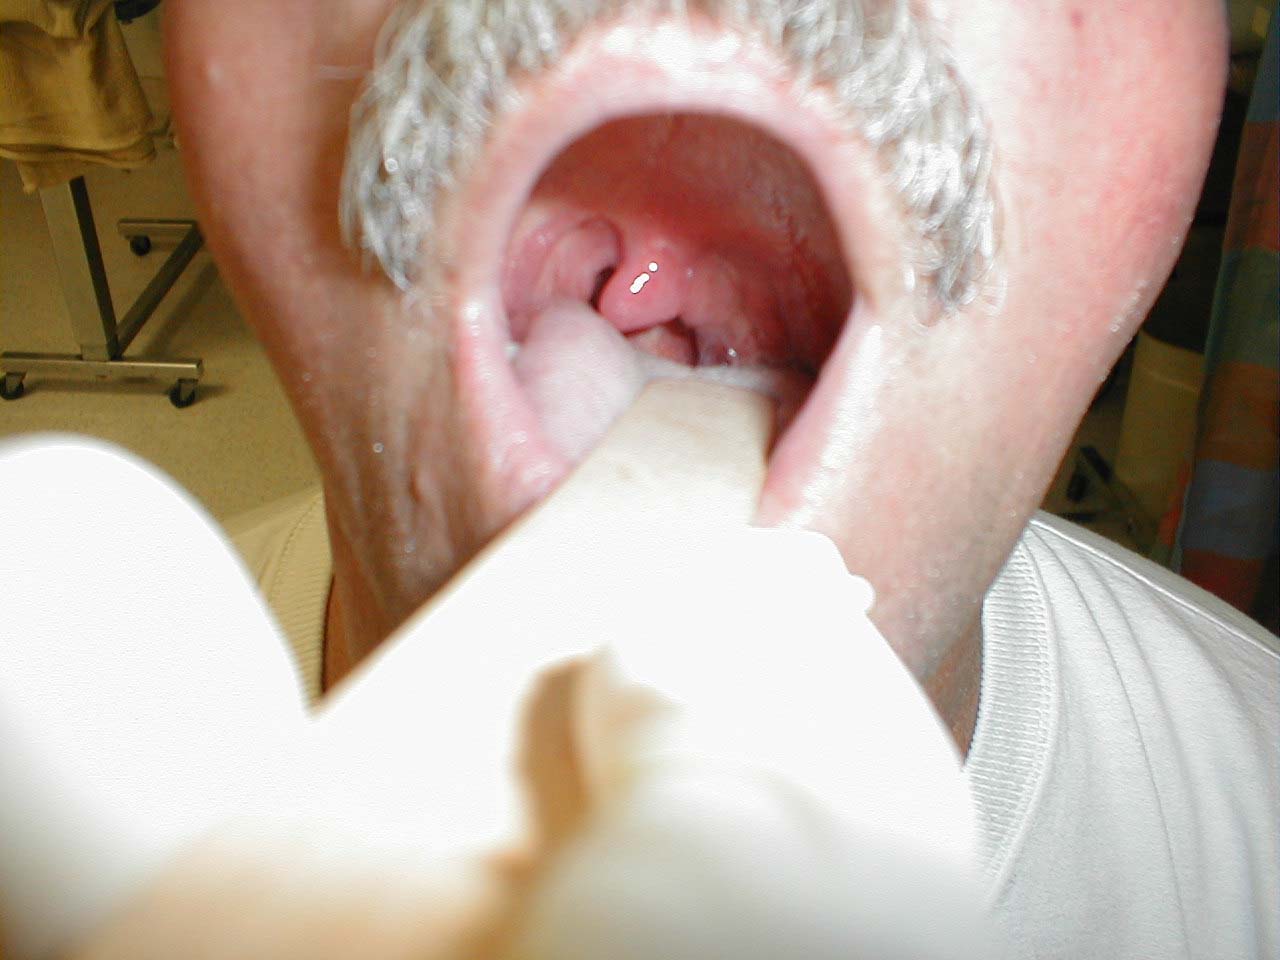
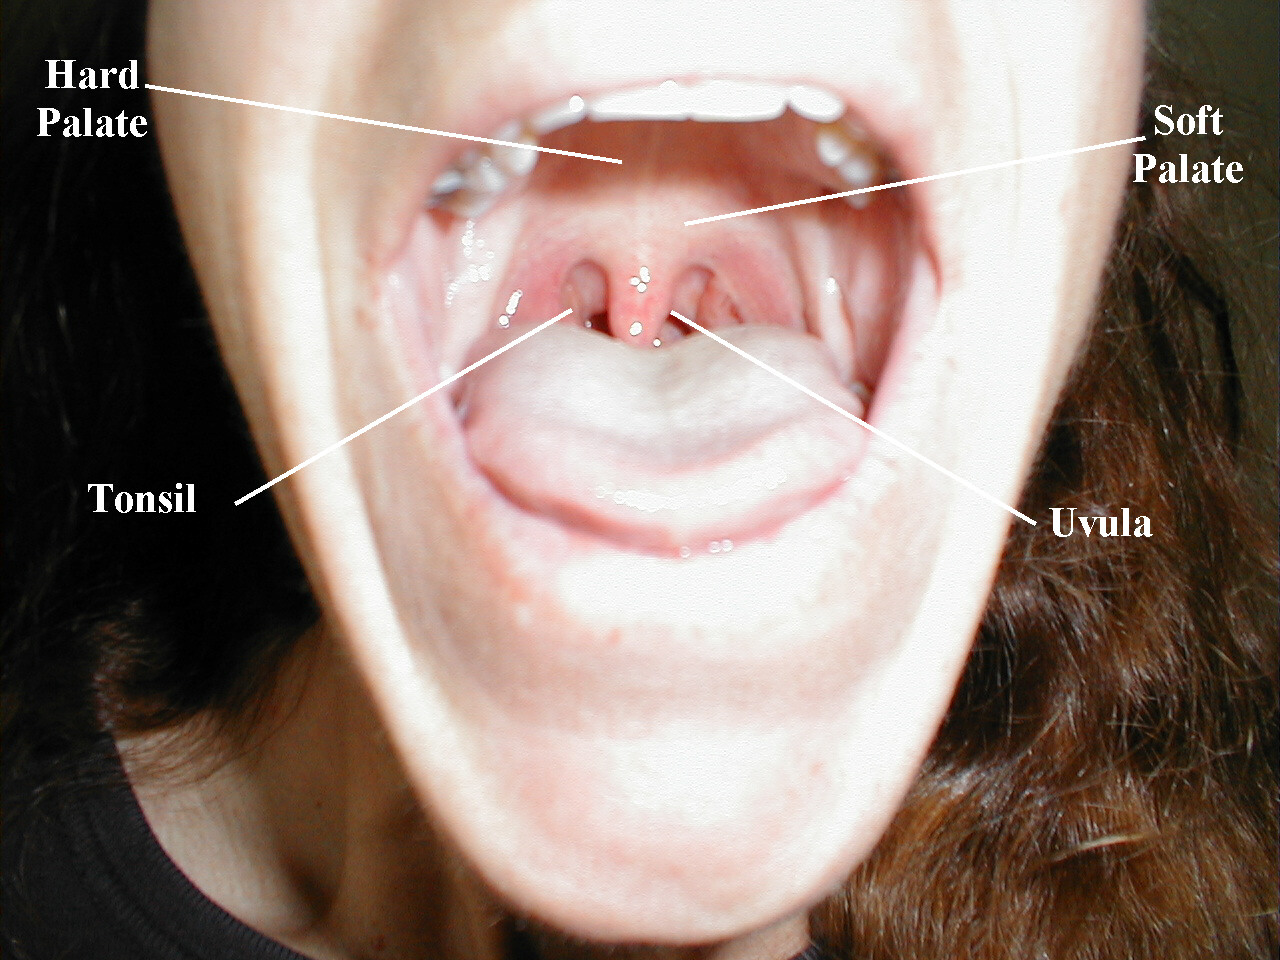
- Have the patient stick out their tongue so that you can examine the posterior pharynx (i.e. the back of the throat). Ask the patient to say "Ah", which elevates the soft palate, giving you a better view. If you are still unable to see, place the tongue blade � way back on the tongue and press down while the patient again says "Ah," hopefully improving your view. This causes some people to gag, particularly when the blade is pushed onto the more proximal aspects of the tongue. It may occasionally be important to determine whether the gag reflex is functional (e.g. after a stroke that impairs CNs 9 or 10; or to determine if a patient with depressed level of consciousness is able to protect their airway from aspiration). This is done by touching a q-tip against the posterior pharynx, uvula or tongue. It is not necessary to do this during your routine exam as it can be quite noxious!
- Note that the uvula hangs down from the roof of the mouth, directly in the
mid-line. With an "Ah," the uvula rises up. Deviation to one side may be caused
by CN 9 palsy (the uvula deviates away from the affected side), a tumor or
an infection.
 Cranial Nerve 9 Dysfunction:Patient has suffered stroke, causing loss of function of left CN 9. As a result, uvula is pulled towards the normally functioning (ie right) side.
 - The normal pharynx has a dull red color. In the setting of infection, it can become quite red, frequently covered with a yellow or white exudate (e.g. with Strep. Throat or other types of pharyngitis).
- The tonsils lie in an alcove created by arches on either side of the mouth.
The apex of these arches are located lateral to and on a line with the uvula.
Normal tonsils range from barely apparent to quite prominent. When infected,
they become red, are frequently covered by whitish/yellow discharge. In the
setting of a peritonsilar abscess, the tonsils appear asymmetric and the uvula
may be pushed away from the affected side. When this occurs, the tonsil may
actually compromise the size of the oral cavity, making breathing quite difficult.
 Left Peritonsilar Abscess.Note deveiation of uvula towards right.
 - Look carefully along the upper and lower gum lines and at the mucosa in general, which can appear quite dry if the patient is dehydrated.
- Examine the teeth to get a sense of general dentition, as dental health
has wide implications including:
- Nutrition (ability to eat)
- Appearance
- Self esteem
- Employability
- Social acceptance
- Systemic disease (endocarditis, ? other)
- Local problems:
- Pain, infection
- Profound lack of access to dental care has resulted in MDs assuming responsibility for primary Dx and Rx of a number of dental conditions.
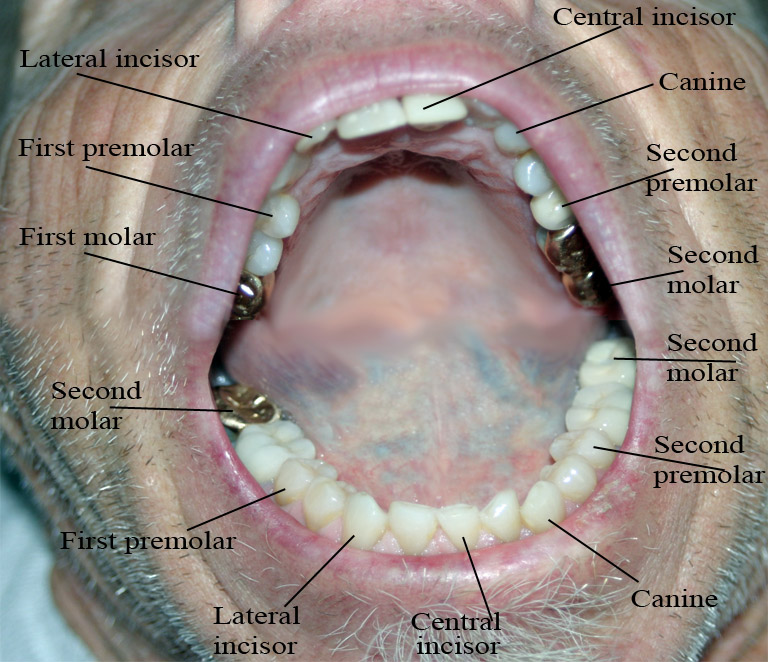
- Dental Anatomy & Exam
- 16 top teeth, 16 bottom teeth
- Examine all the teeth and gums, using gloved hands, gauze, tongue depressor & lighting if abnormal
- Make note of: General appearance, any absent teeth, broken teeth or obvious cavities; areas of pain, swelling, or infection
- If abnormal areas are noted, try to precisely define the tooth/teeth
involved as well as extent of the problem. For example, pain produced
by tapping on a tooth is commonly caused by a root abscess.
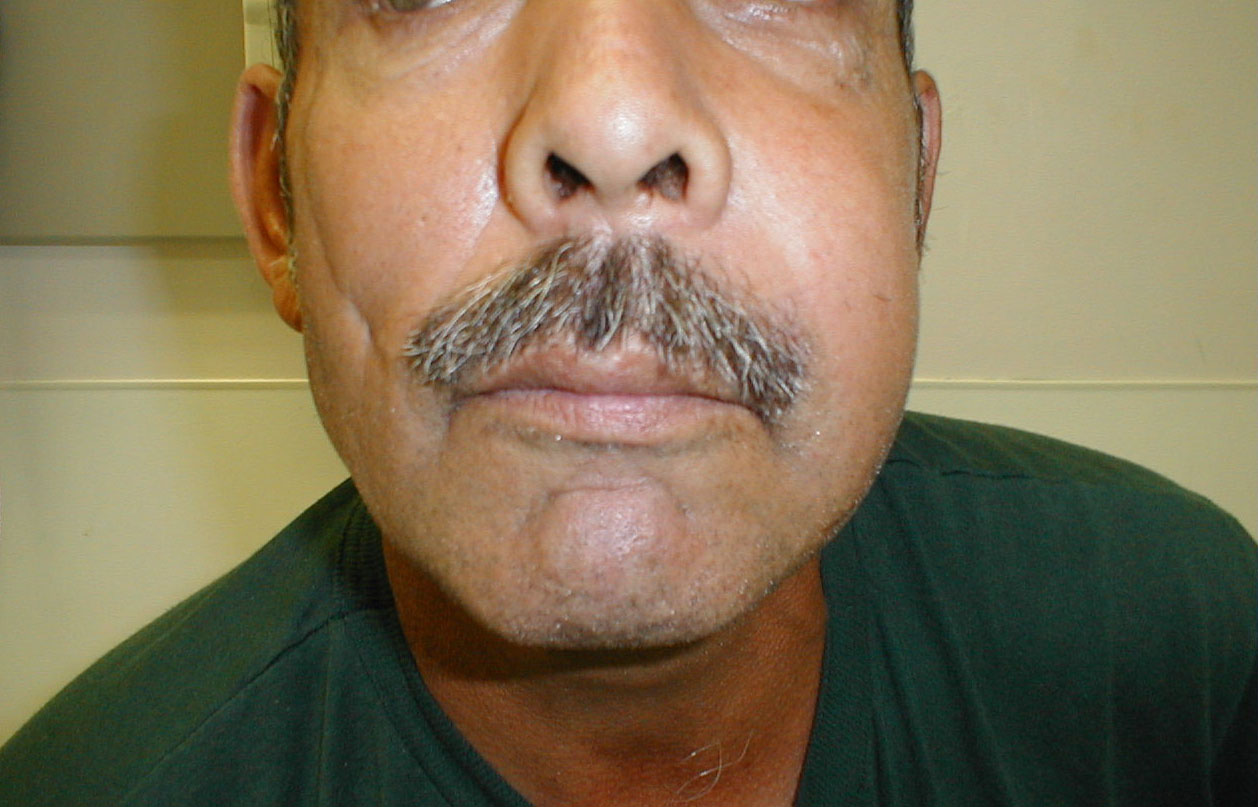
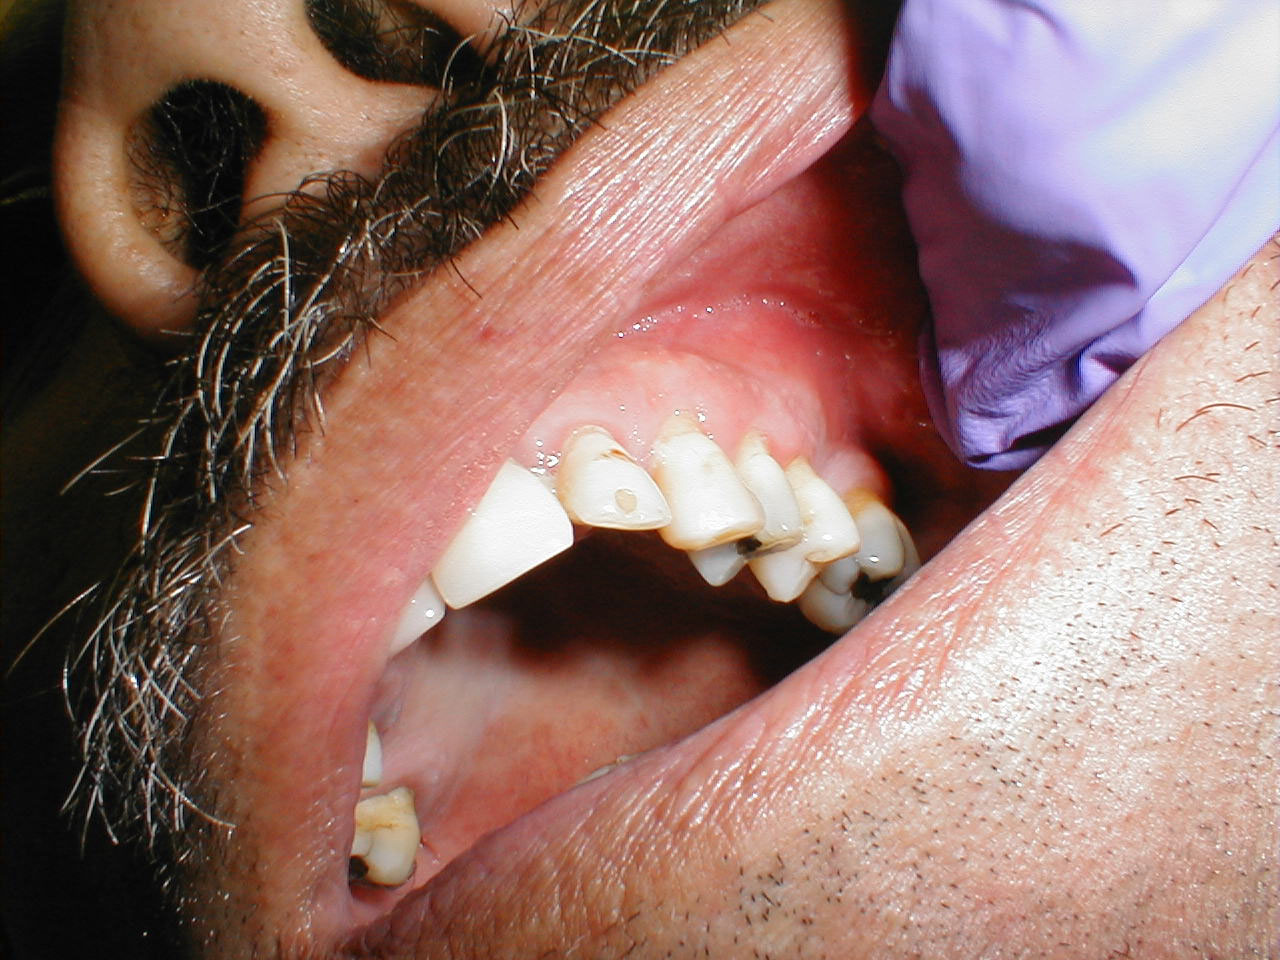
Tooth Abscess: Tooth abscess involving left molar region. Associated inflammation of left face can clearly be seen.
- Have the patient stick their tongue outside their mouth, which allows evaluation
of CN 12. If there is nerve impairment, the tongue will deviate towards the
affected side. Any obvious growths or abnormalities? Ask them to flip their
tongue up so that you can look at the underside. If you see something abnormal,
grasp the tongue with gauze so that you can get a better look.
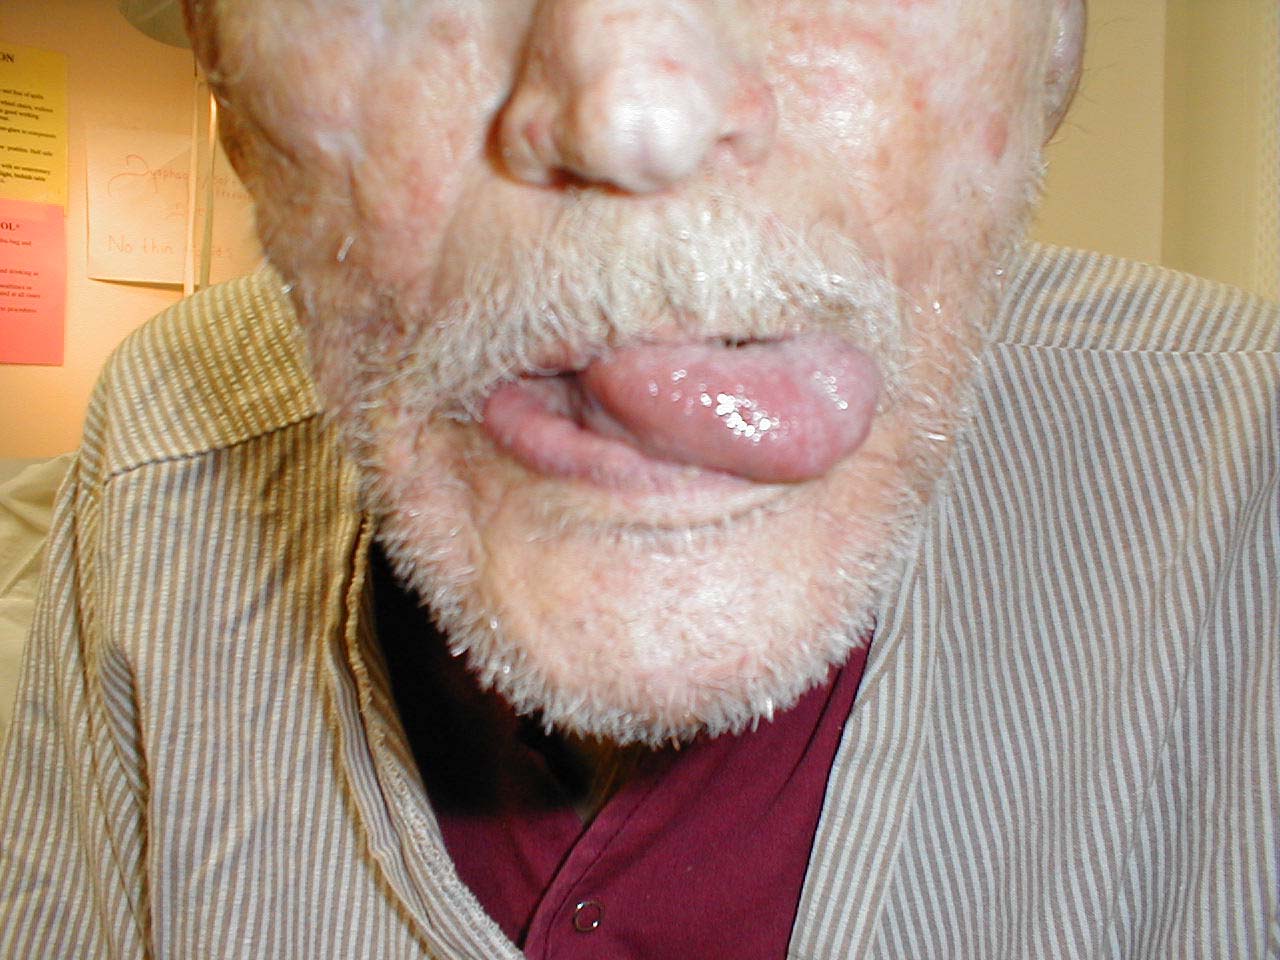 Left CN 12 Dysfunction:Stroke has resulted in L CN 12 Palsy.
Tongue therefore deviates to the left. - Make note of any growths along the cheeks, hard palate (the roof of the mouth between the teeth), soft palate, or anywhere else. In particular, patients who smoke or chew tobacco are at risk for oral squamous cell cancer. Any areas which are painful or appear abnormal should also be palpated. Put on a pair of gloves to better explore these regions. What do they feel like? Are they hard? To what extent does a growth involve deeper structures? If the patient feels something that you cannot see, try to get someone else to hold the light source, freeing both your hands to explore the oral cavity with two tongue depressors.
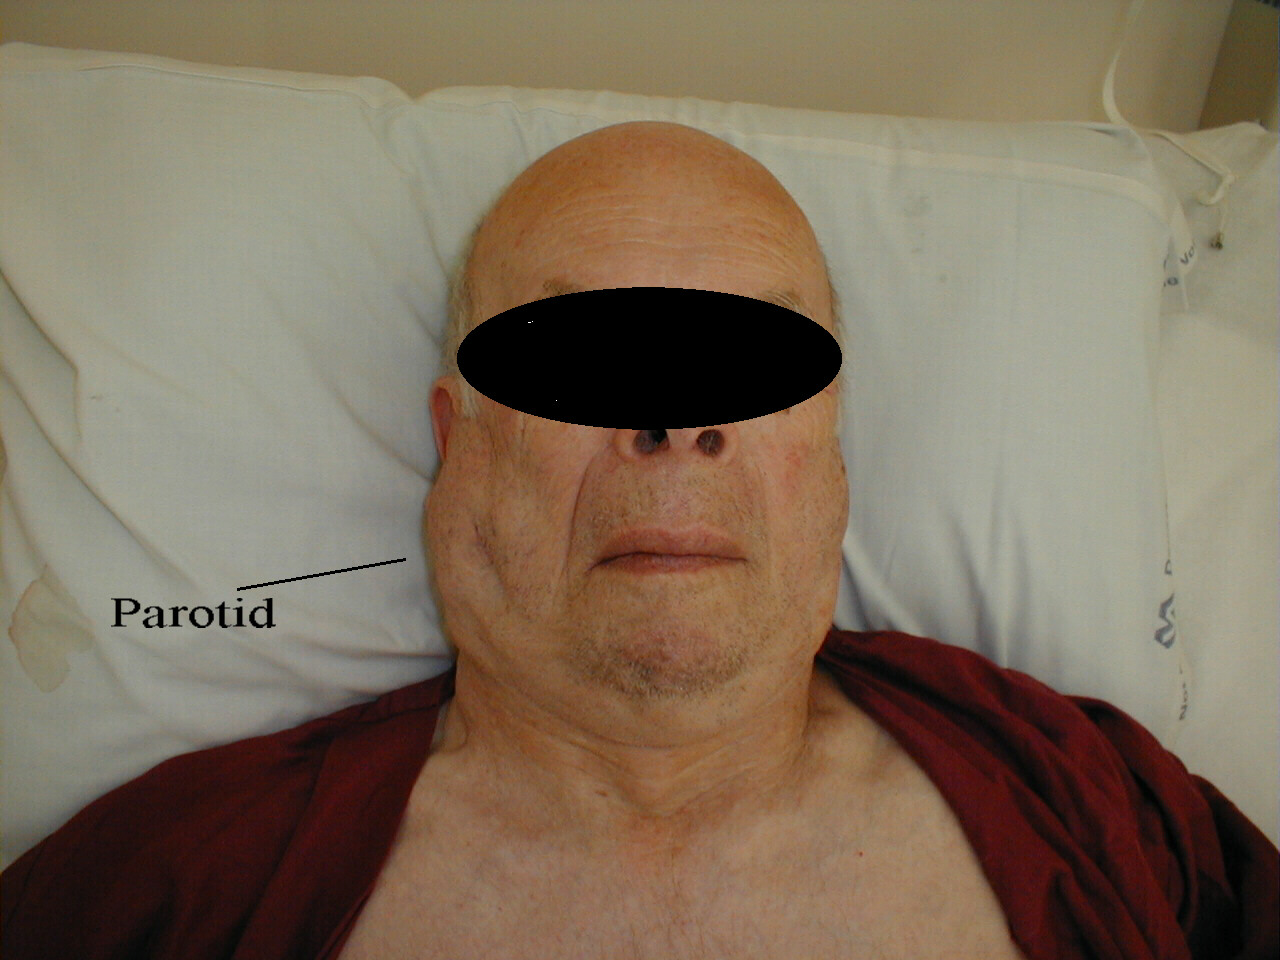
- The parotid glands are located in either cheek. Infection will cause pain and swelling in this area, which can be confirmed on palpation. The ducts which drain the parotids enter the mouth in line with the lower molars and are readily visible. When infected, you may be able to express pus from the ducts by gently palpating the gland.
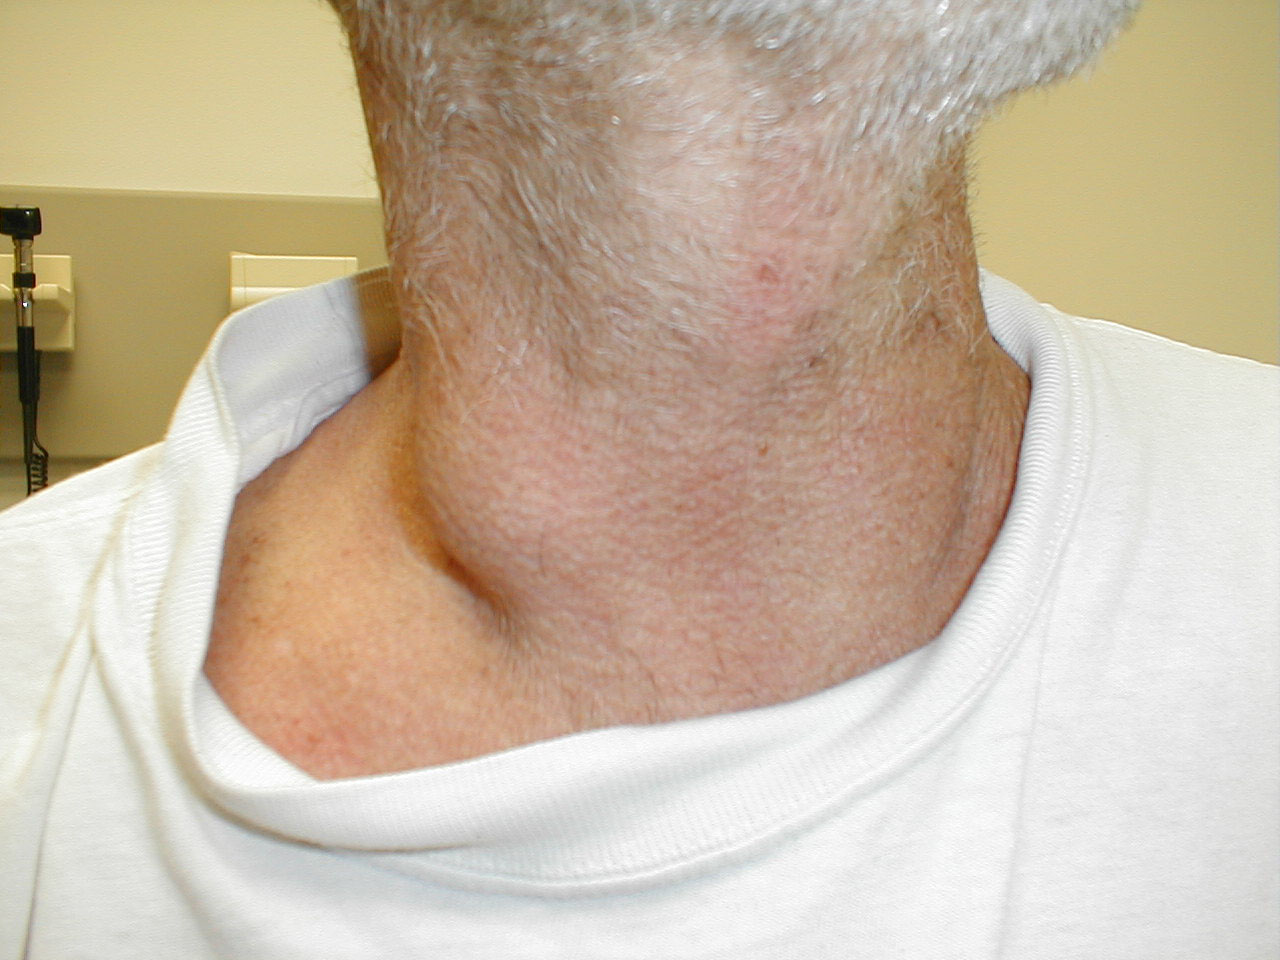
The Thyroid Exam
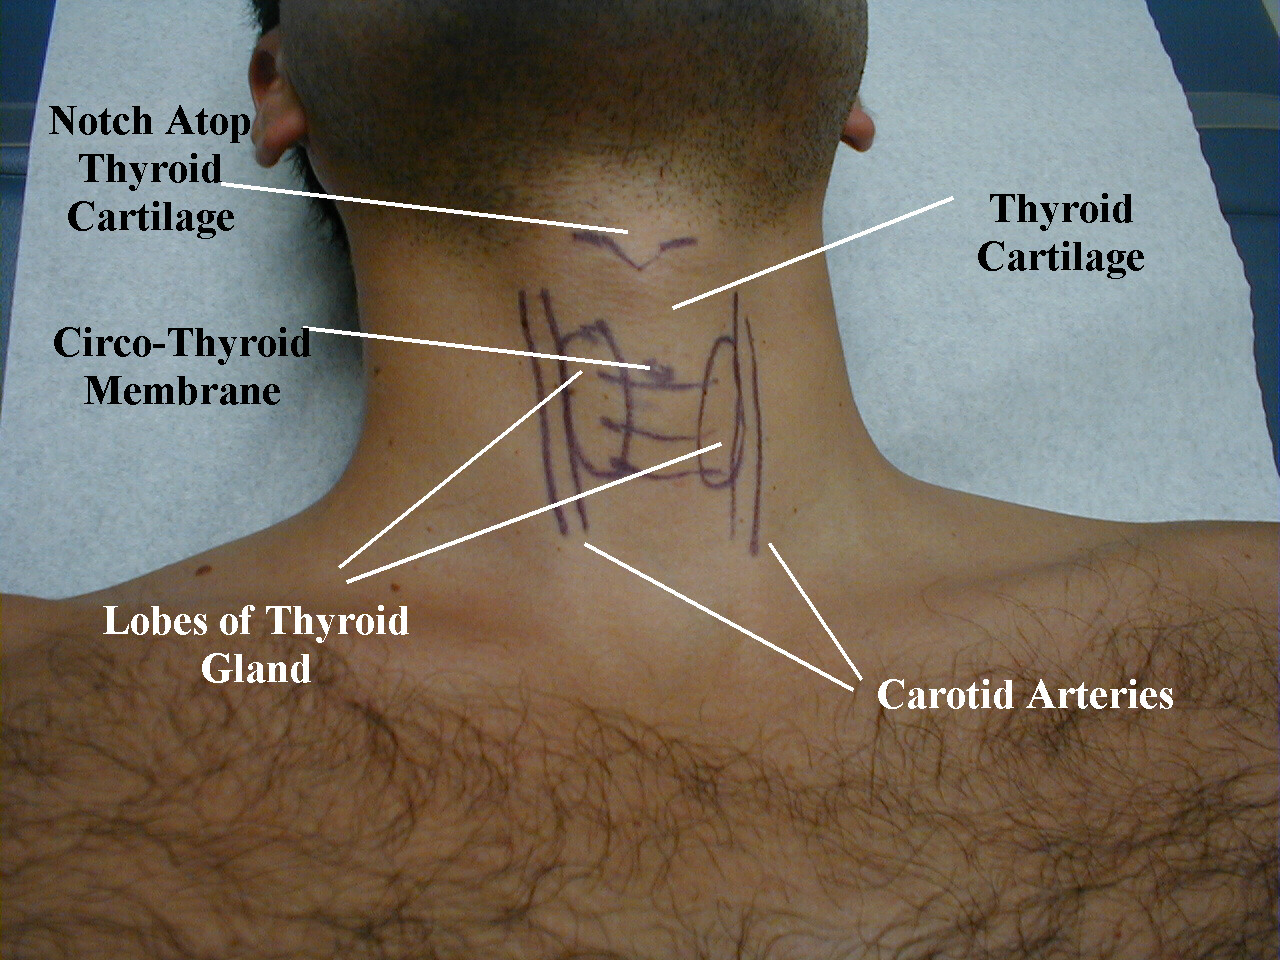
Prior to palpation, look at the thyroid region. If the gland is quite enlarged, you may actually notice it protruding underneath the skin. To find the thyroid gland, first locate the thyroid cartilage (a.k.a the Adams Apple), which is a mid-line bulge towards the top of the anterior surface of the neck. It's particularly prominent in thin males, sits atop the tracheal rings, and can be seen best when the patient tilts their head backwards. Deviation to one side or the other is usually associated with intra-thoracic pathology. For example, air trapped in one pleural space (known as a pneumothorax) can generate enough pressure so that it collapses the lung on that side, causing mediastinal structures, along with the trachea, to be pushed towards the opposite chest. This deviation may be visible on inspection and can be accentuated by gently placing your finger in the top of the thyroid cartilage and noting its position relative to the midline. The thyroid gland lies approximately 2-3 cm below the thyroid cartilage, on either side of the tracheal rings, which may or may not be apparent on visual inspection. If you're unsure, give the patient a glass of water and have them swallow as you watch this region. Thyroid tissue, along with all of the adjacent structures, will move up and down with swallowing. The normal thyroid is not visible, so it's not worth going through this swallowing exercise if you don't see anything on gross inspection.
Location of the Thyroid

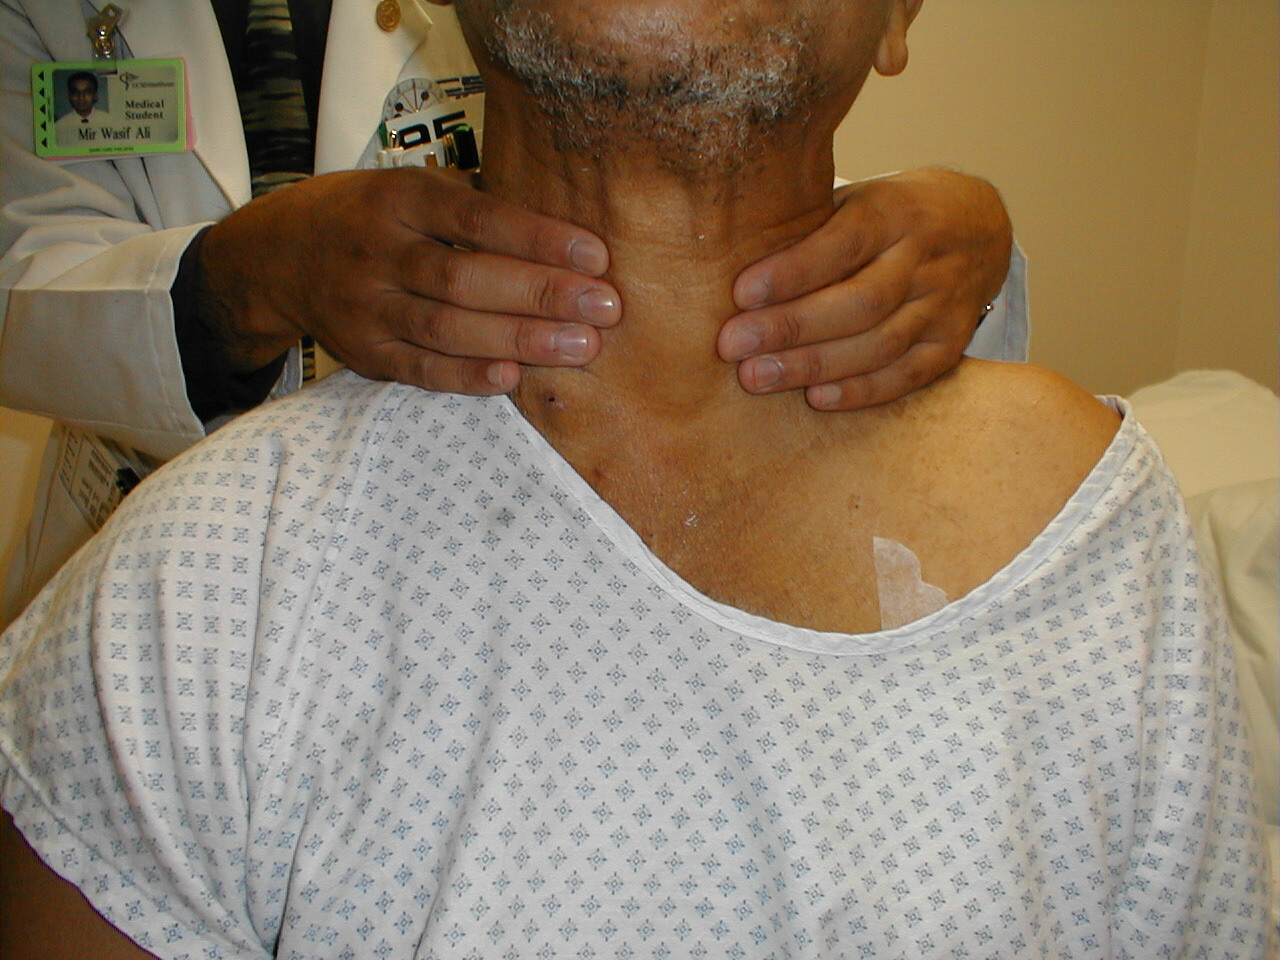
Palpation: The thyroid can be examined while you stand in front of or behind the patient. Exam from behind the patient is described below:
- Stand behind the patient and place the middle three fingers of either hand along the mid-line of the neck, just below the chin. Gently walk them down until you reach the top of the thyroid cartilage, the first firm structure with which you come into contact. Use gentle pressure, otherwise this can be uncomfortable. Make sure that you tell your patients what you're doing so they know you're not trying to choke them! The cartilage has a small notch in its top and is approximately 1.5-2 cm in length. As you cannot actually see the area that you're examining, it may be helpful to practice in front of a mirror. You can also try to identify and feel the structures from the front while looking at the area in question before performing the exam from behind.
- Walk down the thyroid cartilage with your fingers until you come to the horizontal groove which separates it from the cricoid cartilage (the first tracheal ring). You should be able to feel a small indentation (it barely accepts the tip of your finger) between these 2 structures, directly in the mid-line. This is the crico-thyroid membrane, the site for emergent tracheal access in the event of upper airway obstruction.
- Continue walking down until you reach the next well defined tracheal ring.
Now slide the three fingers of both hands to either side of the rings. The
thyroid gland extends from this point downwards for approximately 2-3 cm along
each side. The two main lobes are connected by a small isthmus that reaches
across mid-line and is almost never palpable. Apply very gentle pressure when
you palpate as the normal thyroid tissue is not very prominent and easily
compressible. If you're unsure or wish confirmation, have the patient drink
water as you palpate. The gland should slide beneath your fingers while it
moves upward along with the cartilagenous rings. It takes a very soft, experienced
touch in order to actually feel this structure, so don't be disappointed if
you can't identify anything.
Thyroid Examination
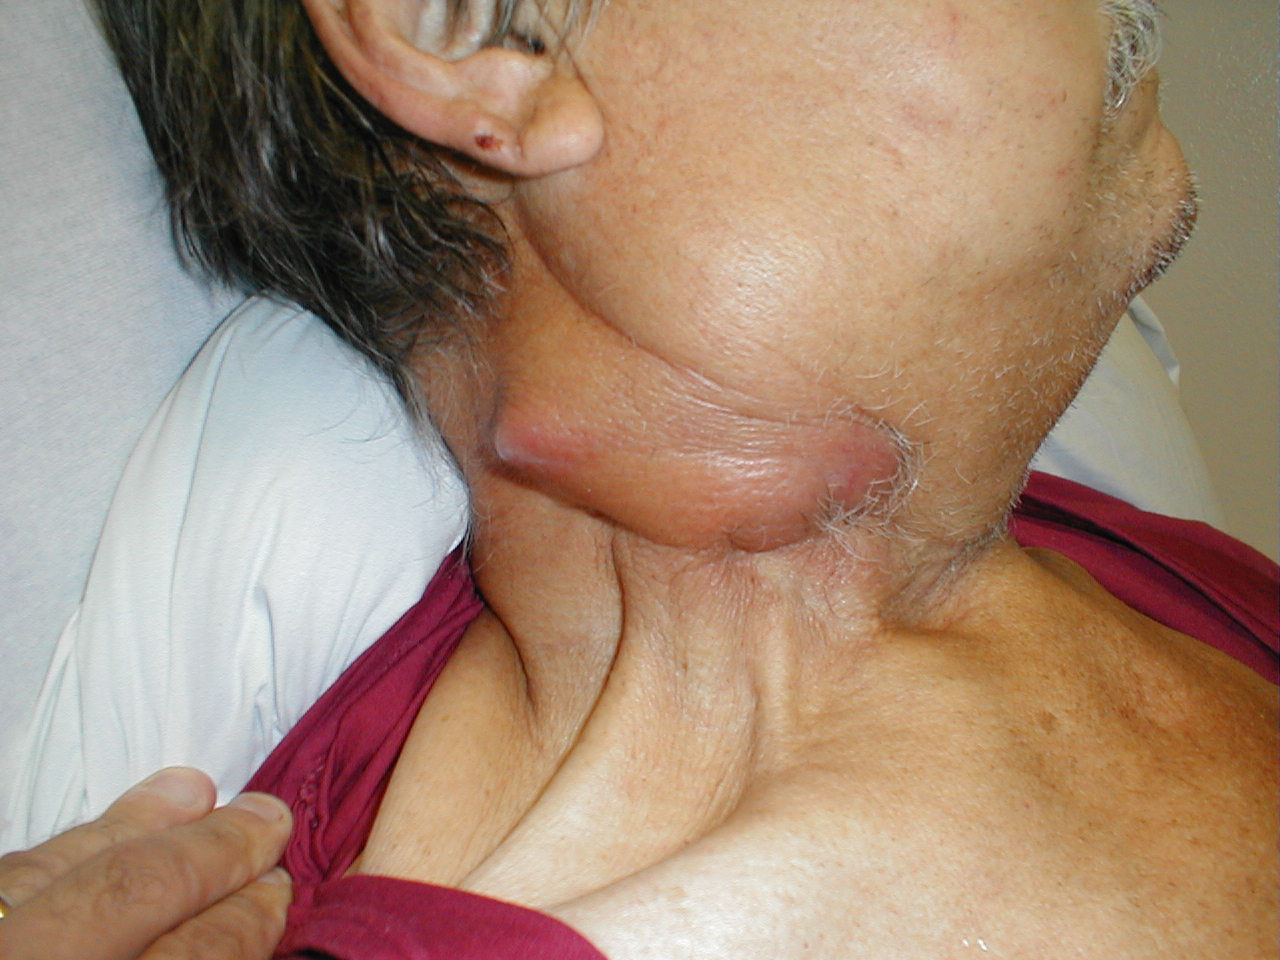
- Pay attention to several things as you try to identify the thyroid: If enlarged (and this is a subjective sense that you will develop after many exams), is it symmetrically so? Unilateral vs. bilateral? Are there discrete nodules within either lobe? If the gland feels firm, is it attached to the adjacent structures (i.e. fixed to underlying tissue.. consistent with malignancy) or freely mobile (i.e. moves up and down with swallowing)? If there is concern re: malignancy, a careful lymph node exam (described above) is important as this is the most common site of spread.