Cardiovascular Exam
The major elements of the cardiac exam include observation, palpation and, most importantly, auscultation (percussion is omitted). As with all other areas of the physical exam, establishing adequate exposure and a quiet environment are critical. Initially, the patient should rest supine with the upper body elevated 30 to 45 degrees. Most exam tables have an adjustable top. If not, use 2 or 3 pillows. Remember that although assessment of pulse and blood pressure are discussed in the vital signs section they are actually important elements of the cardiac exam.
The evaluation of the cardiovascular system focuses on the heart, but should also include an assessment for disease in the arterial system throughout the body. Atherosclerosis, the most common cardiovascular ailment in the western world, is a systemic disease. As such, appropriate evaluation requires a broad assessment.
For Additional Information See: Digital DDx: Cardiovascular Review of Symptoms and Differentials
- Observation & Jugular Venous Pressure
- Gowning
- Palpation
- Auscultation
- Palpation of the abdominal aorta
- Assessment of lower extremities
Observation:
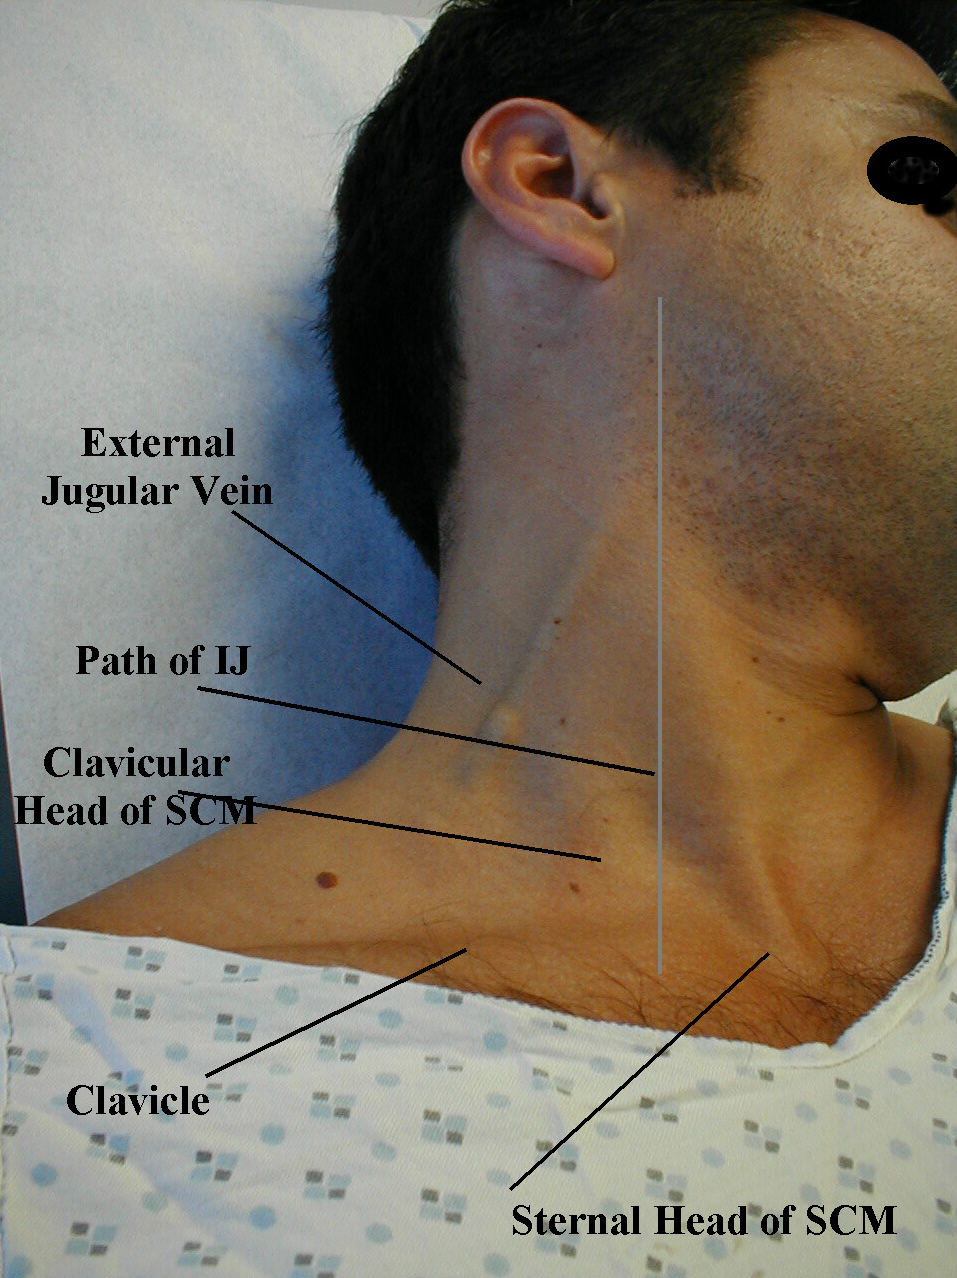
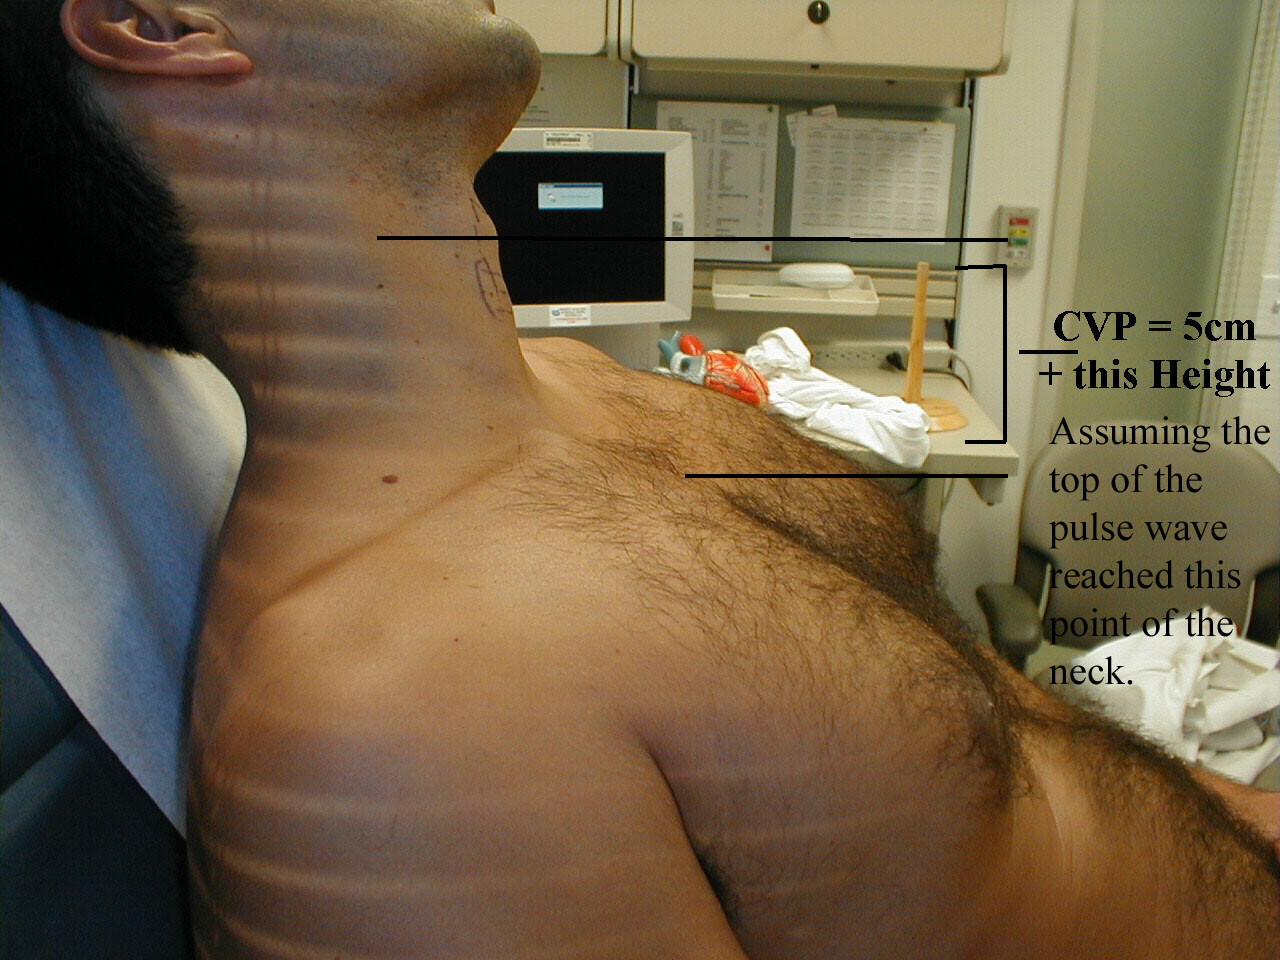
Assessment for distention of the right Internal Jugular vein (IJ) is a difficult skill. Its importance lies in the fact that the IJ is in straight-line communication with the right atrium. The IJ can therefore function as a manometer, with distention indicating elevation of Central Venous Pressure (CVP). This in turn is an important marker of intravascular volume status and related cardiac function. The focus here is on simply determining whether or not Jugular Venous Distention (JVD) is present. A discussion of the a, c and v waves that make up the jugular venous pulsations can be found elsewhere. These are quite difficult to detect for even the most seasoned physician.
Why is JVD so hard to assess? The IJ lies deep to skin and soft tissues, which can provide quite a bit of cover. Additionally, this blood vessel is under much lower pressure then the adjacent, pulsating carotid artery. It therefore takes a sharp eye to identify the relatively weak, transmitted venous impulses. A few things to remember:
- Think anatomically. The right IJ runs between the two heads (sternal and clavicular) of the sternocleidomastoid muscle (SCM) and up in front of the ear. This muscle can be identified by asking the patient to turn their head to the left and into your hand while you provide resistance to the movement. The two heads form the sides of a small triangle, with the clavicle making up the bottom edge. You should be able to feel a shallow defect formed by the borders of these landmarks. Note, you are trying to identify impulses originating from the IJ and transmitted to the overlying skin in this area. You can't actually see the IJ. The External Jugular (EJ) runs in an oblique direction across the sternocleidomastoid and, in contrast to the IJ, can usually be directly visualized. If the EJ is not readily apparent, have the patient look to the left and valsalva. This usually makes it quite obvious. EJ distention is not always a reliable indicator of elevated CVP as valves, designed to prevent the retrograde flow of blood, can exist within this vessel causing it to appear engorged even when CVP is normal. It also makes several turns prior to connecting with the central venous system and is thus not in a direct line with the right atrium.
- Take your time. Look at the area in question for several minutes while the patient's head is turned to the left. The carotid artery is adjacent to the IJ, lying just medial to it. If you are unsure whether a pulsation is caused by the carotid or the IJ, place your hand on the patient's radial artery and use this as a reference. The carotid impulse coincides with the palpated radial artery pulsation and is characterized by a single upstroke timed with systole. The venous impulse (at least when the patient is in sinus rhythm and there is no tricuspid regurgitation) has three components, each associated with the aforementioned a, c and v waves. When these are transmitted to the skin, they create a series of flickers that are visible diffusely within the overlying skin. In contrast, the carotid causes a single up and down pulsation. Furthermore, the carotid is palpable. The IJ is not and can, in fact, be obliterated by applying pressure in the area where it emerges above the clavicle.
- Search along the entire projected course of the IJ as the top of the pressure wave (which is the point that you are trying to identify) may be higher then where you are looking. In fact, if the patient's CVP is markedly elevated, you may not be able to identify the top of the wave unless they are positioned with their trunk elevated at 45 degrees or more (else their will be no identifiable "top" of the column as the entire IJ will be engorged). After you've found the top of the wave, see what effect sitting straight up and lying down flat have on the height of the column. Sitting should cause it to appear at a lower point in the neck, while lying has the opposite effect. Realize that these maneuvers do not change the actual value of the central venous pressure. They simply alter the position of the top of the pulsations in relation to other structures in the neck and chest.
- Shine a pen light tangentially across the neck. This sometimes helps to accentuate the pulsations.
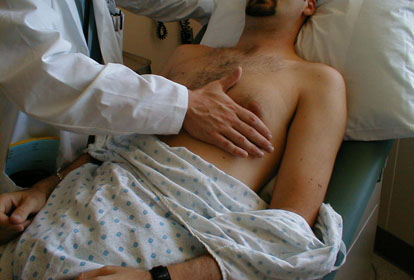
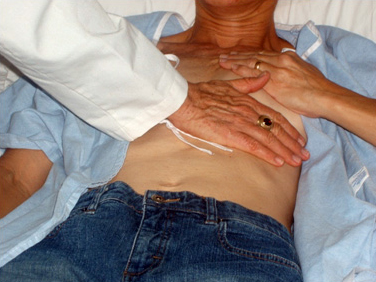
- If you are still uncertain, apply gentle pressure to the right upper quadrant of the abdomen for 5 to 10 seconds. This elicits Hepato-Jugular Reflux which will cause blood that is within the liver (a highly vascular structure) to flow in an antegrade fashion and fill out the IJ. This, in turn, makes the transmitted pulsations more apparent. Make sure that you are looking at the correct area when you push, as the best time to detect any change in the height of the column of blood is immediately after you apply hepatic pressure.
- Once you identify JVD, try to estimate how high in cm the top of the column is above the Angle of Louis. The angle is the site of the joint which connects the manubrium with the rest of the sternum. First identify the supra-sternal notch, a concavity at the top of the manubrium. Then walk your fingers downward until you detect a subtle change in the angle of the bone, which is approximately 4 to 5 cm below the notch. This is roughly at the level of the 2nd intercostal space. The vertical distance from the top of the column to this angle is added to 5cm, the rough vertical distance from the angle to the right atrium with the patient lying at a 45 degree angle. The sum is an estimate of the CVP. However, if you can simply determine with some accuracy whether JVD is present or not, you will be way ahead of he game! Normal is 7-9 cm.
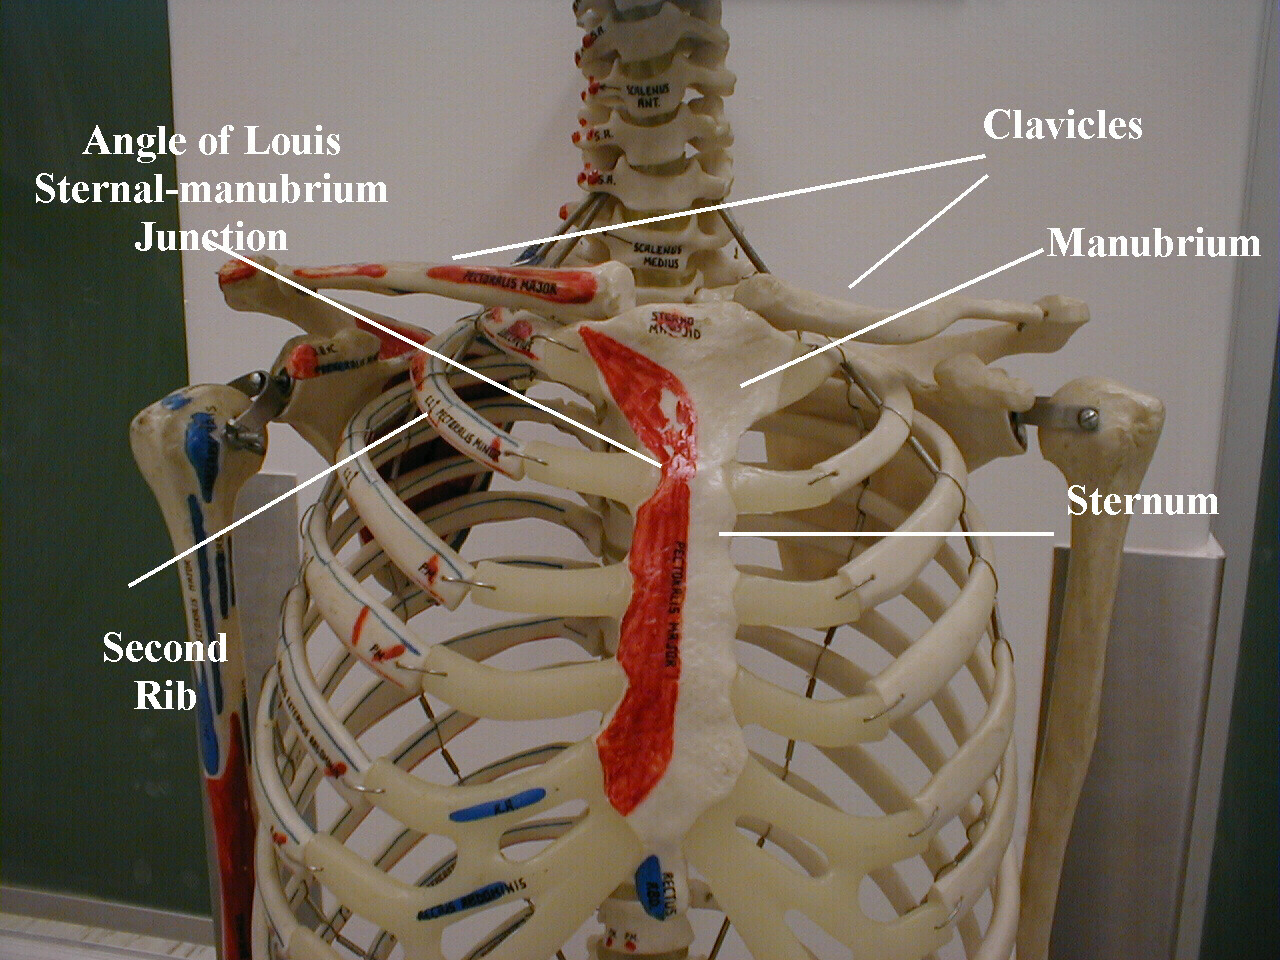
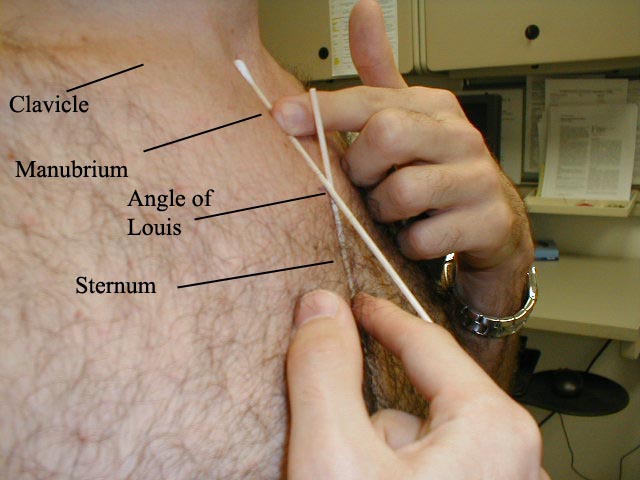
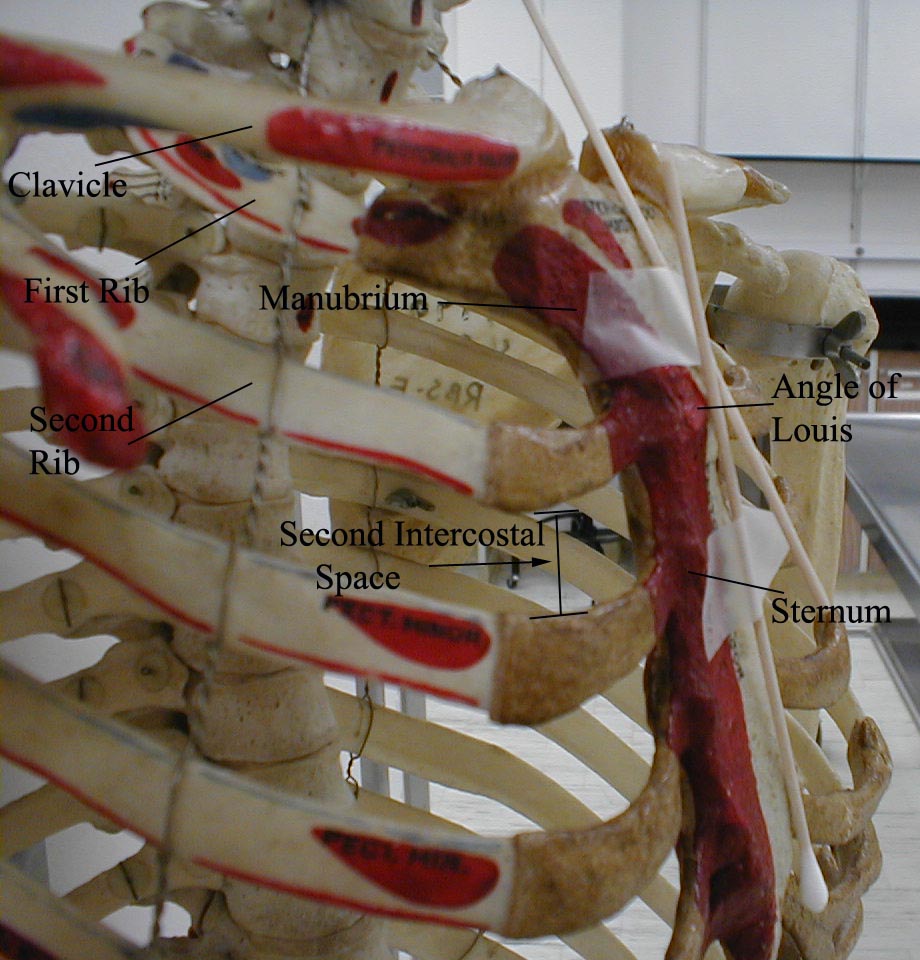
The point at which the Q-tips cross is the Angle of Louis.
Take some time to look across the left chest and try to identify the transmitted impulse caused by ventricular contraction, which may be apparent when contractions are particularly vigorous.
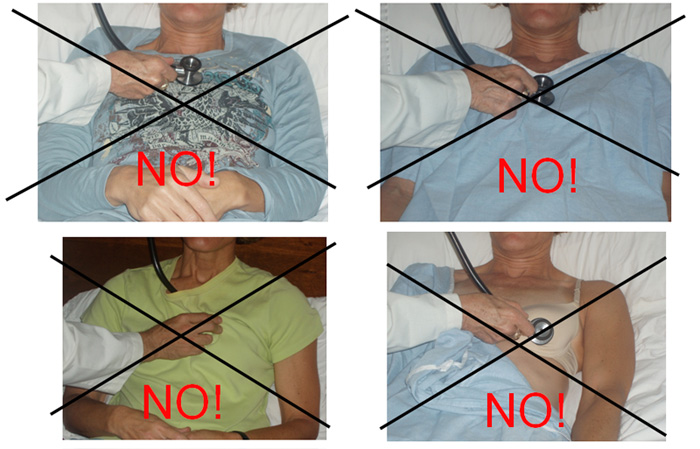
Thoughts On "Gown Management" & Appropriately/Respectfully Touching Your Patients:
There are several sources of tension relating to the physical exam in general, which are really brought to the fore during the chest examine. These include:
- Area to be examined must be reasonably exposed - yet patient kept as covered as possible
- The need to Palpate sensitive areas in order to perform accurate exam - requires touching people w/whom you've little acquaintance - awkward, particularly if opposite gender
- As newcomers to medicine, you're particularly aware that this aspect of the exam is "unnatural" & hence very sensitive.. which is a good thing!
Keys to performing a sensitive yet thorough exam:
- Explain what you're doing (& why) before doing it → acknowledge "elephant in the room"!
- Expose the minimum amount of skin necessary - this requires "artful" use of gown & drapes (males & females)
- Examining heart & lungs of female patients:
- Ask pt to remove bra prior (you can't hear the heart well thru fabric)
- Expose left side of chest to extent needed
- Enlist patient's assistance, asking them to raise their breast to a position that enhances your ability to listen to and palpate the heart
- Don't rush, act in a callous fashion, or cause pain
- PLEASE... don't examine body parts thru gown as:
- It reflects Poor technique
- You'll miss things
- You'll lose points on scored exams (OSCE, CPX, USMLE)!
Palpation:
The palm of your right hand is placed across the patient's left chest so that it covers the area over the heart. The heel should rest along the sternal border with the extended fingers lying below the left nipple. Focus on several things:
- Can you feel a Point of Maximum Impulse (PMI) related to contraction at the apex of the underlying left ventricle? If so, where is it located? After identifying the rough position with the palm of your hand, try to pin down the precise location with the tip of your index finger. The normal sized and functioning ventricle will generate a penny sized impulse that is best felt in the mid-clavicular line, roughly at the 5th intercostal space. If the ventricle becomes dilated, most commonly as the result of past infarcts and always associated with ventricular dysfunction, the PMI is displaced laterally. In cases of significant enlargement, the PMI will be located near the axilla. Occasionally, the PMI will not localize to any one area, which does not necessarily indicate ventricular enlargement or dysfunction. Obesity and COPD may also limit your ability to identify its precise location. Palpating while the patient is in the left lateral decubitus position can make the PMI more obvious.
- What is the duration of the impulse? In the setting of hypertension or any other state of chronic pressure overload, the ventricle hypertrophies and the PMI becomes sustained (i.e. you feel the impulse for a longer period of time). This is actually pretty subjective and can be tough to detect. Note that hypertrophy and dilatation are not synonymous. They can exist separately or in conjunction with one another.
- How vigorous is the transmitted impulse? Processes associated with ventricular hypercontractility (e.g. compensated mitral regurgitation or aortic insufficiency that result in exceptionally large stroke volumes) generate an impulse of unusual vigor.
- Do you feel a thrill, a vibratory sensation produced by turbulent blood flow that is usually secondary to valvular abnormalities? The feeling is similar to that produced when you squeeze on a garden hose, partially obstructing the flow of water. The location of the thrill will depend on the involved valve (e.g. thrills caused by aortic stenosis are best felt toward the right upper sternal border). If a loud murmur is detected during auscultation, you may then go back and reassess for the presence of a thrill. In general, thrills are an uncommon finding.
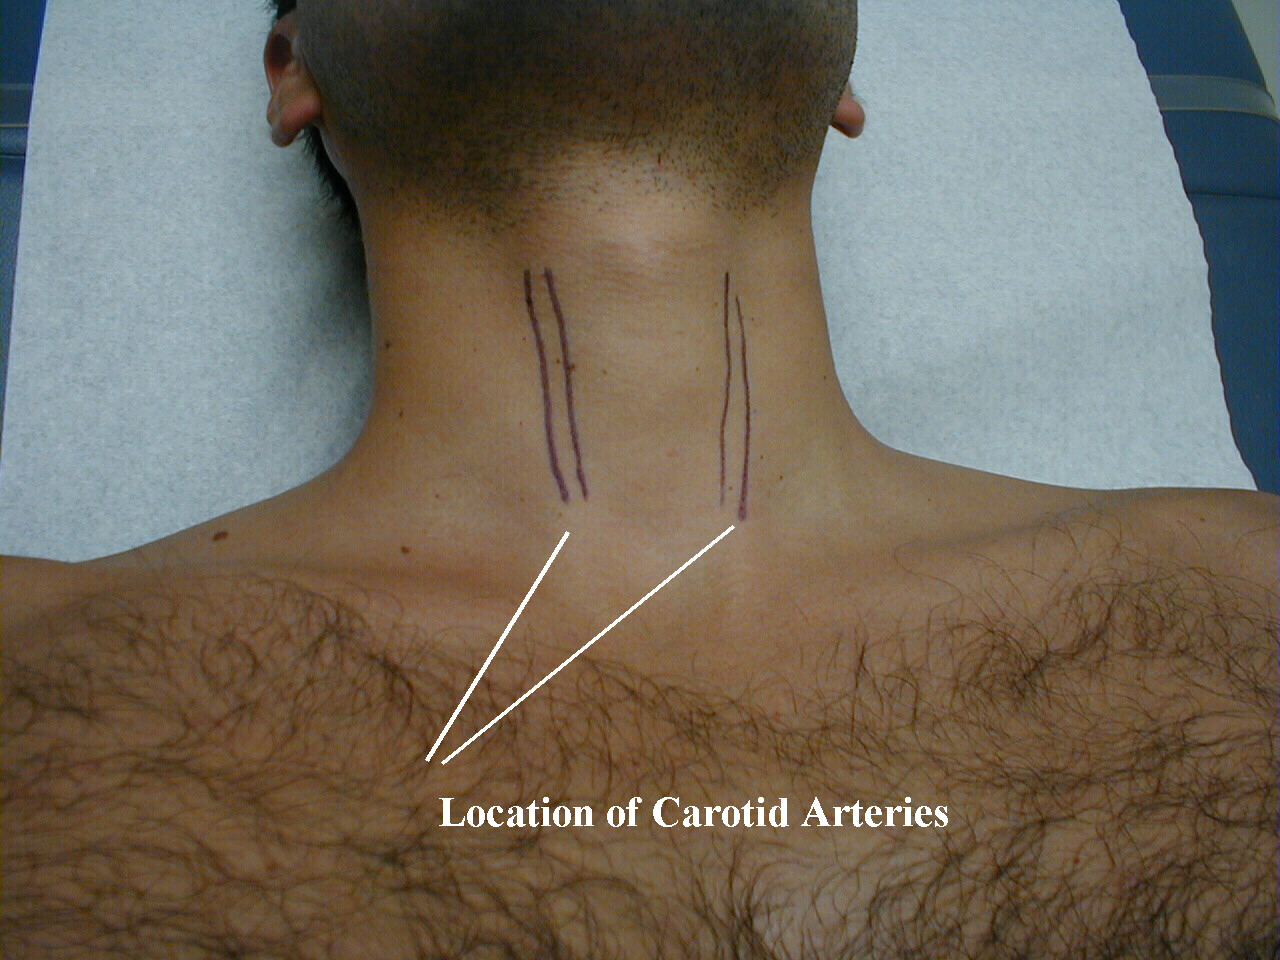
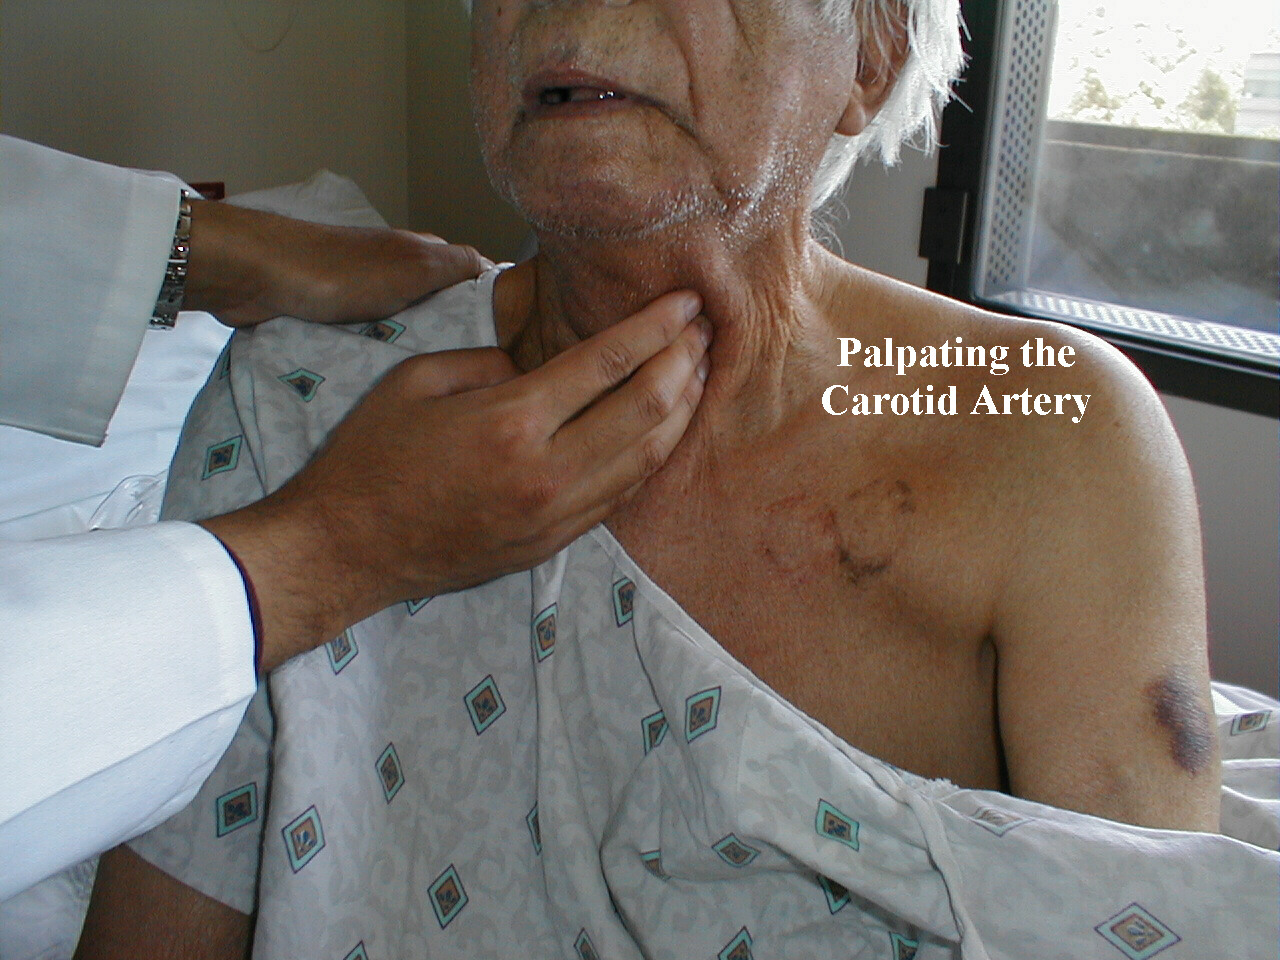
- Carotid Artery Palpation: This is of greatest value during the assessment of aortic valvular and out flow tract disease (see below) and should thus be performed after auscultation so that you know whether or not these problems exist prior to palpation. However, for the sake of completeness it will be described here. The carotids can be located by sliding the second and third finger of either hand along the side of the trachea at the level of the thyroid cartilage (i.e. adams apple). The carotid pulsation is palpable just lateral to the groove formed by the trachea and the surrounding soft tissue. The quantity of subcutaneous fat will dictate how firmly you need to push. The pulsations should be easily palpable. Diminution may be caused by atherosclerosis, aortic stenosis, or severely impaired ventricular performance. Do not push on both sides simultaneously as this may compromise cerebral blood flow.
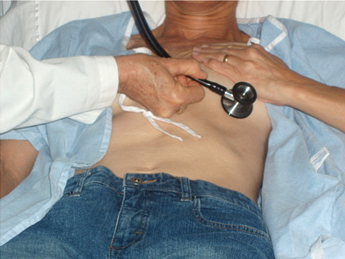
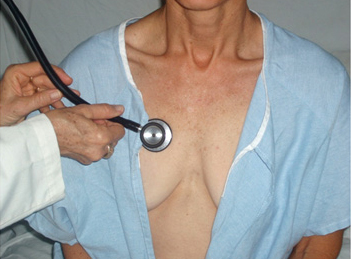
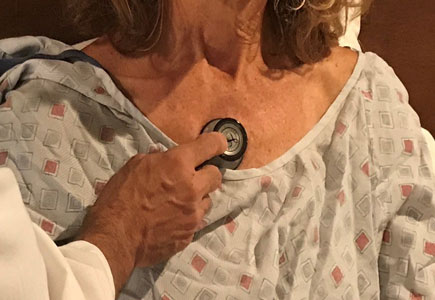
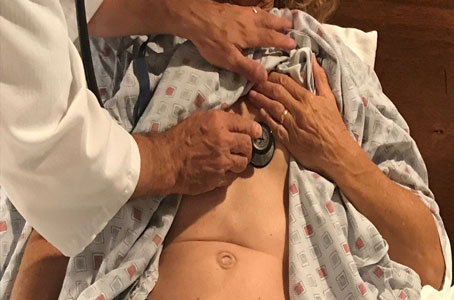
*Palpation of the precordium of a female patient is best done by placing the palm of your right hand directly beneath the patient's left breast such that the edge of your index finger rests against the inferior surface of the breast. Make sure that you tell that patient what you are about to do (and why) before actually performing this maneuver. Remember that with age tissue turgor often declines, causing the breasts to hang below the level of the heart.
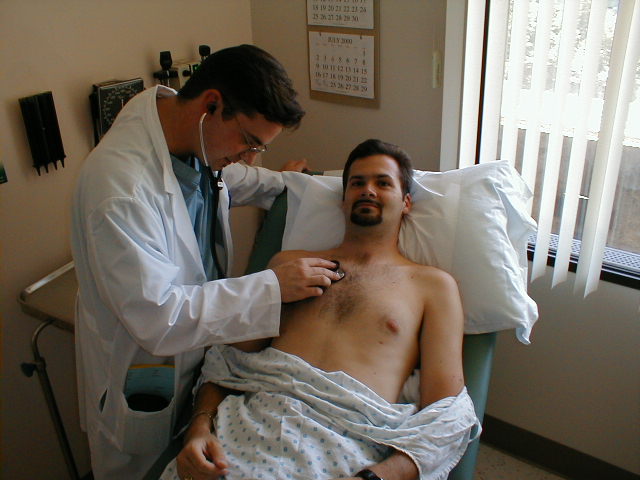
Auscultation:
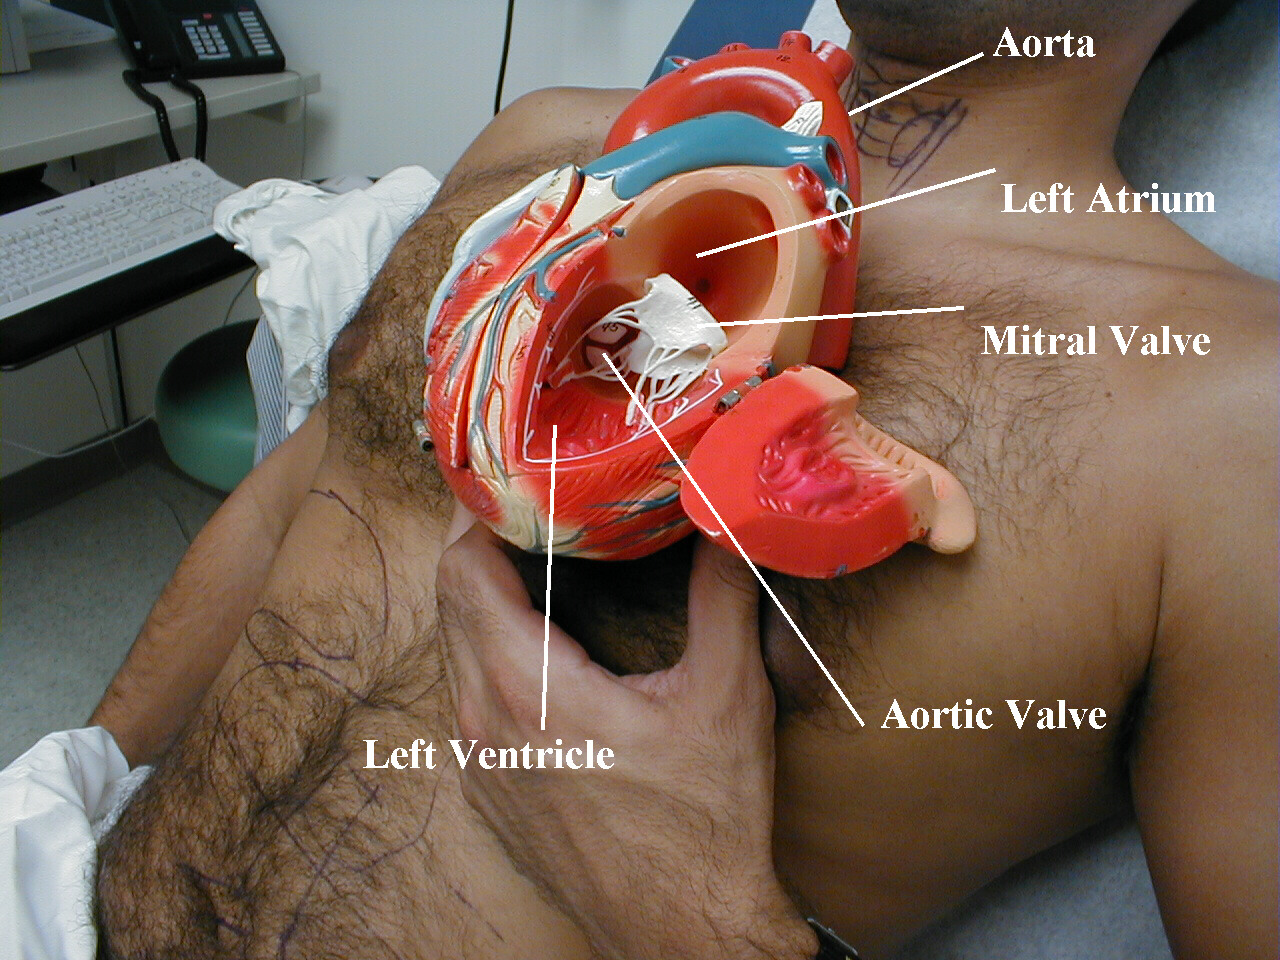
The following anatomic pictures will aid you in understanding the principles of cardiac auscultation.

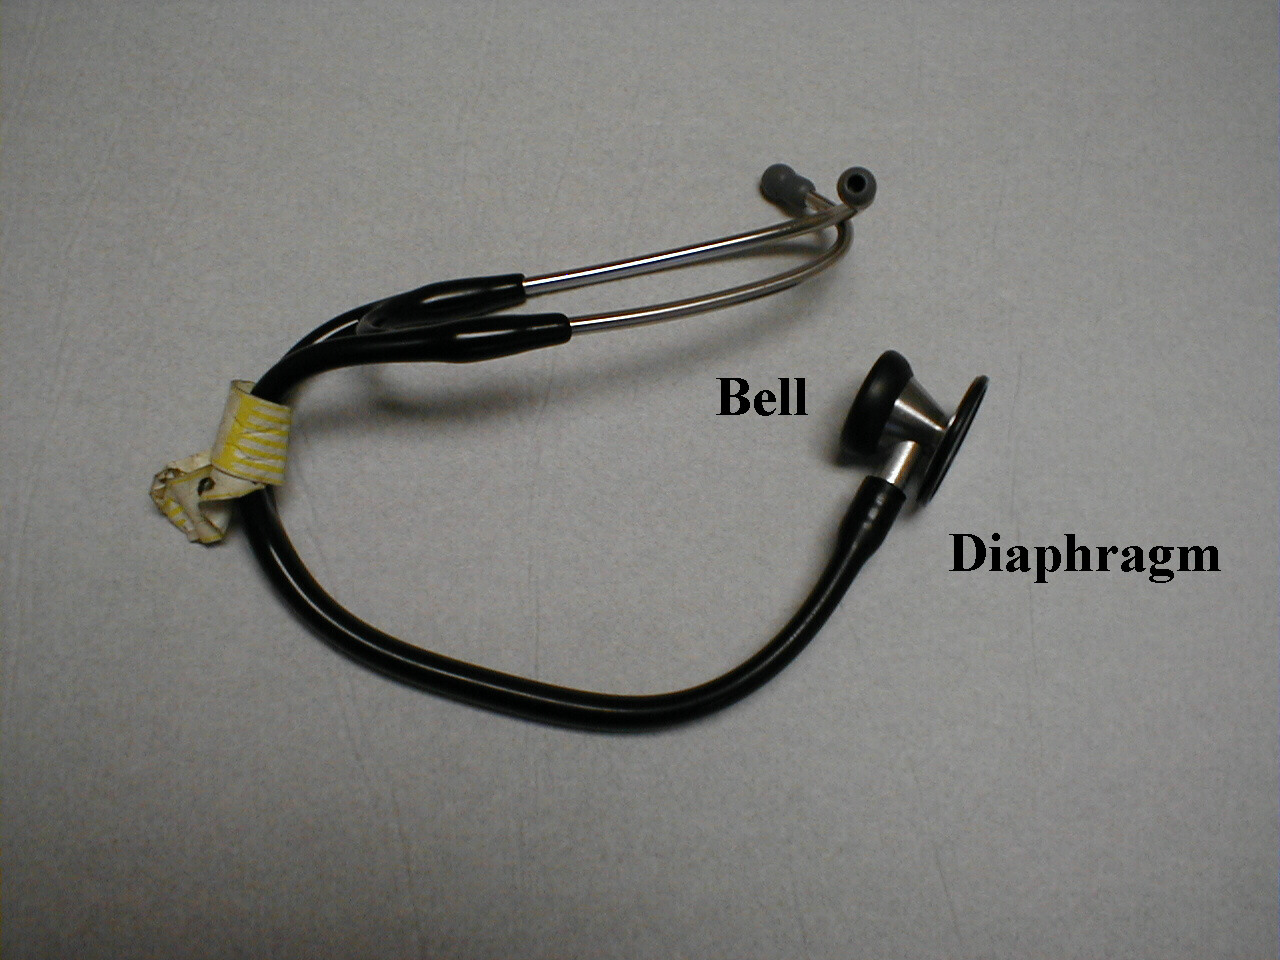
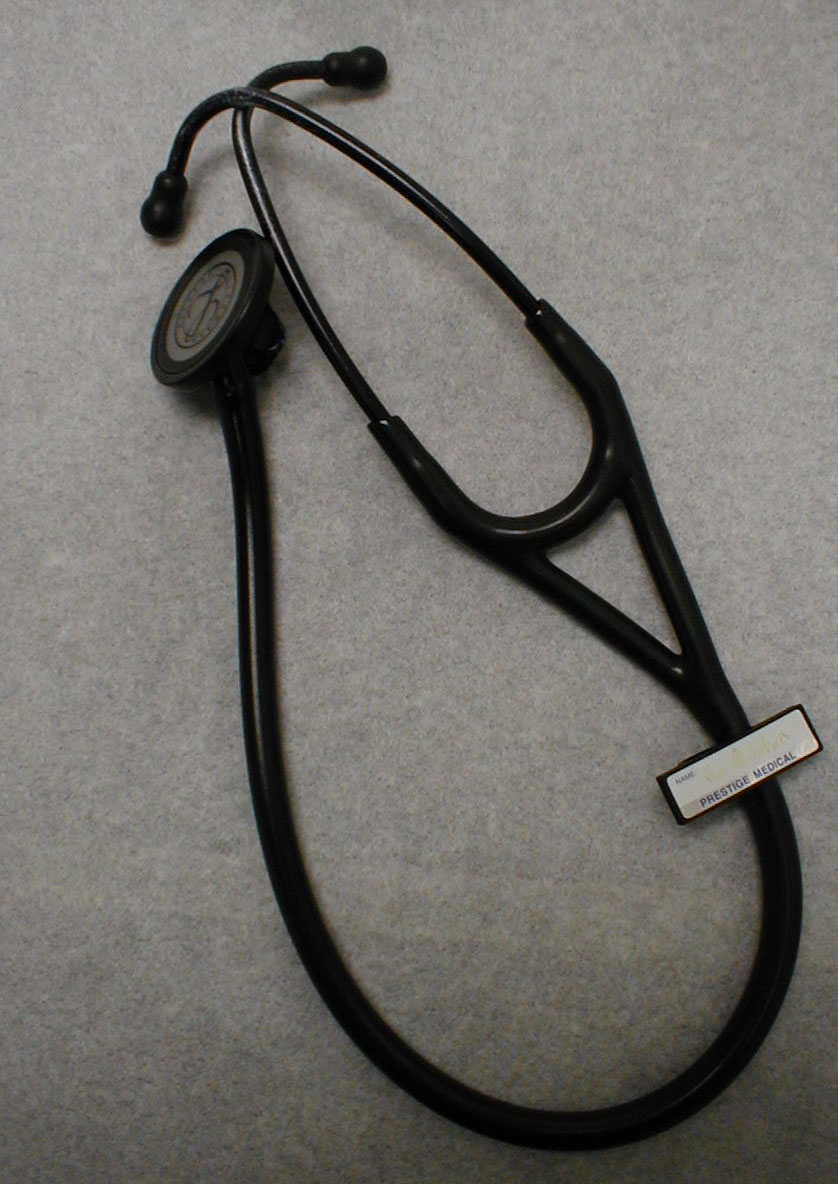
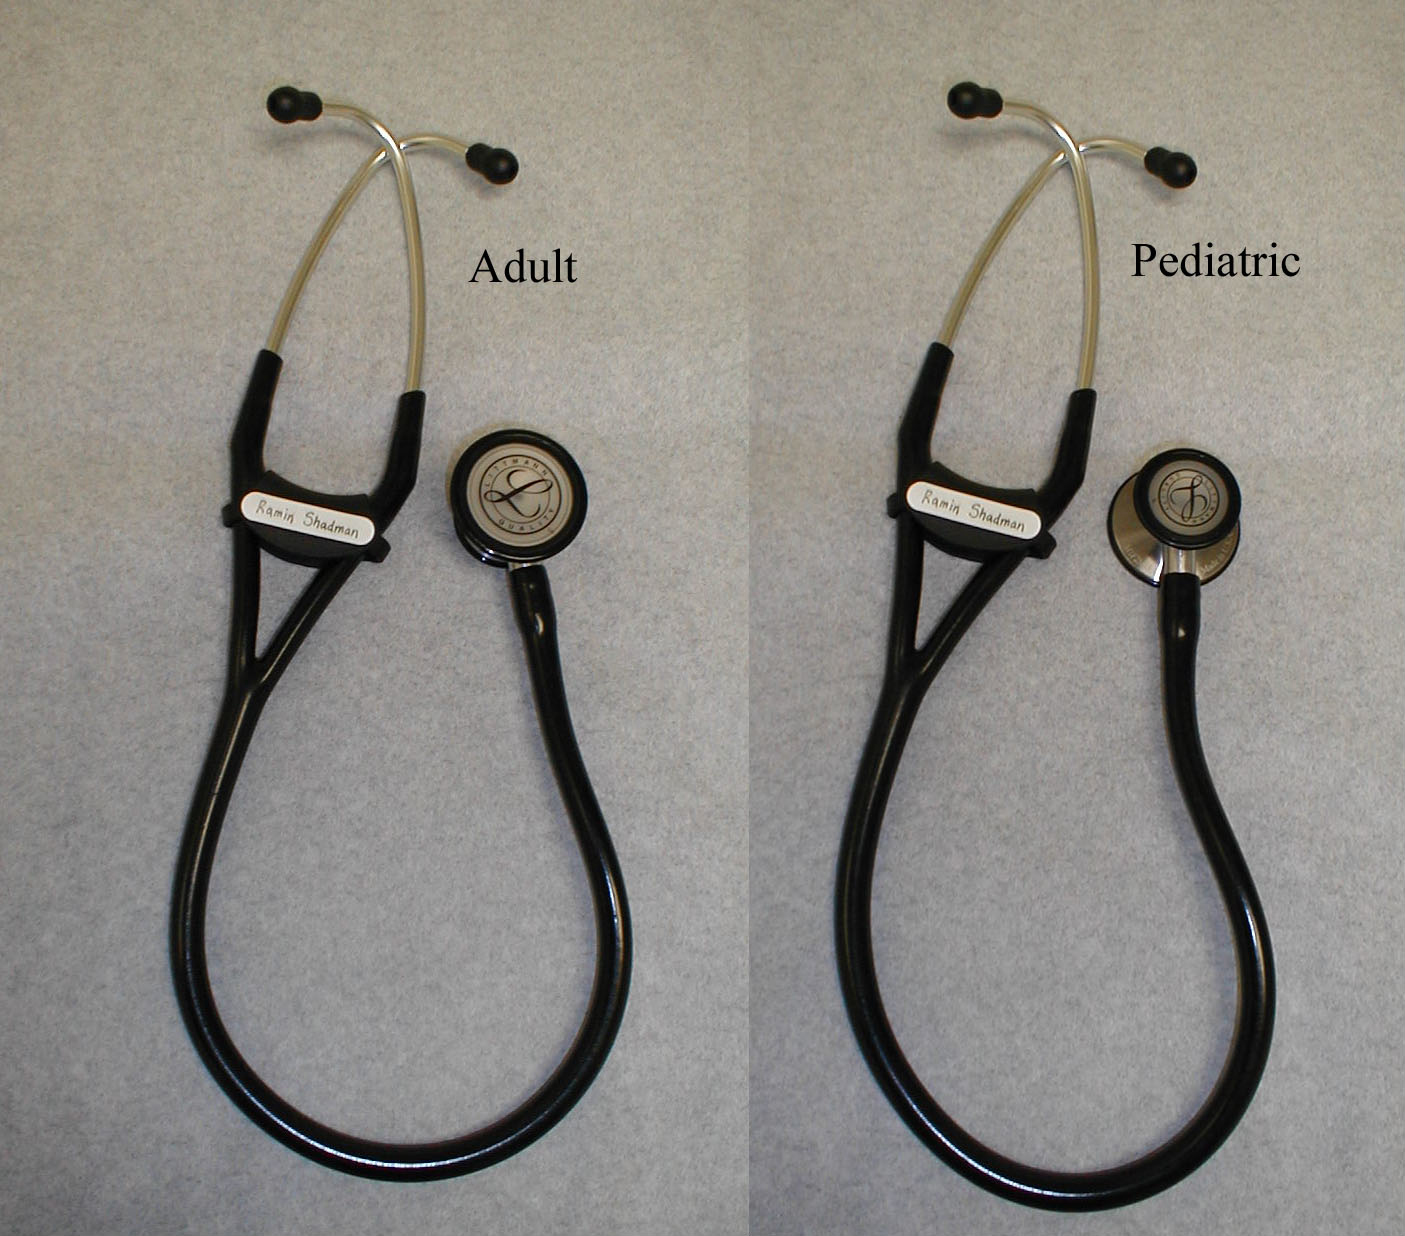
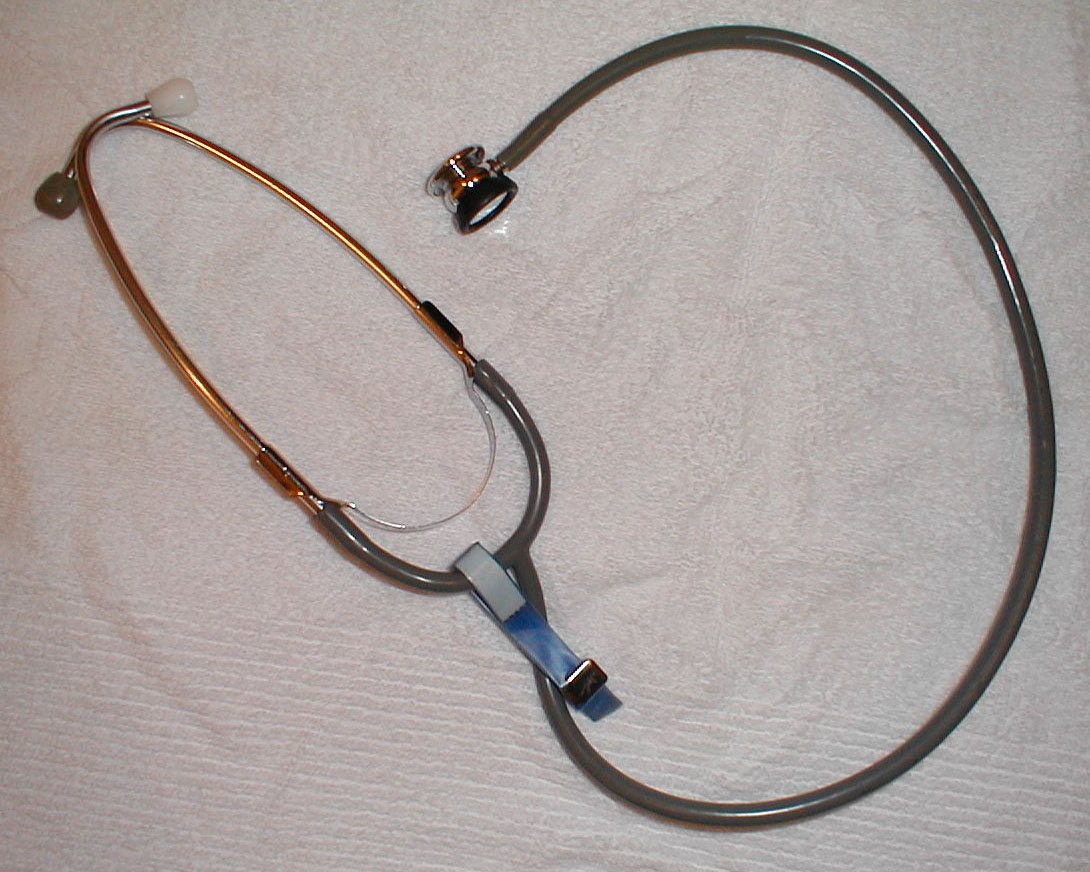
- Become comfortable with your stethescope. There are multiple brands on the market, each of which incorporates its own version of a bell (low pitched sounds) and diaphragm (higher pitched sounds). Some have the diaphragm and bell on opposite sides of the head piece. Others have the bell and diaprhragm built into a single side, with the bell engaged by applying light pressure and the diaphragm engaged by pushing more firmly. Adult, pediatric, and newborn sizes also exist. And some combine adult and pediatric scopes into a single unit. Take the time to read the instructions for your particular model so that you are familiar with how to use it correctly. Several sample stethescopes are pictured below. It's worth mentioning that almost any commercially available scope will do the job. The most important "part" is what sits betwen the ear pieces!
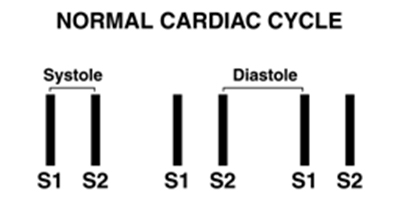
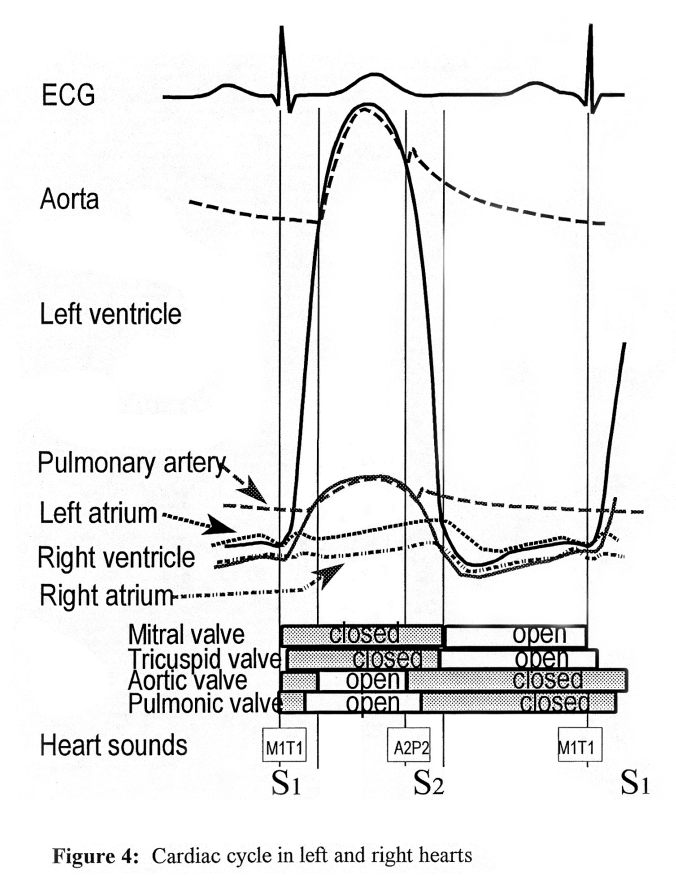
- Engage the diaphragm of your stethescope and place it firmly over the 2nd right intercostal space, the region of the aortic valve. Then move it to the other side of the sternum and listen in the 2nd left intercostal space, the location of the pulmonic valve. Move down along the sternum and listen over the left 4th intercostal space, the region of the tricuspid valve. And finally, position the diaphragm over the 4th intercostal space, left midclavicular line to examine the mitral area. These locations are rough approximations and are generally determined by visual estimation. In each area, listen specifically for S1 and then S2. S1 will be loudest over the left 4th intercostal space (mitral/tricuspid valve areas) and S2 along the 2nd R and L intercostal spaces (aortic/pulomonic valve regions). Note that the time between S1 and S2 is shorter then that between S2 and S1. This should help you to decide which sound is produced by the closure of the mitral/tricuspid and which by the aortic/pulmonic valves and therefore when systole and diastole occur. Compare the relative intensities of S1 and S2 in these different areas.
- In younger patients, you should also be able to detect physiologic splitting of S2. That is, S2 is made up of 2 components, aortic (A2) and pulmonic (P2) valve closure. On inspiration, venous return to the heart is augmented and pulmonic valve closure is delayed, allowing you to hear first A2 and then P2. On expiration, the two sounds occur closer together and are detected as a single S2. Ask the patient to take a deep breath and hold it, giving you a bit more time to identify this phenomenon. The two components of S1 (mitral and tricuspid valve closure) occur so close together that splitting is not appreciated.
- You may find it helpful to tap out S1 and S2 with your fingers as you listen, accentuating the location of systole and diastole and lending a visual component to this exercise. While most clinicians begin asucultation in the aortic area and then move across the precordium, it may actually make more sense to begin laterally (i.e. in the mitral area) and then progress towards the right and up as this follows the direction of blood flow. Try both ways and see which feels more comfortable.
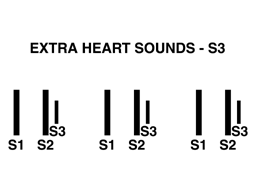
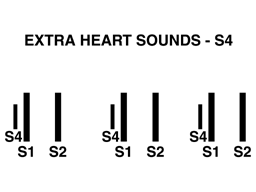
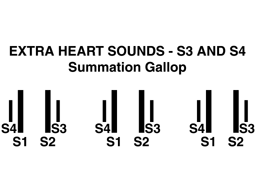
- Listen for extra heart sounds (a.k.a. gallops). While present in normal subjects up to the ages of 20-30, they represent pathology in older patients. An S3 is most commonly associated with left ventricular failure and is caused by blood from the left atrium slamming into an already overfilled ventricle during early diastolic filling. The S4 is a sound created by blood trying to enter a stiff, non-compliant left ventricle during atrial contraction. It's most frequently associated with left ventricular hypertrophy that is the result of long standing hypertension. Either sound can be detected by gently laying the bell of the stethoscope over the apex of the left ventricle (roughly at the 4th intercostal space, mid-clavicular line) and listening for low pitched "extra sounds" that either follow S2 (i.e. an S3) or precede S1 (i.e. an S4). These sounds are quite soft, so it may take a while before you're able to detect them. Positioning the patient on their left side while you listen may improve the yield of this exam. The presence of both an S3 and S4 simultaneously is referred to as a summation gallop.
- Murmurs: These are sounds that occur during systole or diastole
as a result of turbulent blood flow. and fall into 2 broad
groups:
- Leaking backwards across a valve that is supposed to be closed. These are referred to as regurgitant or insufficiency murmurs (e.g. mitral regurgitation, aortic insufficiency).
- Flow disturbance across a valve that will not open fully/normally. These valves suffer from varying degrees of stenosis (e.g. aortic stenosis).
It's worth mentioning that sometimes "flow murmurs" can occur, resulting from high output across structurally normal valves. In addition, some valves with insignificant degrees of pathology (e.g. aortic sclerosis - where the valve leaflets are slightly calcified yet function normally) generate murmurs. Distinguishing which murmurs are clinically relevant takes thought and practice. Ive added a description of some helpful features below.
Traditionally, students are taught that auscultation is performed over the 4 areas of the precordium that roughly correspond to the "location" of the 4 valves of the heart (i.e. aortic valve area ='s the 2nd Right Intercostal Space, pulmonic valve area ='s the 2nd LICS, tricuspid valve area ='s 4th LICS, and mitral valve area ='s 4th LICS in the midclavicular line). This leads to some misperceptions. Valves are not strictly located in these areas nor are the sounds created by valvular pathology restricted to those spaces. So, while it might be OK to listen in only 4 places when conducting the normal exam, it is actually quite helpful to listen in many more when any abnormal sounds are detected. If you hear a murmur, ask yourself:
- Does it occur during systole or diastole?
- What is the quality of the sound (i.e. does it get louder and then softer; does it maintain the same intensity throughout; does it start loud and become soft)? It sometimes helps to draw a pictoral representation of the sound.
- What is the quantity of the sound? The rating
system for murmurs is
as follows:
- 1/6... Can only be heard with careful listening
- 2/6... Readily audible as soon as the stethescope is applied to the chest
- 3/6... Louder then 2/6
- 4/6... As loud as 3/6 but accompanied by a thrill
- 5/6... Audible even when only the edge of the stethescope touches the chest
- 6/6.. Audible to the naked ear
Most murmurs are between 1/6 and 3/6. Louder generally (but not always) indicates greater pathology.
- What is the relationship of the murmur to S1 and S2 (i.e. when does it start and stop)?
- What happens when you march your stethescope from the 2nd RICS (the aortic area) out towards the axilla (the mitral area)? Where is it loudest and in what directions does it radiate? By moving in small increments (i.e. listening in 8 or 10 places along the chest wall) you will be more likely to detect changes in the character of a particular murmur and thus have a better chance of determining which valve is affected and by what type of lesion.
- Auscultation over the carotid arteries (see under aortic stenosis for additional information): In the absence of murmurs suggestive of aortic valvular disease, you can listen for carotid bruits (sounds created by turbulent flow within the blood vessel) at this point in the exam. Place the diaphragm gently over each carotid and listen for a soft, high pitched "shshing" sound. It's helpful if the patient can hold their breath as you listen so that you are not distracted by transmitted tracheal sounds. The meaning of a bruit remains somewhat controversial. I was taught that bruits represented turbulent flow associated with intrinsic atherosclerotic disease... and that the disappearance of a bruit which was previously present was a sign that the lesion was progressing (i.e. further encroachment on the lumen of the vessel). However, a number of studies provide evidence that atherosclerotic disease is frequently absent when a bruit is present as well as the reverse situation. This is actually of clinical importance because recent data suggest that it may be beneficial to surgically repair carotid disease in patients who have significant stenosis yet have not experienced any symptoms (e.g. Transient ischemic attacks or strokes. Surgery in these settings has already proven to be beneficial). Thus, it is becoming increasingly important to determine the best way of identifying asymptomatic carotid artery disease... and carotid auscultation may, in fact, not be the mechanism of choice!


Univeristy of Utah, Review of Cardiac Physiology
 The Auscultation
Assistant is an excellent heart sound simulation
site developed at UCLA. Press the "Back" button to return to this page.
The Auscultation
Assistant is an excellent heart sound simulation
site developed at UCLA. Press the "Back" button to return to this page.
Blaufuss Multimedia Heart Sounds Tutorial. Press the "Back" button to return to this page.
This University of Washington site also provides a variety of simulated heart sounds. Press the "Back" button to return to this page.
Identifying the Most Common Murmurs:
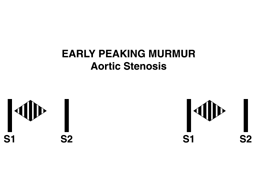
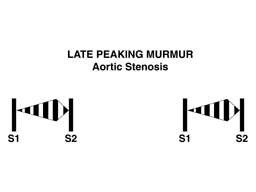
1. Systolic Murmurs: In the adult population, these generally represent either aortic stenosis or mitral regurgitation. To distinguish between them, remember the following:
Murmurs of Aortic Stenosis (AS):
- Tend to be loudest along the upper sternal borders and get softer as you move down and out towards the axilla. There is, however, a phenomenon referred to at the gallavardin Effect which can cause murmurs of AS to sound as loud towards the axilla as they do over the aortic region. When this occurs, the shape of the sound should be similar in both regions, helping you to distinguish it from MR (see below).
- Have a growling, harsh quality (i.e. get louder and then
softer.. also
referred to as a crescendo decrescendo, systolic
ejection, or diamond
shaped murmur). When the stenosis becomes more severe,
the point at which
the murmur is loudest (i.e. its peak intensity) occurs
later in systole,
as it takes longer to generate the higher ventricular
pressure required
to push blood through the tight orifice.
- Are better heard when the patient sits up and exhales.
- Are heard in the carotid arteries and over the right clavicle. Radiation to the clavicle can be appreciated by simply resting the diaphragm on the right clavicle. To assess for transmission to the carotids, have the patient hold their breath while you listen over each artery using the diaphragm of your stethescope. Carotid bruits can be confused with the radiating murmur of aortic stenosis. In general, carotid bruits are softer. Also, murmurs associated with aortic pathology should be audible in both carotids and get louder as you move down the vessel, towards the chest. In settings where carotid pathology coexists with aortic stenosis, a loud transmitted murmur associated with a valvular lesion may overwhelm any sound caused by intrinsic carotid disease, masking it completely.
- Carotid upstrokes refer to the quantity and timing of blood flow into the carotids from the left ventricle. They can be affected by aortic stenosis and must be assessed whenever you hear a murmur that could be consistent with AS. This is done by placing your fingers on the carotid artery as described above while you simultaneously listen over the chest. There should be no delay between the onset of the murmur, which marks the beginning of systole, and when you feel the pulsation in the carotid. In the setting of critical (i.e. very severe) aortic stenosis, small amounts of blood will be ejected into the carotid and there will be a lag between when you hear the murmur and feel the impulse. This is referred to as diminished and delayed upstrokes (a.k.a. parvus et tardus), as opposed to the full and prompt inflow which occurs in the absence of disease. Mild or moderate stenosis does not alter the character of carotid in-flow.
- Sub-Aortic stenosis is a relatively rare condition where the obstruction of flow from the left ventricle into the aorta is caused by an in-growth of septal tissue in the region below the aortic valve known as the aortic outflow tract. It causes a crescendo-decrescendo murmur that sounds just like aortic stenosis. As opposed to AS, however, the murmur is louder along the left lower sternal border and out towards the apex. This makes anatomic sense as the obstruction is located near this region. It also does not radiate loudly to the carotids as the point of obstruction is further from these vessels in comparison with the aortic valve. You may also be able to palpate a bisferiens pulse in the carotid artery (see under aortic insufficiency). Furthermore, the murmur will get softer if the ventricle is filled with more blood as filling pushes the abnormal septum away from the opposite wall, decreasing the amount of obstruction. Conversely, it gets louder if filling is decreased. This phenomenon can actually be detected on physical exam and is a useful way of distinguishing between AS and sub-aortic obstruction. Ask the patient to valsalva while you listen. This decreases venous return and makes the murmur louder (and will have the opposite effect on a murmur of AS). Then, again while listening, squat down with the patient. This maneuver increases venous return, causing the murmur to become softer. Standing will cause the opposite to occur. You need to listen for 20 seconds or so after each change in position to really appreciate any difference. Because the degree of obstruction can vary with ventricular filling, sub-aortic stenosis is referred to as a dynamic outflow tract obstruction. In aortic stenosis, the degree of obstruction that exists at any given point in time is fixed.
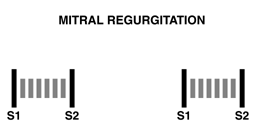
Murmurs of Mitral Regurgitation (MR):
- Sound the same throughout systole.
- Generally do not have the harsh quality associated with aortic stenosis. In fact, they sound a bit like the "shshing" noise produced when you pucker your lips and blow through clenched teeth.
- Get louder as you move your stethescope towards the axilla.
- Will get even louder if you roll the patient onto their left side while keeping your stethescope over the mitral area of the chest wall and listening as they move. This maneuver brings the chamber receiving the regurgitant volume, the left atrium, closer to your stethescope, accentuating the murmur.
- Get louder if afterload is suddenly increased, which can be accomplished by having the patient close their hands tightly. MR is also affected by the volume of blood returning to the heart. Squatting increases venous return, causing a louder sound. Standing decreases venous return, thereby diminishing the intensity of the murmur.
Sometimes murmurs of aortic stenosis and mitral regurgitation co-exist, which can be difficult to sort out on exam. Moving your stethescope back and forth between the mitral and aortic areas will allow for direct comparison, which may help you decide if more then one type of lesion is present or if the quality of the murmur is the same in both locations, changing only in intensity (i.e. consistent with a one valve problem).
2. Diastolic Murmurs: Tend to be softer and therefore much more difficult to hear then those occurring during systole. This makes physiologic sense as diastolic murmurs are not generated by high pressure ventricular contractions. In adults they may represent either aortic regurgitation or mitral stenosis, neither of which is too common. While systolic murmurs are often obvious, you will probably not be able to detect diastolic murmurs on your own until you have had them pointed out by a more experienced examiner.
Aortic Regurgitation (AR); a.k.a. Aortic Insufficiency (AI):
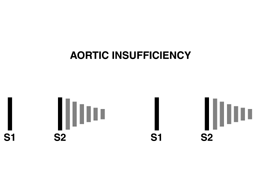
- Is best heard along the left para-sternal border, as this is the direction of the regurgitant flow.
- Becomes softer towards the end of diastole (a.k.a. decrescendo).
- Can be accentuated by having the patient sit up, lean forward and exhale while you listen.
- Occasionally accompanies aortic stenosis, so listen carefully for regurgitation in patients with AS.
- Will cause the carotid upstrokes to feel extraordinarily full as significant regurgitation increases ventricular pre-load, resulting in ejection of an augmented stroke volume. AI can also produce a double peaked pulsation in the carotids known as a bisferiens pulse, which is quite difficult to appreciate. Feeling your own carotid impulse at the same time that you're palpating the patient's may accentuate this finding. In cases of co-existent AS and AI, a bisferiens pulse suggests that the AI is the dominant problem. It may also be present with sub-aortic stenosis (see above), helping to distinguish it from AS.
Mitral Stenosis (MS):
- Heard best towards the axilla
- Can be accentuated by having the patient role onto their left side while you listen with the bell of your sthethescope.
- Associated with a soft, low pitched sound preceding the murmur, called the opening snap. This is the noise caused by the calcified valve "snapping" open. It can, however, be pretty hard to detect.
Auscultation, an ordered approach:
Try to focus on each sound individually and in a systematic
fashion. Ask
yourself: Do I hear S1? Do I hear S2? What is their relative
intensities
in each of the major valvular areas? Is S2 split
physiologically? Are there
extra sounds before S1or after S2 (i.e. an S4 or S3)? Is
there a murmur
during systole? Is there a murmur during diastole? If a
murmur is present,
how loud is it? What is its character? Where does it
radiate? Are there
any maneuvers which affect its intensity? Remember that
these sounds are
created by mechanical events in the heart. As you listen,
remind yourself
what is happening to produce each of them. By linking
auscultatory findings
with physiology, you can build a case in your mind for a
particular lesion.
A few final comments about auscultation:
- Pulmonic valve murmurs are rare in the adult population and, even when present, are difficult to hear due to the relatively low pressures generated by the right side of the heart.
- Tricuspid regurgitation (TR) is relatively common, most frequently associated with elevated left sided pressures which are then transmitted to the right side of the heart (though a number of other processes can cause TR as well). In this setting, both mitral and tricuspid regurgitation often co-exist. The murmur of MR is generally louder then that of TR, again due to the higher pressures on the left side of the heart. It can therefore be difficult to sort out if there is co-existent TR when MR is present. Try to listen along both the low left and right sternal borders (areas where the tricuspid valve is best assessed) and compare this to the mitral area. Move your stethoscope slowly across the precordium and note if there is any change in the character/intensity of the murmur. TR murmurs are also accentuated by inhalation, which increases venous return and therefore flow across the valve.
- Patients with COPD (emphysema) often have very soft heart sounds. Air trapping and subsequent lung hyperinflation results in a posterior-inferior rotation of the heart away from the chest wall and causes the interposition of lung between the chest wall and heart. In this setting, heart sounds can be accentuated by having the patient lean forward and fully exhale prior to listening. Furthermore, in any patient with particularly "noisy" breath sounds, it may be helpful to ask them to hold their breath (if they're able) while you examine the heart.
- Rubs: These are uncommon sounds produced when the parietal and visceral pericardium become inflamed, generating a creaky-scratchy noise as they rub together. The classic rub is actually made up of three sounds, associated with atrial contraction, ventricular contraction, and ventricular filling. In reality, its rare to hear all 3 components (more commonly, 2 are apparent). They can be accentuated by listening when the patient sits up, leans forward and exhales, bringing the two layers in closer communication. I feel compelled to mention this finding only because a common short hand for reporting the results of the cardiac exam comments on the absence of "gallops, murmurs, or rubs," implying (incorrectly) that rubs are a frequent finding.
- If a patient has an abnormal heart sound due to a structural defect that has been quantified by echocardiography, make sure that you compare your findings to those identified during the study. This is a great way of learning!
- Don't get frustrated! Auscultation is a difficult skill to "master" and we are all continually refining our techniques. Take your time. Make sure the room is quiet. Be patient. Ask for help frequently. Read about particular murmurs and their pathophysiology when you encounter them. A number of the more subtle findings (e.g. an S3 or S4) can be very difficult to identify when the patient is tachycardic, a not uncommon scenario as this is one of the compensatory mechanisms for dealing with the dysfunction that has generated these findings in the first place. Re-examination after the patient has made clinical improvement may be more revealing.
In general, many of the above techniques are not used when examining every patient. If the exam is normal, it would be neither efficient nor revealing to put a patient through all of these maneuvers. The goal is to have a "bag of skills" at your disposal that you can reach into and employ to better define abnormalities when they present themselves.