The Lung Exam
The 4 major components of the lung exam (inspection, palpation, percussion and auscultation) are also used to examine the heart and abdomen. Learning the appropriate techniques at this juncture will therefore enhance your ability to perform these other examinations as well. Vital signs, an important source of information, are discussed elsewhere.
Inspection/Observation:
A great deal of information can be gathered from simply watching a patient breathe. Pay particular attention to:
- General comfort and breathing pattern of the patient. Do they appear distressed, diaphoretic, labored? Are the breaths regular and deep?
- Use of accessory muscles of breathing (e.g. scalenes, sternocleidomastoids). Their use signifies some element of respiratory difficulty.
- Color of the patient, in particular around the lips and
nail beds. Obviously, blue is bad!
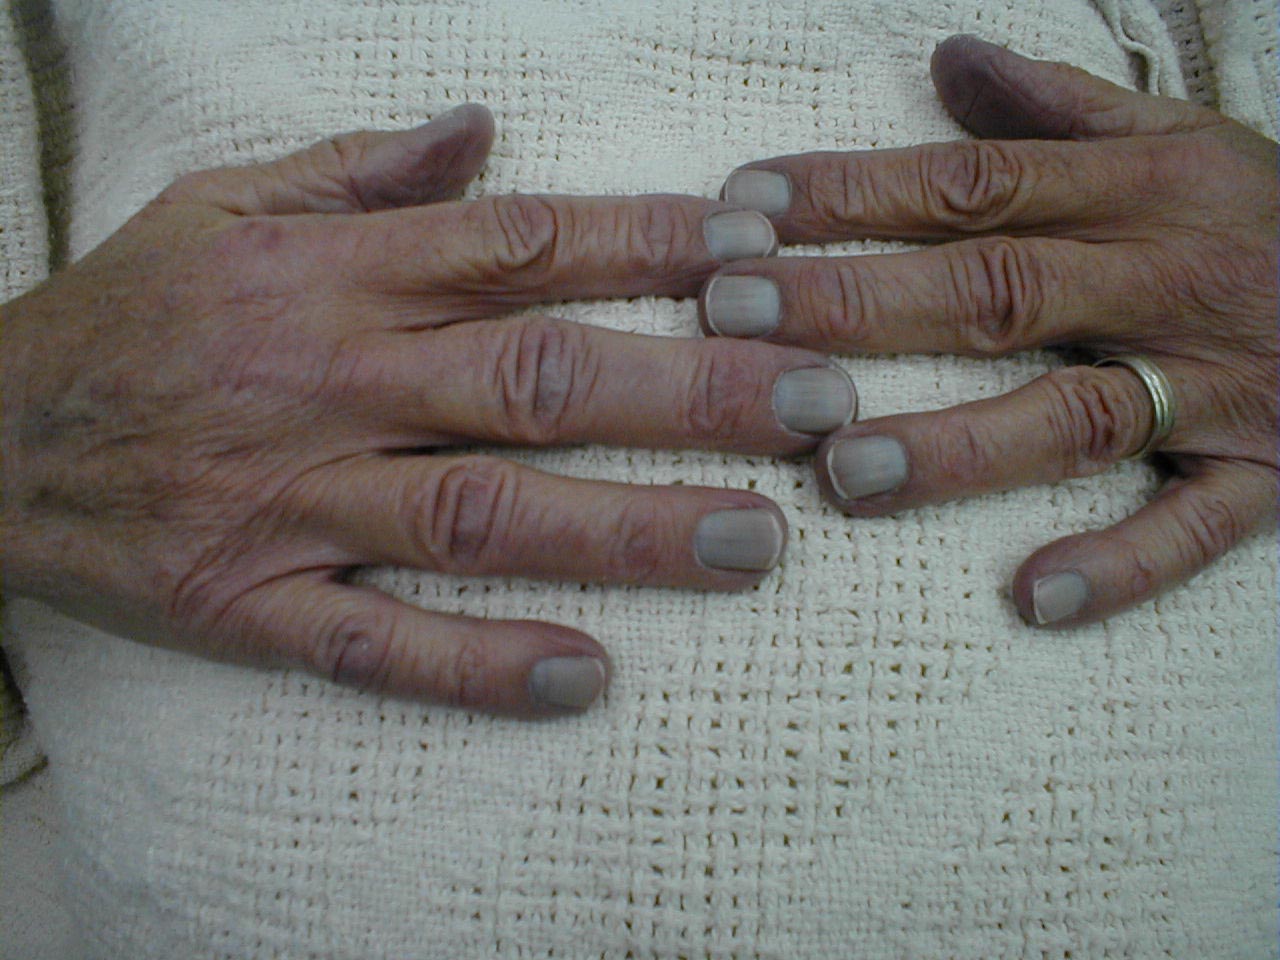 Cyanosis of nail beds
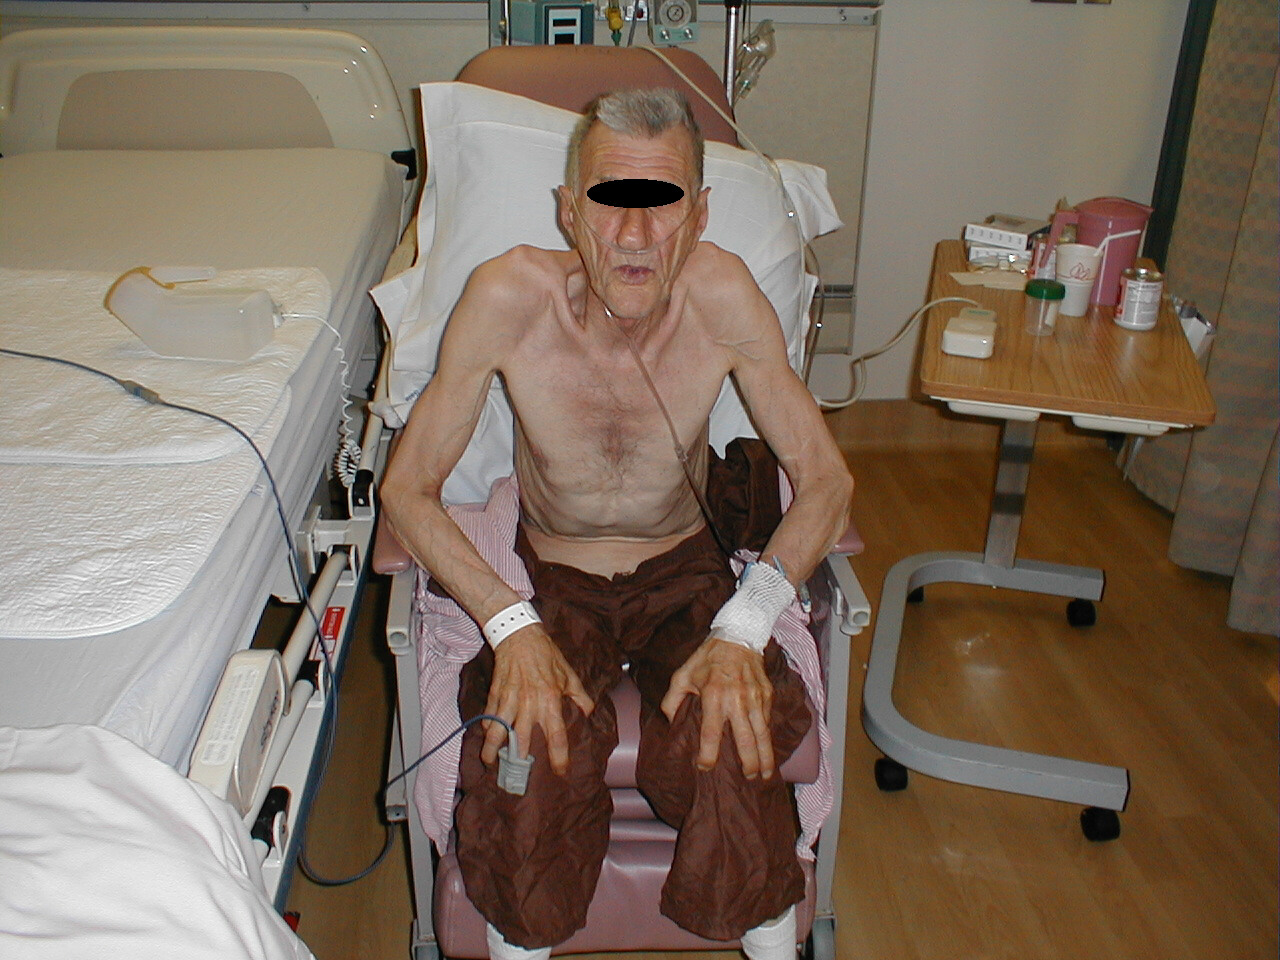
 - The position of the patient. Those with extreme pulmonary dysfunction will
often sit up-right. In cases of real distress, they will lean forward, resting
their hands on their knees in what is known as the tri-pod position.
Patient with emphysema bending over in Tri-Pod Position
- Breathing through pursed lips, often seen in cases of emphysema.
- Ability to speak. At times, respiratory rates can be so high and/or work of breathing so great that patients are unable to speak in complete sentences. If this occurs, note how many words they can speak (i.e. the fewer words per breath, the worse the problem!).
- Any audible noises associated with breathing as occasionally, wheezing or the gurgling caused by secretions in large airways are audible to the "naked" ear.
- The direction of abdominal wall movement during inspiration. Normally, the descent of the diaphragm pushes intra-abdominal contents down and the wall outward. In cases of severe diaphragmatic flattening (e.g. emphysema) or paralysis, the abdominal wall may move inward during inspiration, referred to as paradoxical breathing. If you suspect this to be the case, place your hand on the patient's abdomen as they breathe, which should accentuate its movement.
- Any obvious chest or spine deformities. These may arise as a result of chronic
lung disease (e.g. emphysema), occur congenitally, or be otherwise acquired.
In any case, they can impair a patient's ability to breathe normally. A few
common variants include:
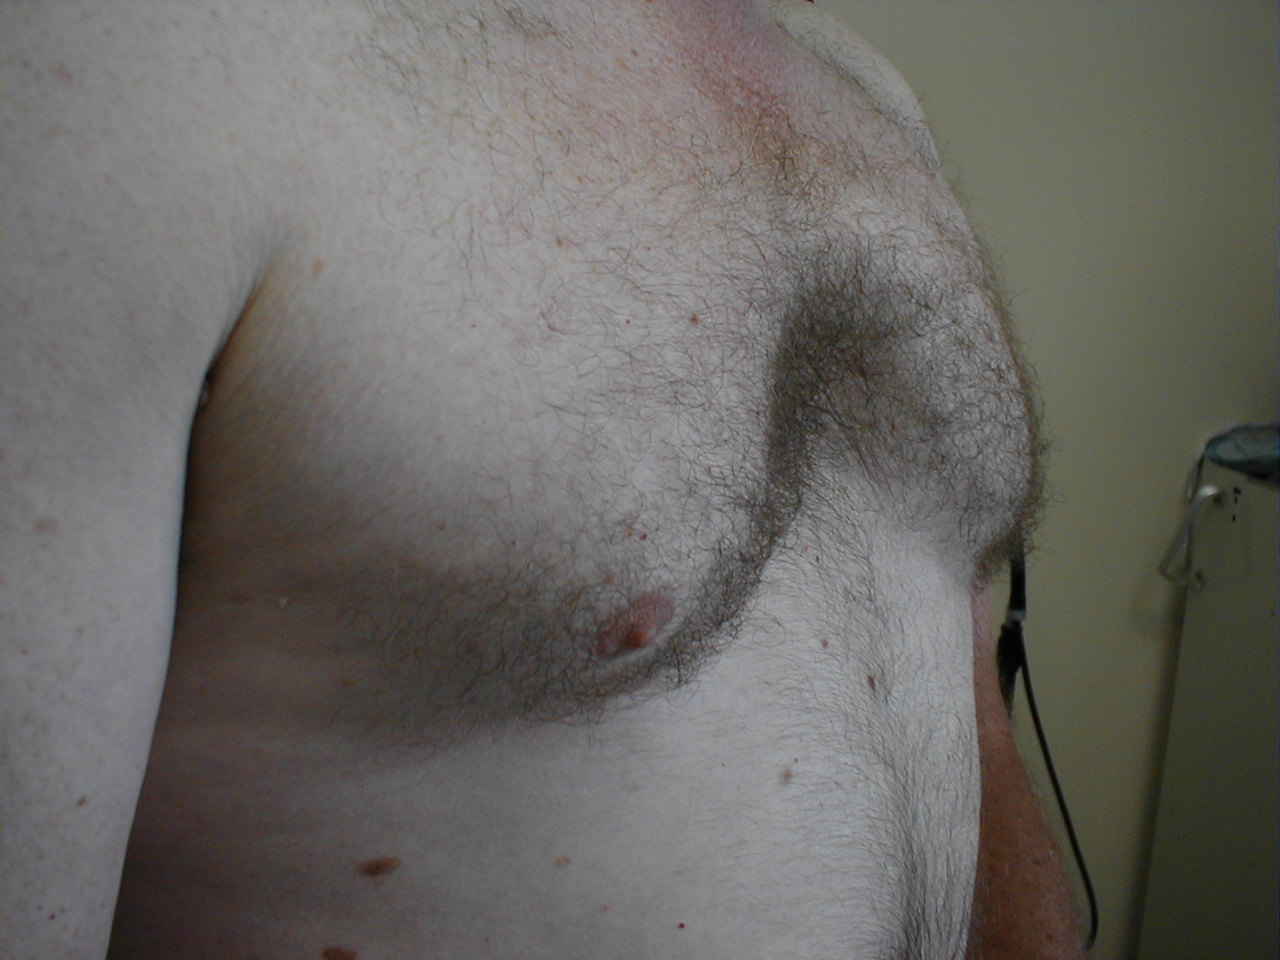
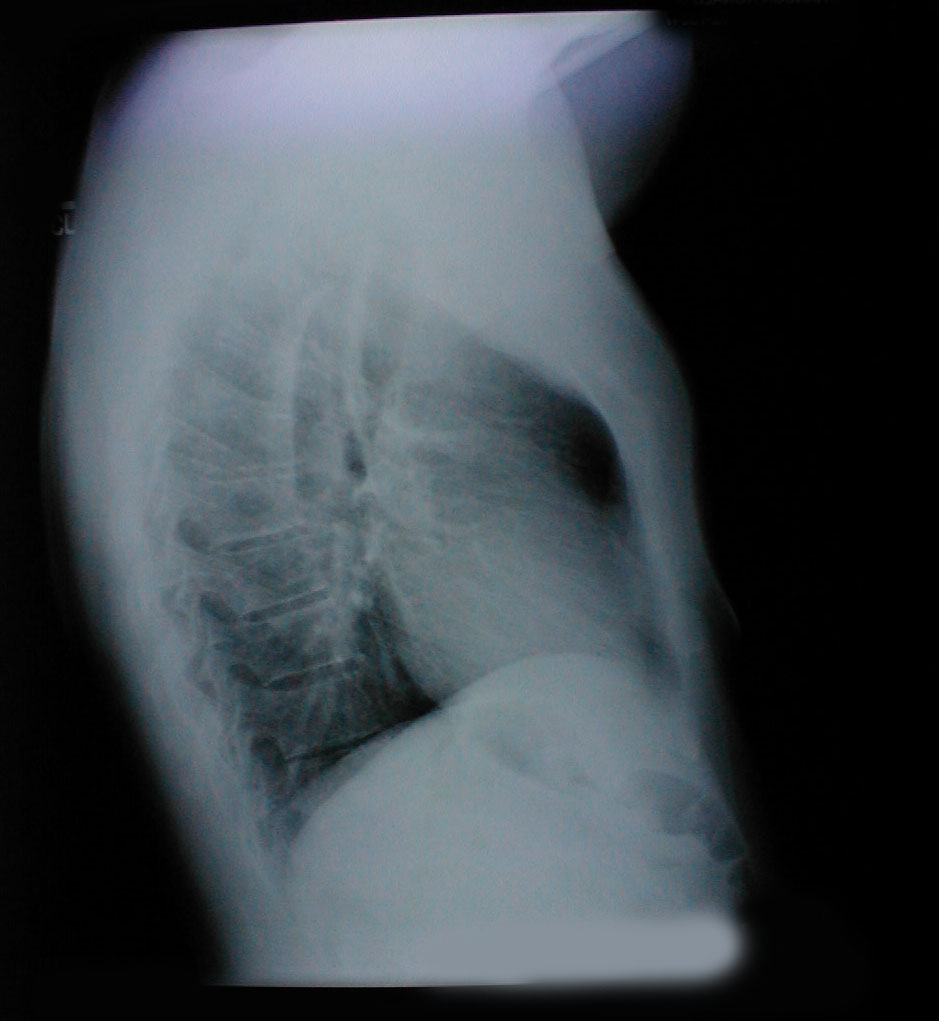
- Pectus excavatum: Congenital posterior displacement of lower aspect
of sternum. This gives the chest a somewhat "hollowed-out" appearance.
The x-ray shows a subtle concave appearance of the lower sternum.
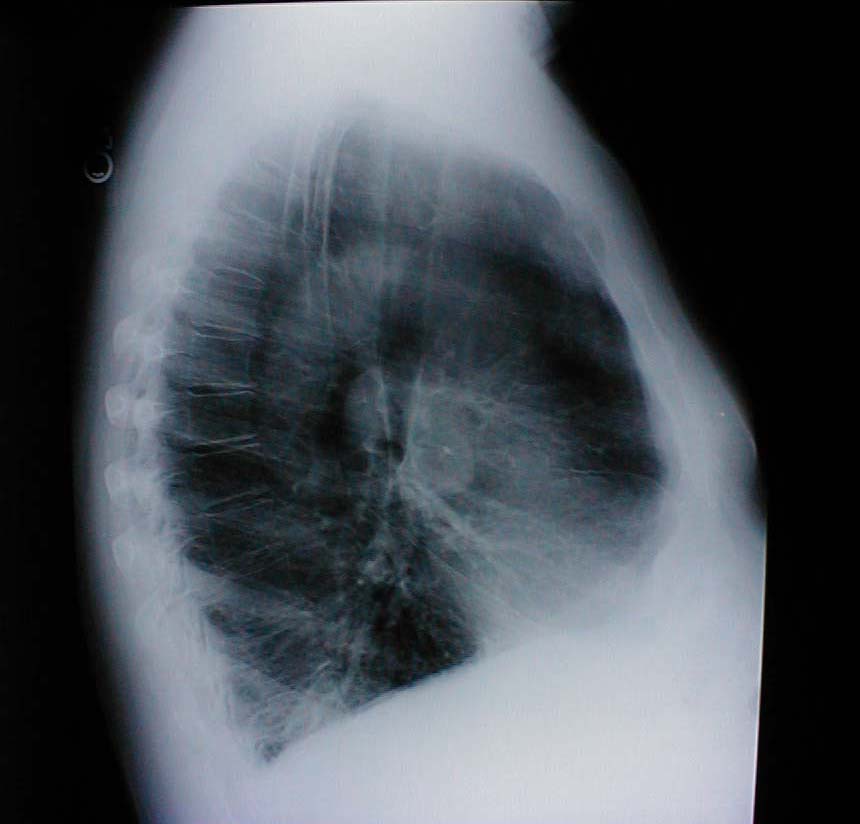
- Barrel chest: Associated with emphysema and lung hyperinflation. Accompanying
xray also demonstrates
increased anterior-posterior diameter as well as diaphragmatic flattening.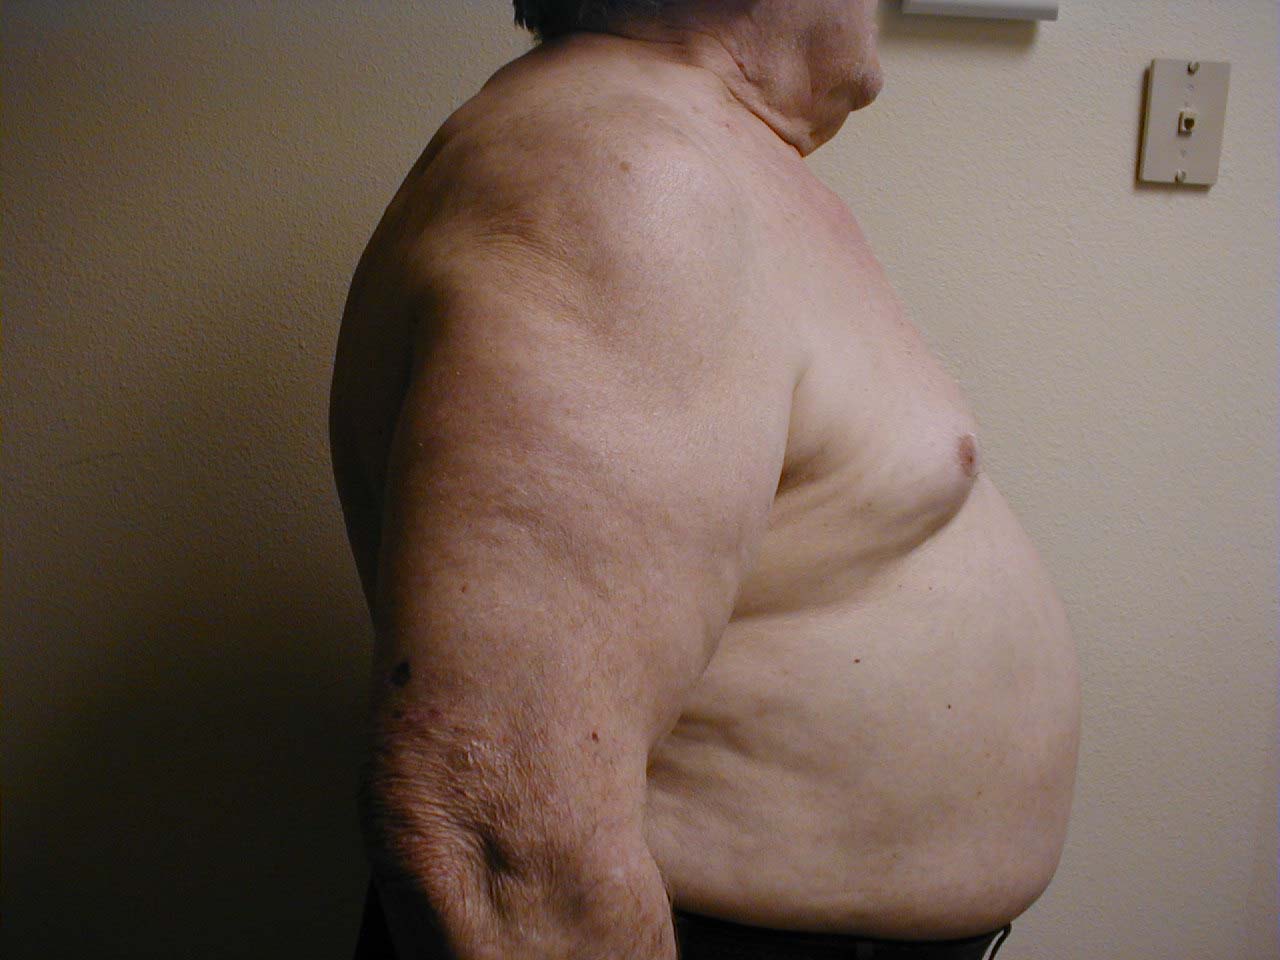
- Spine abnormalities:
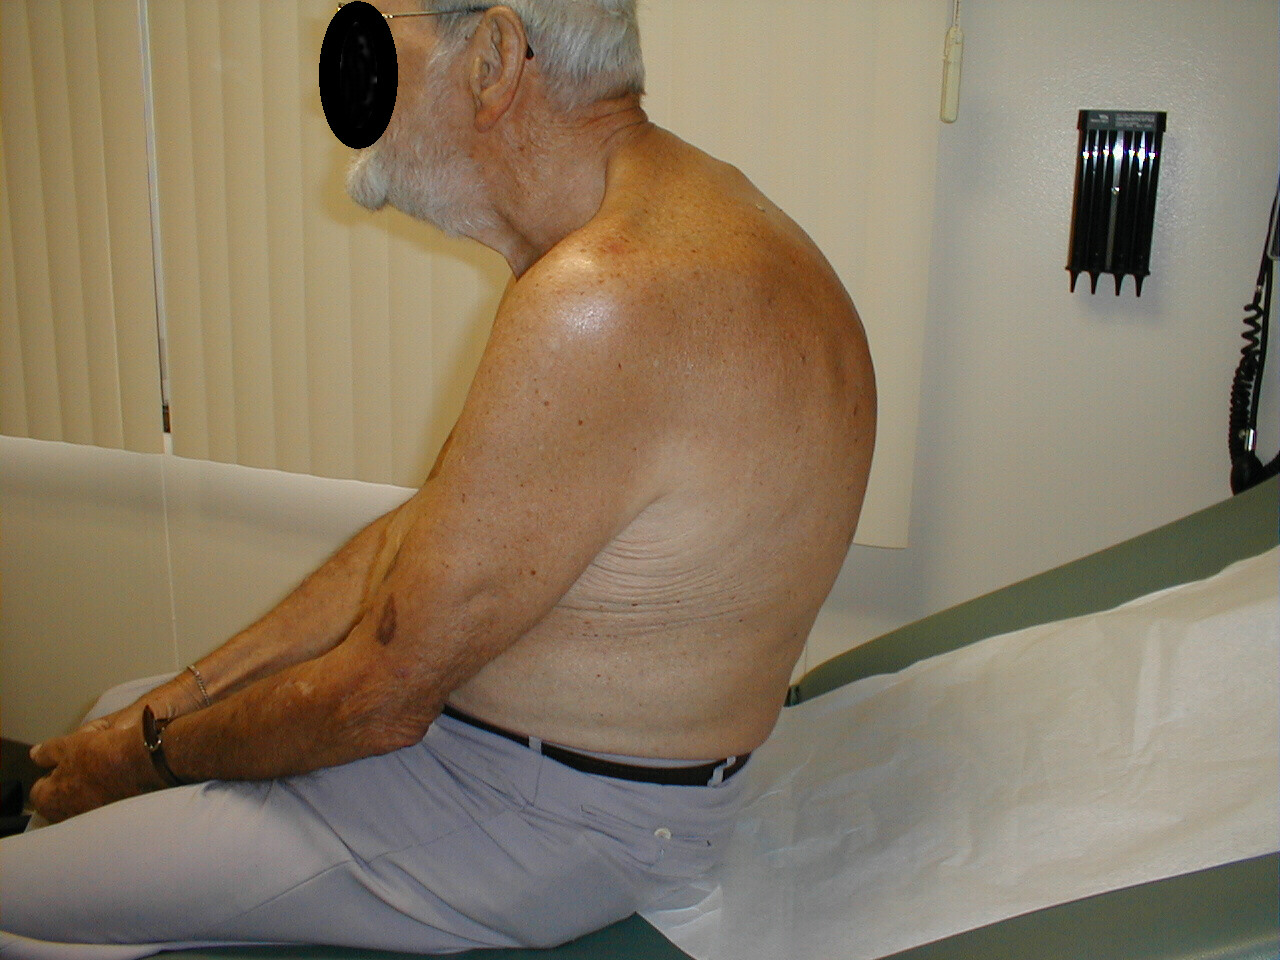
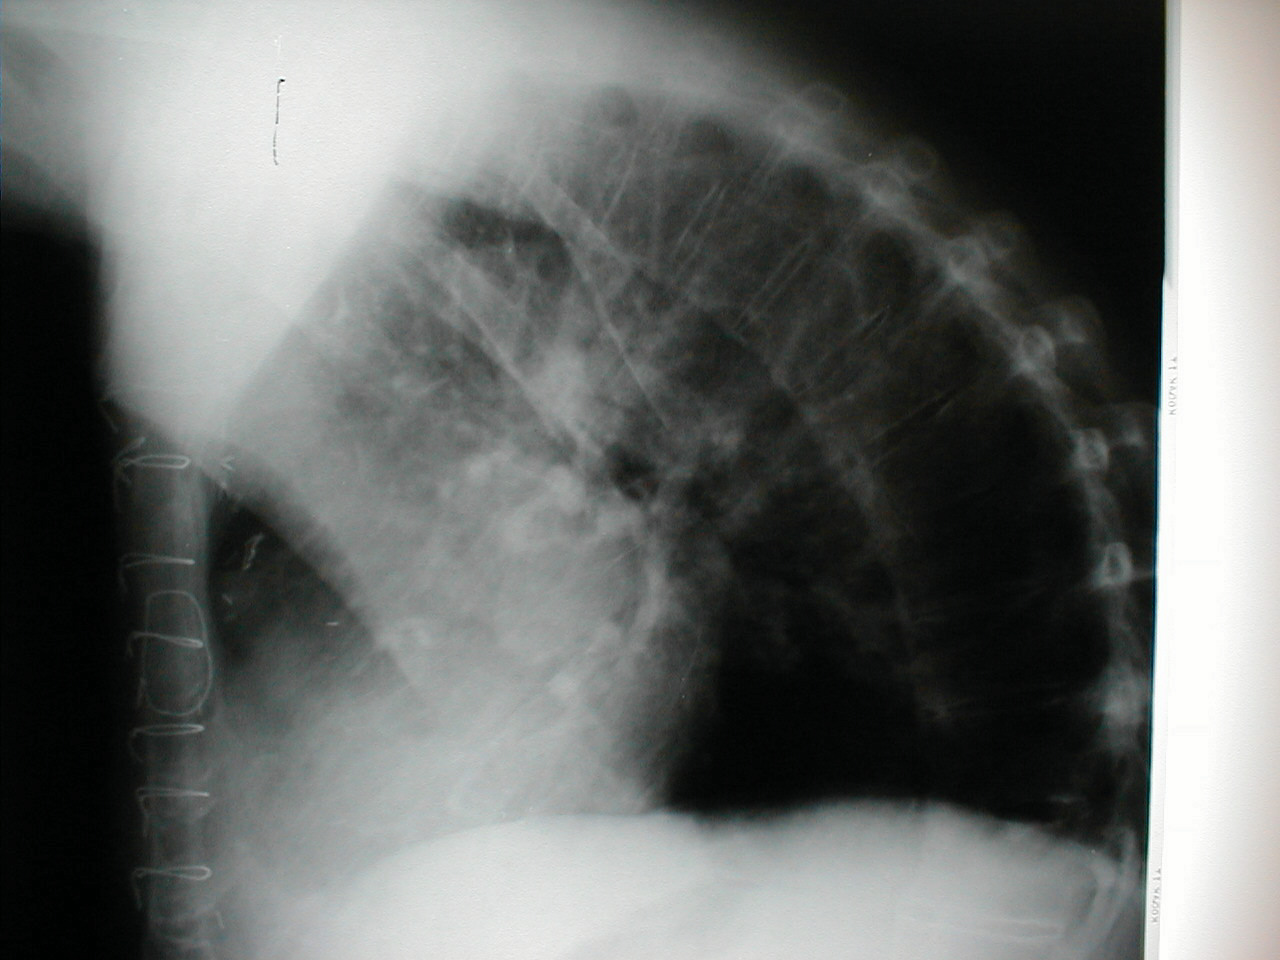
- Kyphosis: Causes the patient to be bent forward. Accompanying X-Ray
of same patient clearly demonstrates extreme curvature of the spine.
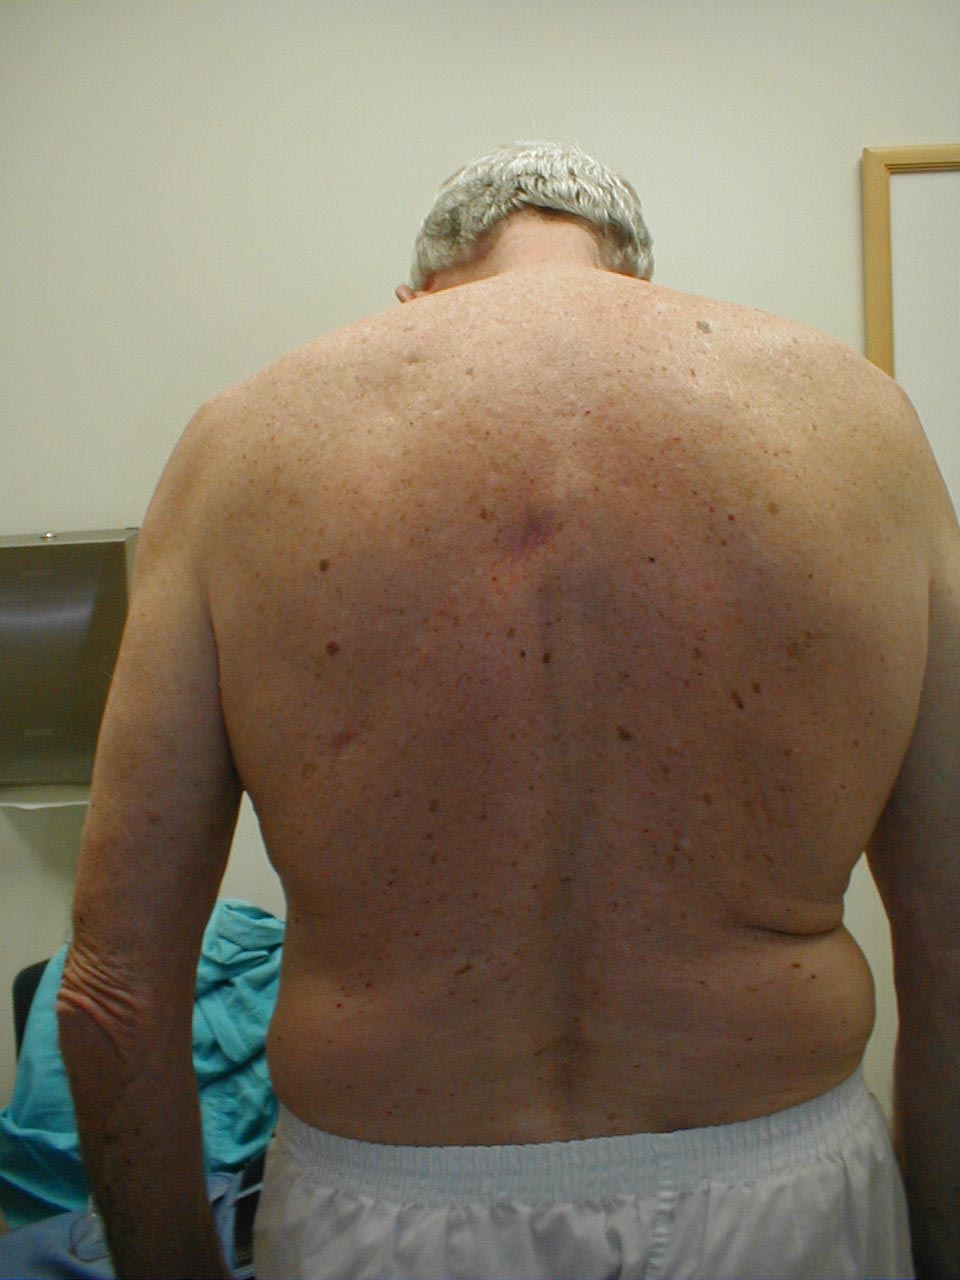
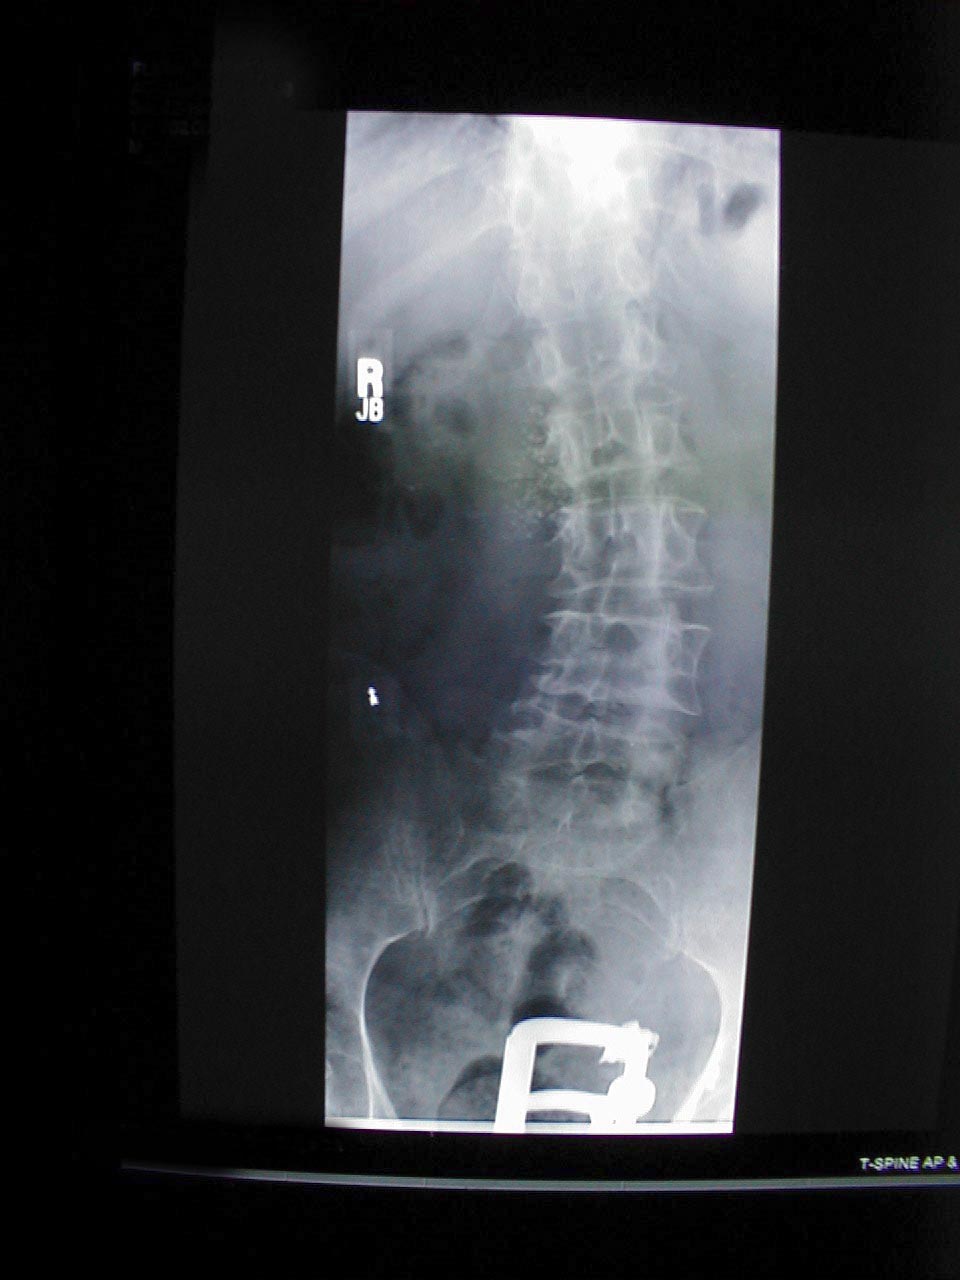
- Scoliosis: Condition where the spine is curved to either the left
or right. In the pictures below, scoliosis of the spine causes right
shoulder area to appear somewhat higher than the left. Curvature is
more pronounced on x-ray.
- Kyphosis: Causes the patient to be bent forward. Accompanying X-Ray
of same patient clearly demonstrates extreme curvature of the spine.
- Pectus excavatum: Congenital posterior displacement of lower aspect
of sternum. This gives the chest a somewhat "hollowed-out" appearance.
The x-ray shows a subtle concave appearance of the lower sternum.
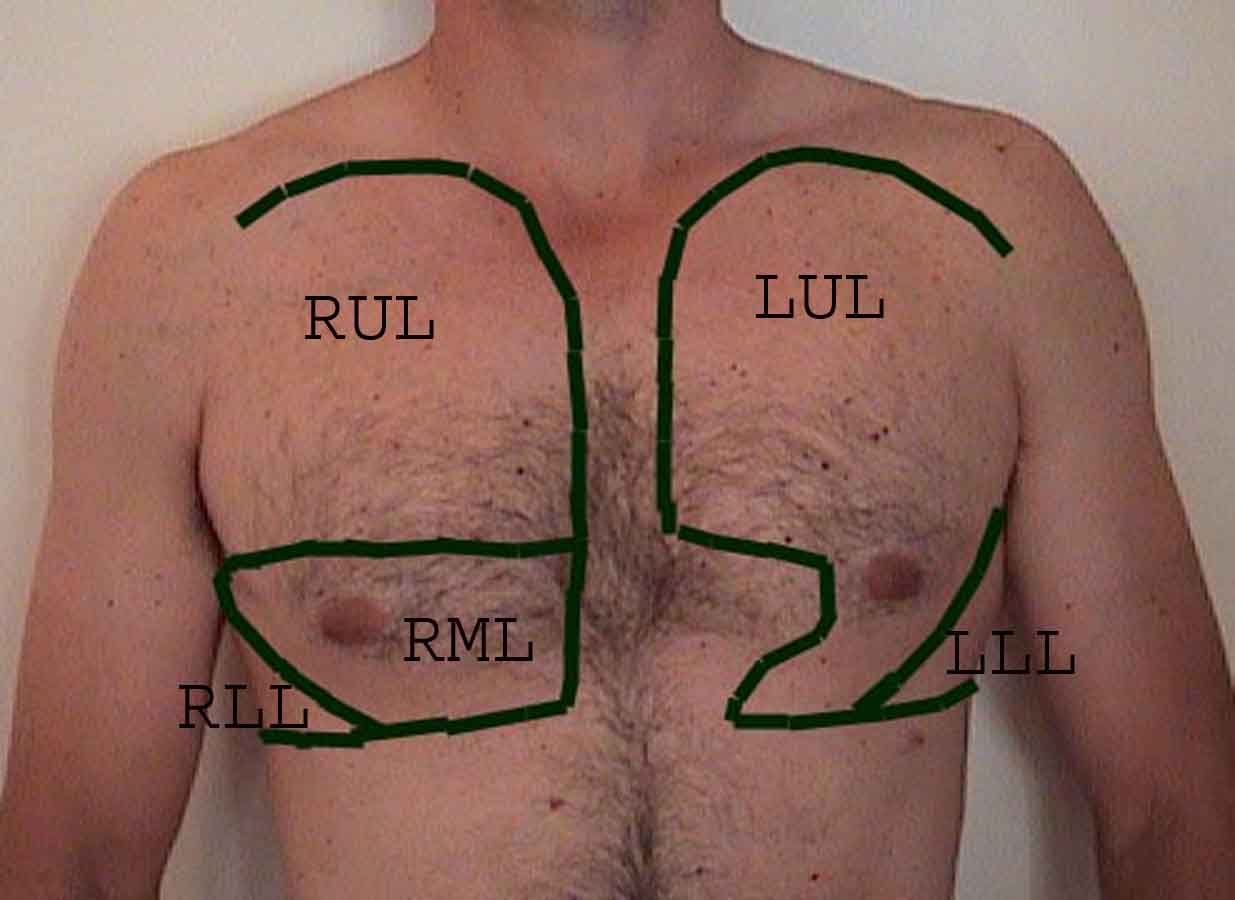
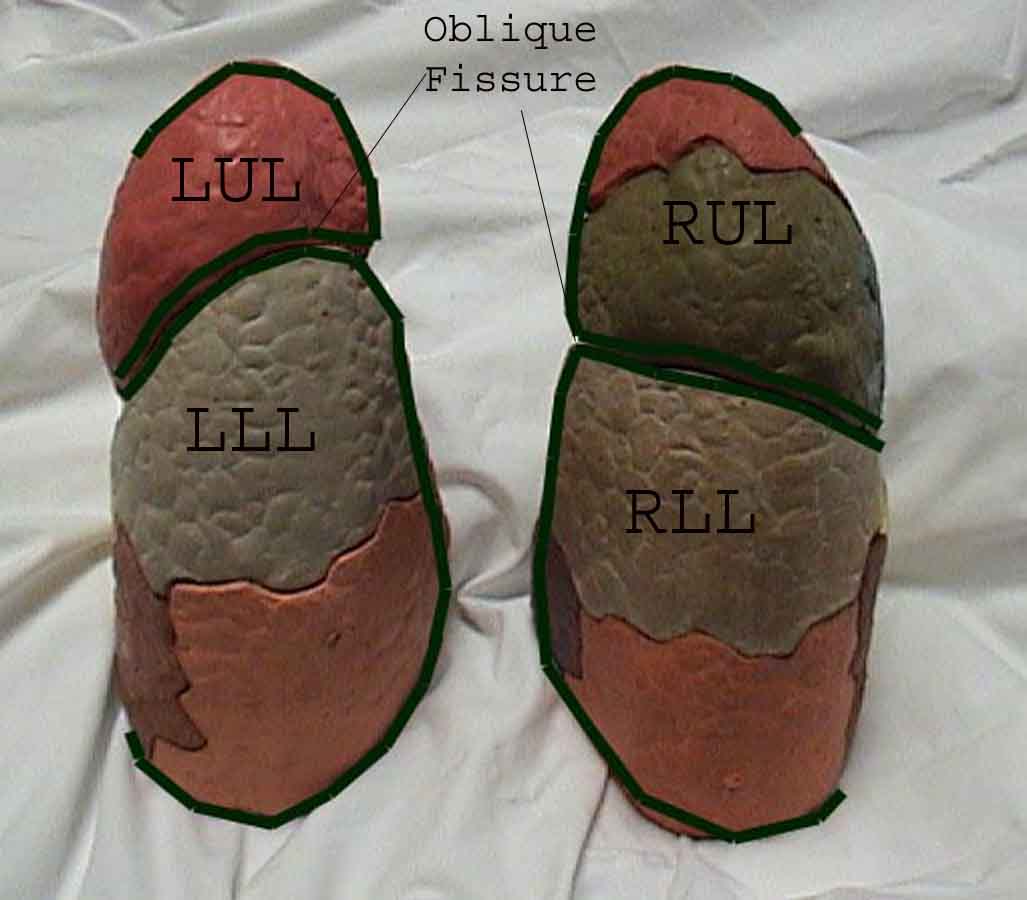
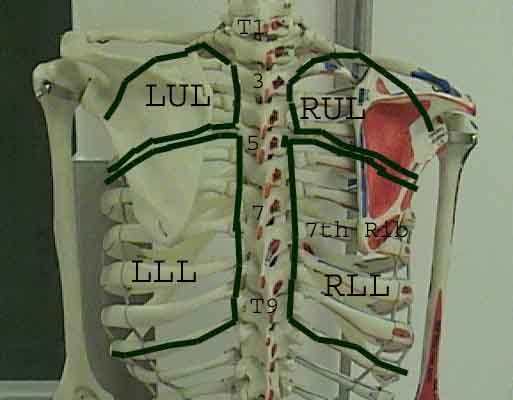
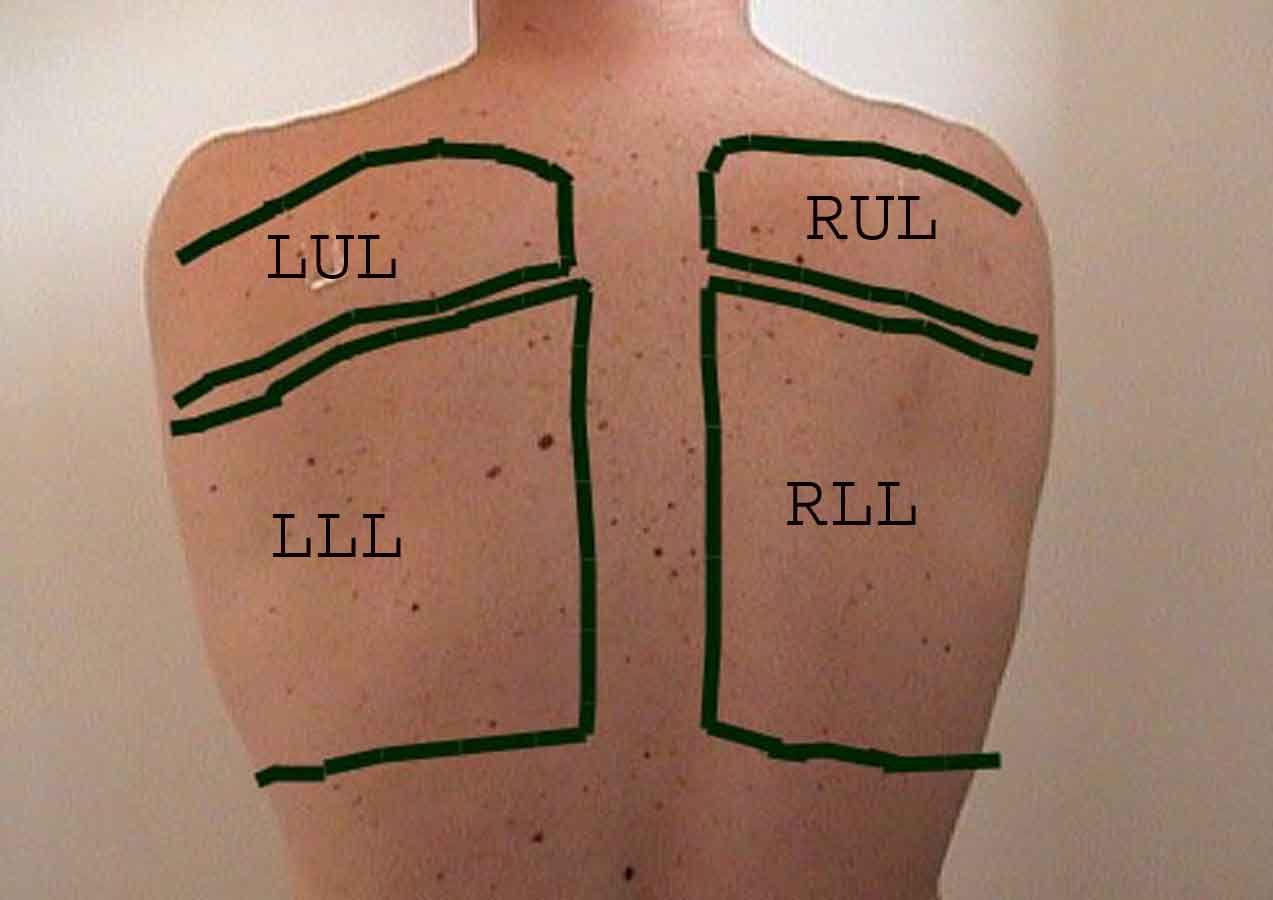
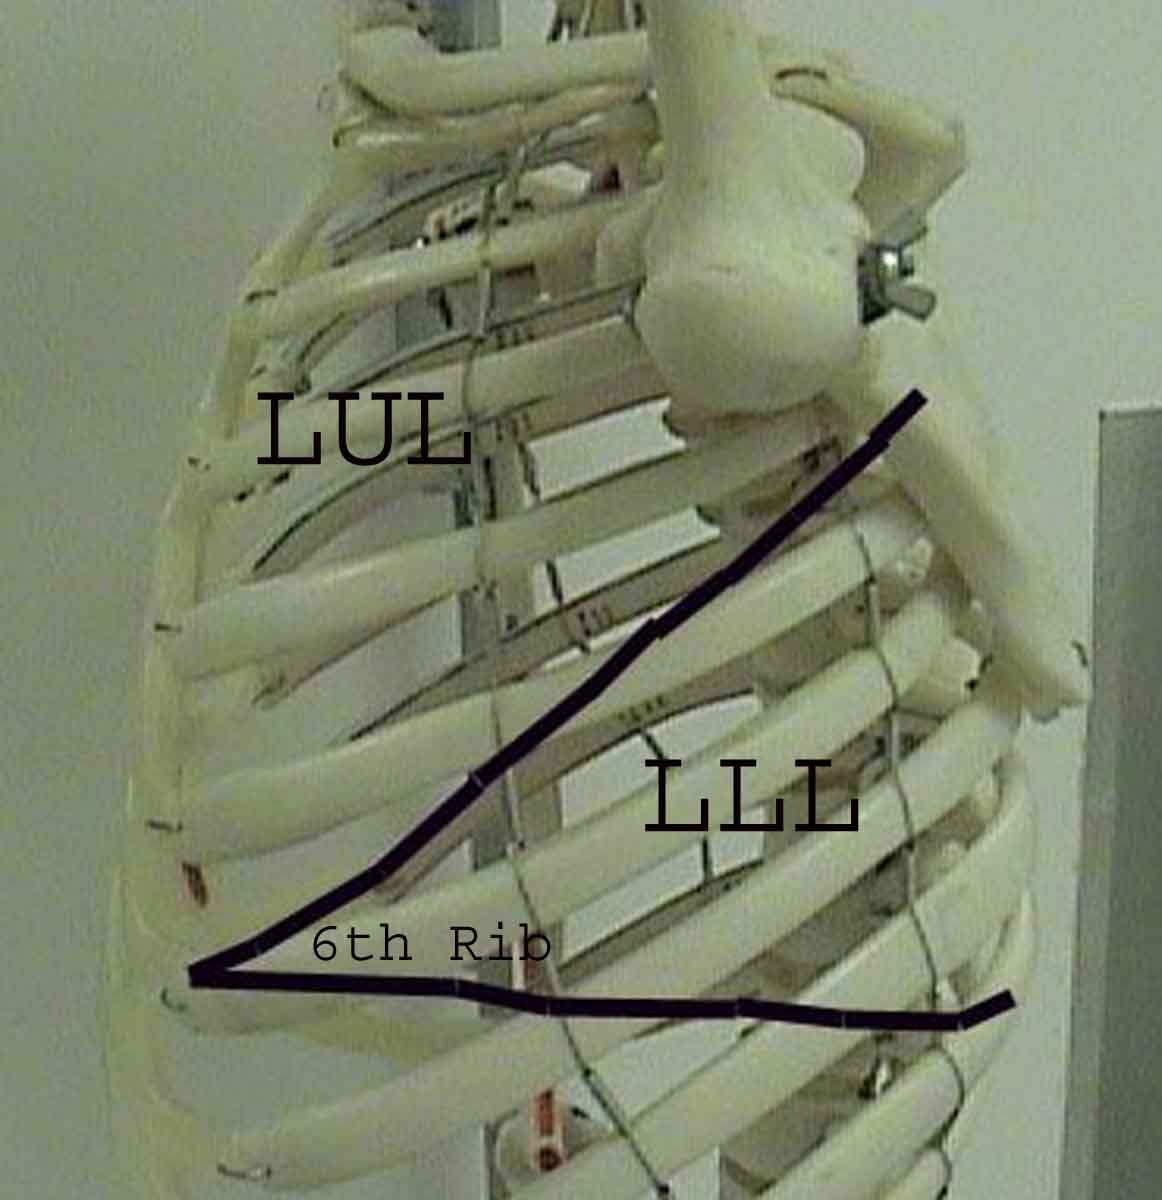
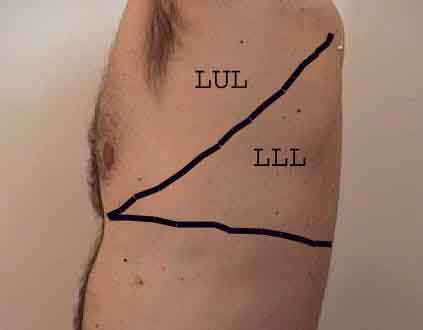
Review of Lung Anatomy:
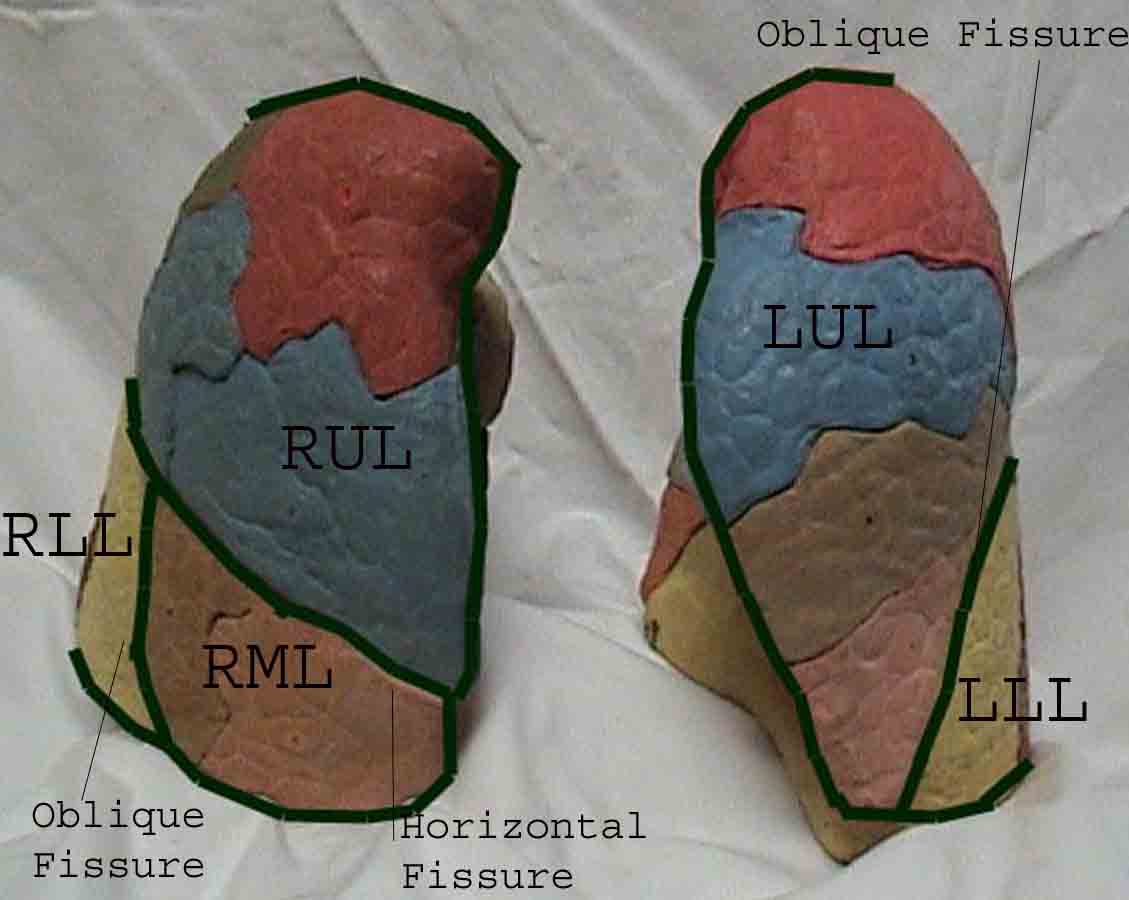
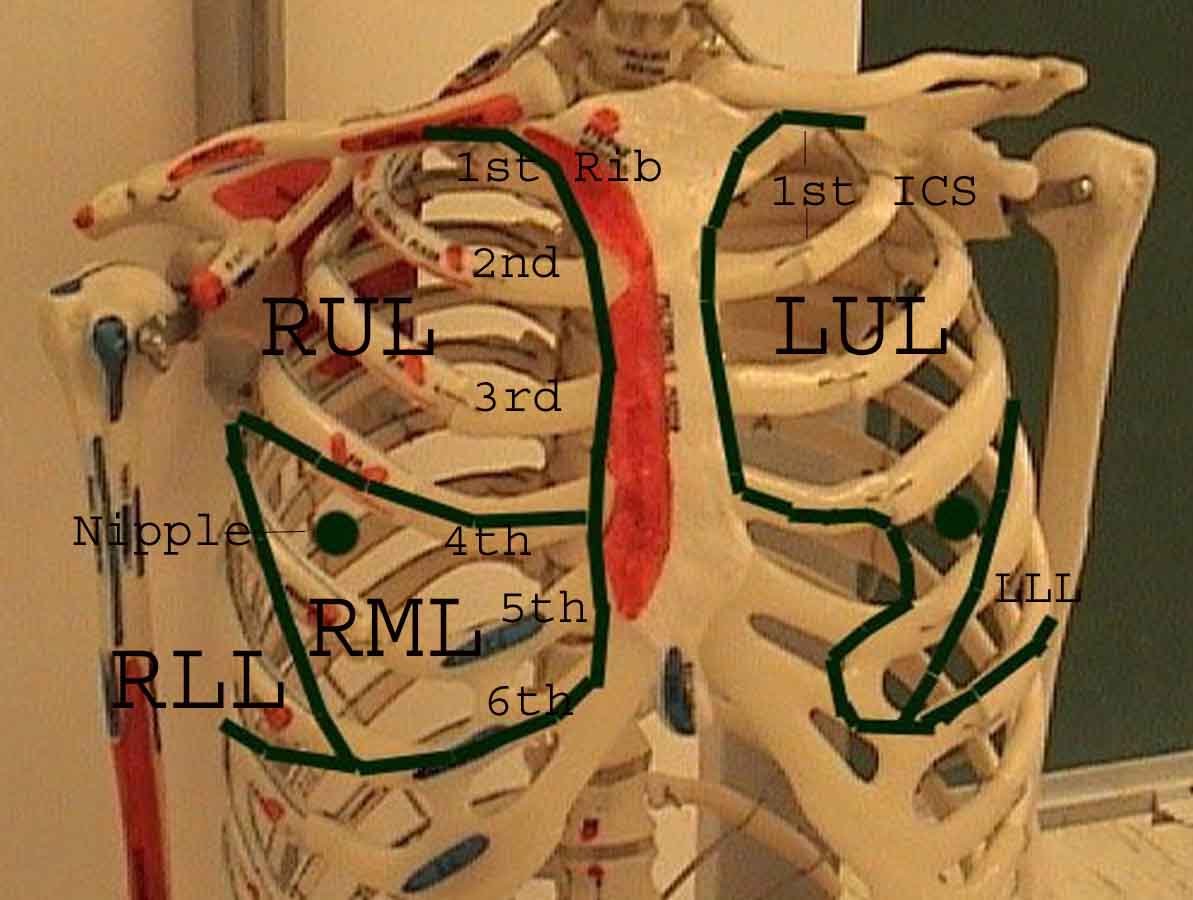
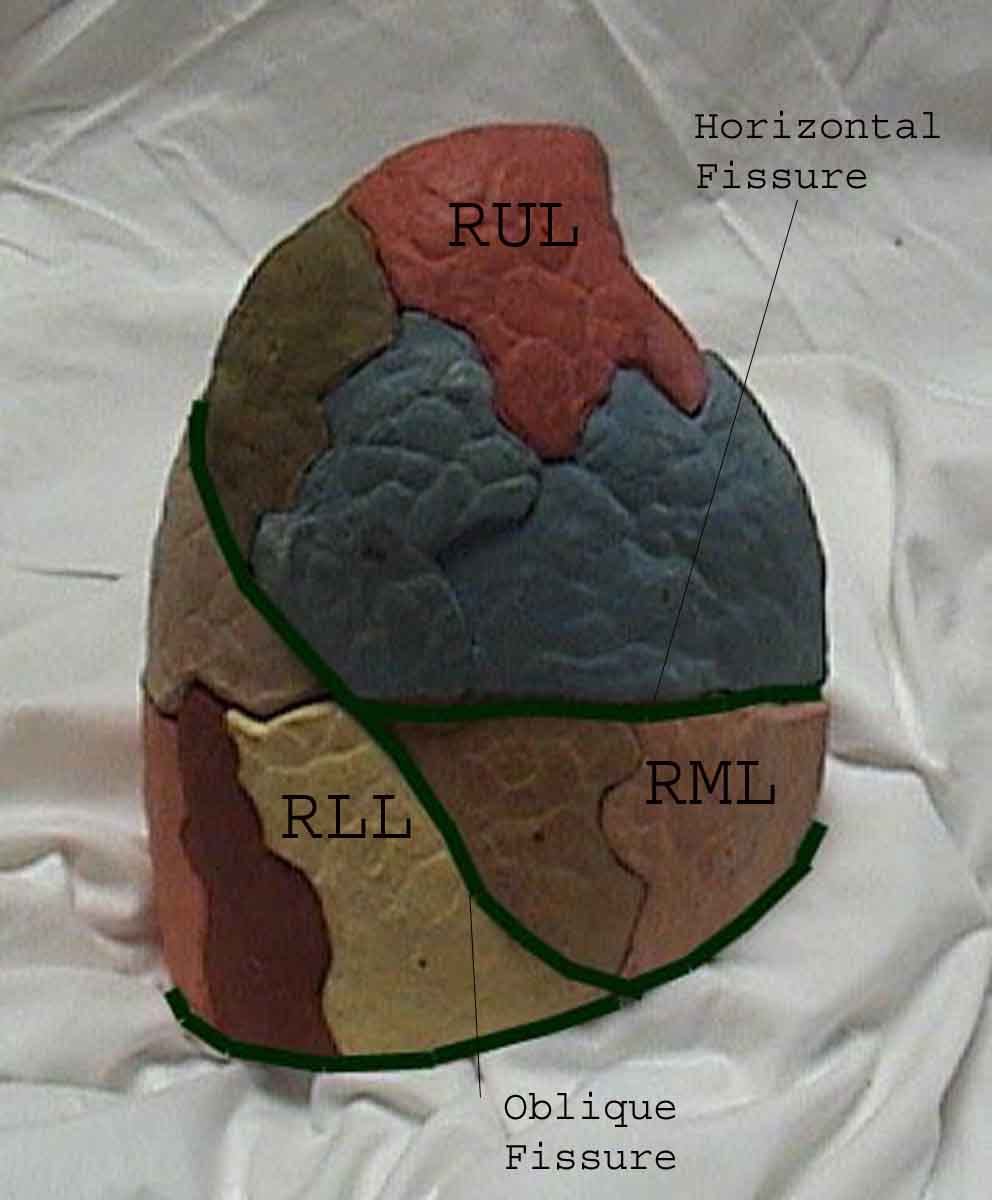
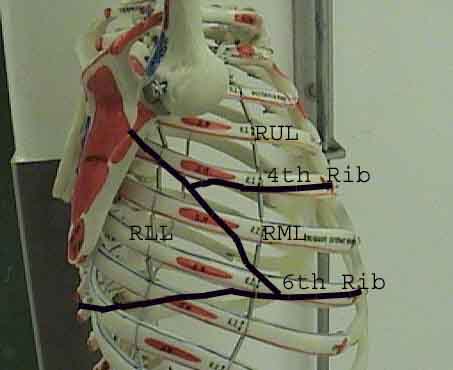
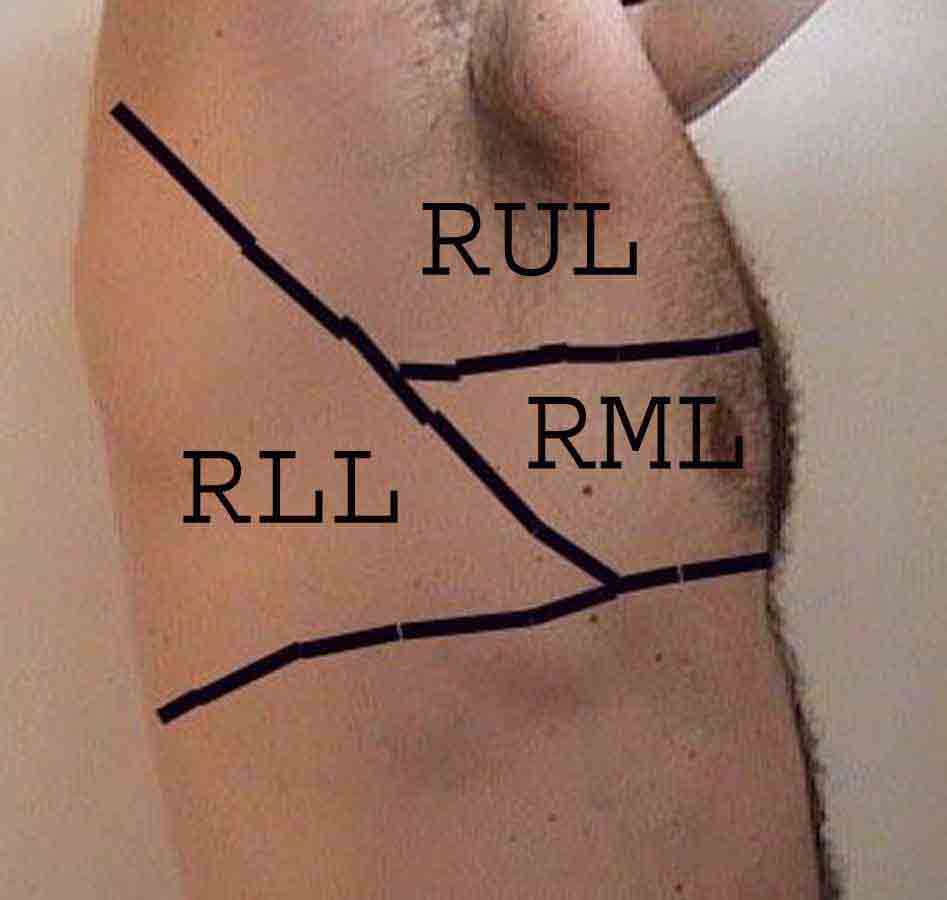
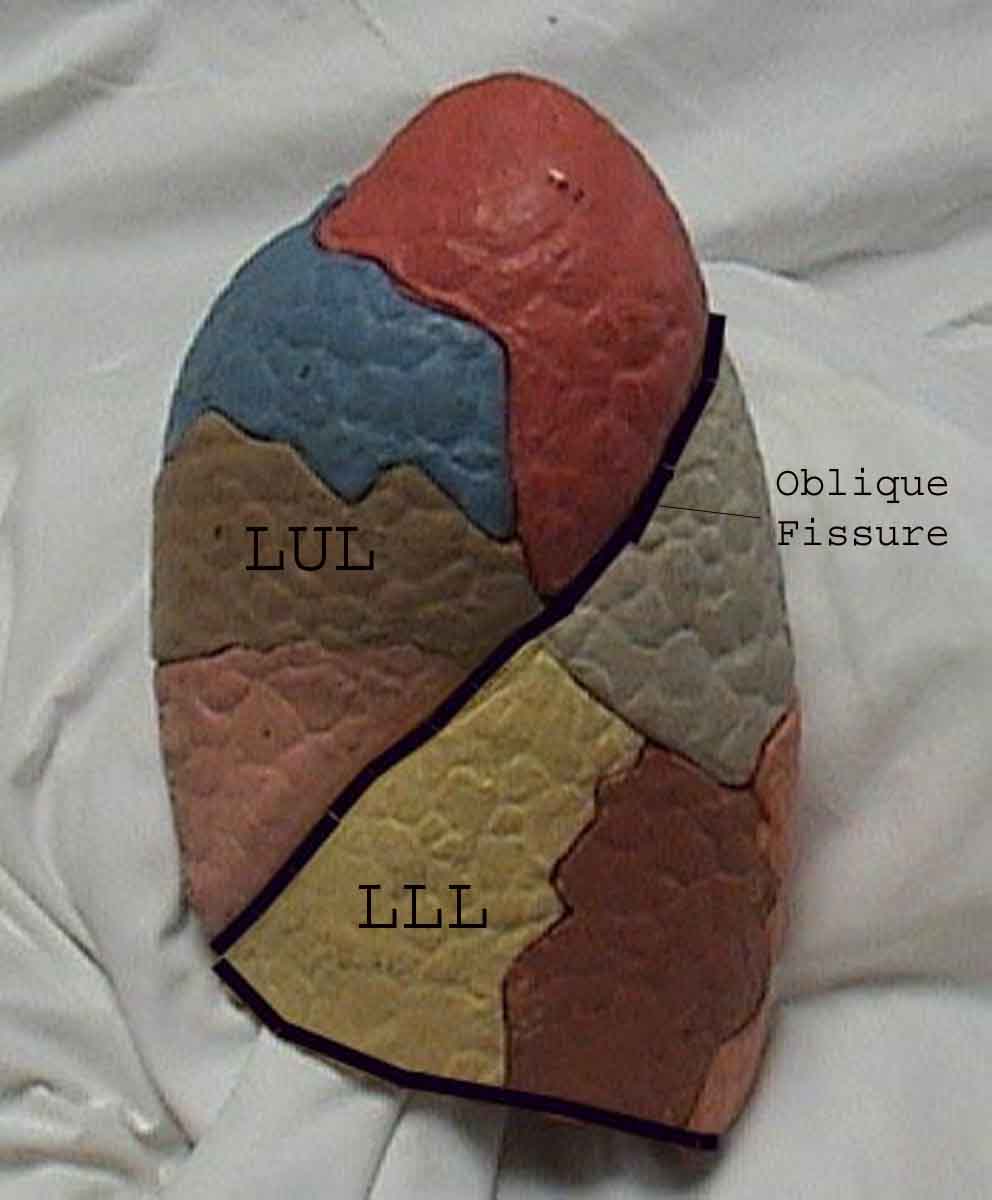
Understanding the pulmonary exam is greatly enhanced by recognizing the relationships between surface structures, the skeleton, and the main lobes of the lung. Realize that this can be difficult as some surface landmarks (eg nipples of the breast) do not always maintain their precise relationship to underlying structures. Nevertheless, surface markers will give you a rough guide to what lies beneath the skin. The pictures below demonstrate these relationships. The multi-colored areas of the lung model identify precise anatomic segments of the various lobes, which cannot be appreciated on examination. Main lobes are outlined in black. The following abbreviations are used: RUL = Right Upper Lobe; LUL = Left Upper Lobe; RML = Right Middle Lobe; RLL = Right Lower Lobe; LLL = Left Lower Lobe.
Palpation:
Palpation plays a relatively minor role in the examination of the normal chest as the structure of interest (the lung) is covered by the ribs and therefore not palpable. Specific situations where it may be helpful include:
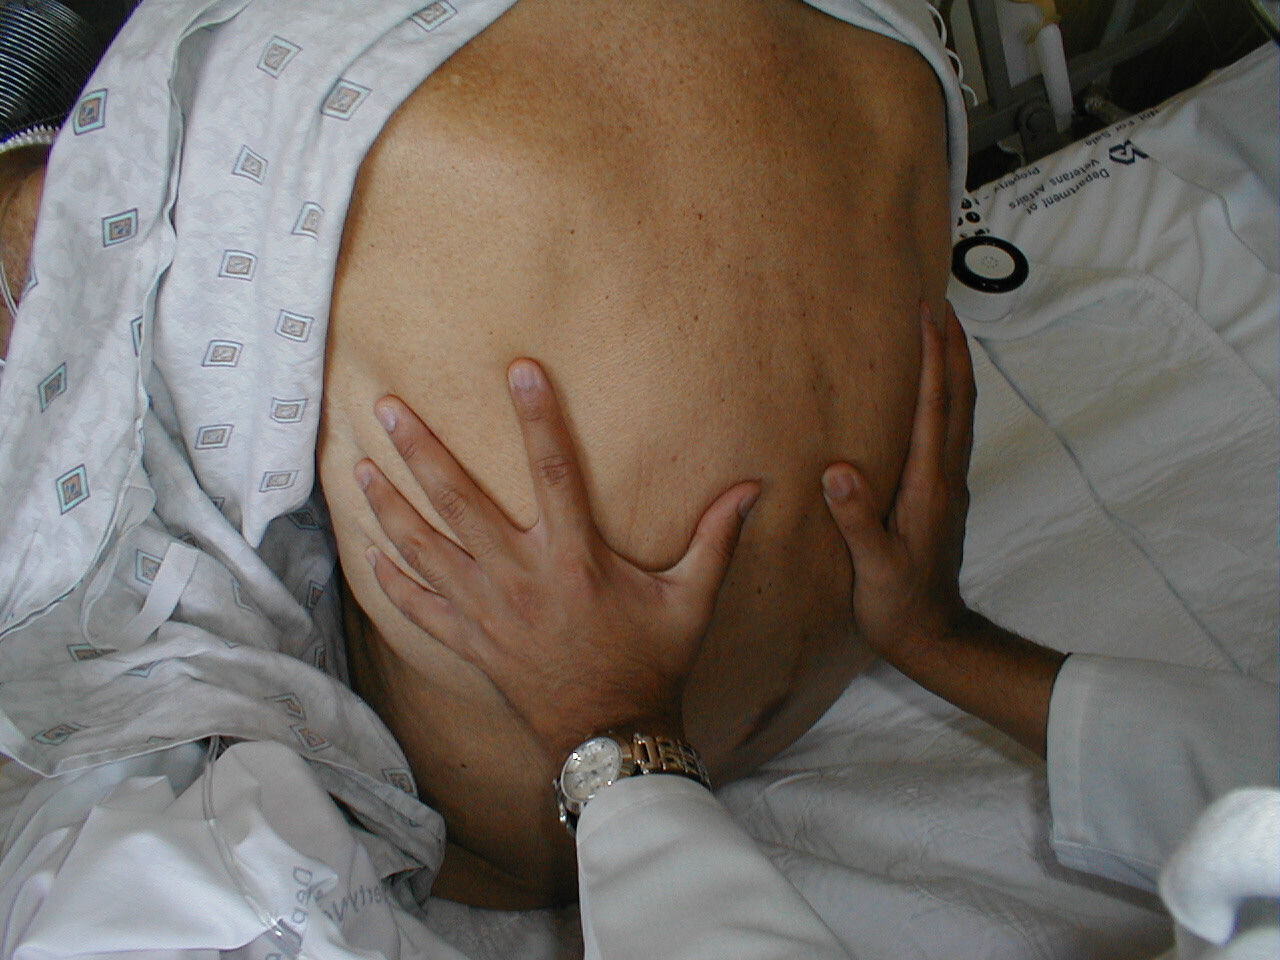
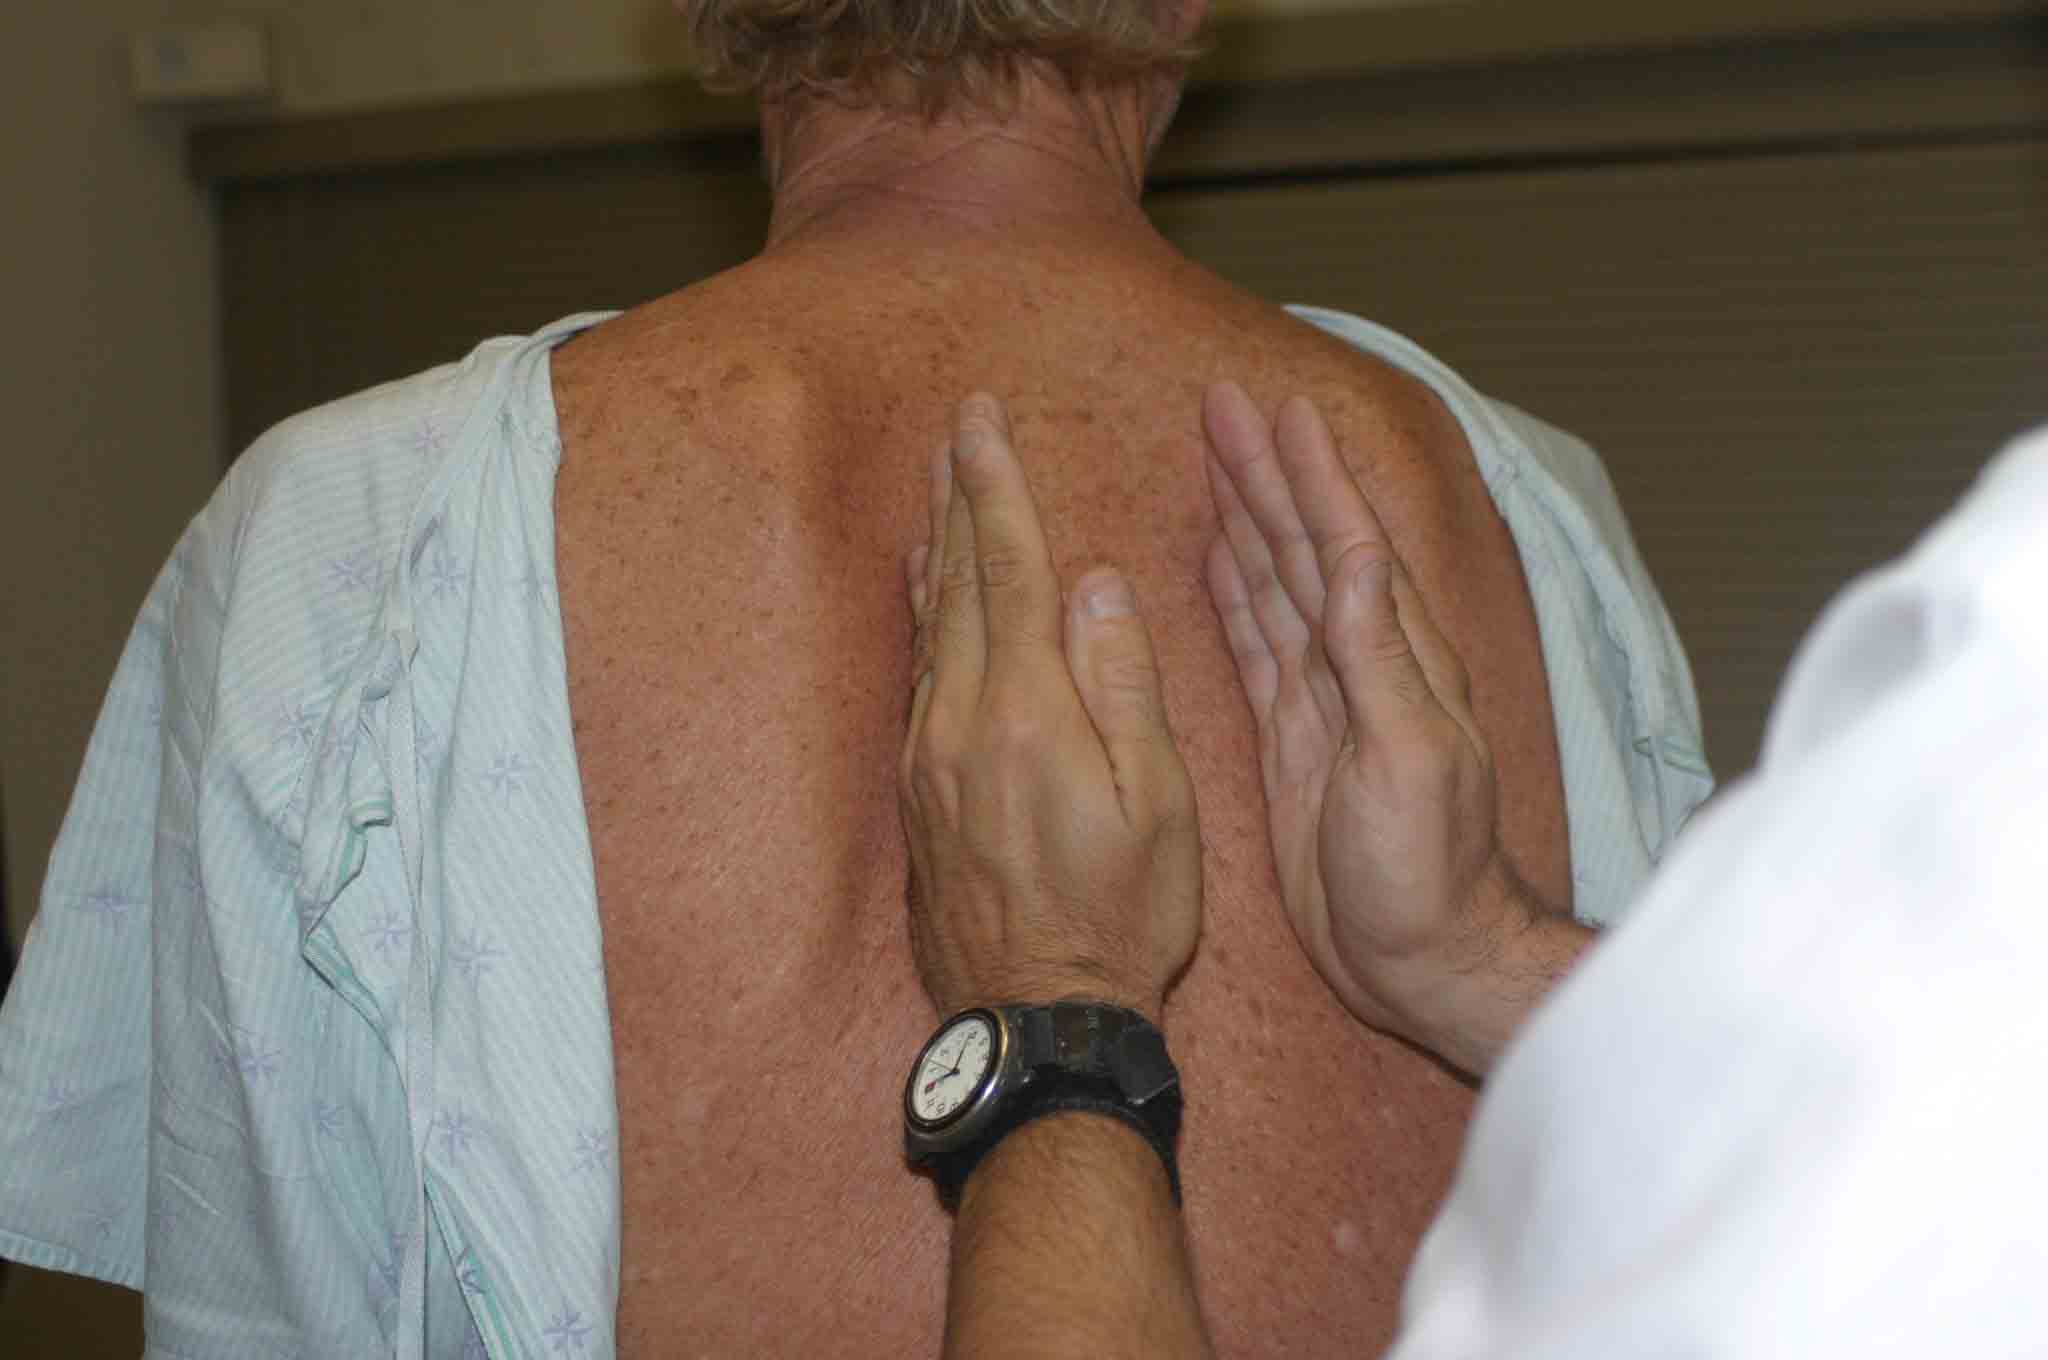
- Accentuating normal chest excursion: Place your hands on the patient's
back with thumbs pointed towards the spine. Remember to first rub your
hands together so that they are not too cold prior to touching the patient.
Your hands should lift symmetrically outward when the patient takes a
deep breath. Processes that lead to asymmetric lung expansion, as might
occur when anything fills the pleural space (e.g. air or fluid), may then
be detected as the hand on the affected side will move outward to a lesser
degree. There has to be a lot of plerual disease before this asymmetry
can be identified on exam.
Detecting Chest Excursion
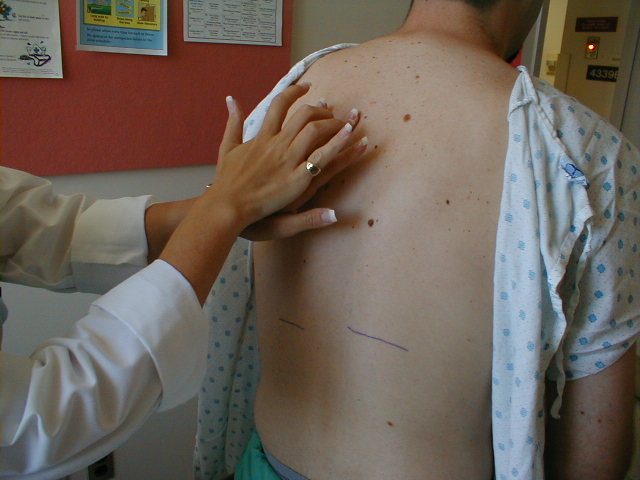
- Tactile Fremitus: Normal lung transmits a palpable vibratory sensation
to the chest wall. This is referred to as fremitus and can be detected
by placing the ulnar aspects of both hands firmly against either side
of the chest while the patient says the words "Ninety-Nine." This maneuver
is repeated until the entire posterior thorax is covered. The bony aspects
of the hands are used as they are particularly sensitive for detecting
these vibrations.
 Assessing Fremitus
Pathologic conditions will alter fremitus. In particular:
- Lung consolidation: Consolidation occurs when the normally air filled lung parenchyma becomes engorged with fluid or tissue, most commonly in the setting of pneumonia. If a large enough segment of parenchyma is involved, it can alter the transmission of air and sound. In the presence of consolidation, fremitus becomes more pronounced.
- Pleural fluid: Fluid, known as a pleural effusion, can collect in the potential space that exists between the lung and the chest wall, displacing the lung upwards. Fremitus over an effusion will be decreased.
In general, fremitus is a pretty subtle finding and should not be thought of as the primary means of identifying either consolidation or pleural fluid. It can, however, lend supporting evidence if other findings (see below) suggest the presence of either of these processes.
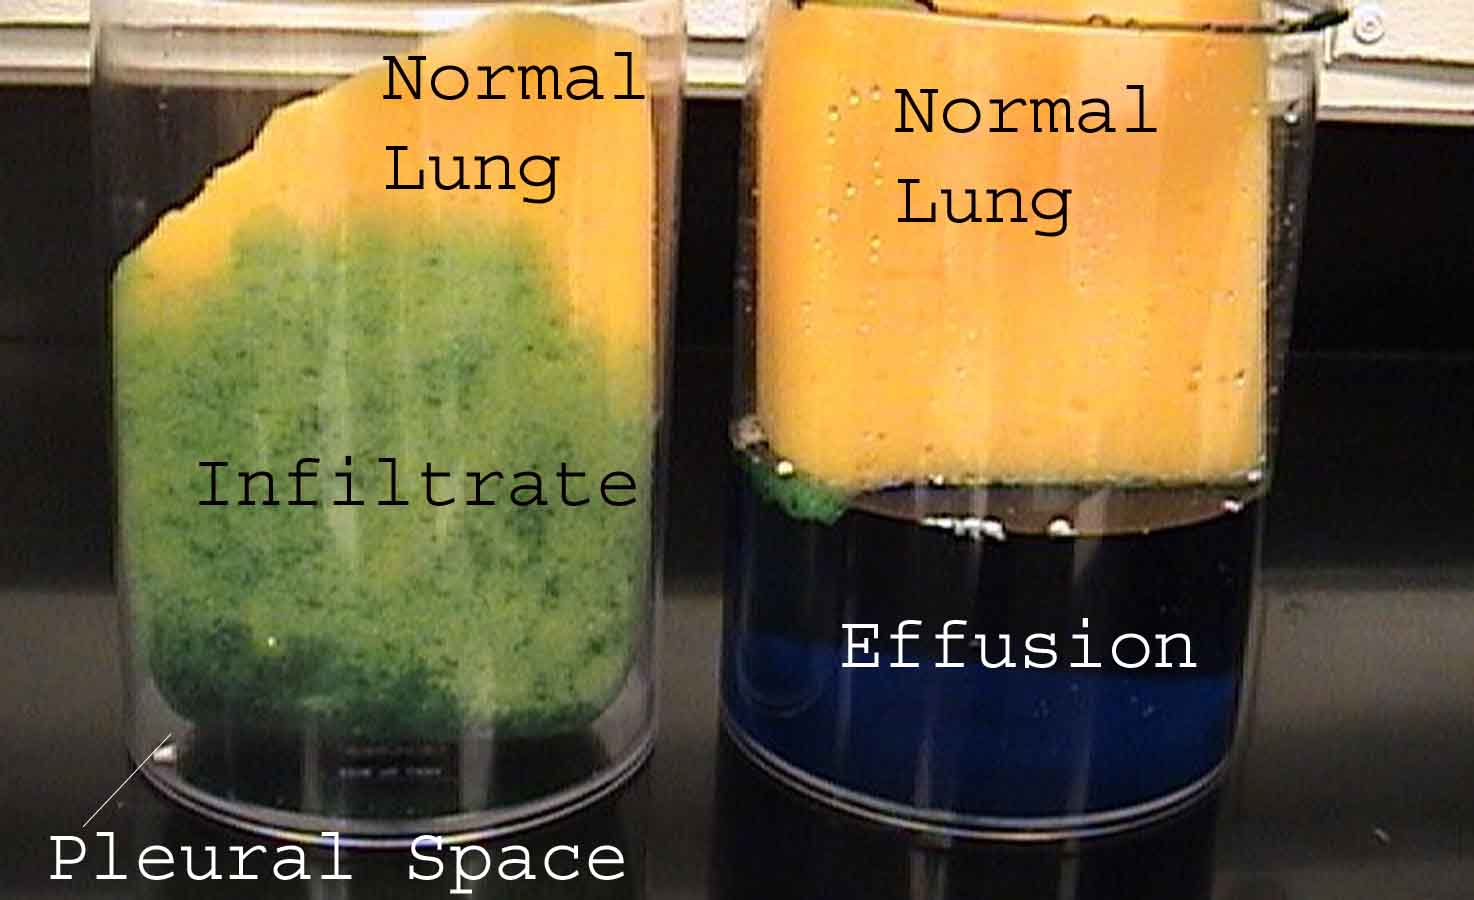 Effusions and infiltrates can perhaps be more easily understood using a sponge to represent the lung. In this model, an infiltrate is depicted by the blue coloration that has invaded the sponge itself (sponge on left). An effusion is depicted by the blue fluid upon which the lung is floating (sponge on right).
 - Investigating painful areas: If the patient complains of pain at a particular site it is obviously important to carefully palpate around that area. In addition, special situations (e.g. trauma) mandate careful palpation to look for evidence of rib fracture, subcutaneous air (feels like your pushing on Rice Krispies or bubble paper), etc.
Percussion:
This technique makes use of the fact that striking a surface which covers an air-filled structure (e.g. normal lung) will produce a resonant note while repeating the same maneuver over a fluid or tissue filled cavity generates a relatively dull sound. If the normal, air-filled tissue has been displaced by fluid (e.g. pleural effusion) or infiltrated with white cells and bacteria (e.g. pneumonia), percussion will generate a deadened tone. Alternatively, processes that lead to chronic (e.g. emphysema) or acute (e.g. pneumothorax) air trapping in the lung or pleural space, respectively, will produce hyper-resonant (i.e. more drum-like) notes on percussion. Initially, you will find that this skill is a bit awkward to perform. Allow your hand to swing freely at the wrist, hammering your finger onto the target at the bottom of the down stroke. A stiff wrist forces you to push your finger into the target which will not elicit the correct sound. In addition, it takes a while to develop an ear for what is resonant and what is not. A few things to remember:
- If you're percussing with your right hand, stand a bit to the left side of the patient's back.
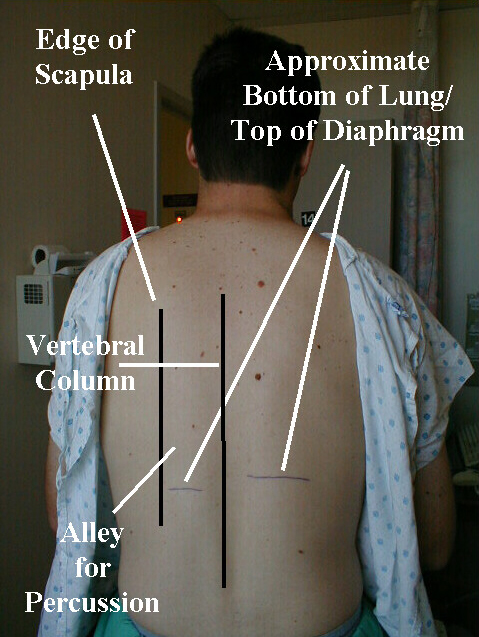
- Ask the patient to cross their hands in front of their chest, grasping the opposite shoulder with each hand. This will help to pull the scapulae laterally, away from the percussion field.
- Work down the "alley" that exists between the scapula and vertebral column, which should help you avoid percussing over bone.
- Try to focus on striking the distal inter-phalangeal joint (i.e. the last joint) of your left middle finger with the tip of the right middle finger. The impact should be crisp so you may want to cut your nails to keep blood-letting to a minimum!
- The last 2 phalanges of your left middle finger should rest firmly on the patient's back. Try to keep the remainder of your fingers from touching the patient, or rest only the tips on them if this is otherwise too awkward, in order to minimize any dampening of the perucssion notes.
- When percussing any one spot, 2 or 3 sharp taps should suffice, though
feel free to do more if you'd like. Then move your hand down several inter-spaces
and repeat the maneuver. In general, percussion in 5 or so different locations
should cover one hemi-thorax. After you have percussed the left chest,
move yours hands across and repeat the same procedure on the right side.
If you detect any abnormality on one side, it's a good idea to slide your
hands across to the other for comparison. In this way, one thorax serves
as a control for the other. In general, percussion is limited to the posterior
lung fields. However, if auscultation (see below) reveals an abnormality
in the anterior or lateral fields, percussion over these areas can help
identify its cause.
Percussion Technique
- The goal is to recognize that at some point as you move down towards the base of the lungs, the quality of the sound changes. This normally occurs when you leave the thorax. It is not particularly important to identify the exact location of the diaphragm, though if you are able to note a difference in level between maximum inspiration and expiration, all the better. Ultimately, you will develop a sense of where the normal lung should end by simply looking at the chest. The exact vertebral level at which this occurs is not really relevant.
- "Speed percussion" may help to accentuate the difference between dull and resonant areas. During this technique, the examiner moves their left (i.e. the non-percussing) hand at a constant rate down the patient's back, tapping on it continuously as it progresses towards the bottom of the thorax. This tends to make the point of inflection (i.e. change from resonant to dull) more pronounced.
Practice percussion! Try finding your own stomach bubble, which should be around the left costal margin. Note that due to the location of the heart, tapping over your left chest will produce a different sound then when performed over your right. Percuss your walls (if they're sheet rock) and try to locate the studs. Tap on tupperware filled with various amounts of water. This not only helps you develop a sense of the different tones that may be produced but also allows you to practice the technique.
Auscultation:
Prior to listening over any one area of the chest, remind yourself which lobe of the lung is heard best in that region: lower lobes occupy the bottom 3/4 of the posterior fields; right middle lobe heard in right axilla; lingula in left axilla; upper lobes in the anterior chest and at the top 1/4 of the posterior fields. This can be quite helpful in trying to pin down the location of pathologic processes that may be restricted by anatomic boundaries (e.g. pneumonia). Many disease processes (e.g. pulmonary edema, bronchoconstriction) are diffuse, producing abnormal findings in multiple fields.
- Put on your stethoscope so that the ear pieces are directed away from you. Adjust the head of the scope so that the diaphragm is engaged. If you're not sure, scratch lightly on the diaphragm, which should produce a noise. If not, twist the head and try again. Gently rub the head of the stethoscope on your shirt so that it is not too cold prior to placing it on the patient's skin.
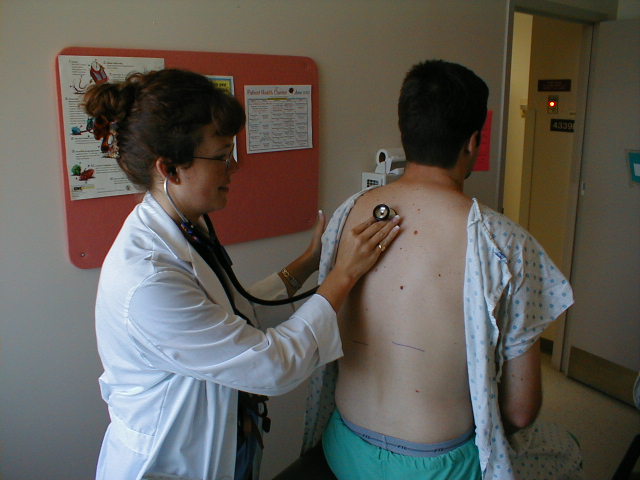
- The upper aspect of the posterior fields (i.e. towards the top of the
patient's back) are examined first. Listen over one spot and then move
the stethoscope to the same position on the opposite side and repeat.
This again makes use of one lung as a source of comparison for the other.
The entire posterior chest can be covered by listening in roughly 4 places
on each side. Of course, if you hear something abnormal, you'll need to
listen in more places.
Lung Auscultation
- The lingula and right middle lobes can be examined while you are still standing behind the patient.
- Then, move around to the front and listen to the anterior fields in the same fashion. This is generally done while the patient is still sitting upright. Asking female patients to lie down will allow their breasts to fall away laterally, which may make this part of the examination easier.
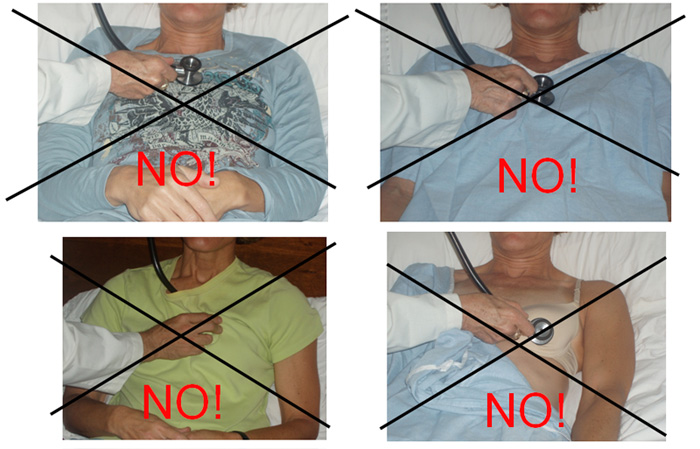
Thoughts On "Gown Management" & Appropriately/Respectfully Touching Your Patients:
There are several sources of tension relating to the physical exam in general, which are really brought to the fore during the chest examine. These include:
- Area to be examined must be reasonably exposed - yet patient kept as covered as possible
- The need to Palpate sensitive areas in order to perform accurate exam - requires touching people w/whom you've little acquaintance - awkward, particularly if opposite gender
- As newcomers to medicine, you're particularly aware that this aspect of the exam is "unnatural" & hence very sensitive.. which is a good thing!
Keys to performing a sensitive yet thorough exam:
- Explain what you're doing (" why) before doing it → acknowledge "elephant in the room"!
- Expose the minimum amount of skin necessary - this requires "artful" use of gown & drapes (males & females)
- Examining heart & lungs of female patients:
- Ask pt to remove bra prior (you can't hear the heart well thru fabric)
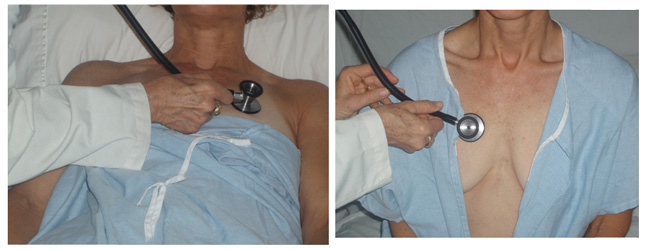
- Expose the chest only to the extent needed. For lung exam, you can listen to the anterior fields by exposing only the top part of the breasts (see picture below).
- Enlist patient's assistance, asking them to raise their breast to a position that enhances your ability to listen to the heart
- Don't rush, act in a callous fashion, or cause pain
- PLEASE... don't examine body parts thru gown as:
- It reflects Poor technique
- You'll miss things
- You'll lose points on scored exams (OSCE, CPX, USMLE)!
A few additional things worth noting.
- Ask the patient to take slow, deep breaths through their mouths while you are performing your exam. This forces the patient to move greater volumes of air with each breath, increasing the duration, intensity, and thus detectability of any abnormal breath sounds that might be present.
- Sometimes it's helpful to have the patient cough a few times prior to beginning auscultation. This clears airway secretions and opens small atelectatic (i.e. collapsed) areas at the lung bases.
- If the patient cannot sit up (e.g. in cases of neurologic disease, post-operative states, etc.), auscultation can be performed while the patient is lying on their side. Get help if the patient is unable to move on their own. In cases where even this cannot be accomplished, a minimal examination can be performed by listening laterally/posteriorly as the patient remains supine.
- Requesting that the patient exhale forcibly will occasionally help to accentuate abnormal breath sounds (in particular, wheezing) that might not be heard when they are breathing at normal flow rates.
What can you expect to hear? A few basic sounds to listen for:
- A healthy individual breathing through their mouth at normal tidal volumes produces a soft inspiratory sound as air rushes into the lungs, with little noise produced on expiration. These are referred to as vessicular breath sounds.
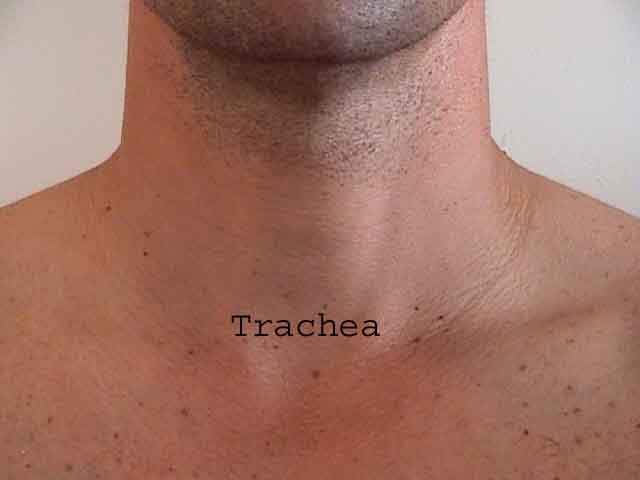
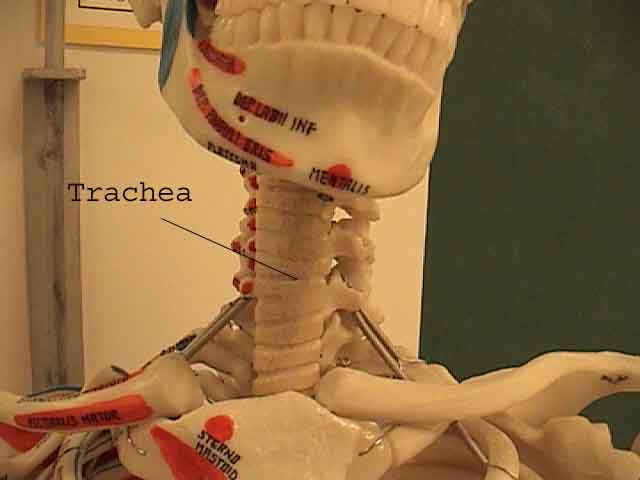
- Wheezes are whistling-type noises produced during expiration (and sometimes inspiration) when air is forced through airways narrowed by bronchoconstriction, secretions, and/or associated mucosal edema. As this most commonly occurs in association with diffuse processes that affect all lobes of the lung (e.g. asthma and emphysema) it is frequently audible in all fields. In cases of significant bronchoconstriction, the expiratory phase of respiration (relative to inspiration) becomes noticeably prolonged. Clinicians refer to this as a decrease in the I to E ratio. The greater the obstruction, the longer expiration is relative to inspiration. Occasionally, focal wheezing can occur when airway narrowing if restricted to a single anatomic area, as might occur with an obstructing tumor or bronchoconstriction induced by pneumonia. Wheezing heard only on inspiration is referred to as stridor and is associated with mechanical obstruction at the level of the trachea/upper airway. This may be best appreciated by placing your stethescope directly on top of the trachea.
- Rales (a.k.a. crackles) are scratchy sounds that occur in association with processes that cause fluid to accumulate within the alveolar and interstitial spaces. The sound is similar to that produced by rubbing strands of hair together close to your ear. Pulmonary edema is probably the most common cause, at least in the older adult population, and results in symmetric findings. This tends to occur first in the most dependent portions of the lower lobes and extend from the bases towards the apices as disease progresses. Pneumonia, on the other hand, can result in discrete areas of alveolar filling, and therefore produce crackles restricted to a specific region of the lung. Very distinct, diffuse, dry-sounding crackles, similar to the noise produced when separating pieces of velcro, are caused by pulmonary fibrosis, a relatively uncommon condition.
- Dense consolidation of the lung parenchyma, as can occur with pneumonia, results in the transmission of large airway noises (i.e. those normally heard on auscultation over the trachea... known as tubular or bronchial breath sounds) to the periphery. In this setting, the consolidated lung acts as a terrific conducting medium, transferring central sounds directly to the edges. It's very similar to the noise produced when breathing through a snorkel. Furthermore, if you direct the patient to say the letter 'eee' it is detected during auscultation over the involved lobe as a nasal-sounding 'aaa'. These 'eee' to 'aaa' changes are referred to as egophony. The first time you detect it, you'll think that the patient is actually saying 'aaa'... have them repeat it several times to assure yourself that they are really following your directions!
- Secretions that form/collect in larger airways, as might occur with bronchitis or other mucous creating process, can produce a gurgling-type noise, similar to the sound produced when you suck the last bits of a milk shake through a straw. These noises are referred to as ronchi.
- Auscultation over a pleural effusion will produce a very muffled sound. If, however, you listen carefully to the region on top of the effusion, you may hear sounds suggestive of consolidation, originating from lung which is compressed by the fluid pushing up from below. Asymmetric effusions are probably easier to detect as they will produce different findings on examination of either side of the chest.
- Auscultation of patients with severe, stable emphysema will produce very little sound. These patients suffer from significant lung destruction and air trapping, resulting in their breathing at small tidal volumes that generate almost no noise. Wheezing occurs when there is a superimposed acute inflammatory process (see above).
Most of the above techniques are complimentary. Dullness detected on percussion, for example, may represent either lung consolidation or a pleural effusion. Auscultation over the same region should help to distinguish between these possibilities, as consolidation generates bronchial breath sounds while an effusion is associated with a relative absence of sound. Similarly, fremitus will be increased over consolidation and decreased over an effusion. As such, it may be necessary to repeat certain aspects of the exam, using one finding to confirm the significance of another. Few findings are pathognomonic. They have their greatest meaning when used together to paint the most informative picture.
Sample Lung Sounds
(courtesy of Dr. Michael Wilkes, MD-- UC Davis and UCLA Schools of Medicine)
 The Auscultation Assistant -- A
limited sampling of lung sounds can be found at this
site.
The Auscultation Assistant -- A
limited sampling of lung sounds can be found at this
site.
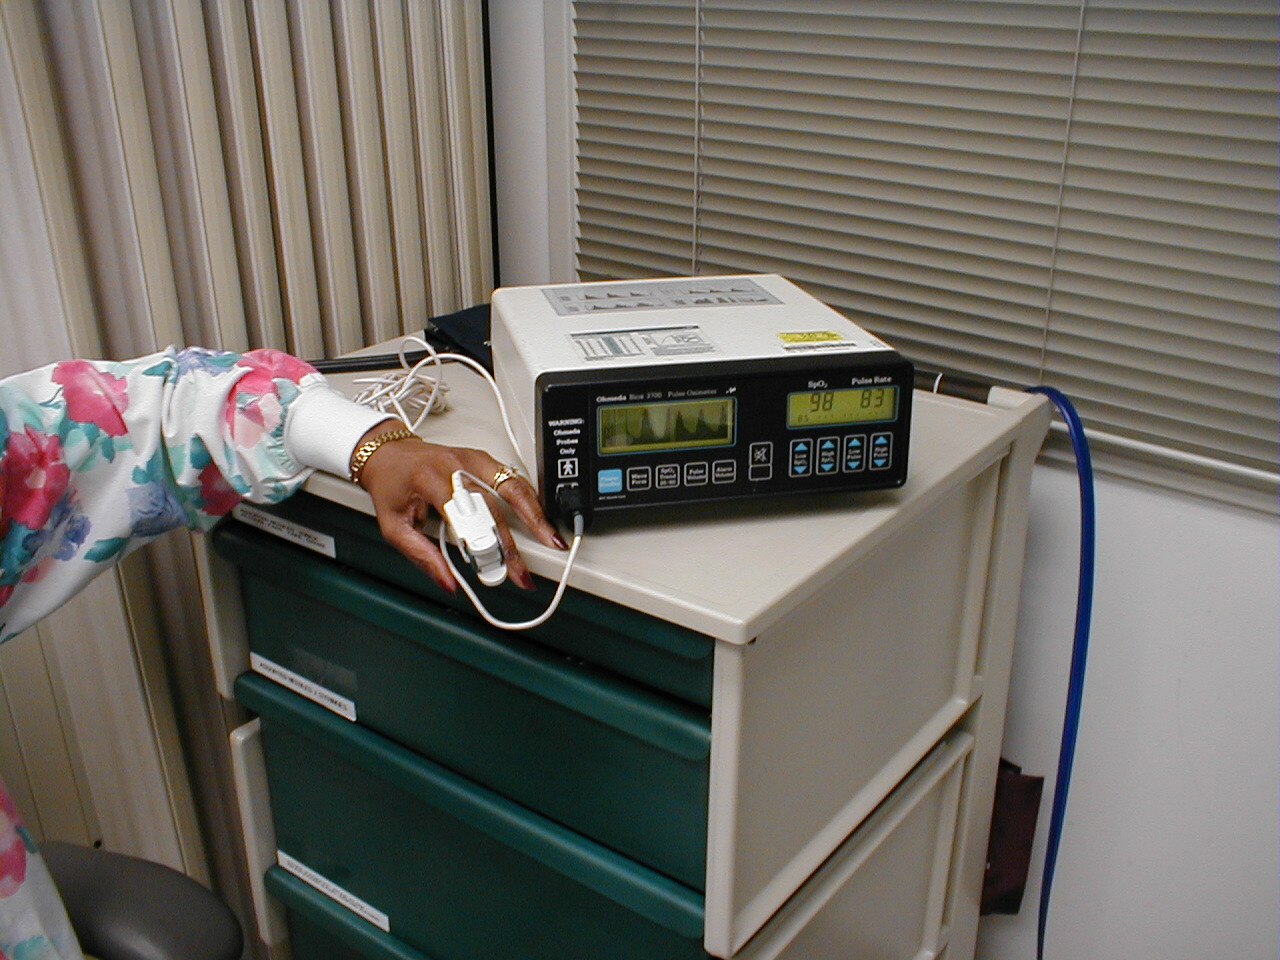
Oftentimes, a patient will complain of a symptom that is induced by activity or movement. Shortness of breath on exertion, one such example, can be a marker of significant cardiac or pulmonary dysfunction. The initial examination may be relatively unrevealing. In such cases, consider observed ambulation (with the use of a pulse oxymeter, a device that continuously measures heart rate and oxygen saturation, if available) as a dynamic extension of the cardiac and pulmonary examinations. Quantifying a patient's exercise tolerance in terms of distance and/or time walked can provide information critical to the assessment of activity induced symptoms. It may also help unmask illness that would be inapparent unless the patient was asked to perform a task that challenged their impaired reserves. Pay particular attention to the rate at which the patient walks, duration of activity, distance covered, development of dyspnea, changes in heart rate and oxygen saturation, ability to talk during exercise and anything else that the patient identifies as limiting their activity. The objective data derived from this low tech test can aid you in determining disease and symptom severity, helping to create a list of possible diagnoses and assisting you in the rational use of additional tests to further delineate the nature of the problem. This can be particularly helpful in providing objective information when symptoms seem out of proportion to findings. Or when patients report few complaints yet seem to have a cosiderable amount of disease. It will also generate a measurement that you can refer back to during subsequent evaluations in order to determine if there has been any real change in functional status.