The Neurological Examination
- Cranial Nerves
- Sensory and Motor Examinations
- Reflex Testing
- Coordination
- Gait Testing
- Making Sense of Neurological Findings
Introduction
The goals of the neurological examination are several:
- For patients presenting with symptoms suggestive of a neurological problem, the examination
should:
- Determine, on the basis of an organized and thorough examination, whether in fact neurological dysfunction exists.
- Identify which component(s) of the neurological system are affected (e.g. motor, sensory, cranial nerves, or possibly several systems simultaneously).
- If possible, determine the precise location of the problem (e.g. peripheral v central nervous system; region and side of the brain affected etc.).
- On the basis of these findings, generate a list of possible etiologies. Unlikely diagnoses can be excluded and appropriate testing (e.g. brain and spinal cord imaging) then applied in an orderly and logical fashion.
- Screening for the presence of discrete abnormalities in patients at risk for the development of neurological disorders. This is appropriate for individuals who have no particular subjective symptoms suggestive of a neurological problem, yet have systemic illnesses that might put them at risk for subtle dysfunction. Diabetic patients, for example (particularly those with long standing poor control), may develop peripheral nerve dysfunction. This may only be detected through careful sensory testing (see below under Sensory Testing), which would have important clinical implications.
- Cursory screening/documentation of baseline function for those who are otherwise healthy. In patients with neither signs nor risk factors for neurological disease, it's unlikely that the detailed exam would uncover occult problems. Simply observing the patient during the course of the usual H&P (i.e. watching them walk, get up and down from the exam table, etc.) may well suffice. Many examiners incorporate some aspects of the neuro exam into their standard evaluations. Cranial Nerve testing, for example, can be easily blended into the Head and Neck evaluation. Deciding what other aspects to routinely include is based on judgment and experience.
The major areas of the exam, covering the most testable components of the neurological system, include:
- Mental status testing (covered in a separate section of this web site)
- Cranial Nerves
- Muscle strength, tone and bulk
- Reflexes
- Coordination
- Sensory Function
- Gait
Real and imagined problems with the neurological examination:
The neurological examination is one of the least popular and (perhaps) most poorly performed aspects of the complete physical. I suspect that this situation exists for several reasons:
- This exam is perceived as being time and labor intensive.
- Students and house staff never develop an adequate level of confidence in their ability to perform the exam, nor in the accuracy of their findings. This, in turn, probably translates into poor performance later in their careers.
- Exam findings are often quite subjective.Thus, particularly when the examiner does not have confidence in their abilities (see above), interpretation of the results can be problematic.
- Understanding/Interpretation of some neurological findings requires an in depth understanding of neuroanatomy and pathophysiology. As many clinicians do not see a large number of patients with neurological disorders, they likely maintain a limited working understanding of this information.
- There is an over reliance on the utility of neuro-imaging (e.g. CT, MRI). These studies provide an evaluation of anatomy but not function. Thus, while extremely helpful, they must be interpreted within the context of exam findings. Careful examination may make imaging unnecessary. Also, exam findings can make a strong case for the presence of a pathologic process, even if it is not seen on a particular radiological study (i.e. there are limits to what can be seen on even the most high tech imaging).
The above are not meant to lower expectations with regards to how well a physician should be expected to learn and perform the neurological examination. Rather, I mention these points to highlight some of the real and imagined obstacles to clinical performance. Like all other aspects of the physical exam, there is a wealth of information that can be obtained from the neurological examination, provided that it is done carefully and accurately.This is, of course, predicated on learning how to do it correctly. A few practical considerations/suggestions:
- In general, the neurological examination is not applied in its entirety to asymptomatic, otherwise healthy people as the yield (i.e. likelihood of identifying occult disease) would be quite low. It is, however, a good idea to practice the exam early in your careers, even when working with normal patients.This will improve the facility with which you perform the exam, provide you with a better sense of the range of normal, increase the accuracy of the results generated, and give you confidence in the meaning of findings identified when evaluating other patients.
- It is sometimes appropriate to perform only certain parts of the neurological examination (e.g. just cranial nerves; or only motor testing)These situations will become apparent with experience.
- The testing described below is still rather basic. There are many additional aspects of the exam that should be applied in specific settings. They are beyond the scope of this text, but can be found in other references.
- Take advantage of those opportunities when a more experienced clinician examines one of your patients. When possible, watch them perform their exam. Then go back alone and verify the findings.
Like any other aspect of the exam, the neurological assessment has limits. Testing of one system is often predicated on the normal function of other organ systems. If, for example, a patient is visually impaired, they may not be able to perform finger to nose testing, a part of the assessment of cerebellar function (see below). Or, a patient's severe degenerative hip disease will prevent them from walking, making that aspect of the exam impossible to assess. The interpretation of "findings" must therefore take these things into account. Only in this way can you generate an accurate picture. Doing this, of course, takes practice and experience.
Cranial Nerve (CN) Testing
Many practitioners incorporate cranial nerve testing with their complete examination of the head and neck (see the Head and Neck section of this web site for details). A detailed description of the CN assessment is provided below. As each half of the body has its own cranial nerve, both right and left sides must be checked independently.
Cranial Nerve 1 (Olfactory): Formal assessment of ability to smell is generally omitted, unless there is a specific complaint. If it is to be tested:
- 1. Check to make sure that the patient is able to inhale and exhale through the open nostril.
- Have the patient close their eyes.
- Present a small test tube filled with something that has a distinct, common odor (e.g. ground coffee) to the open nostrils. The patient should be able to correctly identify the odor at approximately 10 cm.
Cranial Nerve 2 (Optic): This nerve carries visual impulses from the eye to the optical cortex of the brain by means of the optic tracts. Testing involves 3 phases (also covered in the section of this site dedicated to the Eye Exam):
- Acuity:
- Each eye is tested separately. If the patient uses glasses to view distant objects, they should be permitted to wear them (referred to as best corrected vision).
- A Snellen Chart is the standard, wall mounted device used for this assessment. Patients are asked to read the letters or numbers on successively lower lines (each with smaller images) until you identify the last line which can be read with 100% accuracy. Each line has a fraction written next to it. 20/20 indicates normal vision. 20/400 means that the patient's vision 20 feet from an object is equivalent to that of a normal person viewing the same object from 400 feet. In other words, the larger the denominator, the worse the vision.
- There are hand held cards that look like Snellen Charts but are positioned 14 inches from the patient. These are used simply for convenience. Testing and interpretation are as described for the Snellen.
- If neither chart is available and the patient has visual complaints, some attempt should be made to objectively measure visual acuity. This is a critically important reference point, particularly when trying to communicate the magnitude of a visual disturbance to a consulting physician. Can the patient read news print? The headline of a newspaper? Distinguish fingers or hand movement in front of their face? Detect light?Failure at each level correlates with a more severe problem.
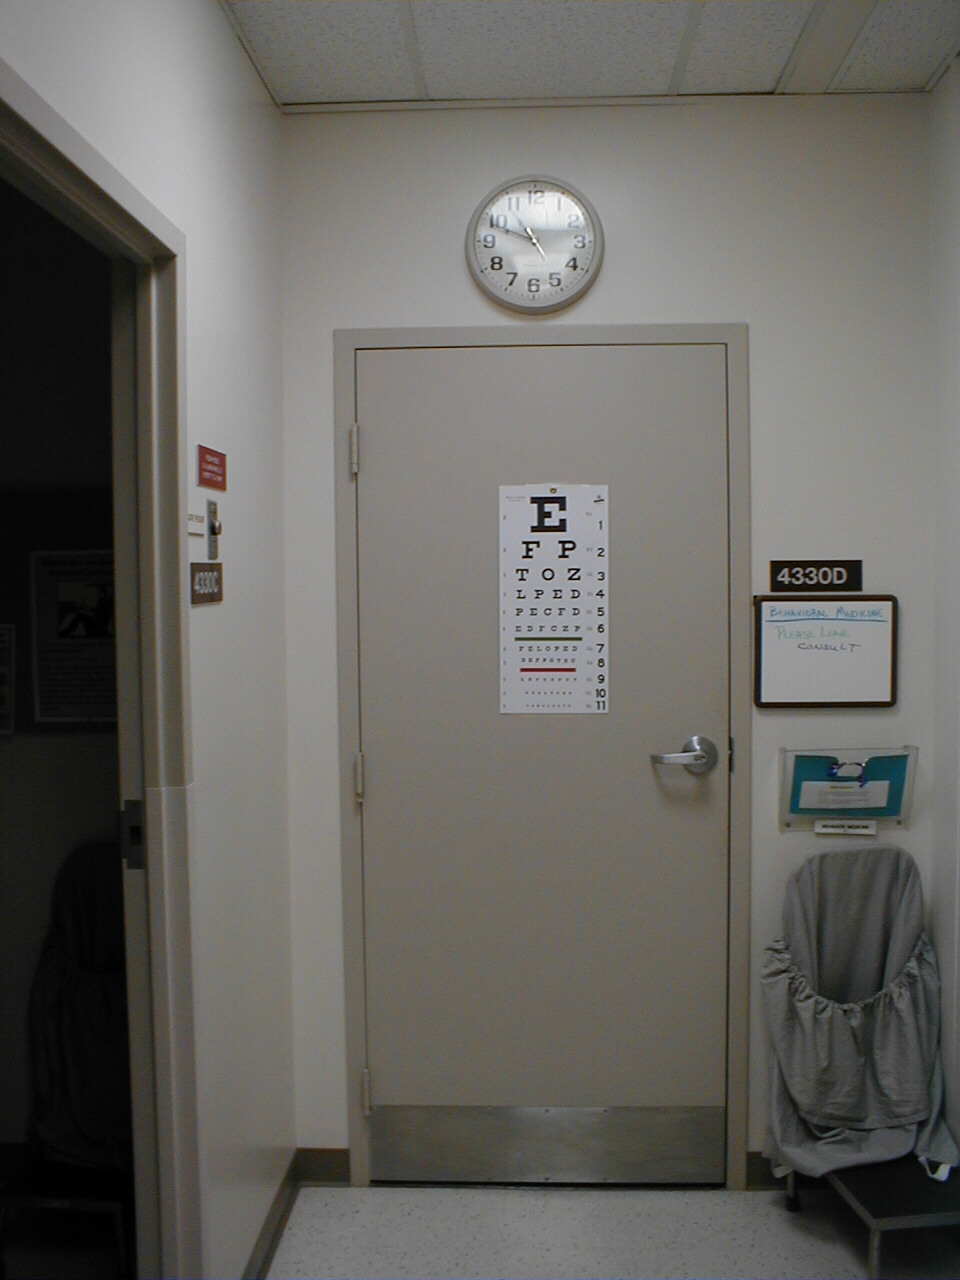 Snellen chart for measuring visual acuity
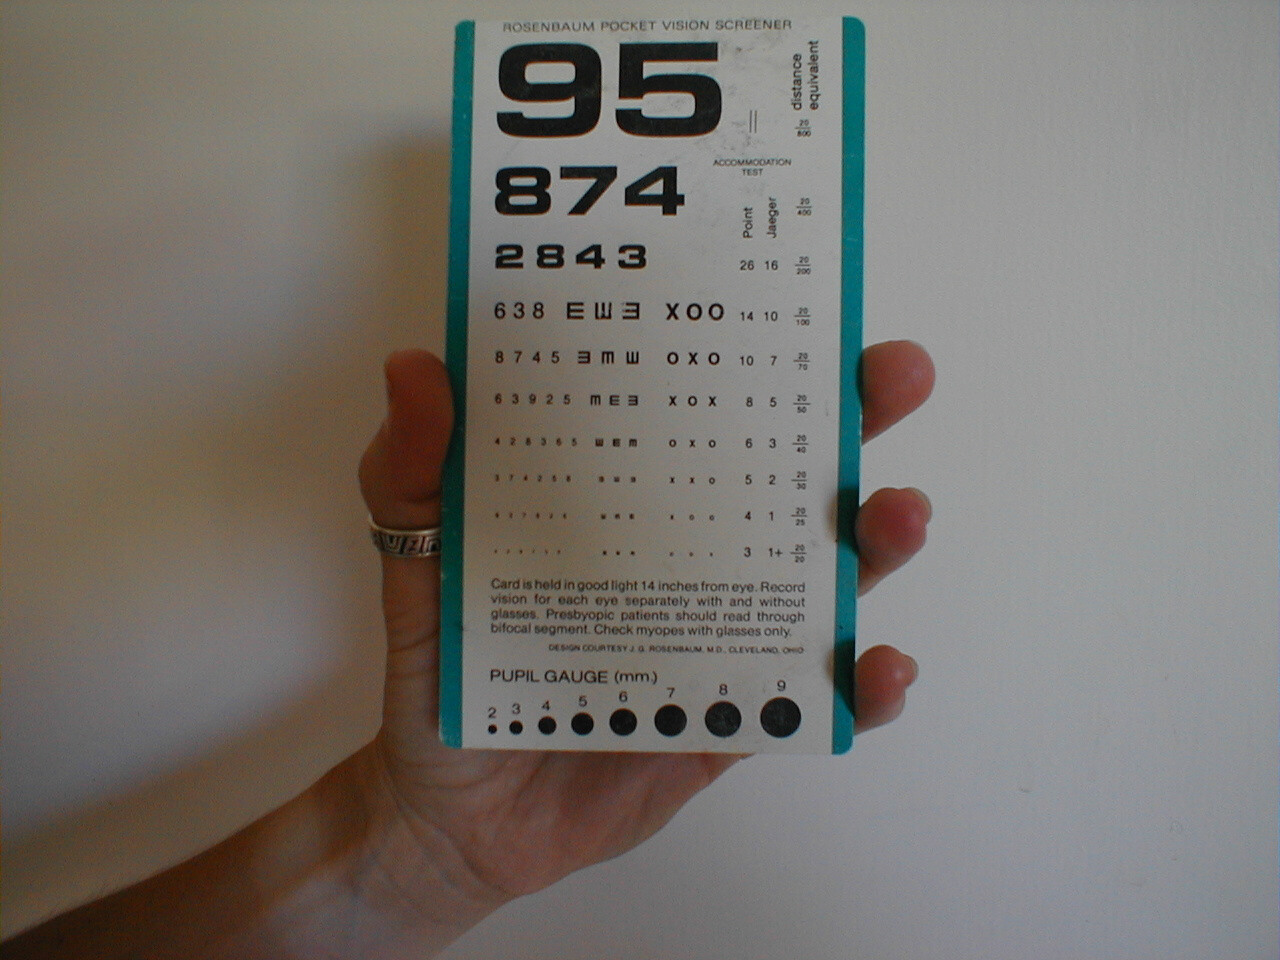 Hand held visual acuity card
For Additional Information See: Digitl DDx: Decreased Vision
- Visual Field Testing: Specific areas of the retina receive input from precise areas of the
visual field. This information is carried to the brain along well defined anatomic pathways.
Holes in vision (referred to as visual field cuts) are caused by a disruption along any
point in the path from the eyeball to the visual cortex of the brain. Visual fields can be
crudely assessed as follows:
- The examiner should be nose to nose with the patient, separated by approximately 8 to 12 inches.
- Each eye is checked separately. The examiner closes one eye and the patient closes the one opposite. The open eyes should then be staring directly at one another.
- The examiner should move their hand out towards the periphery of his/her visual field on the side where the eyes are open. The finger should be equidistant from both persons.
- The examiner should then move the wiggling finger in towards them, along an imaginary line drawn between the two persons.The patient and examiner should detect the finger at more or less the same time.
- The finger is then moved out to the diagonal corners of the field and moved inwards from each of these directions. Testing is then done starting at a point in front of the closed eyes. The wiggling finger is moved towards the open eyes.
- The other eye is then tested.
Meaningful interpretation is predicated upon the examiner having normal fields, as they are using themselves for comparison.
If the examiner cannot seem to move their finger to a point that is outside the patient's field don't worry, as it simply means that their fields are normal.
Interpretation: This test is rather crude, and it is quite possible to have small visual field defects that would not be apparent on this type of testing. Prior to interpreting abnormal findings, the examiner must understand the normal pathways by which visual impulses travel from the eye to the brain.
For more information about visual field testing, see the following links:
University of Arkansas, gross anatomy of visual pathway
- Pupils: The pupil has afferent (sensory) nerves that travel with CN2. These nerves carry the impulse generated by the light back towards the brain. They function in concert with efferent (motor) nerves that travel with CN 3 and cause pupillary constriction. Seen under CN 3 for specifics of testing.
Cranial nerves 3, 4 and 6 & extra ocular movements:
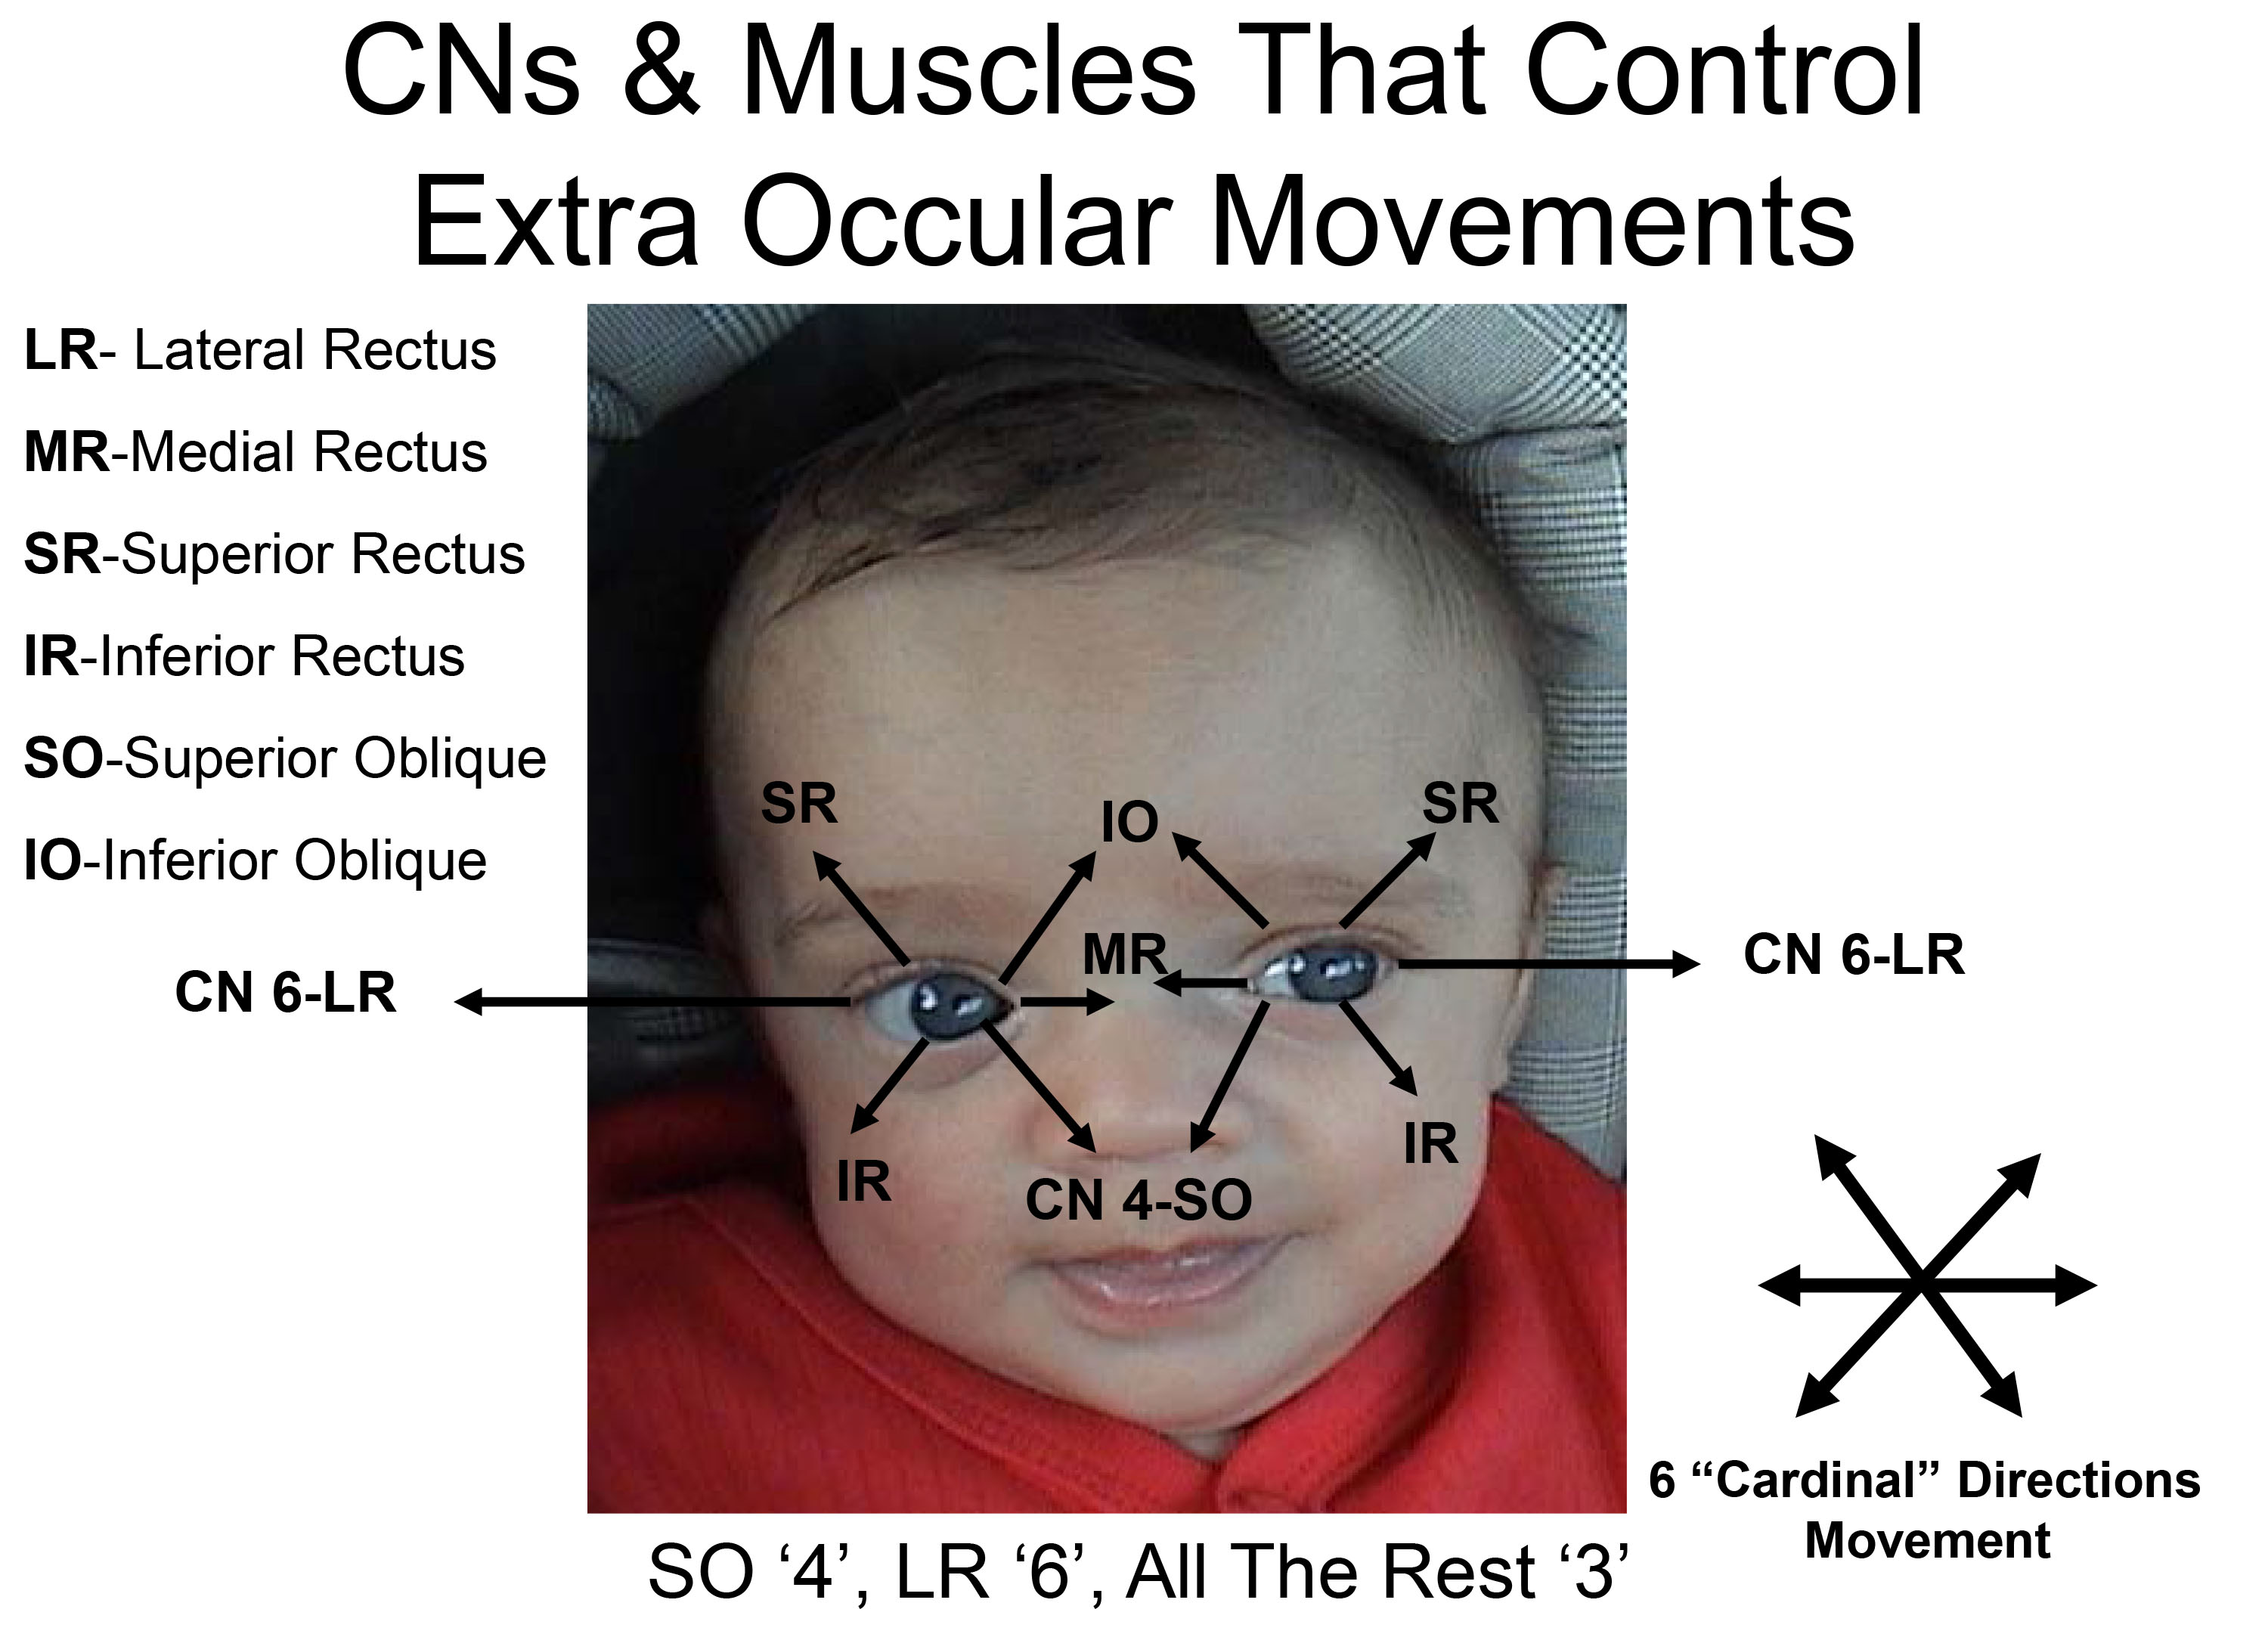
Normally, the eyes move in concert (ie when left eye moves left, right eye moves in same direction to a similar degree). The brain takes the input from each eye and puts it together to form a single image. This coordinated movement depends on 6 extra ocular muscles that insert around the eye balls and allow them to move in all directions. Each muscle is innervated by one of 3 Cranial Nerves (CNs): CNs 3, 4 and 6. Movements are described as: elevation (pupil directed upwards), depression (pupil directed downwards), adbduction (pupil directed laterally), adduction (pupil directed medially), extorsion (top of eye rotating away from the nose), and intorsion (top of eye rotating towards the nose).

The 3 CNs responsible for eye movement and the muscles that they control are as follows:
CN 4 (Trochlear): Controls the Superior Oblique muscle.
CN 6 (Abducens): Controls the Lateral Rectus muscle.
CN 3 (Oculomotor): Controls the remaining 4 muscles (inferior oblique, inferior rectus, superior
rectus, and medial rectus). CN3 also raises the eyelid and mediates
constriction of the pupil (discussed below).
The mnemonic "S O 4, L R 6, All The Rest 3" may help remind you which CN does what (Superior Oblique CN 4, Lateral Rectus CN 6, All The Rest of the muscles innervated by CN 3).
EOMs and their function:
The medial and lateral rectus muscles are described first, as their functions are very straight
forward:
Lateral rectus: Abduction (ie lateral movement along the horizontal plane)
Medial rectus: Adduction (ie. Medial movement along the horizontal plane)
The remaining muscles each causes movement in more than one direction (e.g. some combination of elevation/depression, abduction/adduction, intorsion/extorsion). This is due to the fact that they insert on the eyeball at various angles, and in the case of the superior oblique, thru a pulley. Review of the origin and insertion of each muscle sheds light on its actions (see links @ the end of this section). The net impact of any one EOM is the result of the position of the eye and the sum of forces from all other contributing muscles.
Specific actions of the remaining EOMs are described below. The action which the muscle primarily
performs is listed first, followed by secondary and then tertiary actions.
Inferior rectus: depression, extorsion and adduction.
Superior rectus: elevation, intorsion and adduction
Superior oblique: intorsion, depression and abduction
Inferior oblique: extorsion, elevation and abduction
Practically speaking, cranial nerve testing is done such that the examiner can observe eye movements in all directions. The movements should be smooth and coordinated. To assess, proceed as follows:
- Stand in front of the patient.
- Ask them to follow your finger with their eyes while keeping their head in one position
- Using your finger, trace an imaginary "H" or rectangular shape in front of them, making sure that your finger moves far enough out and up so that you're able to see all appropriate eye movements (ie lateral and up, lateral down, medial down, medial up).
- At the end, bring your finger directly in towards the patient's nose. This will cause the patient to look cross-eyed and the pupils should constrict, a response referred to as accommodation.

For Additional Information See: Digitial DDx: Double Vision

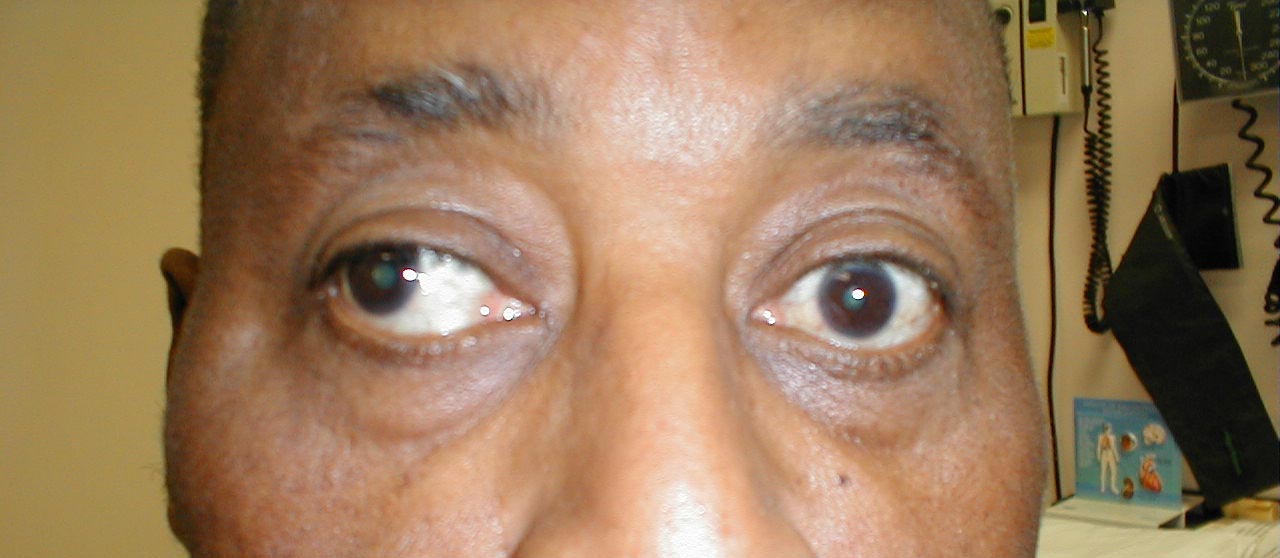
Patient was asked to look left. Note that left eye will not abduct.
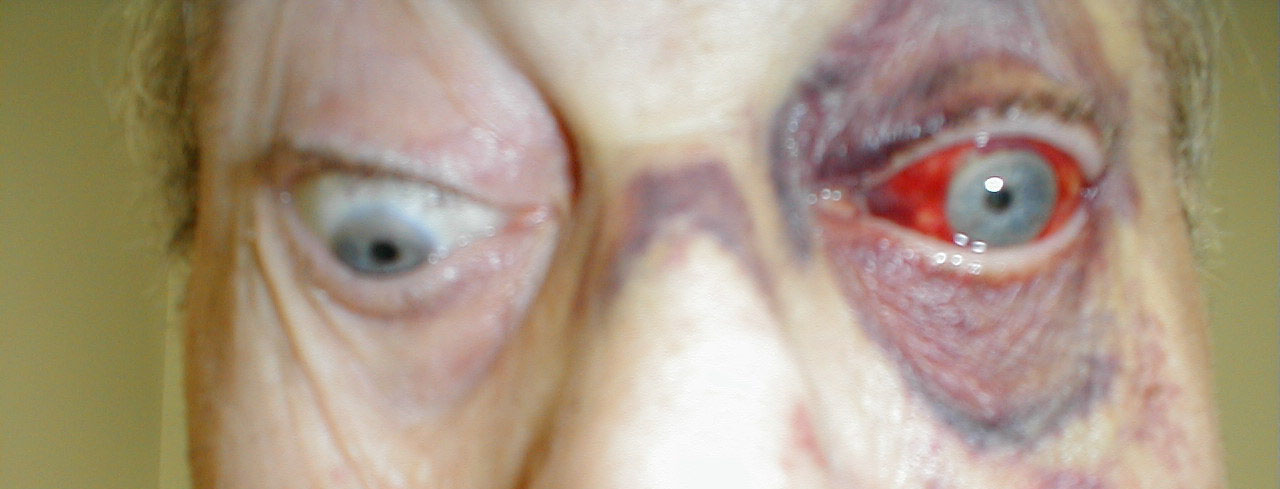
It's worth mentioning that disorders of the extra ocular muscles themselves (and not the CN which innervate them) can also lead to impaired eye movement. For example, pictured below is a patient who has suffered a traumatic left orbital injury. The inferior rectus muscle has become entrapped within the resulting fracture, preventing the left eye from being able to look downward. The scleral blood and peri-orbital echymosis are secondary to the trauma as well.
*For more on EOMs go to: Eyes -EOMs
As mentioned above, CN 3 also innervates the muscle which raises the upper eye lid (Levator Palpebrae Superioris muscle). This can be assessed by simply looking at the patient. If there is CN 3 dysfunction, the eyelid on that side will cover more of the iris compared with the other eye. This is referred to as ptosis.
Assessing Pupils
The response of pupils to light is controlled by afferent (sensory) nerves that travel with CN 2 and efferent (motor) nerves that travel with CN 3. These innervate the ciliary muscle, which controls the size of the pupil. Testing is performed as follows:
- It helps if the room is a bit dim, as this will cause the pupil to become more dilated.
- Using any light source (flashlight, oto-ophtahlmoscope, etc), shine the light into one eye. This will cause that pupil to constrict, referred to as the direct response.
- Remove the light and then re-expose it to the same eye, though this time observe the other pupil. It should also constrict, referred to as the consensual response. This occurs because afferent impulses from one eye generate an efferent response (i.e. signal to constrict) that is sent to both pupils.
- If the patient's pupils are small at baseline or you are otherwise having difficulty seeing the changes, take your free hand and place it above the eyes so as to provide some shade. This should cause the pupils to dilate additionally, making the change when they are exposed to light more dramatic. If you are still unable to appreciate a response, ask the patient to close their eye, generating maximum darkness and thus dilatation. Then ask the patient to open the eye and immediately expose it to the light. This will (hopefully) make the change from dilated to constricted very apparent.
Interpretation:
- Under normal conditions, both pupils will appear symmetric. Direct and consensual response should be equal for both.
- Asymmetry of the pupils is referred to as aniosocoria. Some people with anisocoria have no underlying neuropathology. In this setting, the asymmetry will have been present for a long time without change and the patient will have no other neurological signs or symptoms. The direct and consensual responses should be preserved.
- A number of conditions can also affect the size of the pupils. Medications/intoxications which cause generalized sympathetic activation will result in dilatation of both pupils. Other drugs(e.g. narcotics) cause symmetric constrictionof the pupils. These findings can provide important clues when dealing with an agitated or comatose patient suffering from medication overdose. Eye drops known as mydriatic agents are used to paralyze the muscles, resulting marked dilatation of the pupils. They are used during a detailed eye examination, allowing a clear view of the retina. Addiitonally, any process which causes increased intracranial pressure can result in a dilated pupil that does not respond to light.
- If the afferent nerve is not working, neither pupil will respond when light is shined in the affected eye. Light shined in the normal eye, however, will cause the affected pupil to constrict. That's because the efferent (signal to constrict) response in this case is generated by the afferent impulse received by the normally functioning eye. This is referred to as an afferent pupil defect.
- If the efferent nerve is not working, the pupil will appear dilated at baseline and will have neither direct nor consensual pupillary responses.
For more information about pupillary response and CN 3, see the following links:
More on Extraocular movements: http://www.tedmontgomery.com/the_eye/eom.html#top
Dartmouth Neurosciences - Extraocular movements http://www.dartmouth.edu/~dons/part_1/chapter_4.html
For Additional Information See: Digitial DDx: Pupil Abnormalities
CN 4 (Trochlear): Seen under CN 3.
CN 5 (Trigeminal): This nerve has both motor and sensory components.
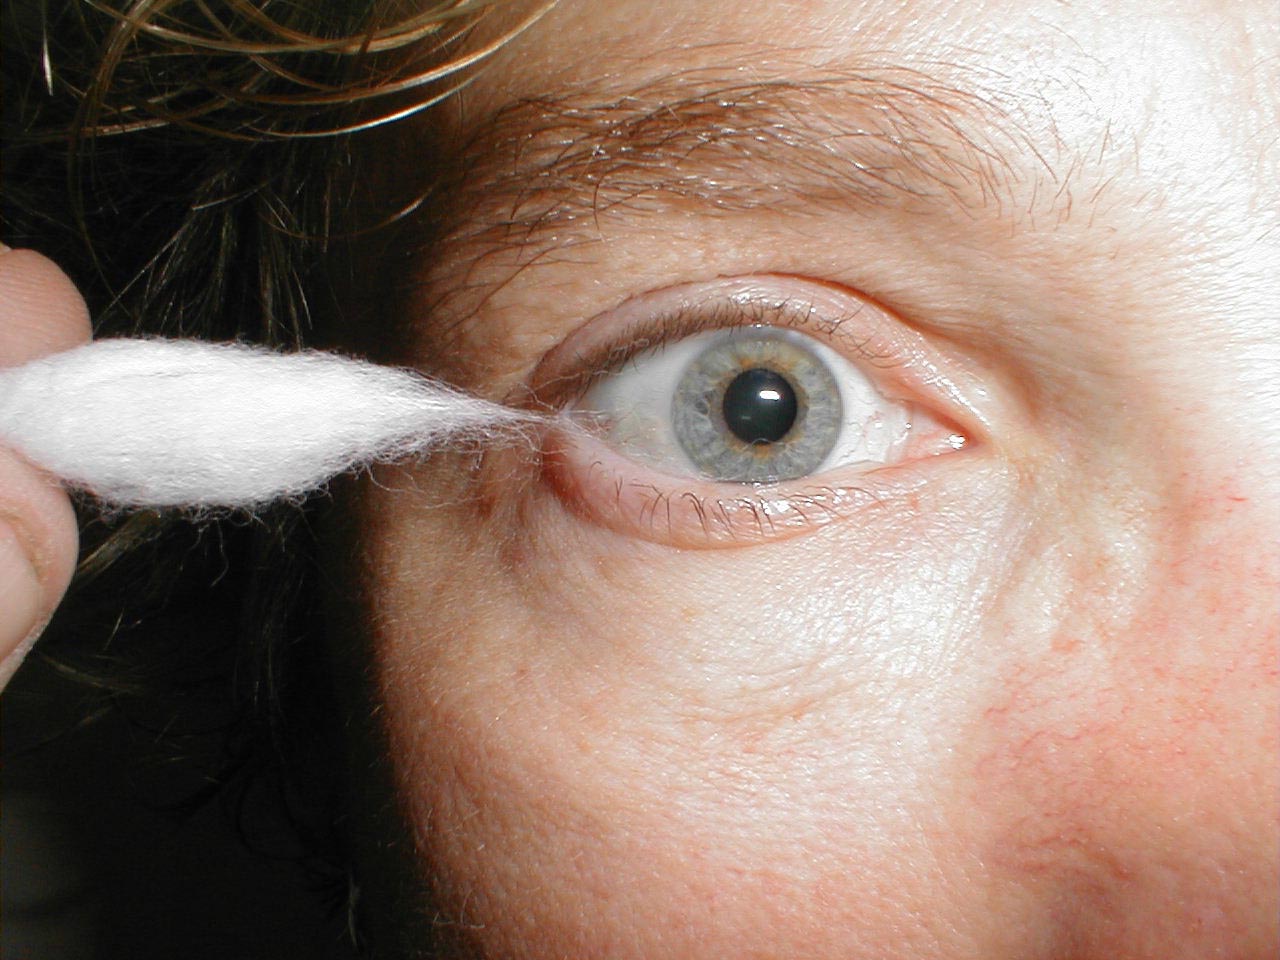
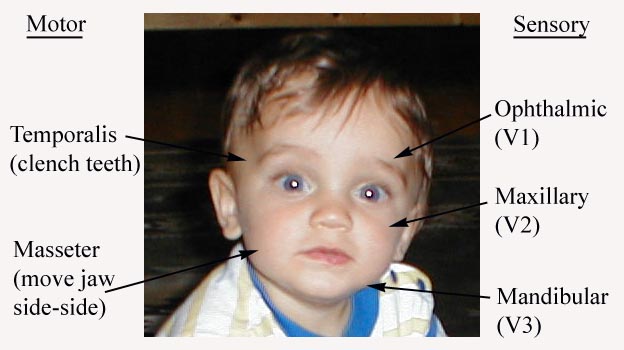
Assessment of CN 5 Sensory Function: The sensory limb has 3 major branches, each covering roughly 1/3 of the face. They are: the Ophthlamic, Maxillary, and Mandibular. Assessment is performed as follows:
- Use a sharp implement (e.g. broken wooden handle of a cotton tipped applicator).
- Ask the patient to close their eyes so that they receive no visual cues.
- Touch the sharp tip of the stick to the right and left side of the forehead, assessing the Ophthalmic branch.
- Touch the tip to the right and left side of the cheek area, assessing the Maxillary branch.
- Touch the tip to the right and left side of the jaw area, assessing the Mandibular branch.
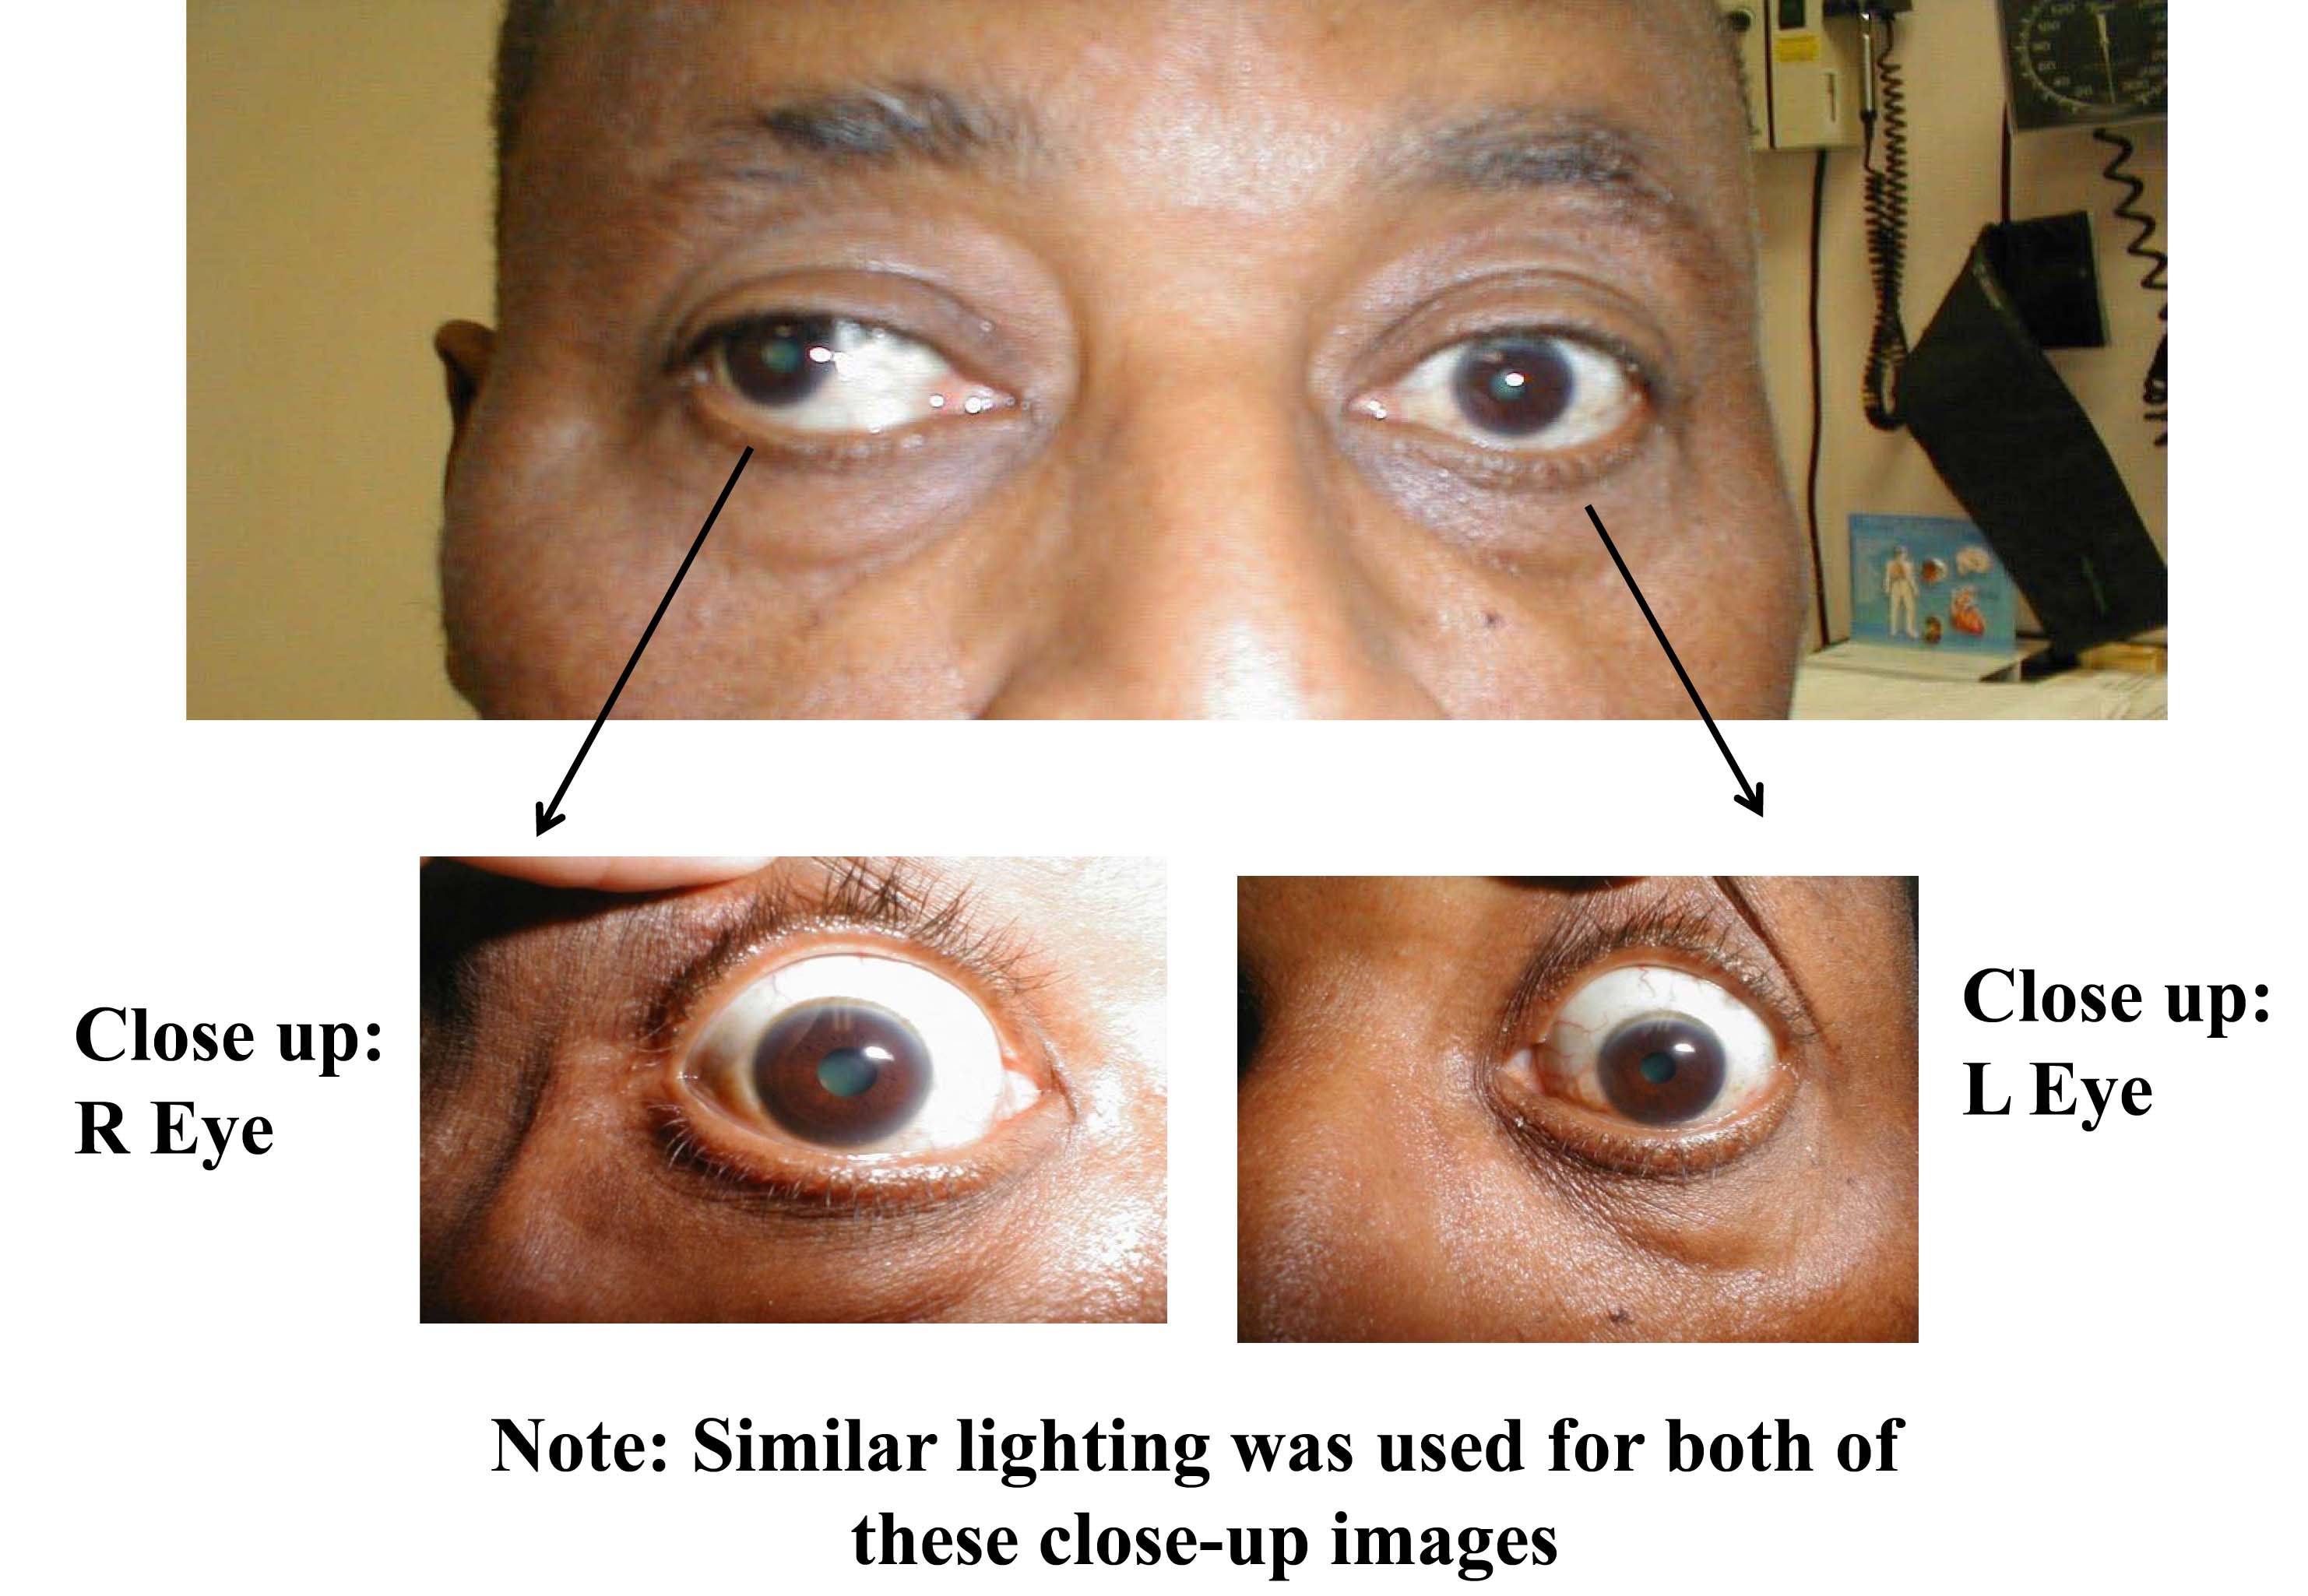
The patient should be able to clearly identify when the sharp end touches their face. Of course, make sure that you do not push too hard as the face is normally quite sensitive. The Ophthalmic branch of CN 5 also receives sensory input from the surface of the eye. To assess this component:
- Pull out a wisp of cotton.
- While the patient is looking straight ahead, gently brush the wisp against the lateral aspect of the sclera (outer white area of the eye ball).
- This should cause the patient to blink. Blinking also requires that CN 7 function normally, as it controls eye lid closure.
Assessment of CN 5 Motor Function: The motor limb of CN 5 innervates the Temporalis and Masseter muscles, both important for closing the jaw. Assessment is performed as follows:
- Place your hand on both Temporalis muscles, located on the lateral aspects of the forehead.
- Ask the patient to tightly close their jaw, causing the muscles beneath your fingers to become taught.
- Then place your hands on both Masseter muscles, located just in from of the Tempero-Mandibular joints (point where lower jaw articulates with skull).
- Ask the patient to tightly close their jaw, which should again cause the muscles beneath your fingers to become taught. Then ask them to move their jaw from side to side, another function of the Massester.
CN6 (Abducens): See under CN 3.
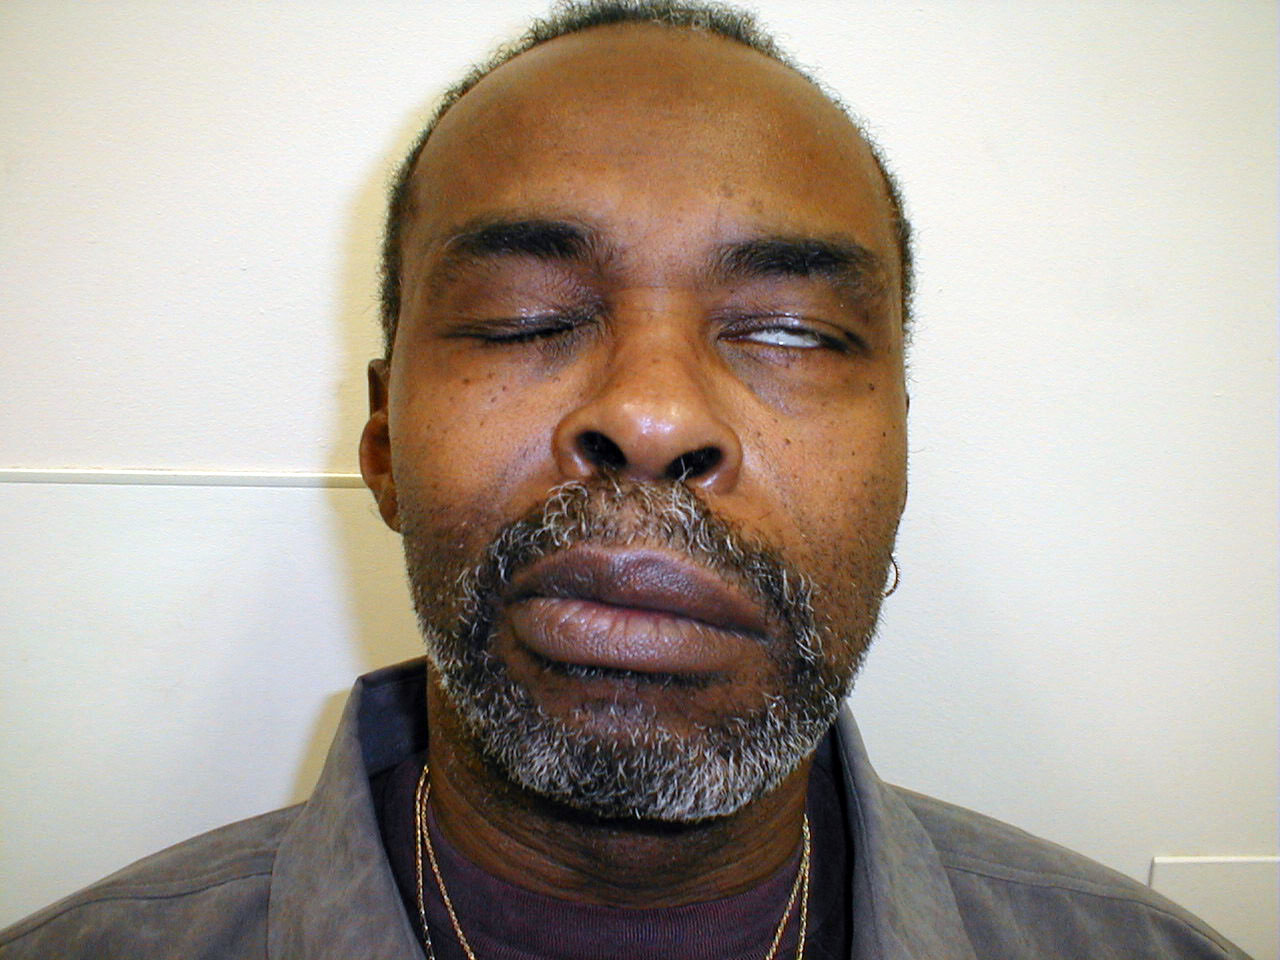
CN7 (Facial): This nerve innervates many of the muscles of facial expression. Assessment is performed as follows:
- First look at the patient's face. It should appear symmetric. That is:
- There should be the same amount of wrinkles apparent on either side of the forehead... barring asymmetric Bo-Tox injection!
- The nasolabial folds (lines coming down from either side of the nose towards the corners of the mouth) should be equal
- The corners of the mouth should be at the same height
If there is any question as to whether an apparent asymmetry if new or old, ask the patient for a picture (often found on a driver's license) for comparison.
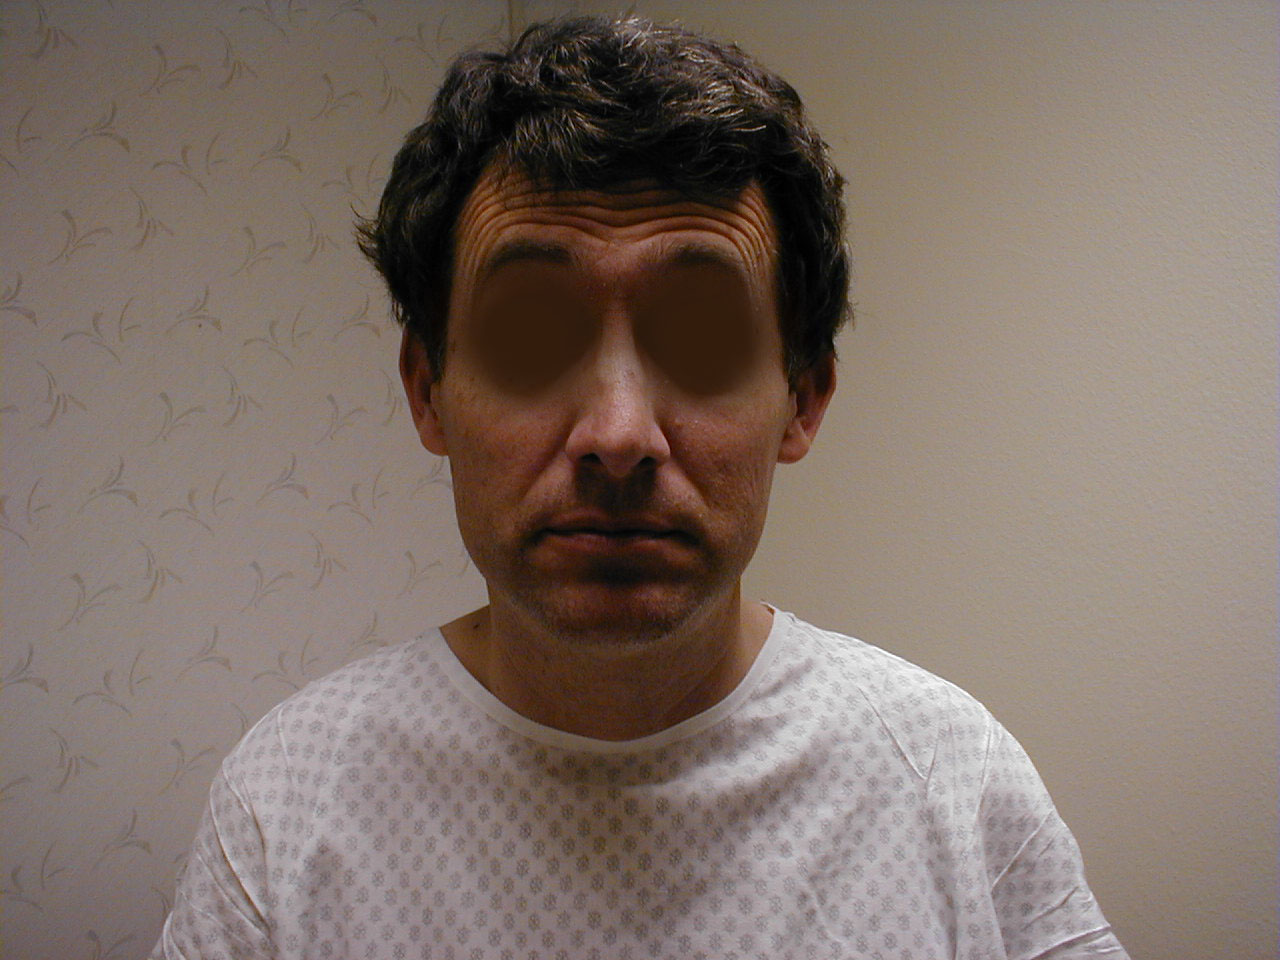
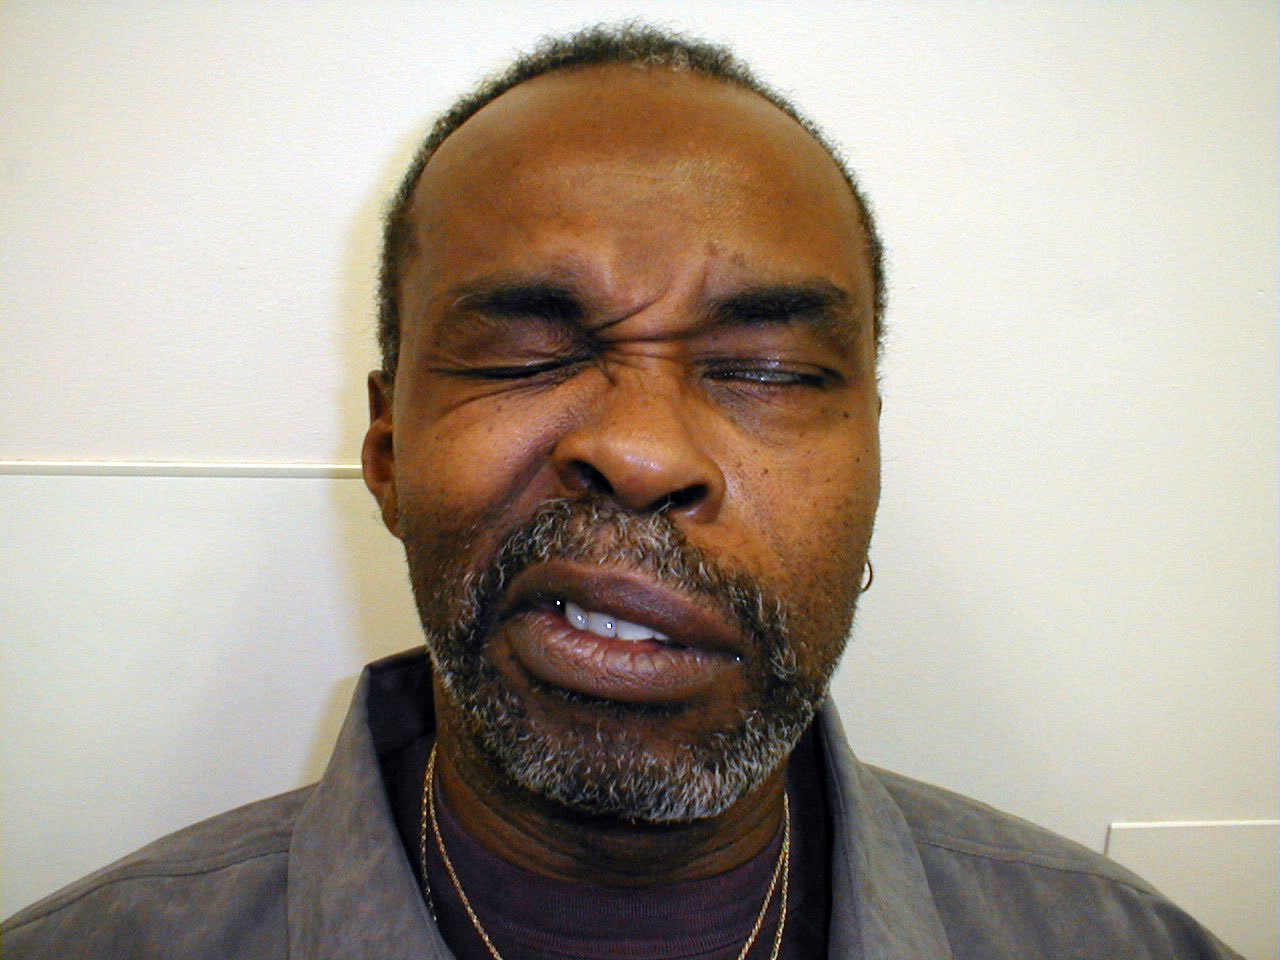
- Ask the patient to wrinkle their eyebrows and then close their eyes tightly. CN 7 controls the muscles that close the eye lids (as opposed to CN 3, which controls the muscles which open the lid). You should not be able to open the patient's eyelids with the application of gentle upwards pressure.
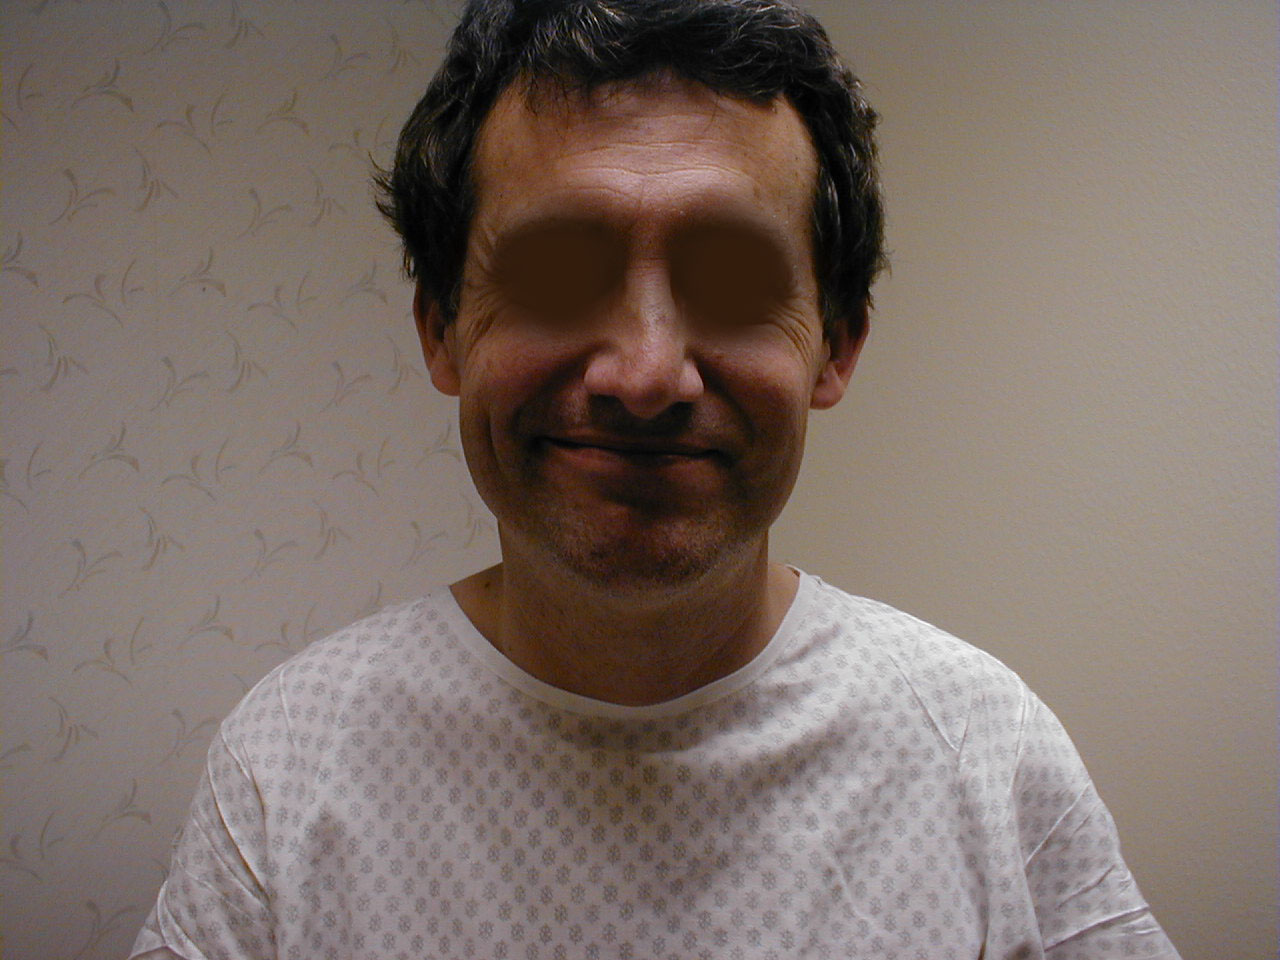
- Ask the patient to smile. The corners of the mouth should rise to the same height and equal amounts of teeth should be visible on either side.
- Ask the patient to puff out their cheeks. Both sides should puff equally and air should not leak from the mouth.
Interpretation: CN 7 has a precise pattern of inervation, which has important clinical implications. The right and left upper motor neurons (UMNs) each innervate both the right and left lower motor neurons (LMNs) that allow the forehead to move up and down. However, the LMNs that control the muscles of the lower face are only innervated by the UMN from the opposite side of the face.
Precise Pattern of Innervation
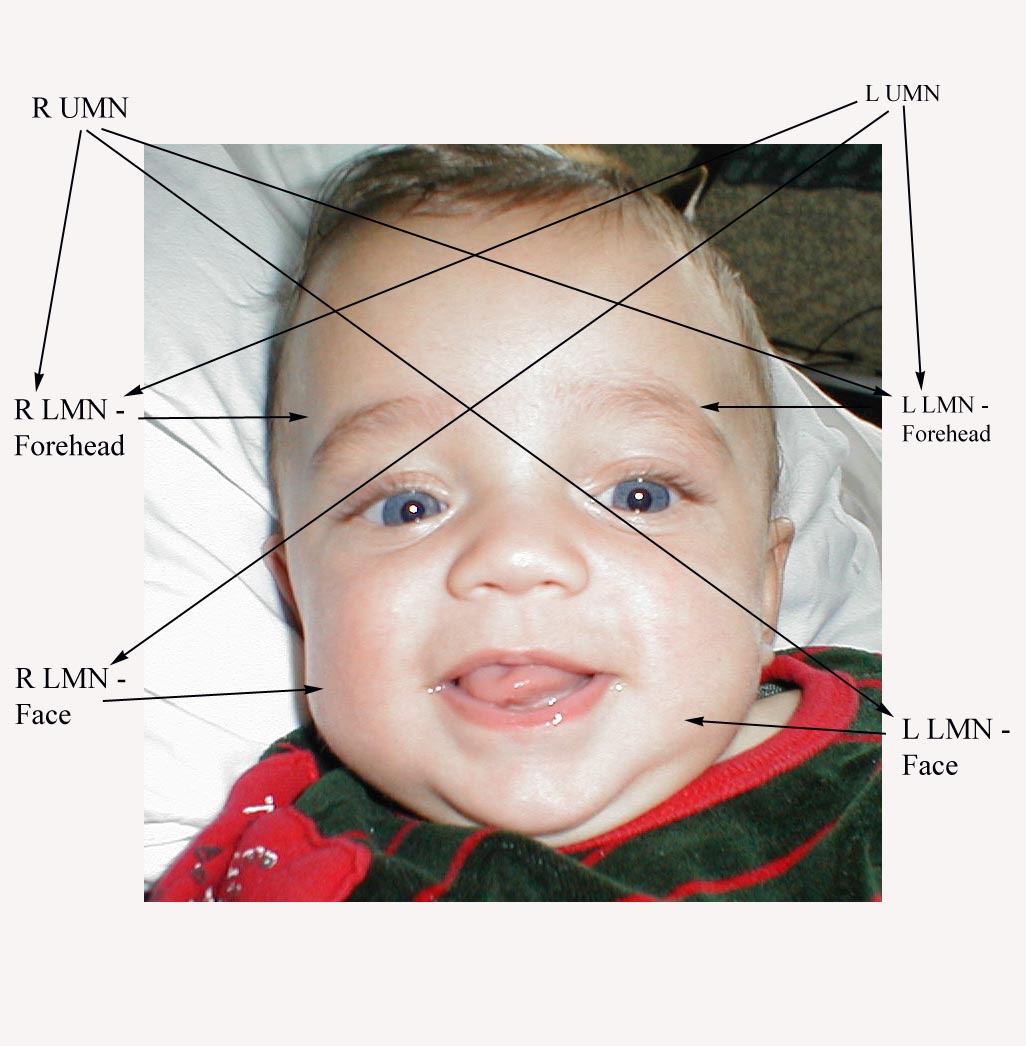
Thus, in the setting of CN 7 dysfunction, the pattern of weakness or paralysis observed will differ depending on whether the UMN or LMN is affected. Specifically:
- UMN dysfunction: This might occur with a central nervous system event, such as a stroke. In the setting of R UMN CN 7 dysfunction, the patient would be able to wrinkle their forehead on both sides of their face, as the left CN 7 UMN cross innervates the R CN 7 LMN that controls this movement. However, the patient would be unable to effectively close their left eye or raise the left corner of their mouth.
- LMN dysfunction: This occurs most commonly in the setting of Bell's Palsy, an idiopathic,
acute CN 7 peripheral nerve palsy. In the setting of R CN 7 peripheral (i.e. LMN)
dysfunction, the patient would not be able to wrinkle their forehead, close their eye or
raise the corner of their mouth on the right side. Left sided function would be normal.
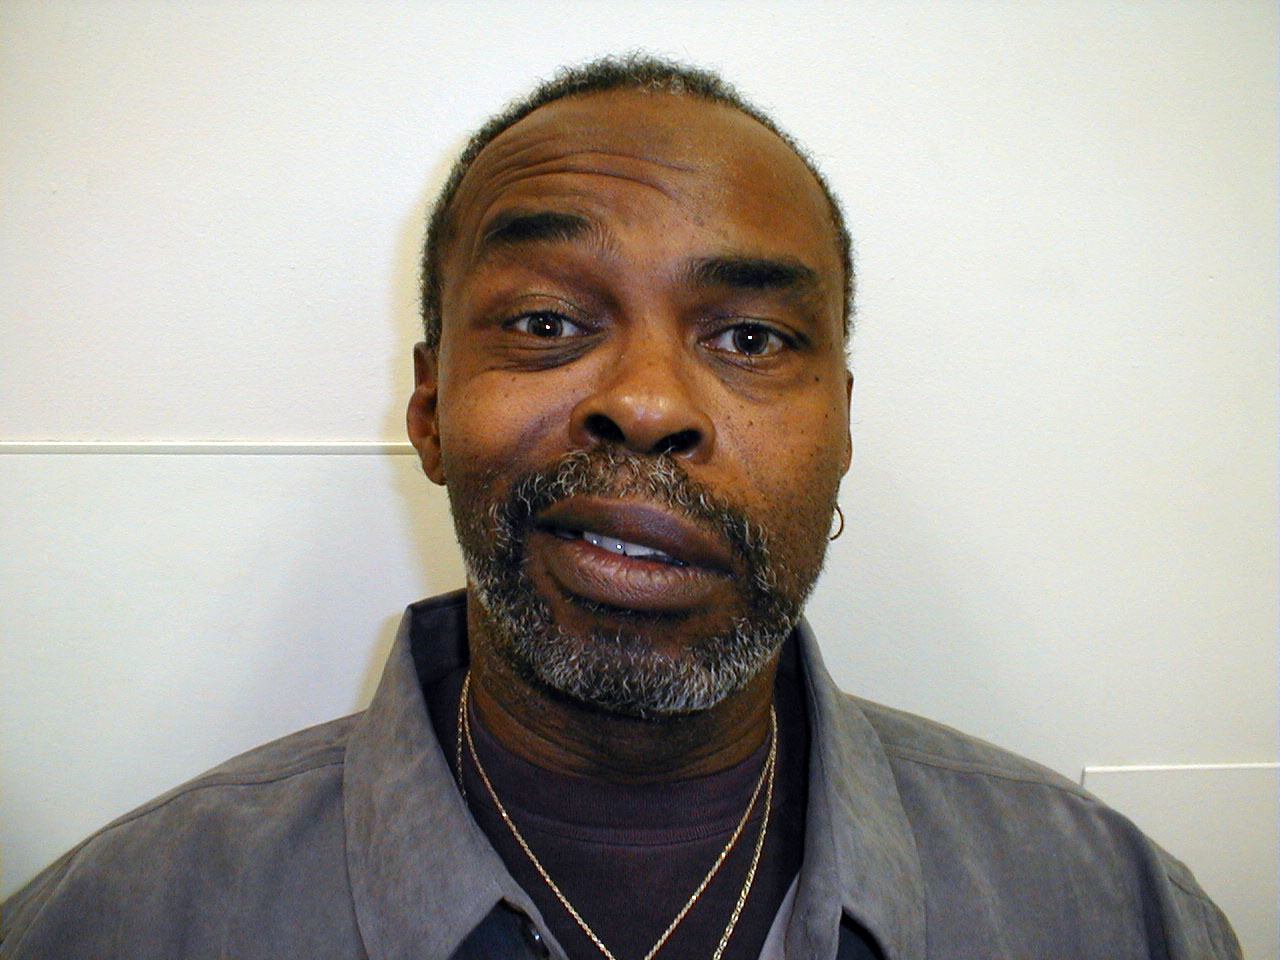
 Right central CN7 dysfunction: Note preserved abiltiy to wrinkle forehead. Left corner of mouth, however, is slightly lower than right. Left naso-labial fold is slightly less pronounced compared with right.
 - LMN dysfunction: This occurs most commonly in the setting of Bell's Palsy, an idiopathic, acute CN 7 peripheral nerve palsy. In the setting of R CN 7 peripheral (i.e. LMN) dysfunction, the patient would not be able to wrinkle their forehead, close their eye or raise the corner of their mouth on the right side. Left sided function would be normal.
This clinical distinction is very important, as central vs peripheral dysfunction carry different prognostic and treatment implications. Bell's Palsy (peripheral CN 7 dysfunction)tends to happen in patient's over 50 and often responds to treatment with Acyclovir (an anti-viral agent) and Prednisone (a corticosteroid). Over the course of weeks or months there is usually improvement and often complete resolution of symptoms. Assessment of acute central (UMN) CN 7 dysfunction would require quite a different approach (e.g. neuroimaging to determine etiology).
CN 7 is also responsible for carrying taste sensations from the anterior 2/3 of the tongue. However as this is rarely of clinical import, further discussion is not included.
CN8 (Acoustic): CN 8 carries sound impulses from the cochlea to the brain. Prior to reaching the cochlea, the sound must first traverse the external canal and middle ear. Auditory acuity can be assessed very crudely on physical exam as follows:
- Stand behind the patient and ask them to close their eyes.
- Whisper a few words from just behind one ear. The patient should be able to repeat these back accurately. Then perform the same test for the other ear.
- Alternatively, place your fingers approximately 5 cm from one ear and rub them together. The patient should be able to hear the sound generated. Repeat for the other ear.
These tests are rather crude. Precise quantification, generally necessary whenever there is a subjective decline in acuity, requires special equipment and training.
The cause of subjective hearing loss can be assessed with bedside testing. Hearing is broken into 2 phases: conductive and sensorineural. The conductive phase refers to the passage of sound from the outside to the level of CN 8. This includes the transmission of sound through the external canal and middle ear. Sensorineural refers to the transmission of sound via CN 8 to the brain. Identification of conductive (a much more common problem in the general population) defects is determined as follows:
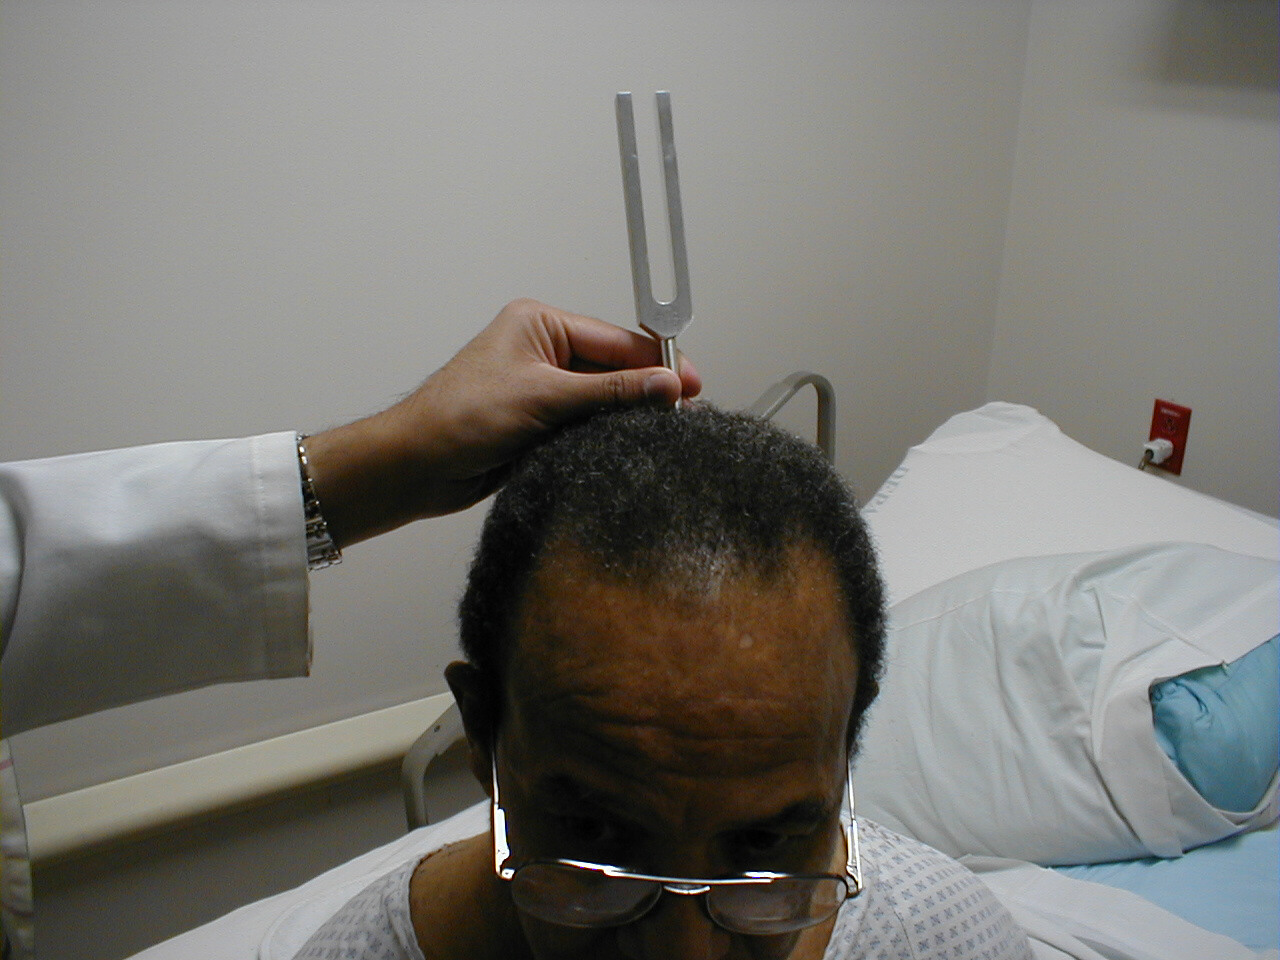
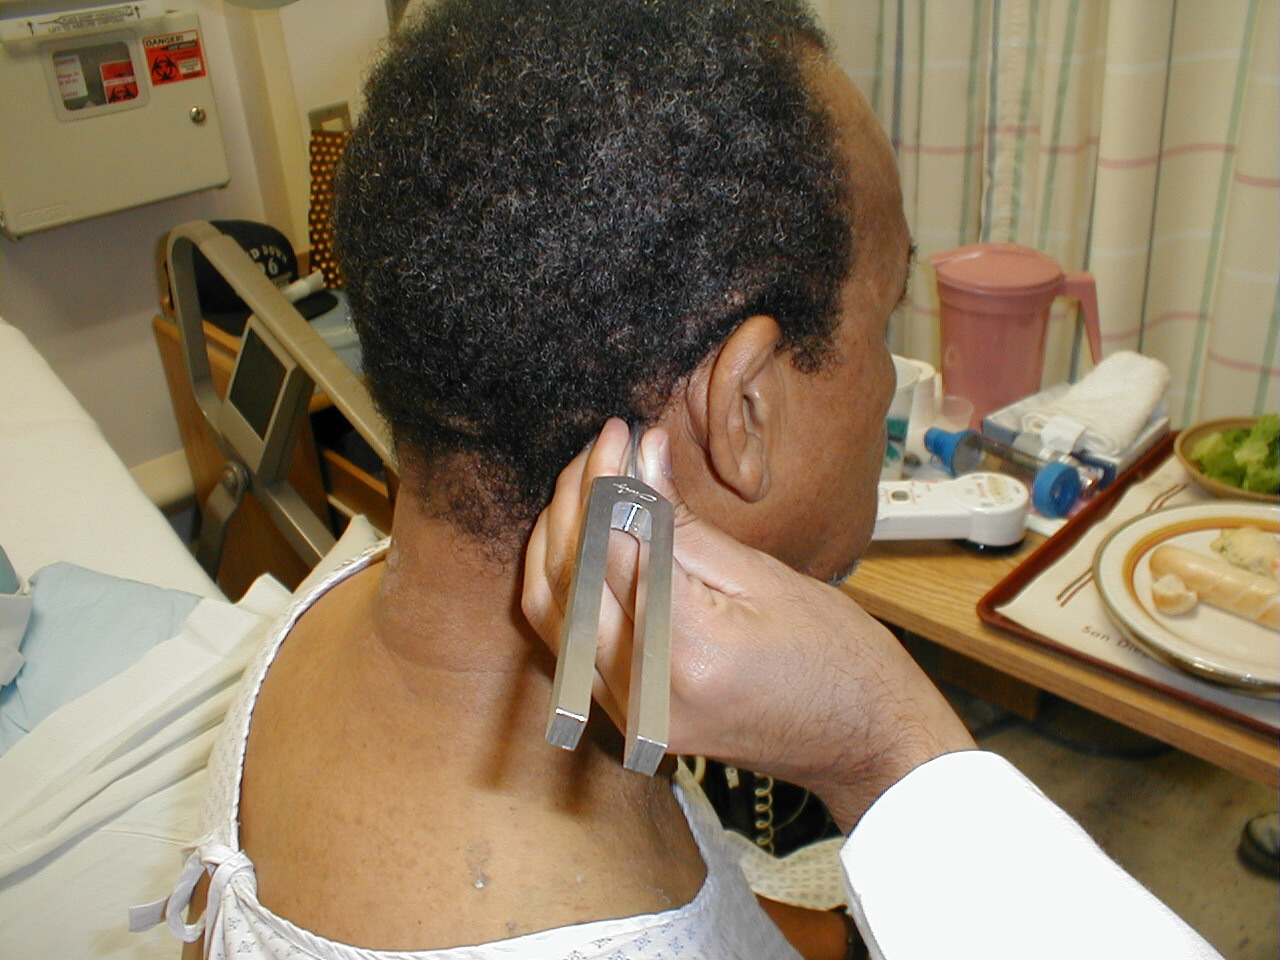
Weber Test:
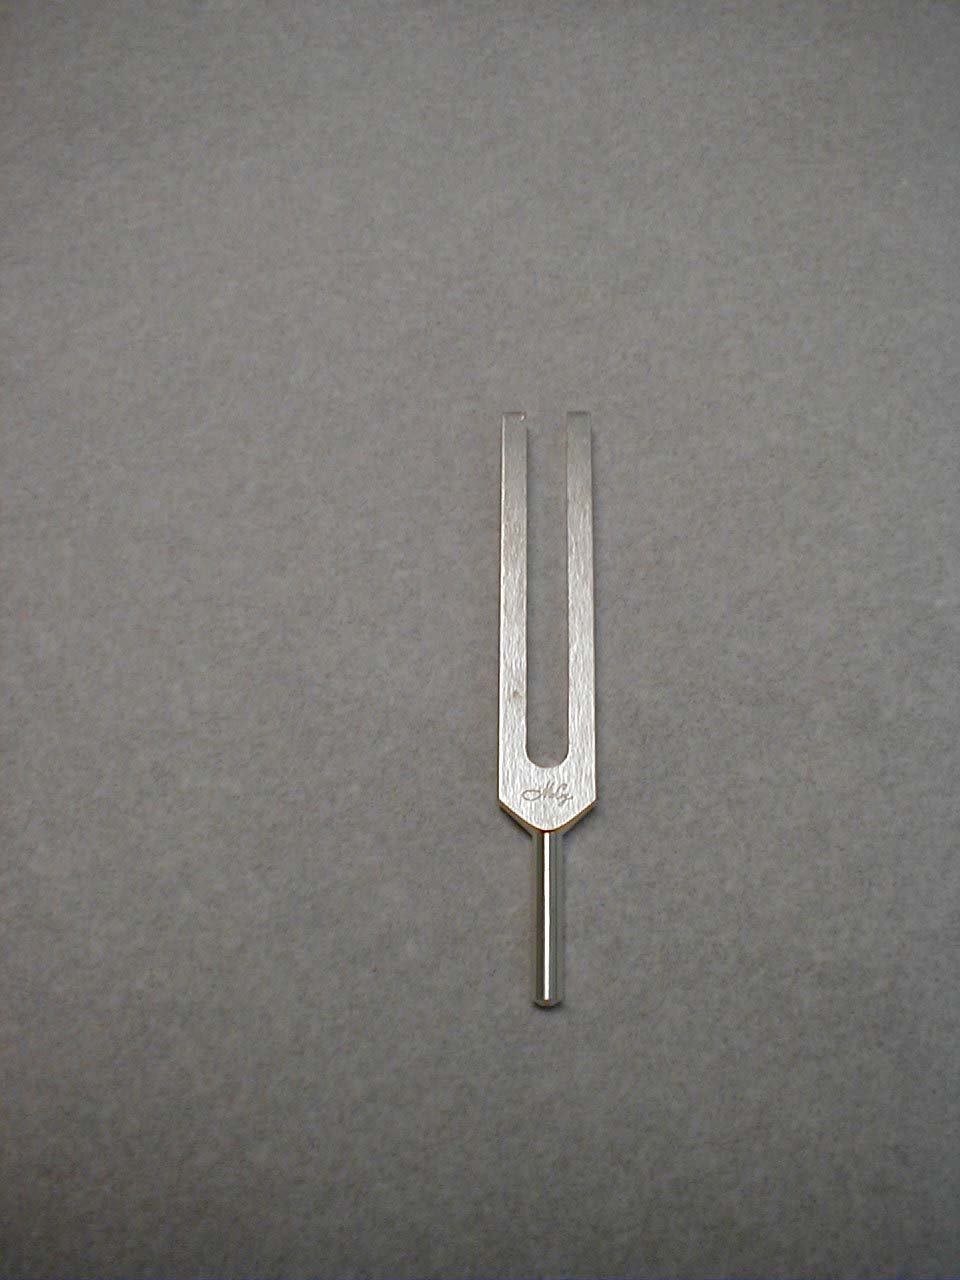
- Grasp the 512 Hz tuning fork by the stem and strike it against the bony edge of your palm, generating a continuous tone. Alternatively you can get the fork to vibrate by "snapping" the ends between your thumb and index finger.
- Hold the stem against the patient's skull, along an imaginary line that is equidistant from either ear.
- The bones of the skull will carry the sound equally to both the right and left CN 8. Both CN 8s, in turn, will transmit the impulse to the brain.
- The patient should report whether the sound was heard equally in both ears or better on one side then the other (referred to as lateralizing to a side).
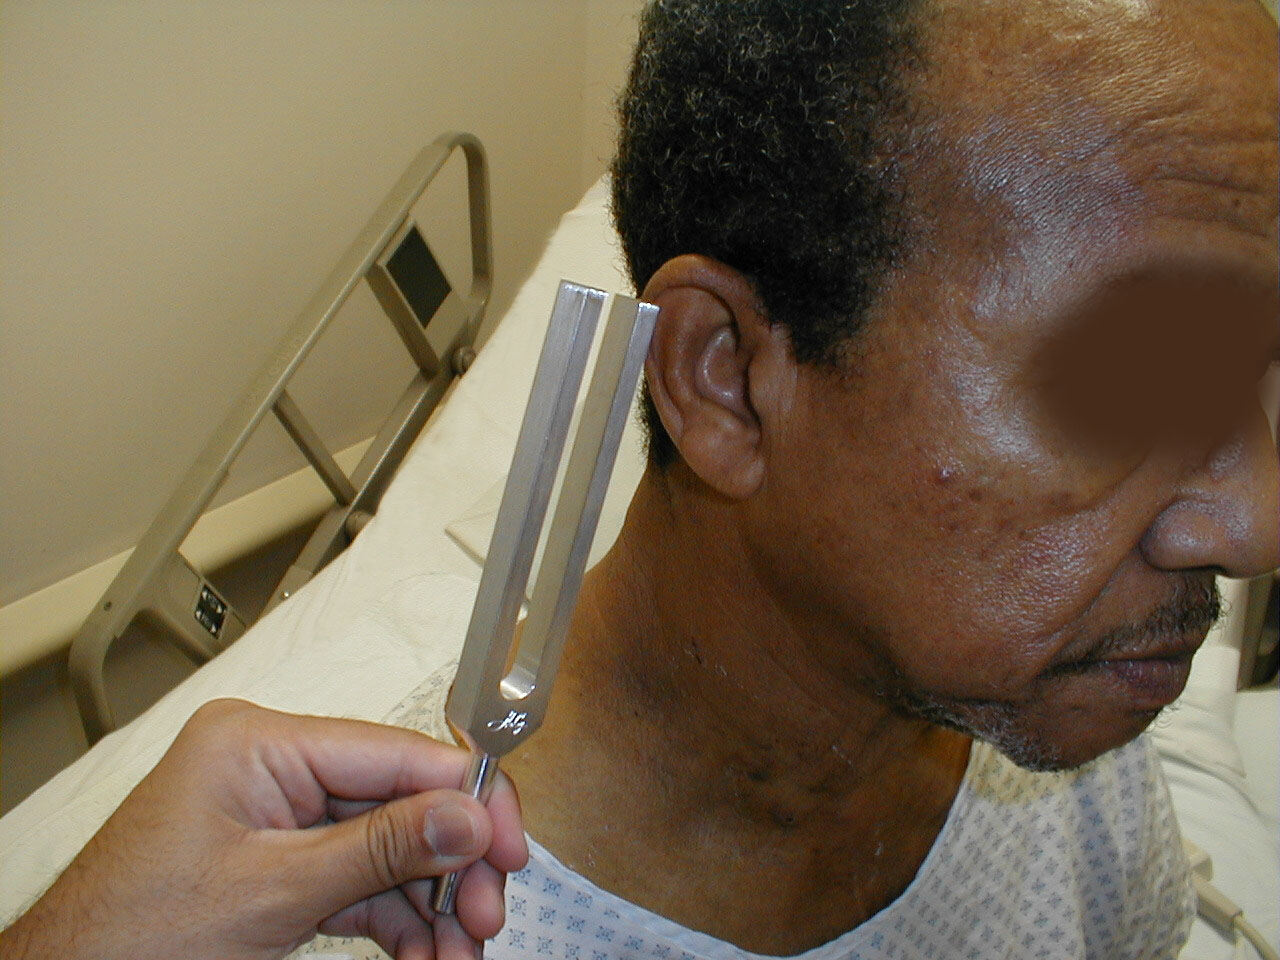
Rinne Test:
- Grasp the 512 Hz tuning fork by the stem and strike it against the bony edge of your palm, generating a continuous tone.
- Place the stem of the tuning fork on the mastoid bone, the bony prominence located immediately behind the lower part of the ear.
- The vibrations travel via the bones of the skull to CN 8, allowing the patient to hear the sound.
- Ask the patient to inform you when they can no longer appreciate the sound. When this occurs, move the tuning fork such that the tines are placed right next to (but not touching) the opening of the ear. At this point, the patient should be able to again hear the sound. This is because air is a better conducting medium then bone.
Interpretation:
- The above testing is reserved for those instances when a patient complains of a deficit in hearing. Thus, on the basis of history, there should be a complaint of hearing decline in one or both ears.
- In the setting of a conductive hearing loss (e.g. wax in the external canal), the Webber test will lateralize (i.e. sound will be heard better)in the ear that has the subjective decline in hearing. This is because when there is a problem with conduction, competing sounds from the outside cannot reach CN 8 via the external canal. Thus, sound generated by the vibrating tuning fork and traveling to CN 8 by means of bony conduction is better heard as it has no outside "competition." You can transiently create a conductive hearing loss by putting the tip of your index finger in the external canal of one ear. If you do this while performing the Webber test, the sound will be heard on that side.
- In the setting of a sensorineural hearing loss (e.g. a tumor of CN 8), the Webber test will lateralize to the ear which does not have the subjective decline in hearing. This is because CN 8 is the final pathway through which sound is carried to the brain. Thus, even though the bones of the skull will successfully transmit the sound to CN 8, it cannot then be carried to the brain due to the underlying nerve dysfunction.
- In the setting of conductive hearing loss, bone conduction (BC) will be better then air conduction (AC) when assessed by the Rinne Test. If there is a blockage in the passageway (e.g. wax) that carries sound from the outside to CN 8, then sound will be better heard when it travels via the bones of the skull. Thus, the patient will note BC to be better then or equal to AC in the ear with the subjective decline in hearing.
- In the setting of a sensorineural hearing loss, air conduction will still be better then bone conduction (i.e. the normal pattern will be retained). This is because the problem is at the level of CN 8. Thus, regardless of the means (bone or air) by which the impulse gets to CN 8, there will still be a marked hearing decrement in the affected ear. As AC is normally better then BC, this will still be the case.
Summary:
Identifying conductive v sensorineural hearing deficits requires historical information as well as the results of Webber and Rinne testing. In summary, this data is interpreted as follows:
- First determine by history and crude acuity testing which ear has the hearing problem.
- Perform the Webber test. If there is a conductive hearing deficit, the Webber will lateralize to the affected ear. If there is a sensorineural deficit, the Webber will lateralize to the normal ear.
- Perform the Rinne test. If there is a conductive hearing deficit, BC will be greater then or equal to AC in the affected ear. If there is a sensorineural hearing deficit, AC will be greater then BC in the affected ear.
For Additional Information See: Digitial DDx: Hearing Loss
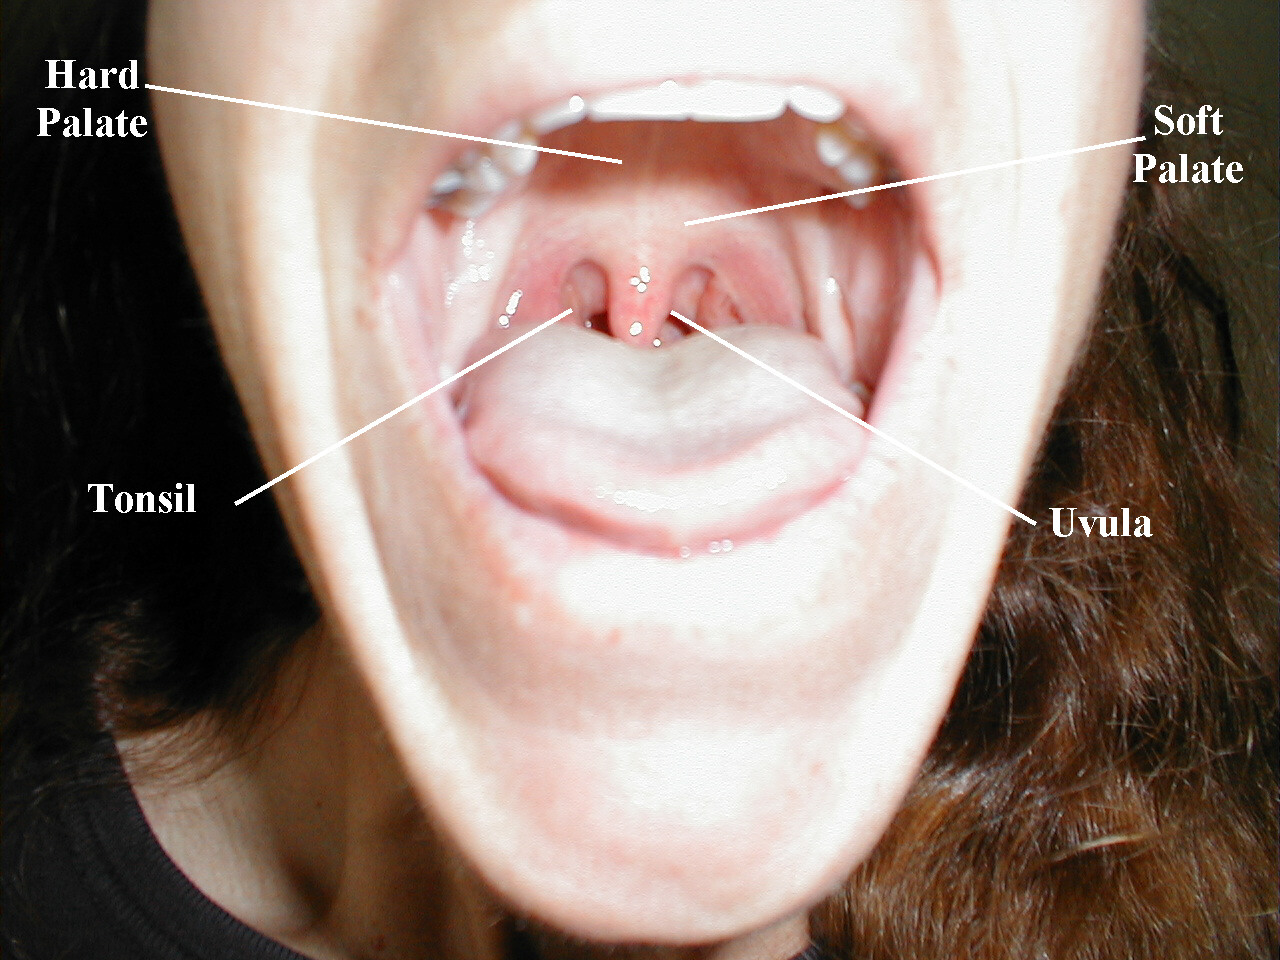
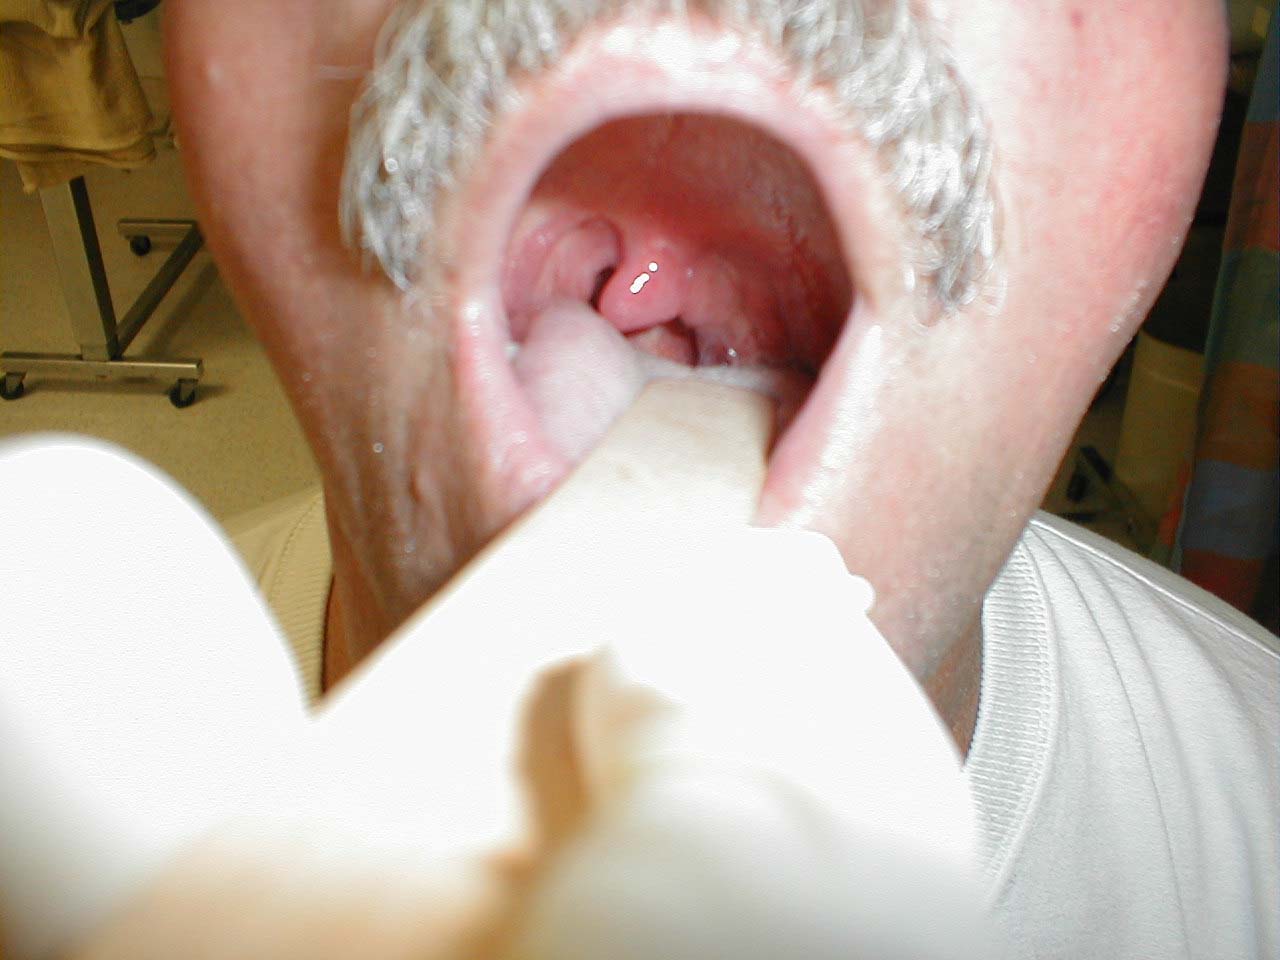
CN9 (Glosopharyngeal) and CN 10 (Vagus): These nerves are responsible for raising the soft palate of the mouth and the gag reflex, a protective mechanism which prevents food or liquid from traveling into the lungs As both CNs contribute to these functions, they are tested together.
Testing Elevation of the soft palate:
- Ask the patient to open their mouth and say, "ahhhh," causing the soft palate to rise upward.
- Look at the uvula, a midline structure hanging down from the palate. If the tongue obscures your view, take a tongue depressor and gently push it down and out of the way.
- The Uvula should rise up straight and in the midline.
Interpretation:
If CN 9 on the right is not functioning (e.g. in the setting of a stroke), the uvula will be pulled to the left. The opposite occurs in the setting of left CN 9 dysfunction.
Be aware that other processes can cause deviation of the uvula.A peritonsilar abscess, for example, will push the uvula towards the opposite (i.e. normal) tonsil.
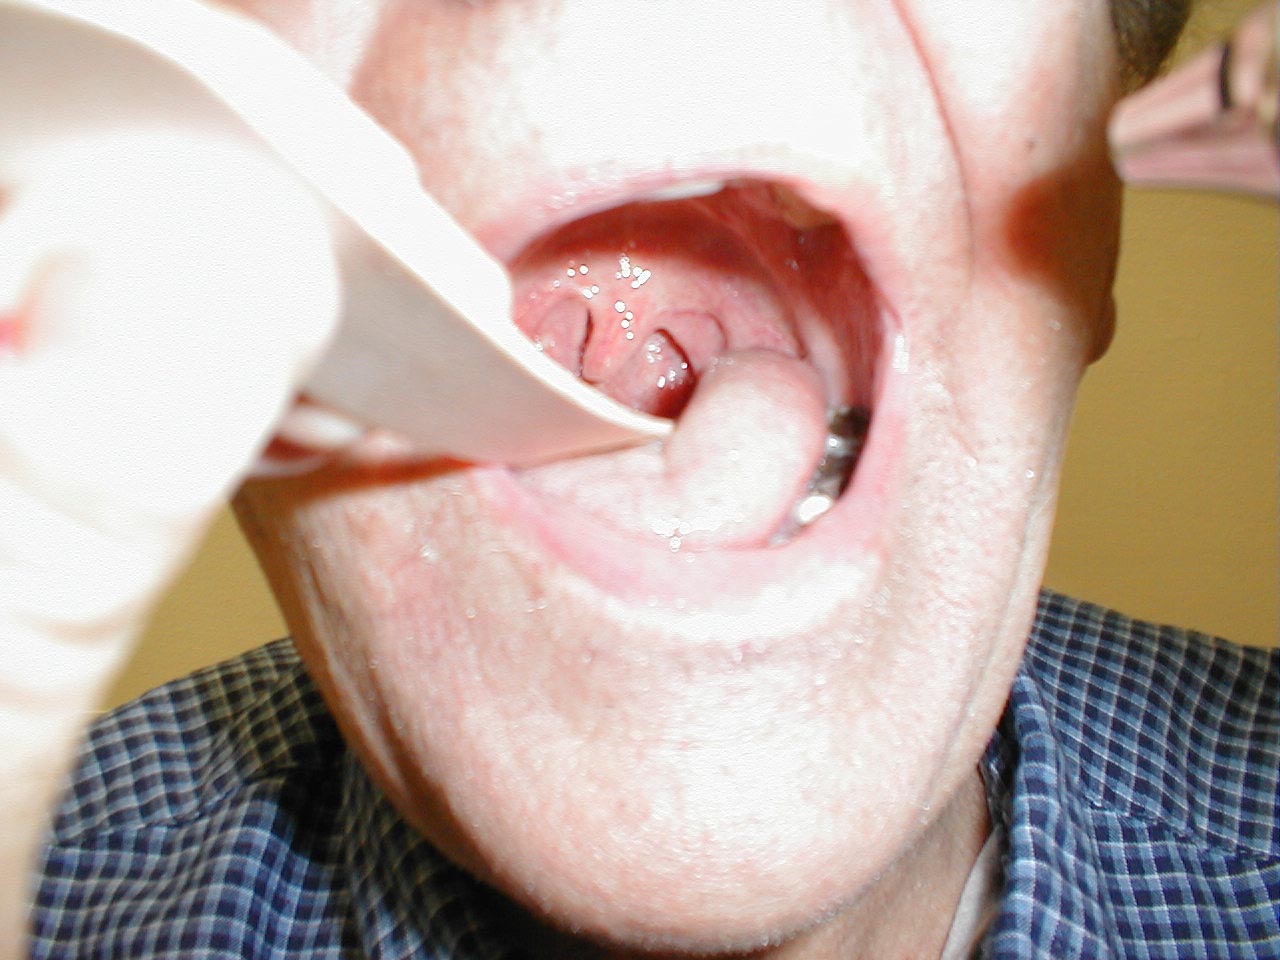
Testing the Gag Reflex:
- Ask the patient to widely open their mouth. If you are unable to see the posterior pharynx (i.e. the back of their throat), gently push down with a tongue depressor.
- In some patients, the tongue depressor alone will elicit a gag. In most others, additional stimulation is required. Take a cotton tipped applicator and gently brush it against the posterior pharynx or uvula. This should generate a gag in most patients.
- A small but measurable percent of the normal population has either a minimal or non-existent gag reflex. Presumably, they make use of other mechanisms to prevent aspiration.
Gag testing is rather noxious. Some people are particularly sensitive to even minimal stimulation. As such, I would suggest that you only perform this test when there is reasonable suspicion that pathology exists. This would include two major clinical situations:
- If you suspect that the patient has suffered acute dysfunction, most commonly in the setting of a stroke. These patients may complain of/be noted to cough when they swallow. Or, they may suffer from recurrent pneumonia. Both of these events are signs of aspiration of food contents into the passageways of the lungs. These patients may also have other cranial nerve abnormalities as lesions affecting CN 9 and 10 often affect CNs 11 and 12, which are anatomically nearby.
- Patient's suffering from sudden decreased level of consciousness. In this setting, the absence of a gag might indicate that the patient is no longer able to reflexively protect their airway from aspiration. Strong consideration should be given to intubating the patient, providing them with a secure mechanical airway until their general condition improves.
CN 9 is also responsible for taste originating on the posterior 1/3 of the tongue. As this is rarely a clinically important problem, further discussion is not included.
CN 10 also provides parasympathetic innervation to the heart, though this cannot be easily tested on physical examination.
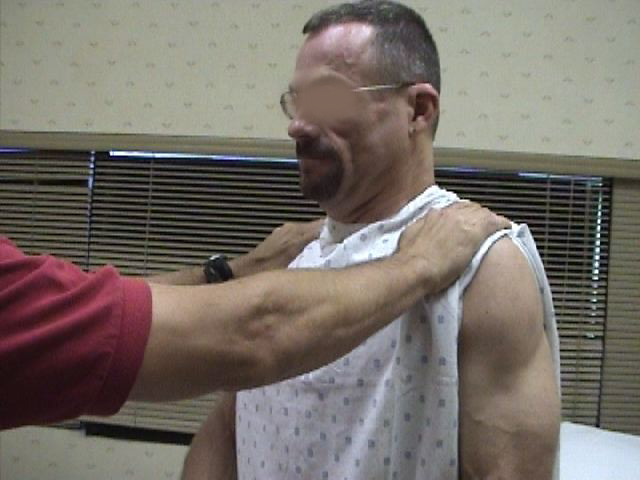
CN11 (Spinal Accessory): CN 11 innervates the muscles which permit shrugging of the shoulders (Trapezius) and turning the head laterally (Sternocleidomastoid).
- Place your hands on top of either shoulder and ask the patient to shrug while you provide
resistance. Dysfunction will cause weakness/absence of movement on the affected side.
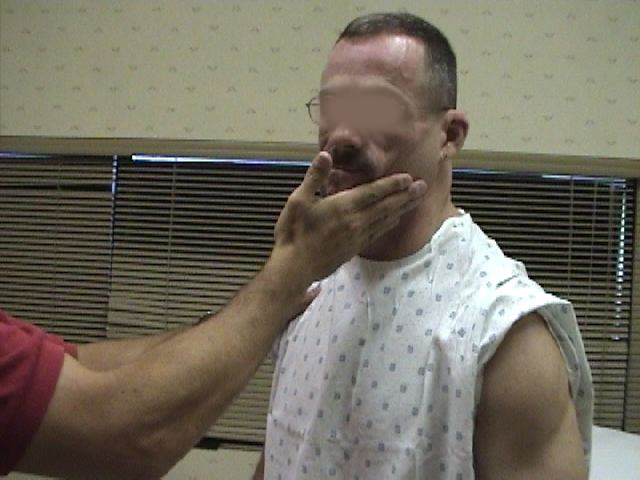
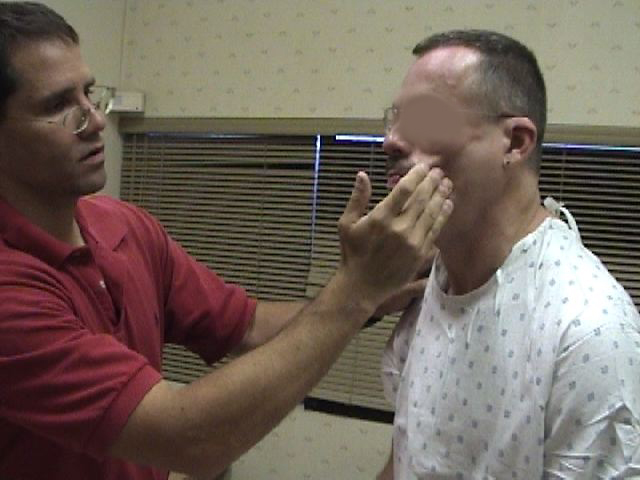
- Place your open left hand against the patient's right cheek and ask them to turn into your
hand while you provide resistance. Then repeat on the other side. The right
Sternocleidomasoid muscle (and thus right CN 11) causes the head to turn to the left, and
vice versa.
CN12 (Hypoglossal): CN 12 is responsible for tongue movement. Each CN 12 innervates one-half of the tongue.
Testing:
- Ask the patient to stick their tongue straight out of their mouth.
- If there is any suggestion of deviation to one side/weakness, direct them to push the tip of
their tongue into either cheek while you provide counter pressure from the outside.
Interpretation:
If the right CN 12 is dysfunctional, the tongue will deviate to the right. This is because the normally functioning left half will dominate as it no longer has opposition from the right. Similarly, the tongue would have limited or absent ability to resist against pressure applied from outside the left cheek.
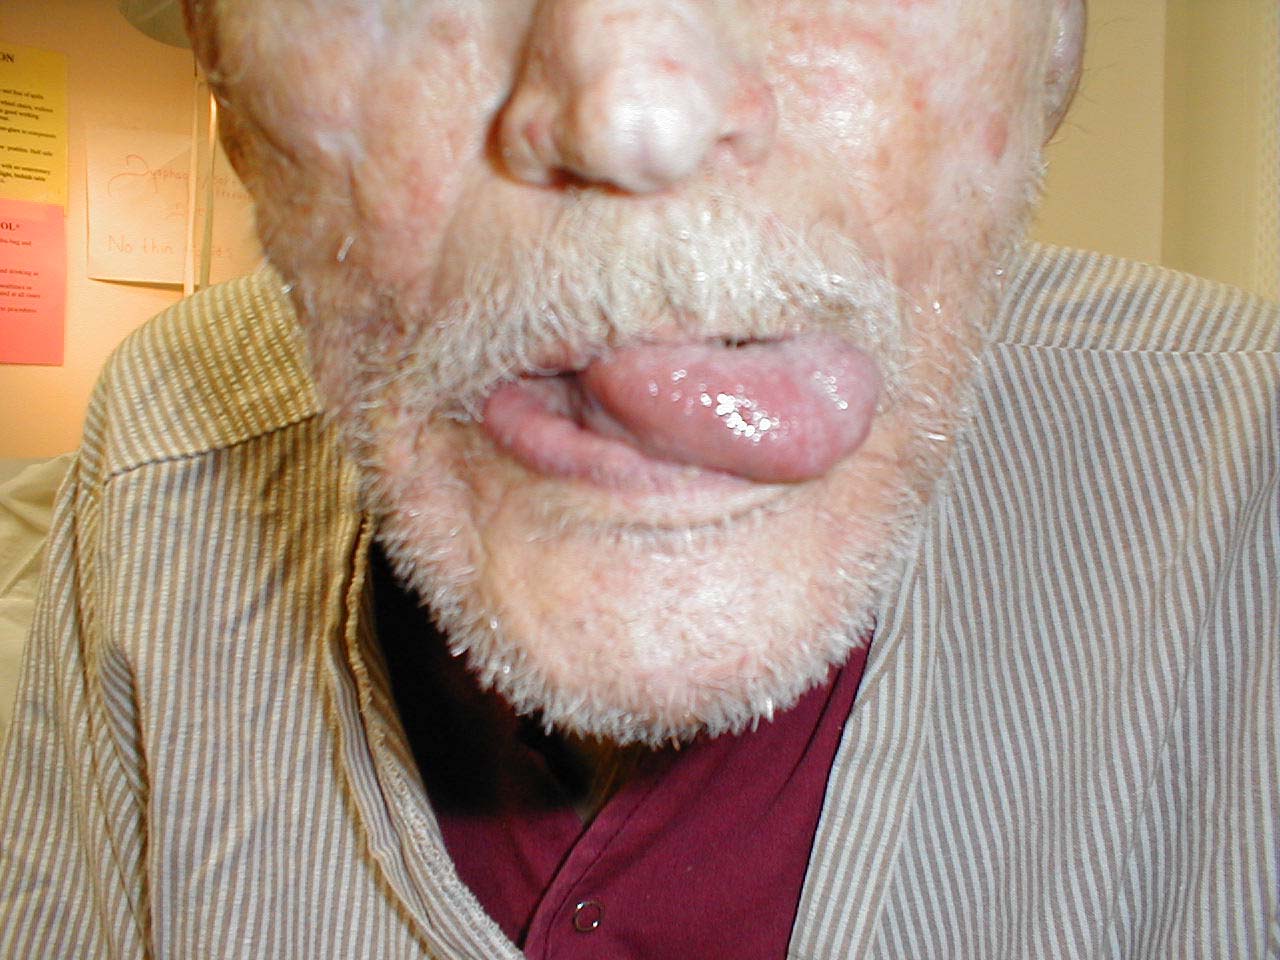
Tongue therefore deviates to the left.
Sensory and Motor Examinations - A Brief Review of Anatomy and Physiology:
Testing of motor and sensory function requires a basic understanding of normal anatomy and physiology. In brief:
- Voluntary movement begins with an impulse generated by cell bodies located in the brain.
- Signals travel from these cells down their respective axons, forming the Cortiospinal (a.k.a. Pyramidal) tract. At the level of the brain stem, this motor pathway crosses over to the opposite side of the body and continue downward on that side of the spinal cord. The nerves which comprise this motor pathway are collectively referred to as Upper Motor Neurons (UMNs). It's important to note that there are other motor pathways that carry impulses from the brain to the periphery and help modulate movement. A discussion of these tracts can be found in other Neurology reference texts.
- At a specific point in the spinal cord the axon synapses with a 2nd nerve, referred to as a Lower Motor Neuron (LMN). The precise location of the synapse depends upon where the lower motor neuron is destined to travel. If, for example, the LMN terminates in the hand, the synapse occurs in the cervical spine (i.e. neck area). However, if it's headed for the foot, the synapse occurs in the lumbar spine (i.e. lower back).
- The UMNs are part of the Central Nervous System (CNS), which is composed of neurons whose cell bodies are located in the brain or spinal cord. The LMNs are part of the Peripheral Nervous System (PNS), made up of motor and sensory neurons with cell bodies located outside of the brain and spinal cord. The axons of the PNS travel to and from the periphery, connecting the organs of action (e.g. muscles, sensory receptors) with the CNS.
- Nerves which carry impulses away from the CNS are referred to Efferents (i.e. motor) while those that bring signals back are called Afferents (i.e. sensory).
- Axons that exit and enter the spine at any given level generally connect to the same distal anatomic area. These bundles of axons, referred to as spinal nerve roots, contain both afferent and efferent nerves. The roots exit/enter the spinal cord through neruoforamina in the spine, paired openings that allow for their passage out of the bony protection provided by the vertebral column.
- As the efferent neurons travels peripherally, components from different roots commingle and branch, following a highly programmed pattern. Ultimately, contributions from several roots may combine to form a named peripheral nerve, which then follows a precise anatomic route on its way to innervating a specific muscle. The Radial Nerve, for example, travels around the Humerus (bone of the upper arm), contains contributions from Cervical Nerve Roots 6, 7 and 8 and innervates muscles that extend the wrist and supinate the forearm.
- Afferents carry impulses in the opposite direction of the motor nerves. That is, they bring information from the periphery to the spinal cord and brain.
- Sensory nerves begin in the periphery, receiving input from specialized receptor organs. The axons then move proximally, joining in a precise fashion with other axons to form the afferent component of a named peripheral nerve. The Radial Nerve, for example, not only has a motor function (described previously) but also carries sensory information from discrete parts of the hand and forearm.
- As the sensory neurons approach the spinal cord, they join specific spinal nerve roots. Each root carries sensory information from a discrete area of the body. The area of skin innervated by a particular nerve root is referred to as a dermatome. Dermatome maps describe the precise areas of the body innervated by each nerve root. These distributions are more or less the same for all people, which is clinically important. In the setting of nerve root dysfunction, the specific area supplied by that root will be affected. This can be mapped out during a careful exam (see below), identifying which root(s) is dysfunctional.
- Sensory input travels up through the spinal cord along specific paths, with the precise route defined by the type of sensation being transmitted. Nerves carrying pain impulses, for example, cross to the opposite side of the spinal cord soon after entering, and travel up to the brain on that side of the cord. Vibratory sensations, on the other hand, enter the cord and travel up the same side, crossing over only when they reach the brain stem (see following sections for detailed descriptions).
- Ultimately, the sensory nerves terminate in the brain, where the impulses are integrated and perception occurs.
For more information about spinal cord anatomy, see the following link:
It may help to think of a nerve root as an electrical cable composed of many different colored wires, each wire representing an axon. As the cable moves away from the spinal cord, wires split off and head to different destinations. Prior to reaching their targets, they combine with wires originating from other cables. The group of wires that ultimately ends at a target muscle group may therefore have contributions from several different roots.
For more information about radial nerve anatomy and function, see below.
To view a dermatomal map, see the following link:
Dermatome Map University of Scranton
Understanding the above neruo-anatomic relationships and patterns of innervation has important clinical implications when trying to determine the precise site of neurological dysfunction. Injury at the spinal nerve root level, for example, will produce a characteristic loss of sensory and motor function. This will differ from that caused by a problem at the level of the peripheral nerve. An approach to localizing lesions on the basis of motor and sensory findings is described in the sections which follow. Realize that there is a fair amount of inter-individual variation with regards to the specifics of innervation. Also, recognize that often only parts of nerves may become dysfunctional, leading to partial motor or sensory deficits. As such, the patterns of loss are rarely as "pure" as might be suggested by the precise descriptions of nerves and their innervations.
Sensory Testing
Sensory testing of the face is discussed in the section on Cranial Nerves. Testing of the extremities focuses on the two main afferent pathways: Spinothalamics and Dorsal Columns.
- Spinothalamics: These nerves detect pain, temperature and crude touch. They travel from the periphery, enter the spinal cord and then cross to the other side of the cord within one or two vertebral levels of their entry point They then continue up that side to the brain, terminating in the cerebral hemisphere on the opposite side of the body from where they began.
- Dorsal Columns: These nerves detect position (a.k.a. proprioception), vibratory sensation and light touch. They travel from the periphery, entering the spinal cord and then moving up to the base of the brain on the same side of the cord as where they started. Upon reaching the brain stem they cross to the opposite side, terminating in the cerebral hemisphere on the opposite side of the body from where they began.
A screening evaluation of these pathways can be performed as follows:
Spinothalamics
- The patient's ability to perceive the touch of a sharp object is used to assess the pain pathway of the Spinothalamics. To do this, break a Q-tip or tongue depressor in half, such that you create a sharp, pointy end. Alternatively, you can use a disposable needle or the sharp and blunt ends of a safety pin. I would discourage the use of the pointy, metal spikes that accompany some reflex hammers. If, for example, you used this and caused bleeding, it's possible (if the tip were not well cleaned) to transmit blood borne infections from one patient to another. Better to use a disposable implement.
- Ask the patient to close their eyes so that they are not able to get visual clues.
- Start at the top of the foot. Orient the patient by informing them that you are going to
first touch them with the sharp implement. Then do the same with a non-sharp object (e.g.
the soft end of a q-tip). This clarifies for the patient what you are defining as sharp and
dull.
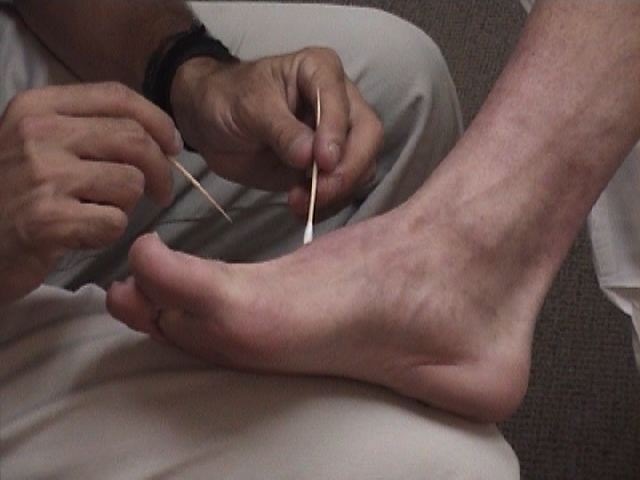
- Now, touch the lateral aspect of the foot with either the sharp or dull tool, asking them to report their response. Move medially across the top of the foot crossing multiple dermatomes, noting the patient's response to each touch.
- If they give accurate responses, do the same on the other foot. The same test can be
repeated for the upper extremities (i.e. on the hand), though this would only be of utility
if the patient complained of numbness/impaired sensation in that area.
- Spinothalamic tract function can also be assessed by checking the patient's ability to detect differences in temperature. Cold and warm can be reproduced by running a tuning fork under water of that temperature, touching it against the affected limb, and asking the patient to comment (patient's eyes should be closed).
Dorsal Columns
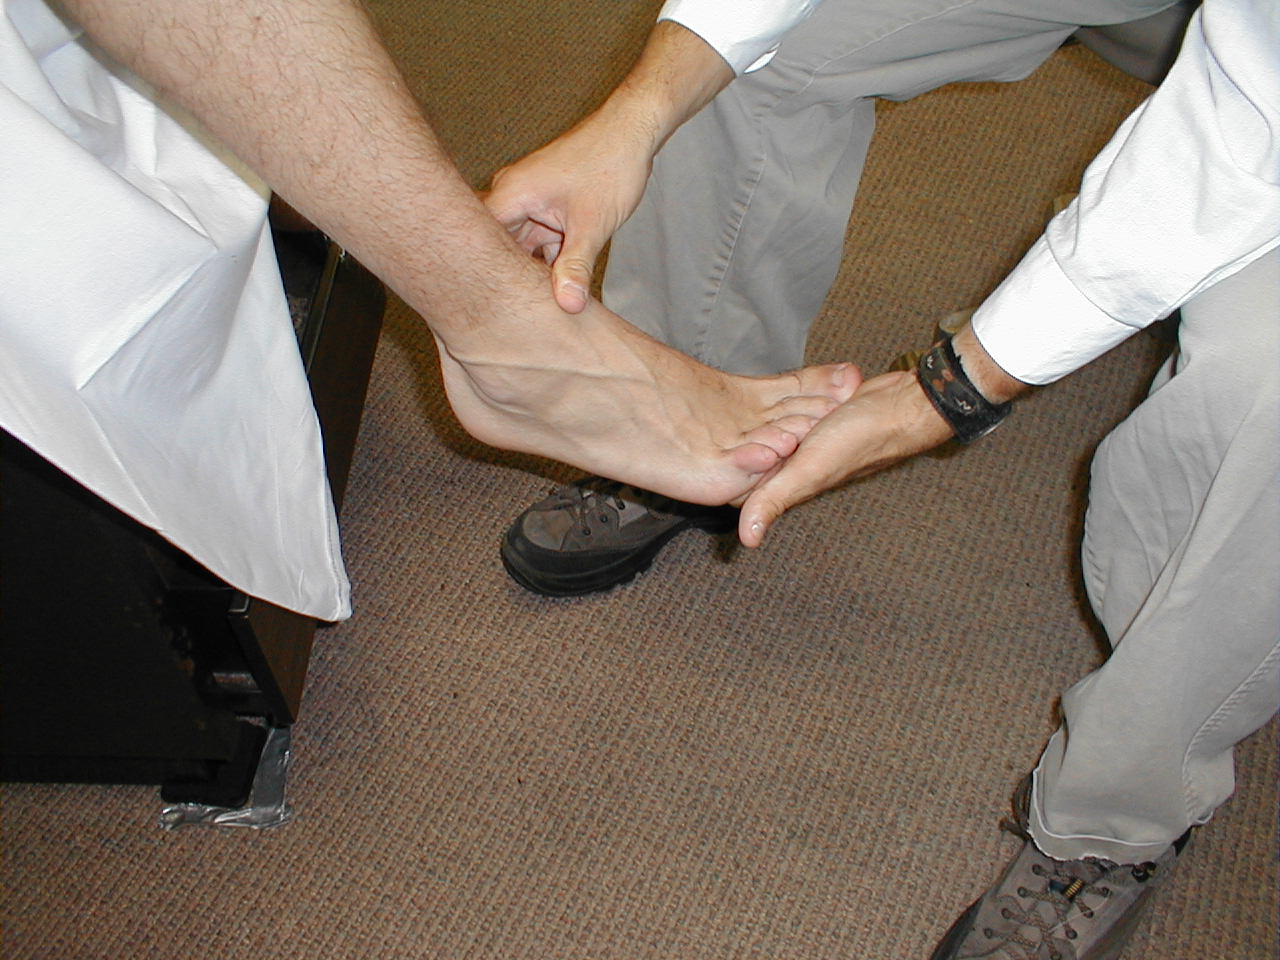
Proprioception: This refers to the body's ability to know where it is in space. As such, it
contributes to balance. Similar to the Spinothalamic tracts, disorders which affect this system
tend to first occur at the most distal aspects of the body. Thus, proprioception is checked
first in the feet and then, if abnormal, more proximally (e.g. the hands).
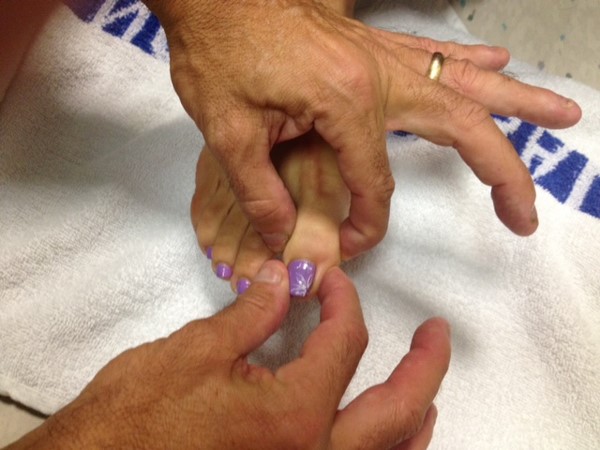
Technique:
- Ask the patient to close their eyes so that they do not receive any visual cues.
- With one hand, grasp either side of great toe at the interphalangeal (IP) joint. Place your other hand on the lateral and medial aspects of the great toe distal to the IP.
- Orient patient to up and down as follows:
Flex the toe (pull it upwards) while telling patient what you're doing.
Extend toe (pull it downwards) while informing them of which direction you're moving it. - Alternately deflect the toe up or down without telling the patient in which direction you are moving it. They should be able to correctly identify the movement and direction.
- Both great toes should be checked in the same fashion. If normal, no further testing need be done in the screening exam.
- If the patient is unable to correctly identify the movement/direction, move more proximally (e.g. to the ankle joint) and repeat (e.g. test whether they can determine whether the foot is moved up or down at the ankle).
Similar testing can be done on the fingers. This is usually reserved for those settings when patients have distal findings and/or symptoms in the upper extremities.
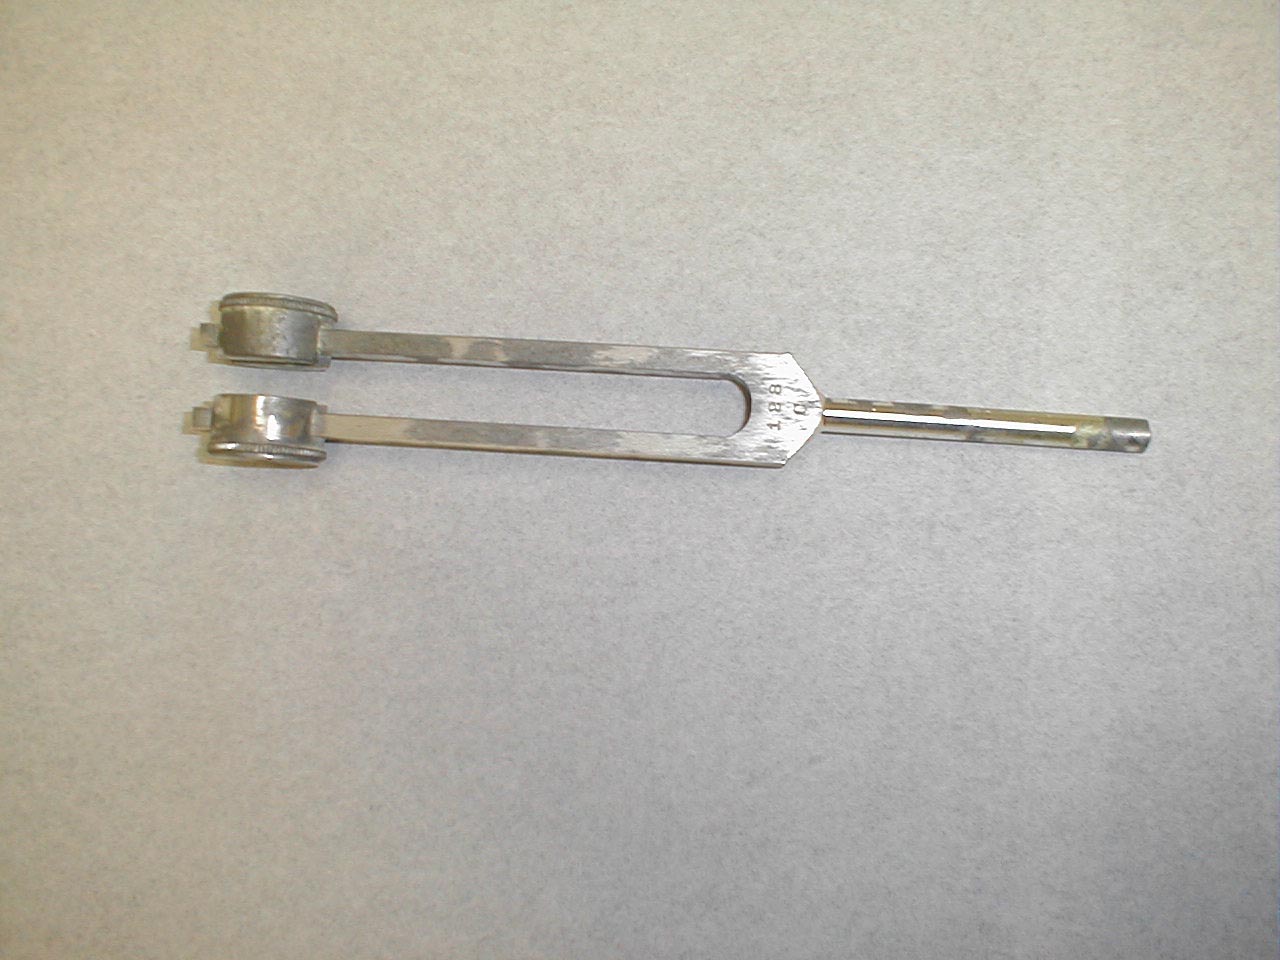
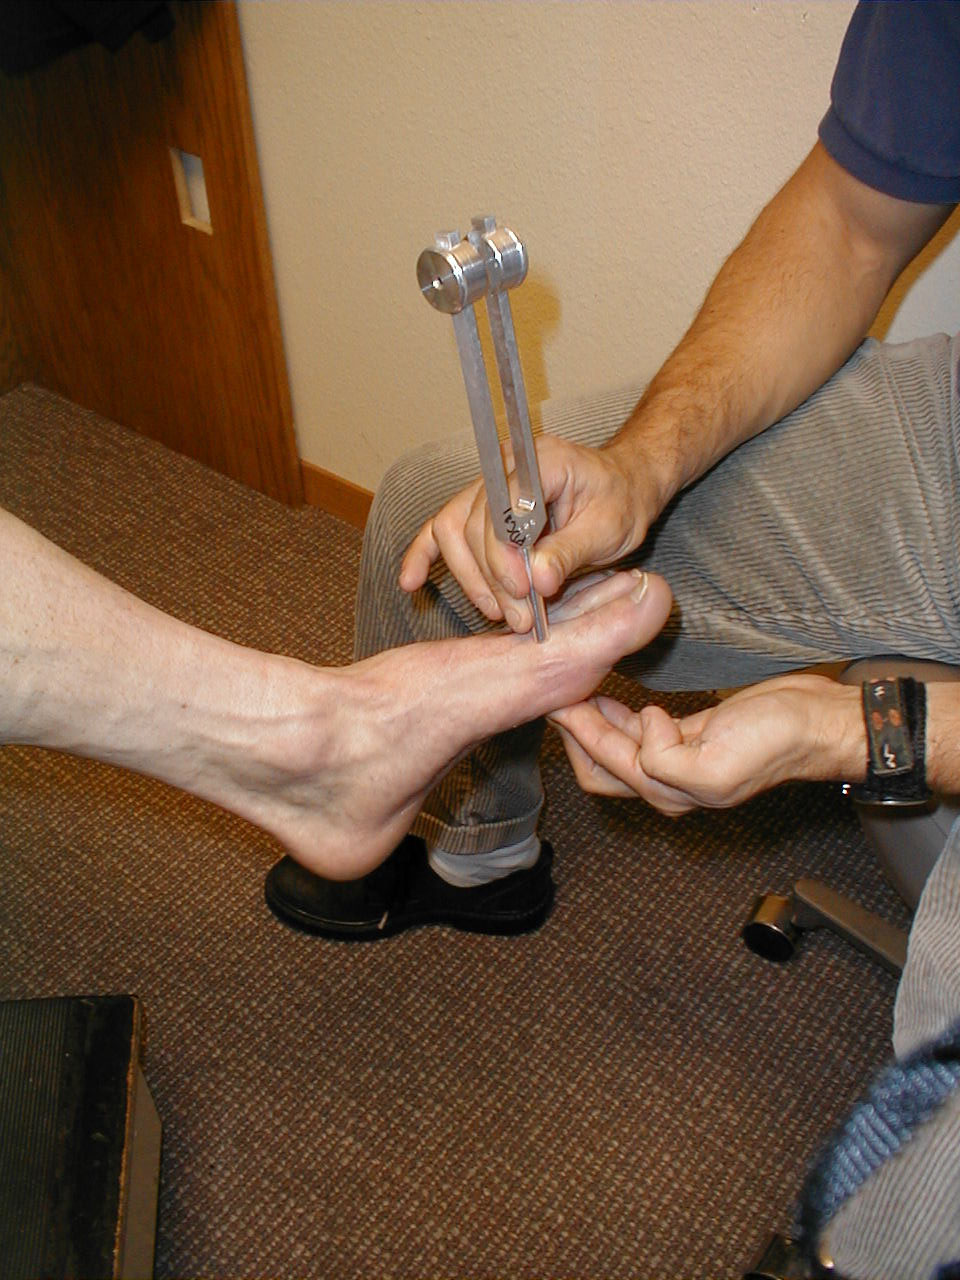
Vibratory Sensation: Vibratory sensation travels to the brain via the dorsal columns. Thus, the findings generated from testing this system should corroborate those of proprioception (see above).
Technique:
- Start at the toes with the patient seated. You will need a 128 hz tuning fork.
- Ask the patient to close their eyes so that they do not receive any visual cues.
- Grasp the tuning fork by the stem and strike the forked ends against the floor, causing it to vibrate.
- Place the stem on top of the interphalangeal joint of the great toe. Put a few fingers of your other hand on the bottom-side of this joint.
- Ask the patient if they can feel the vibration. You should be able to feel the same sensation with your fingers on the bottom side of the joint.
- The patient should be able to determine when the vibration stops, which will correlate with when you are no longer able to feel it transmitted through the joint. It sometimes takes a while before the fork stops vibrating. If you want to move things along, rub the index finger of the hand holding the fork along the tines, rapidly dampening the vibration.
Repeat testing on the other foot.
Additional/Special Testing for Dorsal Column Dysfunction
Testing Two Point Discrimination: Patients should normally be able to distinguish simultaneous touch with 2 objects which are separated by at least 5mm. These stimuli are carried via the Dorsal Columns. While not checked routinely, it is useful test if a discrete peripheral neruropathy is suspected (e.g. injury to the radial nerve).
Technique:
- Testing can be done with a paperclip, opened such that the ends are 5mm apart.
- The patient should be able to correctly identify whether you are touching them with one or both ends simultaneously, along the entire distribution of the specific nerve which is being assessed.
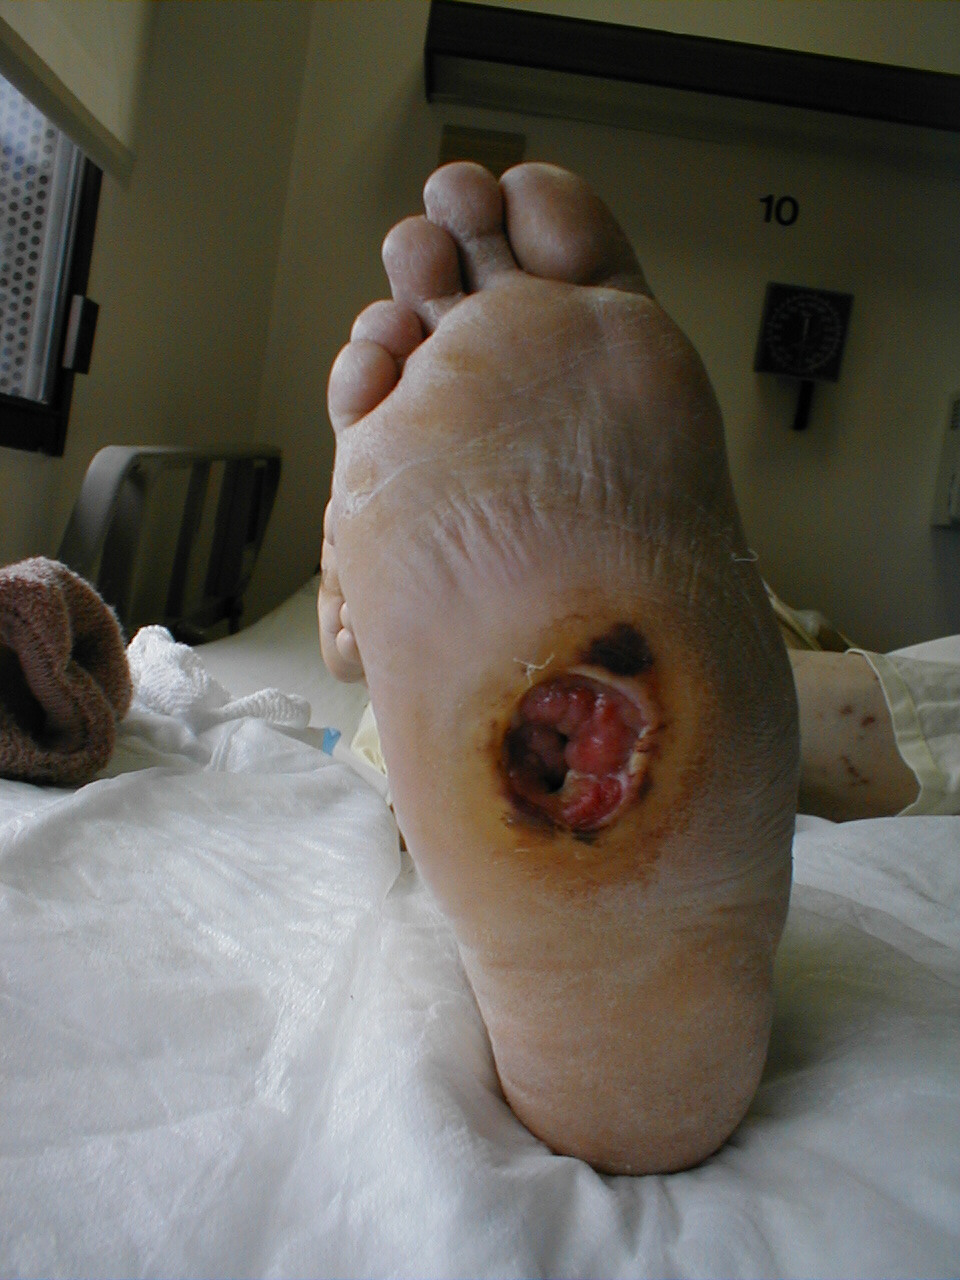
A careful foot examination should be performed on all patients with symptoms suggestive of sensory neuropathy or at particular risk for this disorder (e.g. anyone with Diabetes). Loss of sensation in this area can be particularly problematic as the feet are a difficult area for the patient to evaluate on their own. Small wounds can become large and infected, unbeknownst to the insensate patient. Sensory testing as described above can detect this type of problem. Disposable monofilaments (known as the Semmes-Weinstein Aethesiometer) are specially designed for a screening evaluation. These small nylon fibers are designed such that the normal patient should be able to feel the ends when they are gently pressed against the soles of their feet.
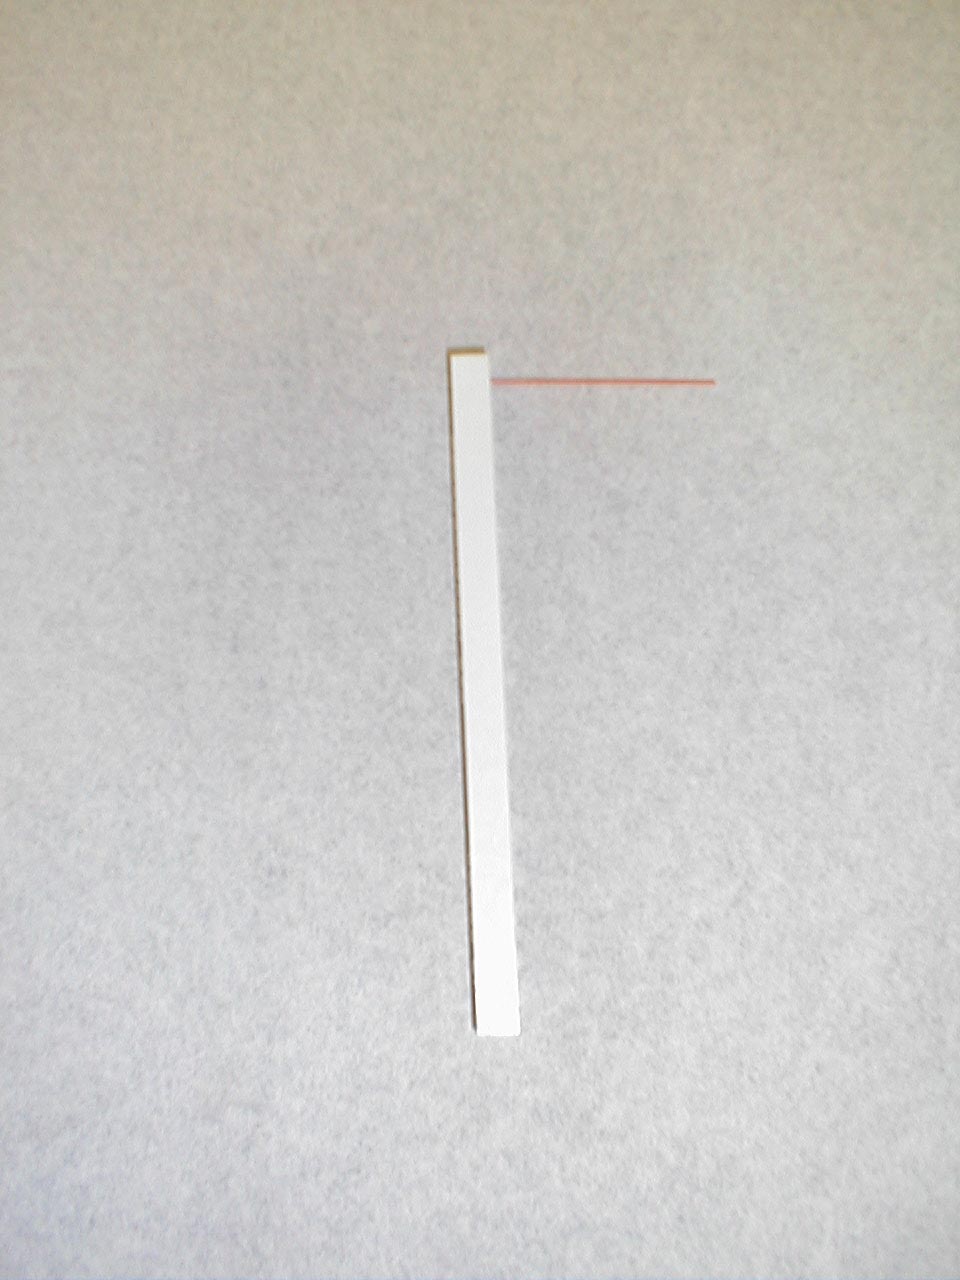
Technique:
- Have the patient close their eyes so that they do not receive any visual cues.
- Touch the monofilament to 5-7 areas on the bottom of the patient's foot. Pick locations so that all of the major areas of the sole are assessed. Avoid calluses, which are relatively insensate.
- The patient should be able to detect the filament when the tip is lightly applied to the skin.

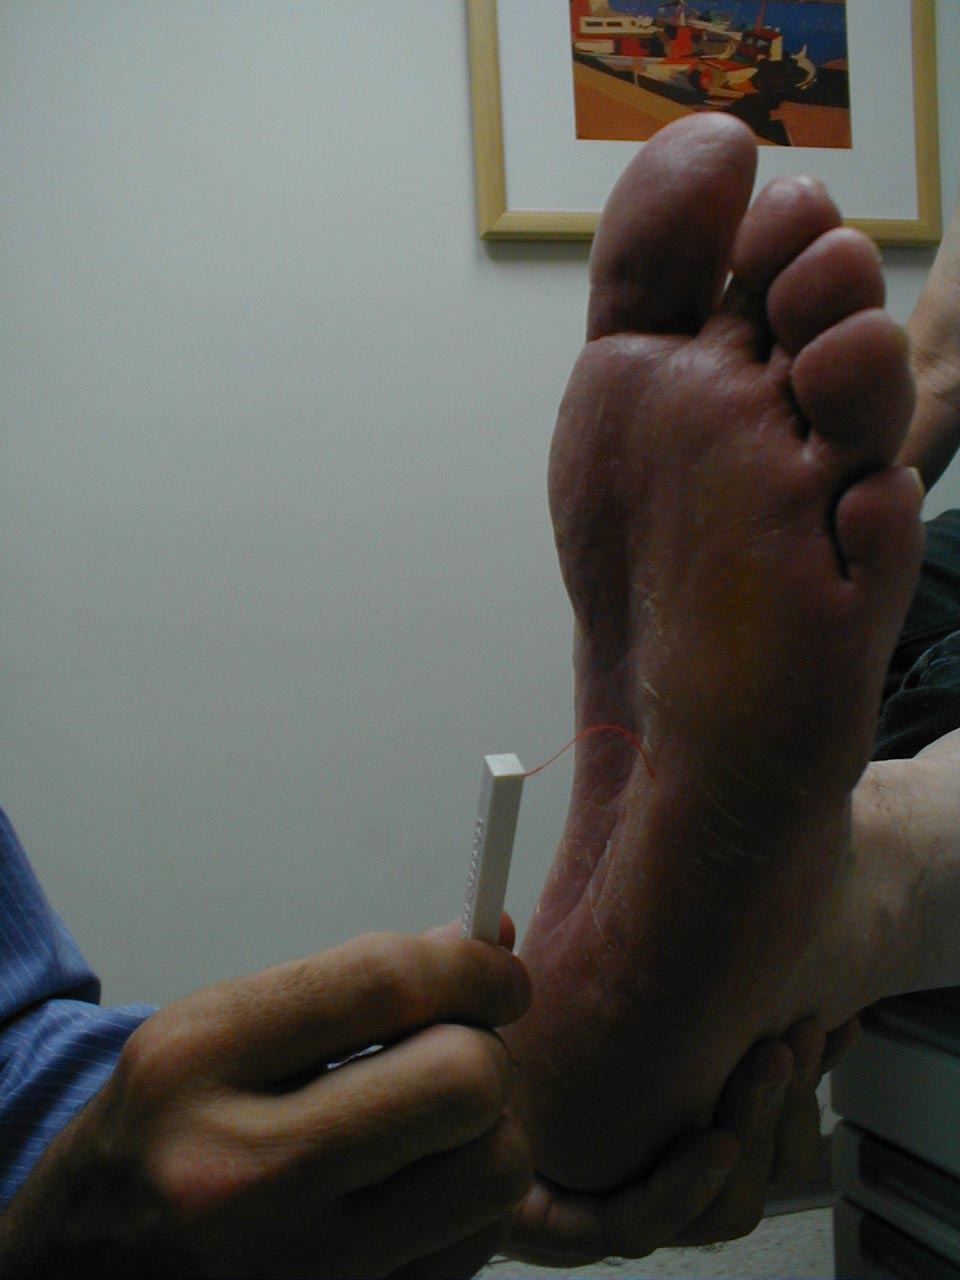
(picture on right), then sensation is impaired.
Interpretation: If the examiner has to supply enough pressure such that the filament bends prior to the patient being able to detect it, they likely suffer from sensory neuropathy. Testing should be done in multiple spots to verify the results. Patient's with distal sensory neuropathy should carefully examine their feet and wear good fitting shoes to assure that skin breakdown and infections don't develop. Efforts should also be made to closely control their diabetes so that the neuropathy does not progress.
For Additional Information See: Digital DDx: Numbness
Patterns of Impairment for the Spinothalamic Tracts:
- Patients should be able to correctly distinguish sharp sensation, indicating normal function of the spinothalamic pathway.
- Mapping out regions of impaired sensation: The examination described above is a screening evaluation for evidence of sensory loss. This is perfectly adequate in most clinical settings. Occasionally, the history or screening examination will suggest a discrete anatomic region that has sensory impairment. When this occurs, it is important to try and map out the territory involved, using careful pin testing to define the medial/lateral and proximal/distal boundaries of the affected region. You may even make pen marks on the skin to clearly identify where the changes occur. As most clinicians have not memorized the distributions of all peripheral nerves or spinal nerve roots, you can simultaneously consult a reference book to see if the mapped territory matches a specific nerve distribution. This type of mapping is somewhat tedious and should only be done in appropriate situations.
- Diffuse Distal Sensory Loss: A number of chronic systemic diseases affect nerve function. The most commonly occurring of these, at least in Western countries, is Diabetes. When control has been poor over many years, the sensory nerves become dysfunctional. This first affects the most distal aspects of the nerves and then moves proximally. Thus, the feet are the first area to be affected. As it is a systemic disease, it occurs simultaneously in both limbs. Exam reveals loss of ability to detect the sharp stimulus across the entire foot. Thus, the sensory loss does not follow a dermatomal (i.e. spinal nerve root) or peripheral nerve distribution. As the examiner tests more proximally, he/she will ultimately reach a point where sensation is again normal. The more advanced the disease, the higher up the leg this will occur. Hands can be affected, though much less commonly then feet as the nerves traveling to the legs are longer and thus at much greater risk. This pattern of loss is referred to as a Stocking or Glove distribution impairment, as the area involved covers an entire distal region, much as a sock or glove would cover a foot or hand. Such deficits may be associated with neuropathic pain, a continuous burning sensation affecting the distal extremity.
- Peripheral Nerve Distribution: A specific peripheral nerve can become dysfunctional. This might, for example, occur as the result of trauma or infarction (another complication of diabetes). In this setting, there will be a pattern of sensory impairment that follows the distribution of the nerve. Radial nerve palsy, for example, can occur if an intoxicated person falls asleep in a position that puts pressure on the nerve as it travels around the Humerus (bone of the upper arm). Intoxication induced loss of consciousness then prevents the patient from reflexively changing position, the normal means by which we prevent nerves from being exposed to constant direct pressure. The resultant sensory loss would involve the back of the hand and forearm. Motor function would also be affected (see under motor exam). Pinning down the culprit nerve requires knowledge of nerve anatomy and innervation. On a practical level, most clinicians don't commit this to memory. Rather, they gather a history suggestive of a discrete nerve deficit, verify the territory of loss on exam, and then look it up in a reference book.
- Nerve Root Impairment: A nerve root (or roots) can be damaged as it leaves the cord. This will result in a sensory deficit along its specific distribution, which can in turn be identified on examination. The S1 nerve root, for example, can be compressed by herniated disc material in the lumbar spine. This would cause sensory loss along the lateral aspect of the lower leg and the bottom of the foot. Only the leg on the affected side would have this deficit. As mentioned under peripheral nerve dysfunction, most clinicians do not memorize the dermatomes related to each nerve root. Rather, they gather a history suggestive of a discrete nerve deficit, verify a dermatomal distribution of loss on exam, and then look it up in a reference book.
- The Spinothalamics are also responsible for temperature discrimination. For practical reasons (i.e. it's often hard to find test tubes, fill them with the requisite temperature water, etc) this is omitted in the screening exam. The information from sharp stimulus testing as described above should suffice. Temperature discrimination could be assessed as a means of verifying any abnormality detected on sharp/dull testing.
- Testing of the sacral nerve roots, serving the anus and rectum, is important if patients complain of incontinence, inability to defecate/urinate, or there is otherwise reason to suspect that these roots may be compromised. In the setting of Cauda Equina syndrome, for example, multiple sacral and lumbar roots become compressed bilaterally (e.g. by posteriorly herniated disc material or a tumor). When this occurs, the patient is unable to urinate, as the lower motor neurons carried in these sacral nerve roots no longer function. Thus there is no way to send an impulse to the bladder instructing it to contract. Nor will they be aware that there bladders are full. There will also be loss of anal spincter tone, which can be appreciated on rectal exam. Ability to detect pin pricks in the perineal area (a.k.a. saddle distribution) is also diminished.
For more information about peripheral nerve injuries, see the following link:
Peripheral nerves and their territories of innervation
For more information about nerve root compression, see the following links:
University of Wisconsin, Anatomy and pathophysiology of nerve root compression
For more information about peripheral nerves and their territories of innervation, see the following link:
Peripheral nerves and their territories of innervation
Patterns of Impairment for Dorsal Column Dysfunction:
Proprioception:
Patients should be able to correctly identify the motion and direction of the toe. In the setting of Dorsal Column dysfunction (a common complication of diabetes, for example), distal testing will be abnormal. This is similar to the pattern of injury which affects the Spinothalamic tracts described above.
Vibratory Sensation:
- Patients should be able to detect the initial vibration and accurately determine when it has stopped.
- As described under testing of proprioception, dorsal column dysfunction tends to first affect the most distal aspects of the system. When this occurs, the patient is either unable to detect the vibration or they perceive that the sensation extinguishes too early (i.e. they stop feeling it even though you can still appreciate the sensation with your fingers on the underside of the joint).
- The findings on vibratory testing should parallel those obtained when assessing proprioception, as both sensations travel via the same pathway.
Motor Testing
The muscle is the unit of action that causes movement. Normal motor function depends on intact upper and lower motor neurons, sensory pathways and input from a number of other neurological systems. Disorders of movement can be caused by problems at any point within this interconnected system.
For Additional Information See: Digital DDx: Weakness
Muscle Bulk and Appearance:
This assessment is somewhat subjective and quite dependent on the age, sex and the activity/fitness level of the individual. A frail elderly person, for example, will have less muscle bulk then a 25 year old body builder. With experience, you will get a sense of the normal range for given age groups, factoring in their particular activity levels and overall states of health.
Things to look for:
- Using your eyes and hands, carefully examine the major muscle groups of the upper and lower extremities. First you need to fully expose the muscles of both extremities (for comparison) that you're examining. Palpation of the muscles will give you a sense of underlying mass. The largest and most powerful groups are those of the quadriceps and hamstrings of the upper leg (i.e. front and back of the thighs).
- Muscle groups should appear symmetrically developed when compared with their counterparts on the other side of the body. They should also be appropriately developed, after making allowances for the patient's age, sex, and activity level.
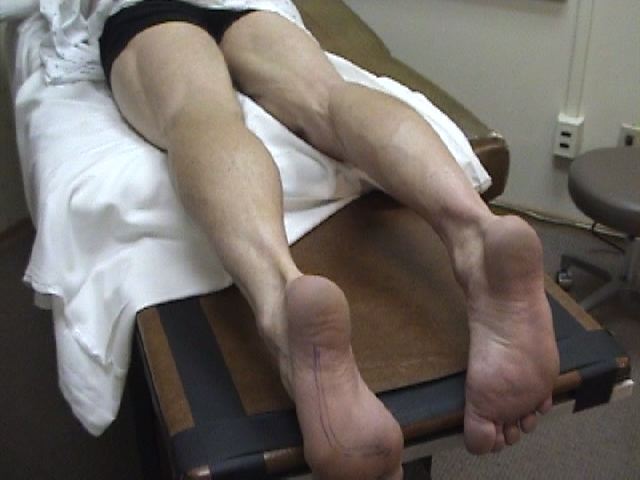
While both legs have well developed musculature, the left has greater bulk.
- There should be no muscle movement when the limb is at rest. Rare disorders
(e.g. Amyotrophic Lateral Sclerosis) result in death of the lower motor neuron and subsequent
denervation of the muscle. This causes twitching of the fibers known as fasciculations,which can
be seen on gross inspection of affected muscles. ALS is accompanied by other findings and
symptoms, in particular, relentlessly progressive weakness.
More on ALS
- Tremors are a specific type of continuous, involuntary muscle activity that results in limb movement. Parkinson's Disease (PD), for example, can cause a very characteristic resting tremor of the hand (the head and other body parts can also be affected) that diminishes when the patient voluntarily moves the affected limb. Benign Essential Tremor, on the other hand, persists throughout movement and is not associated with any other neurological findings, easily distinguishing it from PD.
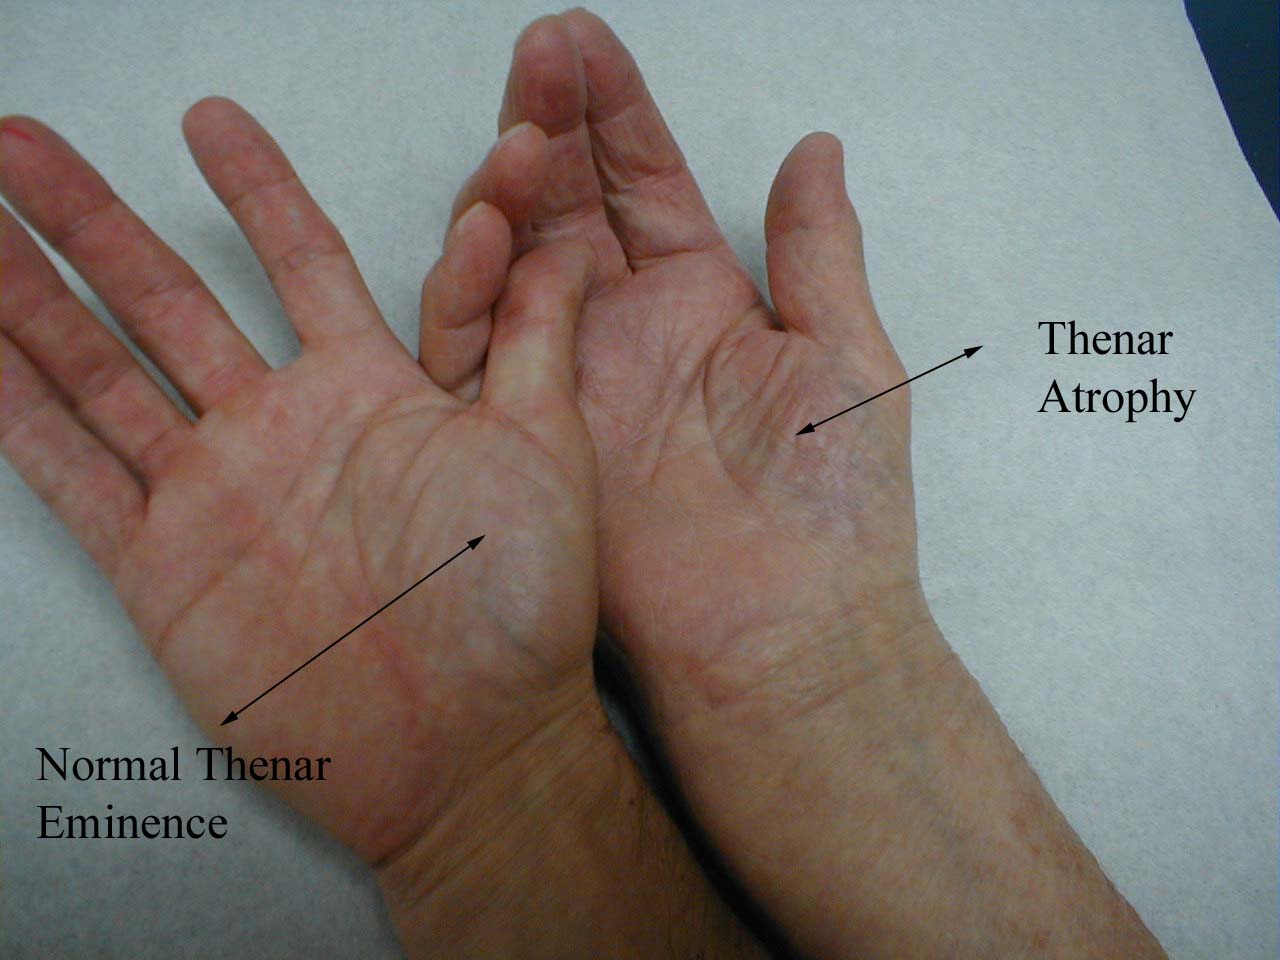
- The major muscle groups to be palpated include: biceps, triceps, deltoids, quadriceps and hamstrings. Palpation should not elicit pain. Interestingly, myositis (a rare condition characterized by idiopathic muscle inflammation) causes the patient to experience weakness but not pain.
- If there is asymmetry, note if it follows a particular pattern. Remember that some allowance must be made for handedness (i.e. right v left hand dominance). Does the asymmetry follow a particular nerve distribution, suggesting a peripheral motor neuron injury? For example, muscles which lose their LMN inervation become very atrophic. Is the bulk in the upper and lower extremities similar? Spinal cord transection at the Thoracic level will cause upper extremity muscle bulk to be normal or even increased due to increased dependence on arms for activity, mobility, etc. However, the muscles of the lower extremity will atrophy due to loss of innervation and subsequent disuse. Is there another process (suggested by history or other aspects of the exam) that has resulted in limited movement of a particular limb? For example, a broken leg that has recently been liberated from a cast will appear markedly atrophic.
A number of more common (and relatively benign) conditions can also cause fasciulations, including: post exercise, meds, stimulants, and assorted metabolic processes.
For more information about Parkinson's Disease, see the following link:
NIH Sponsored Site About Parkinson's Disease
For Additional Information See: Digital DDx: Tremor
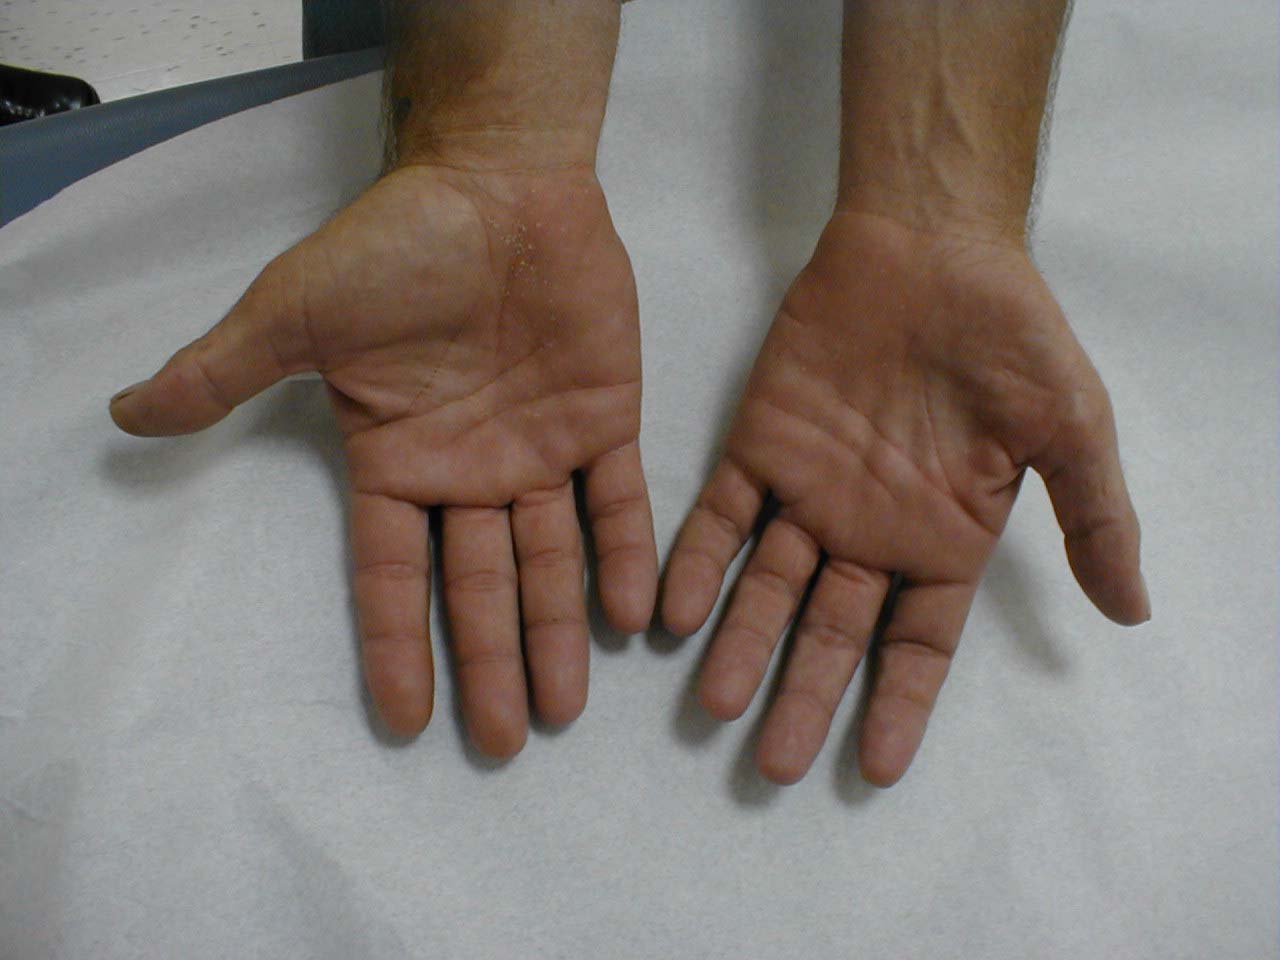
In particular, compare left and right thenar eminences.
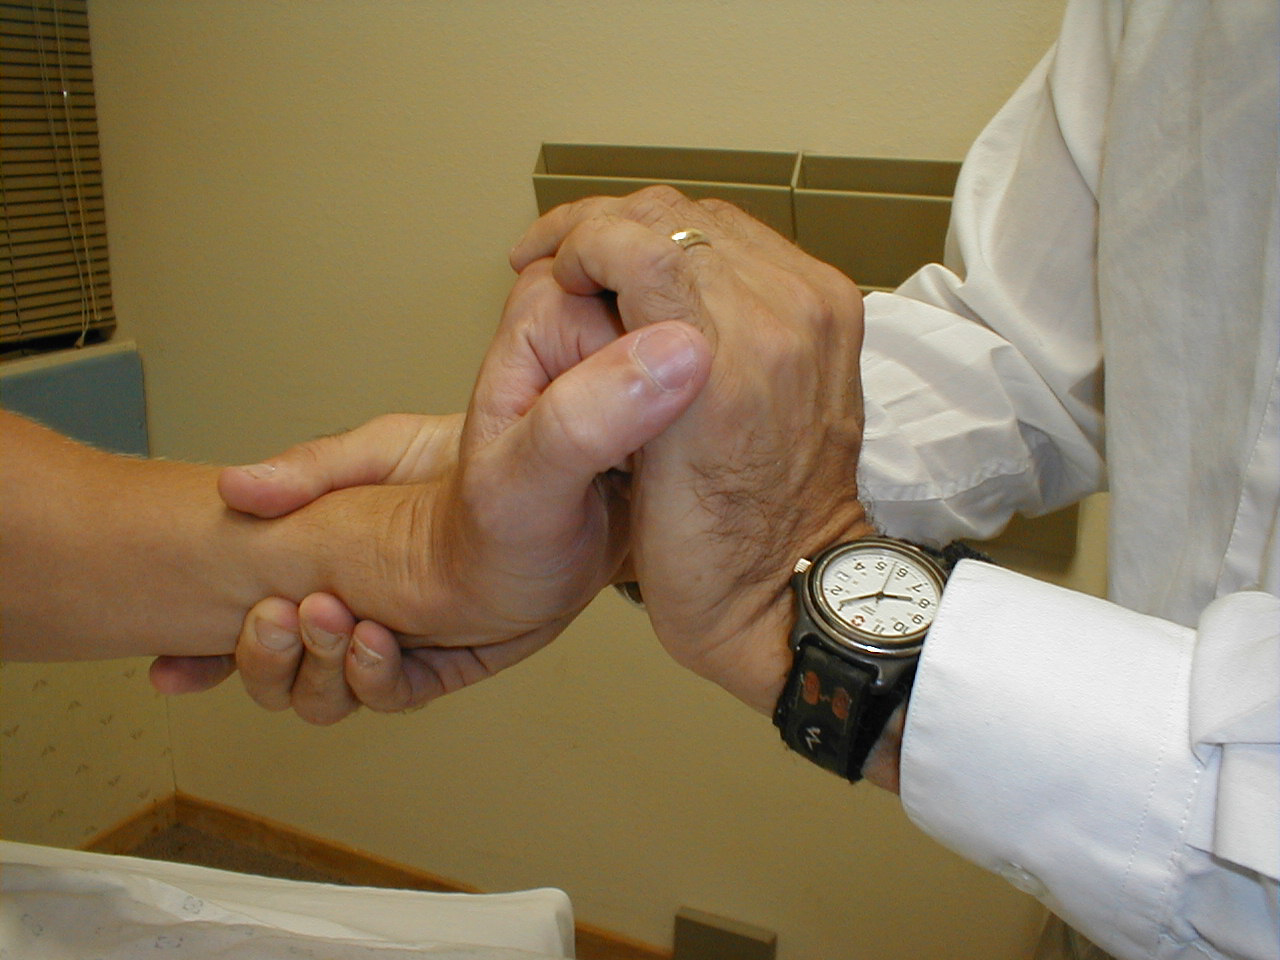
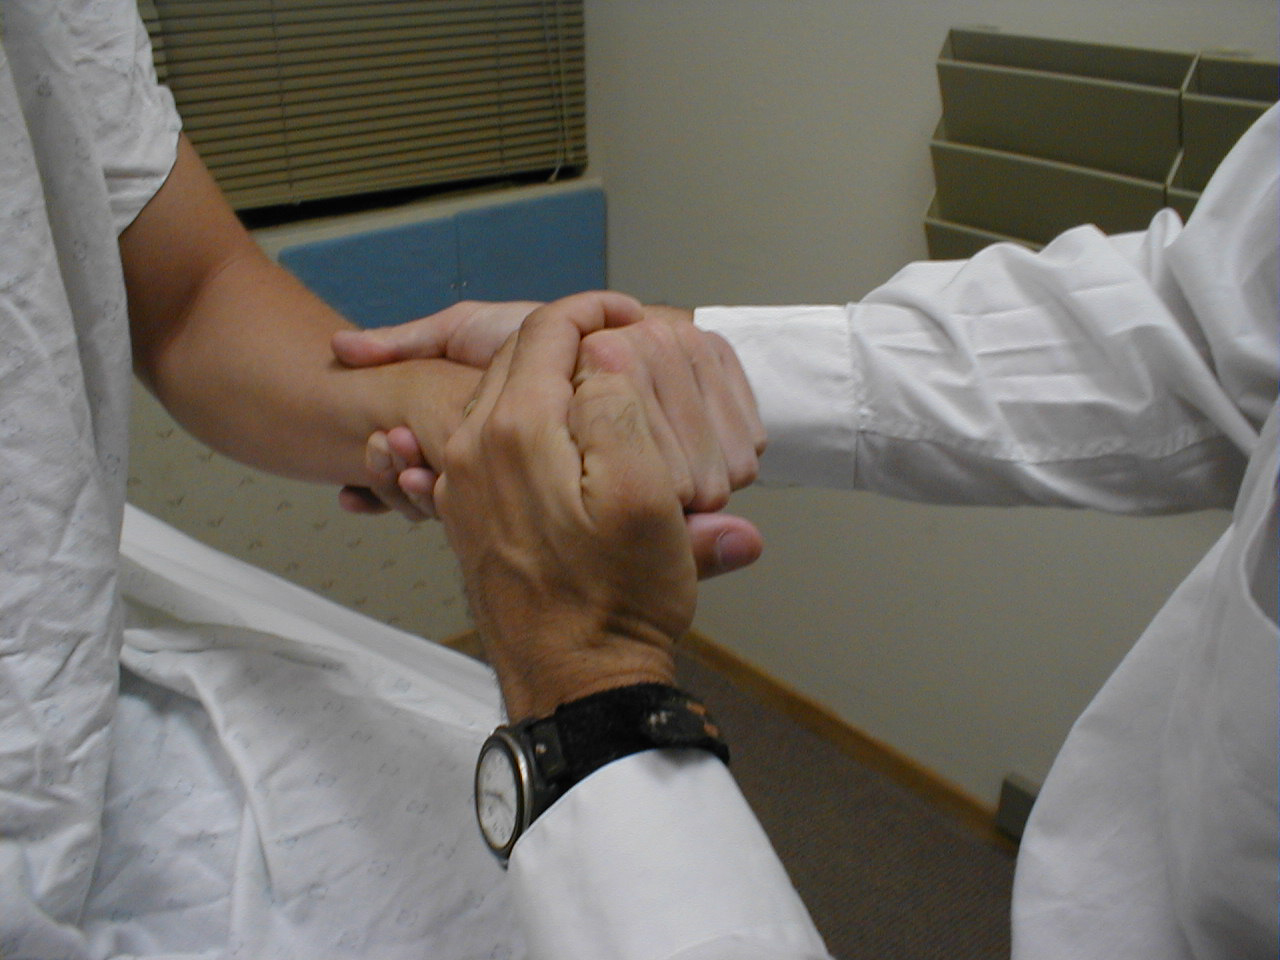
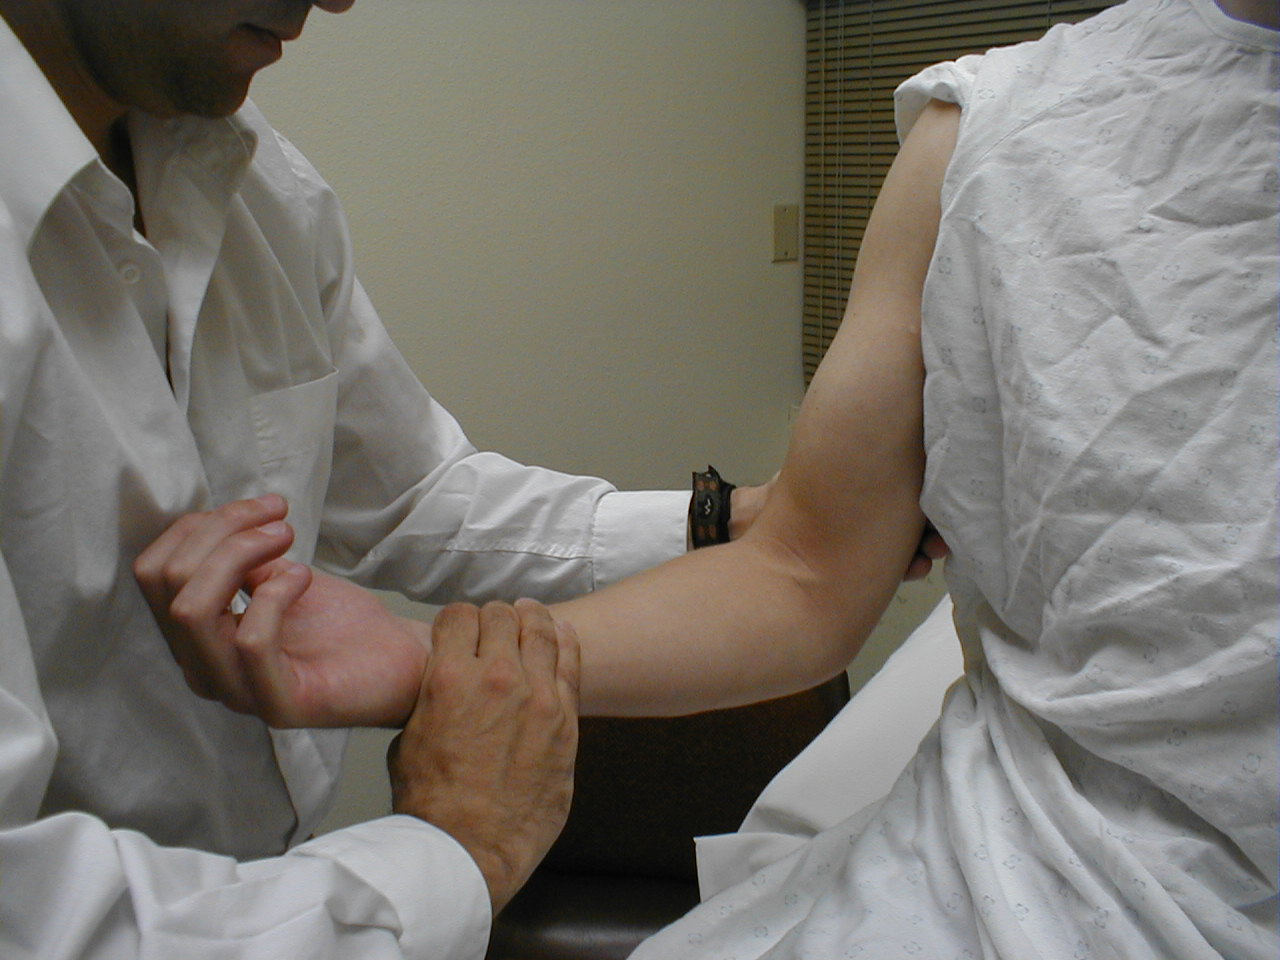
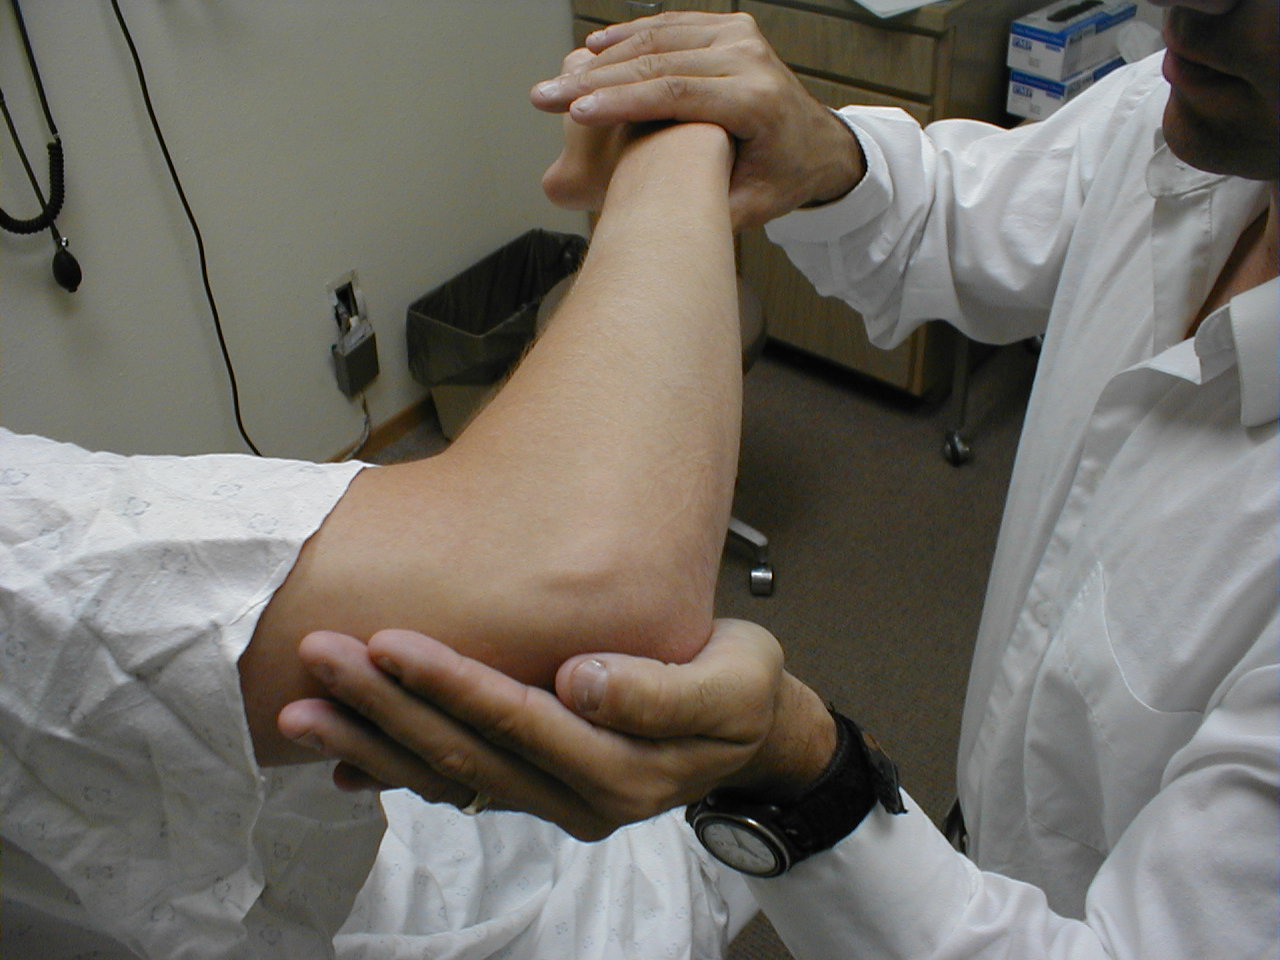
Tone: When a muscle group is relaxed, the examiner should be able to easily manipulate
the joint through its normal range of motion. This movement should feel fluid. A number of
disease states may alter this sensation. For the screening examination, it is reasonable to
limit this assessment to only the major joints, including: wrist, elbow, shoulder, hips and
knees.
Technique:
- Ask the patient to relax the joint that is to be tested.
- Carefully move the limb through its normal range of motion, being careful not to maneuver it in any way that is uncomfortable or generates pain.
- Be aware that many patients, particularly the elderly, often have other medical conditions that limit joint movement. Degenerative joint disease of the knee, for example, might cause limited range of motion, though tone should still be normal. If the patient has recently injured the area or are in pain, do not perform this aspect of the exam.
Things to look for:
- Normal muscle generates some resistance to movement when a limb is moved passively by an examiner. After performing this exam on a number of patients, you'll develop an appreciation for the range of normal tone.
- If the examiner moves the joint (patient relaxed) and there is increased resistance, this is referred to as increased tone, which can be further characterized as rigid or spastic.
- Spasticity: Tone increases if the examiner moves the joint more quickly (i.e. the hypertonicity is affected by the rate of movement of the joint). This is the typical finding with an upper motor neuron lesion (e.g. stroke or spinal cord injury).
- Rigidity: Tone remains increased regardless of how quickly the joint is moved. One example of this is Parkinson's disease, where limb movement generates a ratchet-like sensation known as cog wheeling.
- Flaccidness is the complete absence of tone. This occurs when the lower motor neuron is cut off from the muscles that it normally innervates.
Strength:
There is a 0 to 5 rating scale for muscle strength:
| 0/5 | No movement |
| 1/5 | Barest flicker of movement of the muscle, though not enough to move the structure to which it's attached. |
| 2/5 | Voluntary movement which is not sufficient to overcome the force of gravity. For example, the patient would be able to slide their hand across a table but not lift it from the surface. |
| 3/5 | Voluntary movement capable of overcoming gravity, but not any applied resistance. For example, the patient could raise their hand off a table, but not if any additional resistance were applied. |
| 4/5 | Voluntary movement capable of overcoming "some" resistance |
| 5/5 |
|
'+' and '-' can be added to allow for more nuanced scoring of 4/5 strength (e.g., 4+ or 4- but not 5-, 3+ or 3-, etc.) Thus, a patient who can overcome "moderate but not full resistance" might be graded 4+. This is quite subjective, with a fair amount of variability amongst clinicians. Ultimately, it's most important that you develop your own sense of what these gradations mean, allowing for internal consistency and interpretability of serial measurements.
Specifics of Strength Testing - Major Muscle Groups: In the screening examination, it is reasonable to check only the major muscles/muscle groups. More detailed testing can be performed in the setting of discrete/unexplained weakness. The names of the major muscles/muscle groups along with the spinal roots and peripheral nerves that provide their innervation are provided below. Nerve roots providing the greatest contribution are printed in bold. More extensive descriptions of individual muscles and their functions, along with their precise innervations can be found in a Neurology reference text.
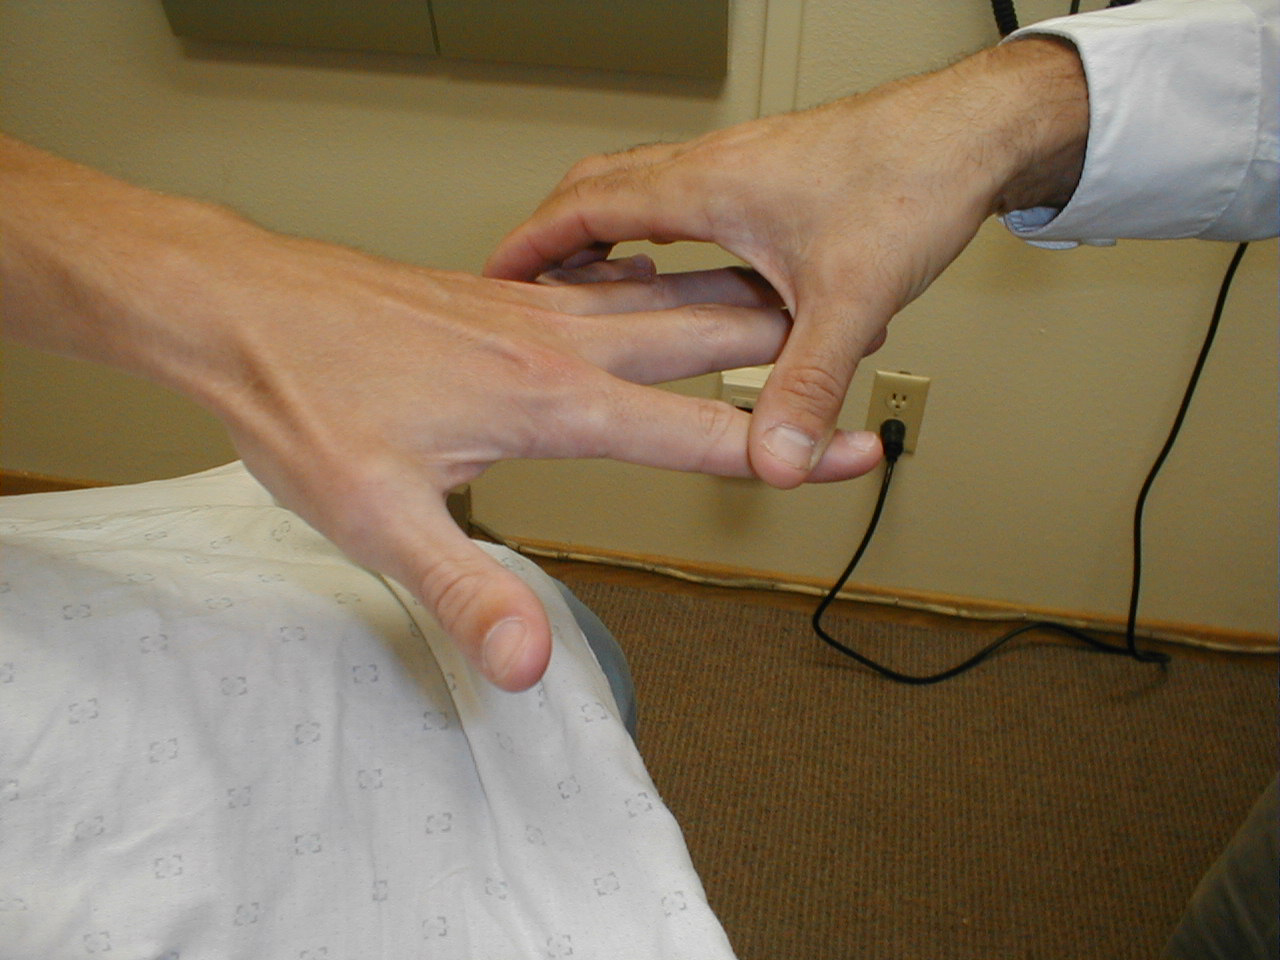
- Intrinsic muscles of the hand (C 8, T 1): Ask the patient to spread their fingers apart
against resistance (abduction). Then squeeze them together, with your fingers placed in
between each of their digits (adduction). Test each hand separately. The muscles which
control adduction and abduction of the fingers are called the Interossei, innervated by the
Ulnar Nerve.
For more information about finger abductors and adductors, see the following links:
University of Washington, Anatomy of finger abductors and adductors
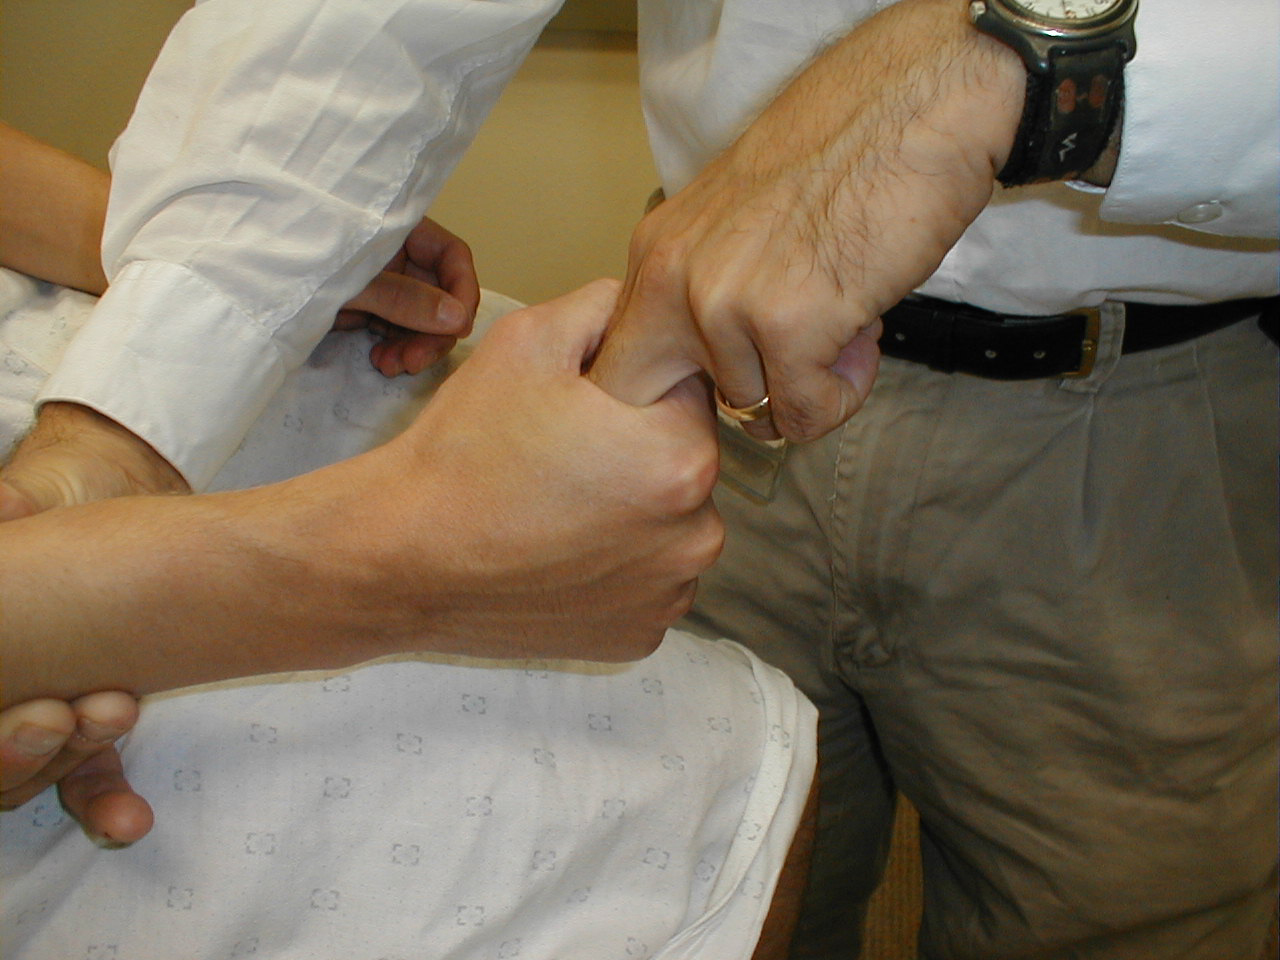
- Flexors of the fingers (C 7, 8, T1): Ask the patient
to make a fist, squeezing their hand around two of your fingers. If the grip is normal, you
will not be able to pull your fingers out. Test each hand separately. The Flexor Digitorum
Profundus controls finger flexion and is innervated by the Median (radial 1/2) and Ulnar
(medial 1/2) Nerves.
For more information about finger flexors, see the following links:
University of Washington, Anatomy of finger flexors 1
University of Washington, Anatomy of finger flexors 2 - Wrist flexion (C 7, 8, T 1): Have the patient try to flex their wrist as you provide
resistance. Test each hand separately. The muscle groups which control flexion are
innervated by the Median and Ulnar Nerves.
For more information about wrist flexors, see the following links:
University of Washington, Anatomy of wrist flexors 1
University of Washington, Anatomy of wrist flexors 2 - Wrist extension (C 6, 7, 8): Have the patient try to
extend their wrist as you provide resistance. Test each hand separately. The Extensor
Radialis muscles control extension and are innervated by the Radial Nerve. Clinical
Correlate: Damage to the radial nerve results in wrist drop (loss of ability to extend the
hand at the wrist). This can occur via any one of a number of mechanisms. For example, the
nerve can be compressed against the humerus for a prolonged period of time when an
intoxicated person loses consciousness with the inside aspect of the upper arm resting
against a solid object (known as a "Saturday Night Palsy").
For more information about wrist extensors, see the following links:
University of Washington, Anatomy of wrist extensors 1
University of Washington, Anatomy of wrist extensors 2 - Elbow Flexion (C 5, 6): The main flexor (and
supinator) of the forearm is the Brachialis Muscle (along with the Biceps Muscle). Have the
patient bend their elbow to ninety degrees while keeping their palm directed upwards. Then
direct them to flex their forearm while you provide resistance. Test each arm separately.
These muscles are innervated by the Musculocutaneous Nerve.
For more information about elbow flexors, see the following links:
University of Washington, Anatomy of elbow flexors 1
University of Washington, Anatomy of elbow flexors 2 - Elbow Extension (C 7, 8): The main extensor of the
forearm is the triceps muscle. Have the patient extend their elbow against resistance while
the arm is held out (abducted at the shoulder) from the body at ninety degrees. Test each
arm separately. The Triceps is innervated by the Radial Nerve.
For more information about elbow extensors, see the following link:
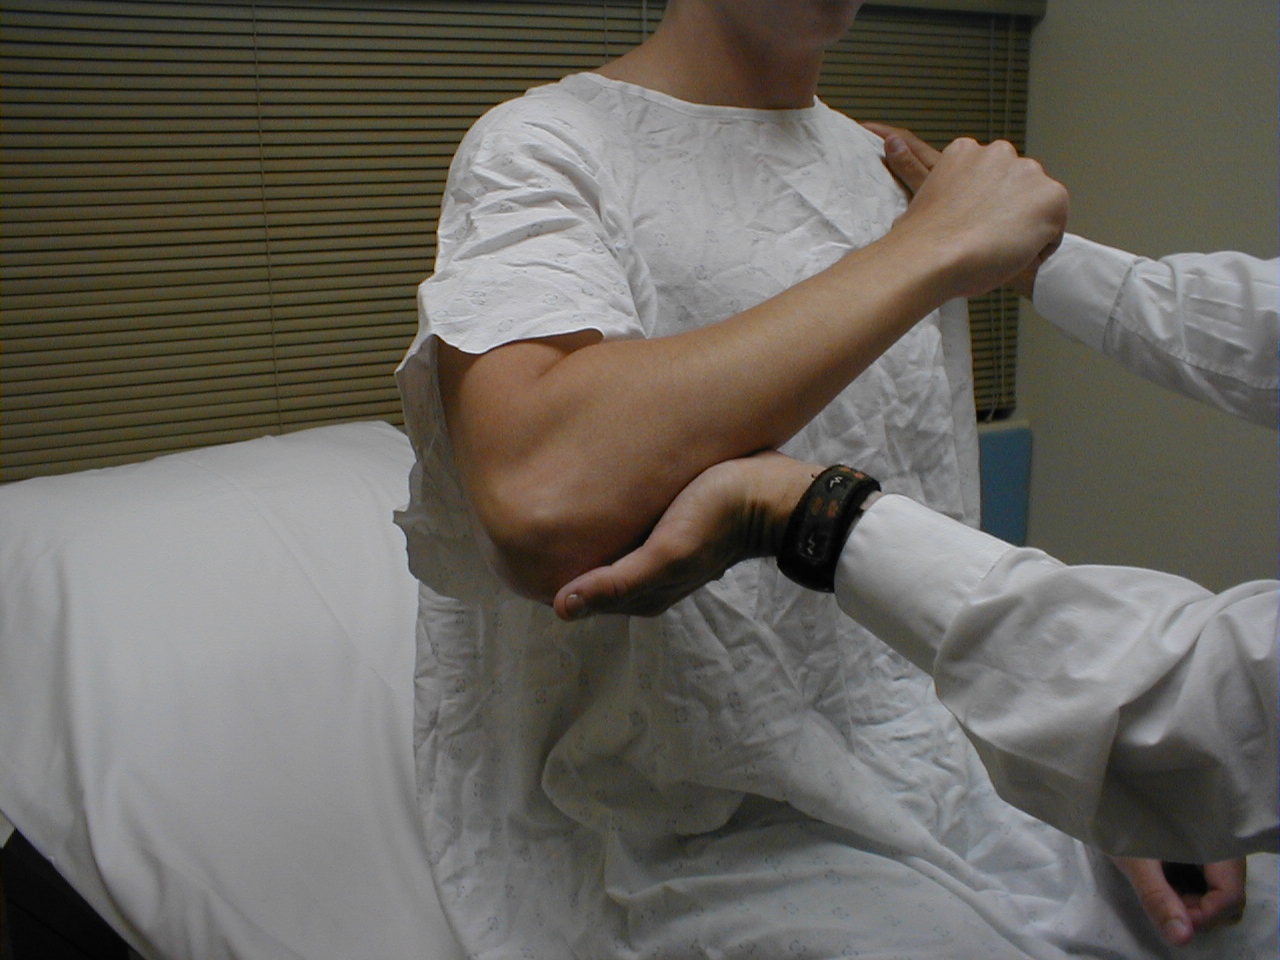
- Shoulder Adduction (C 5 thru T1): The main muscle of adduction is the Pectoralis Major,
though the Latissiumus and others contribute as well. Have the patient flex at the elbow
while the arm is held out from the body at forty-five degrees. Then provide resistance as
they try to further adduct at the shoulder. Test each shoulder separately.
For more information about shoulder adductors, see the following links:
University of Washington, Anatomy of shoulder adductors 1
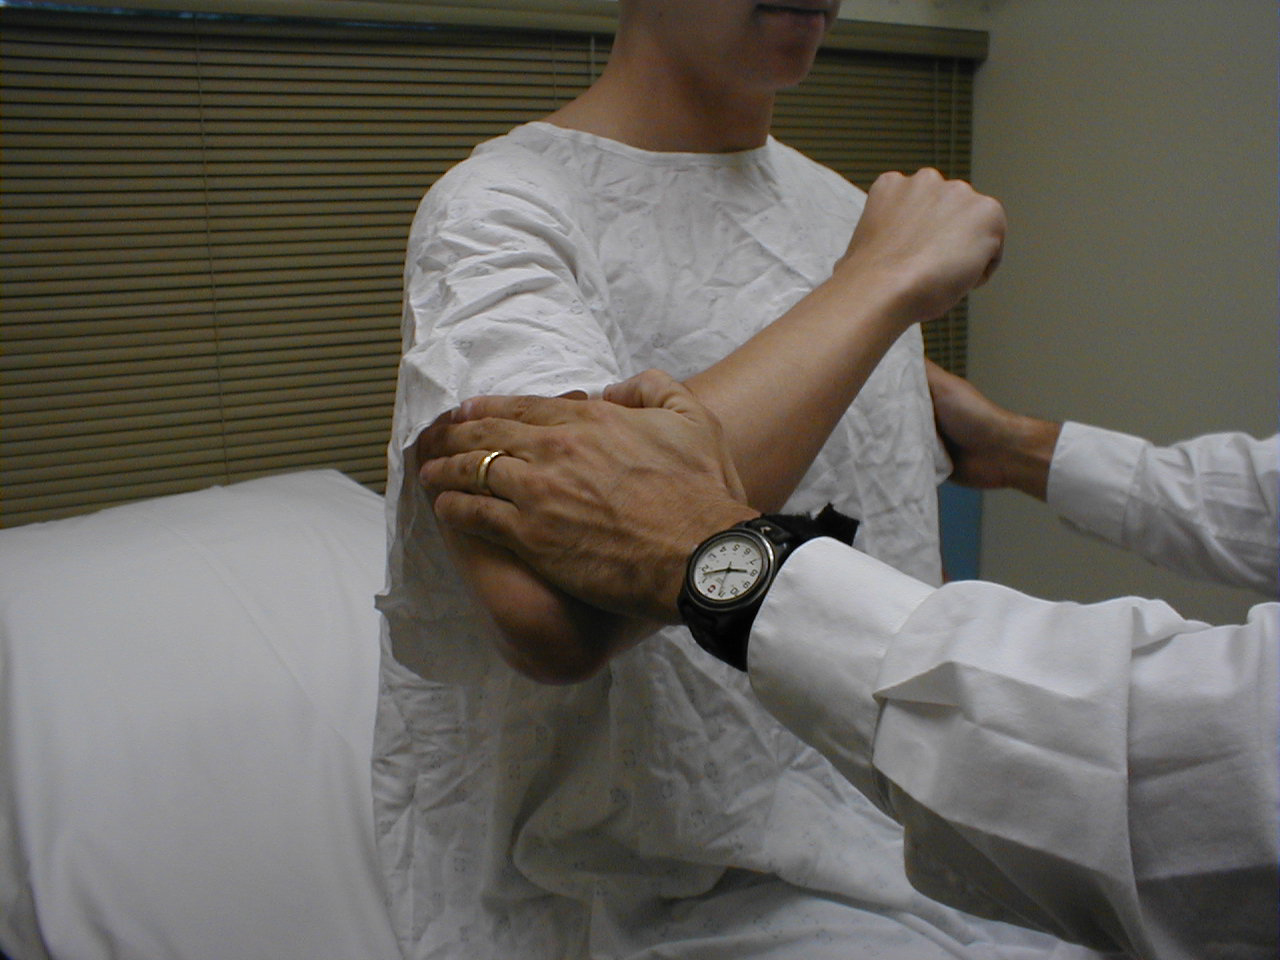
University of Washington, Anatomy of shoulder adductors 2 - Shoulder Abduction (C 5, 6): The deltoid muscle,
innervated by the axillary nerve, is the main muscle of abduction. Have the patient flex at
the elbow while the arms is held out from the body at forty-five degress. Then provide
resistance as they try to further abduct at the shoulder. Test each shoulder separately.
For more information about shoulder abductors, see the following link:
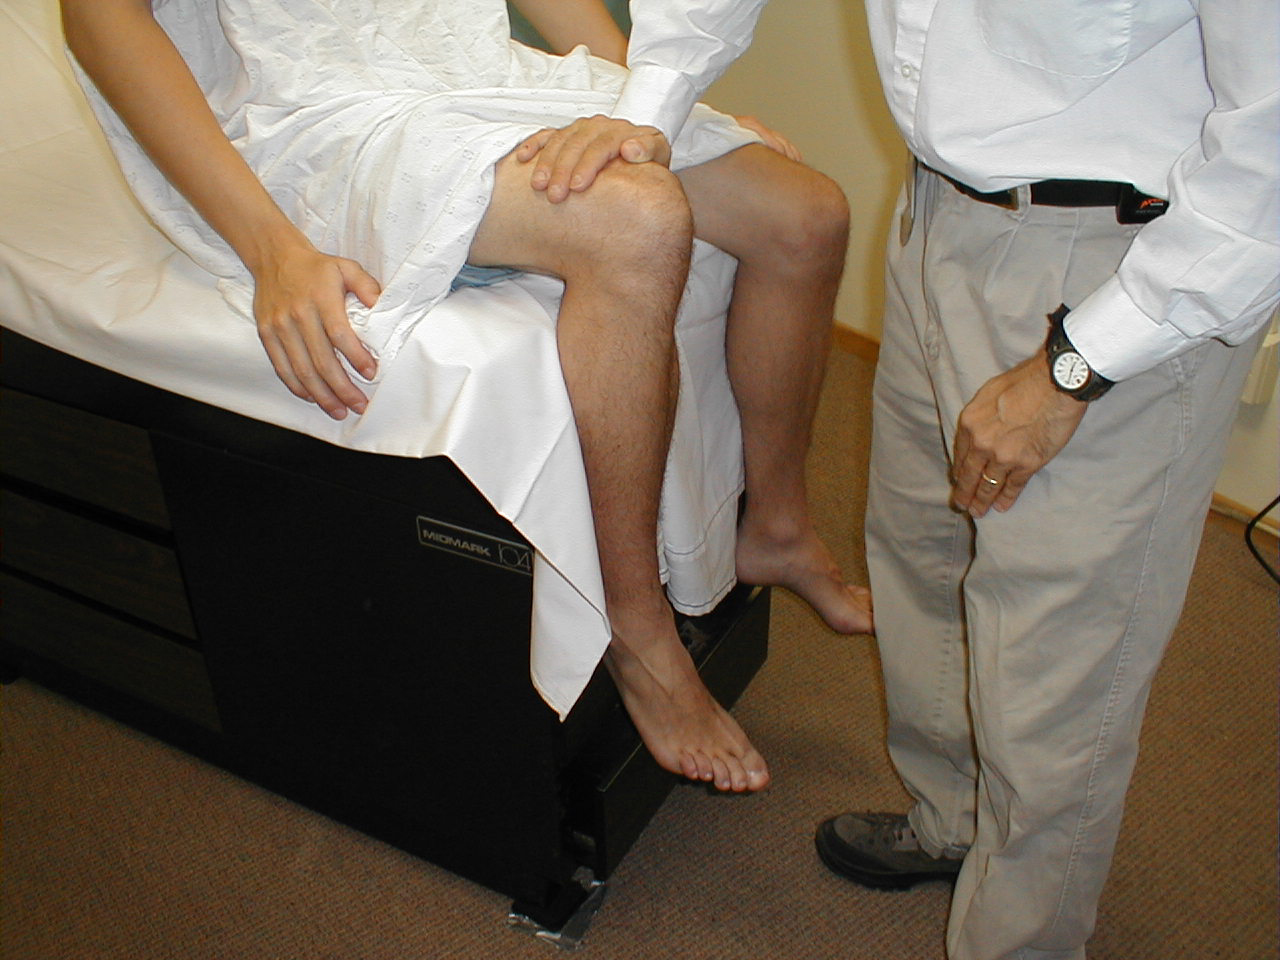
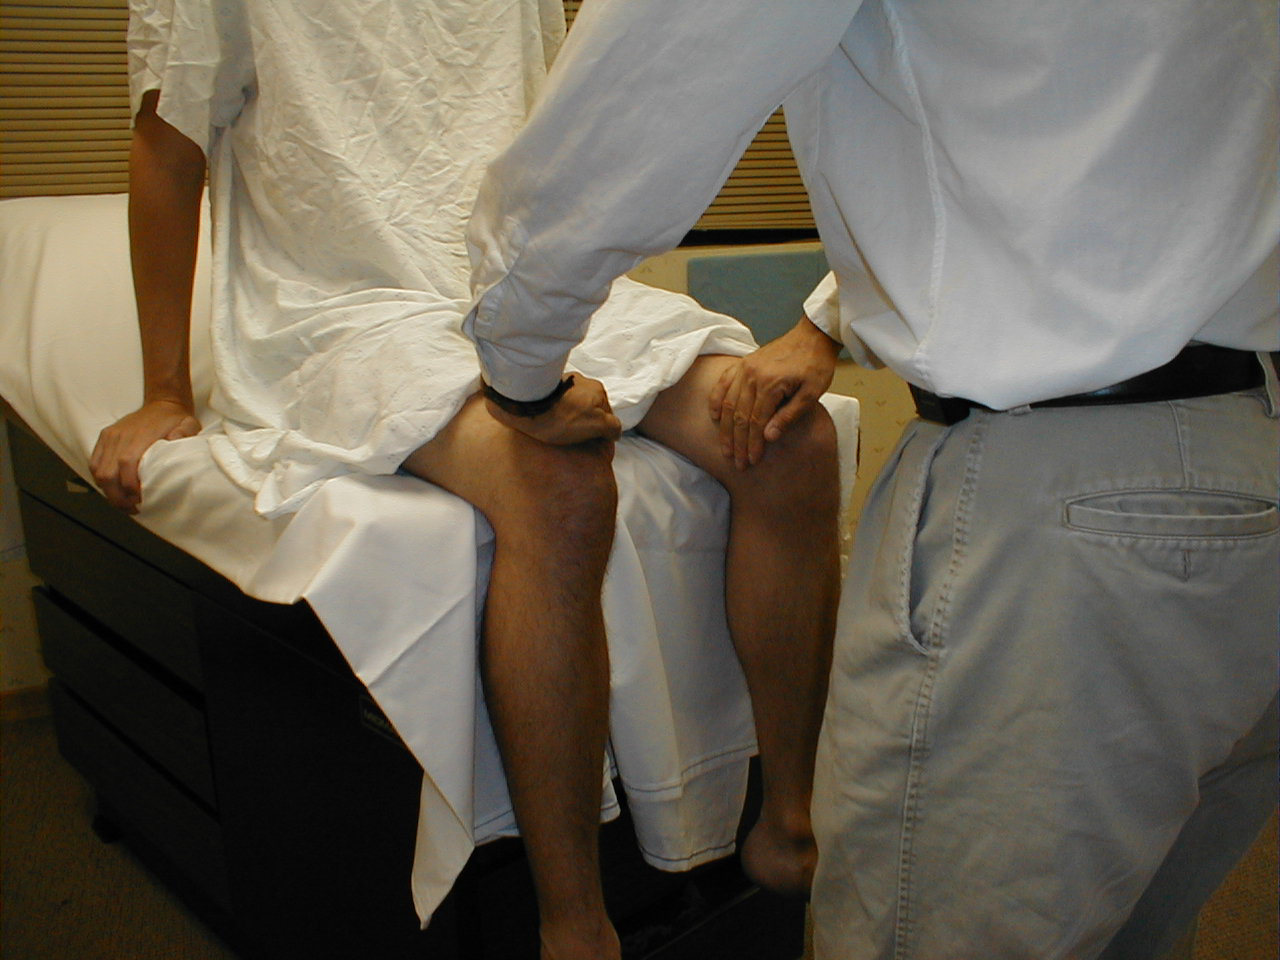
- Hip Flexion (L 2, 3, 4): With the patient seated, place your hand on top
of one thigh and instruct the patient to lift the leg up from the table. The main hip flexor
is the Iliopsoas muscle, innervated by the femoral nerve.
For more information about hip flexors, see the following links:
University of Washington, Anatomy of hip flexors 1
University of Washington, Anatomy of hip flexors 2 - Hip Extension (L5, S1): With the patient lying prone, direct the patient to lift their leg
off the table against resistance. Test each leg separately. The main hip extensor is the
gluteus maximus, innervated by inferior gluteal nerve.

For more information about hip extensors, see the following link:
- Hip Abduction (L 4, 5, S1): Place your hands on the outside of either thigh and direct the
patient to separate their legs against resistance. This movement is mediated by a number of
muscles.
For more information about hip abductors, see the following links:
University of Washington, Anatomy of hip abductors 1
University of Washington, Anatomy of hip abductors 2
University of Washington, Anatomy of hip abductors 3 - Hip Adduction (L 2, 3, 4): Place your hands on the inner aspects of the thighs and repeat
the maneuver. A number of muscles are responsible for adduction. They are innervated by the
obturator nerve.
For more information about hip adductors, see the following links:
University of Washington, Anatomy of hip adductors 1
University of Washington, Anatomy of hip adductors 2
University of Washington, Anatomy of hip adductors 3
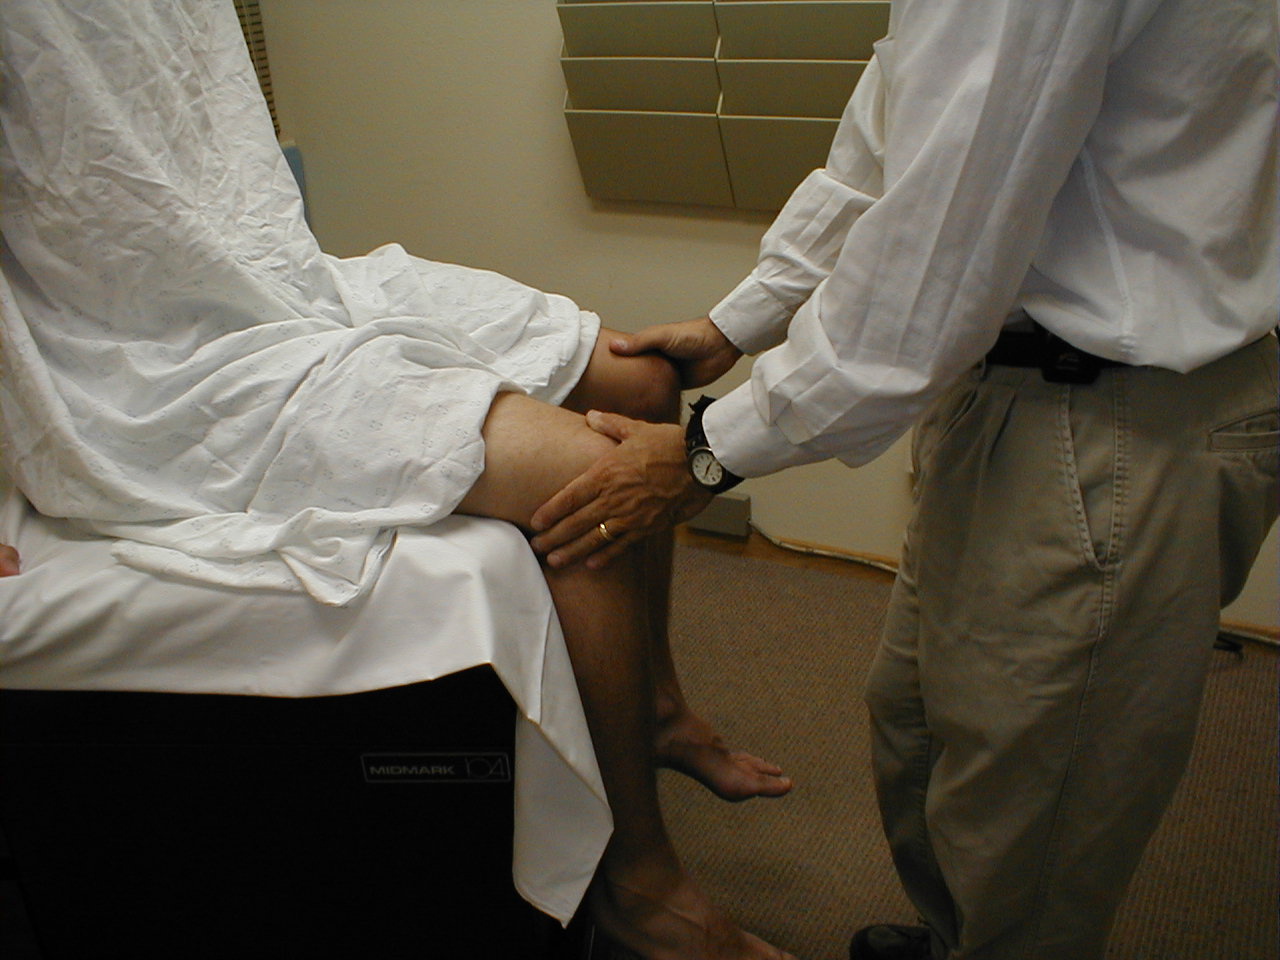
University of Washington, Anatomy of hip adductors 4 - Knee Extension (L 2, 3, 4): Have the
seated patient steadily press their lower extremity into your hand against resistance. Test
each leg separately. Extension is mediated by the quadriceps muscle group, which is
innervated by the femoral nerve.
For more information about knee extensors, see the following links:
Univervsity of Washington, Anatomy of knee extensors 1
Univervsity of Washington, Anatomy of knee extensors 2
University of Washington, Anatomy of knee extensors 3
University of Washington, Anatomy of knee extensors 4 - Knee flexion (L 5; S 1, 2): Have the patient rest prone. Then have them pull
their heel up and off the table against resistance. Each leg is tested separately. Flexion
is mediated by the hamstring muscle group, via branches of the sciatic nerve.
For more information about knee flexors, see the following links:
University of Washington, Anatomy of knee flexors 1
University of Washington, Anatomy of knee flexors 2
University of Washington, Anatomy of knee flexors 3
University of Washington, Anatomy of knee flexors 4
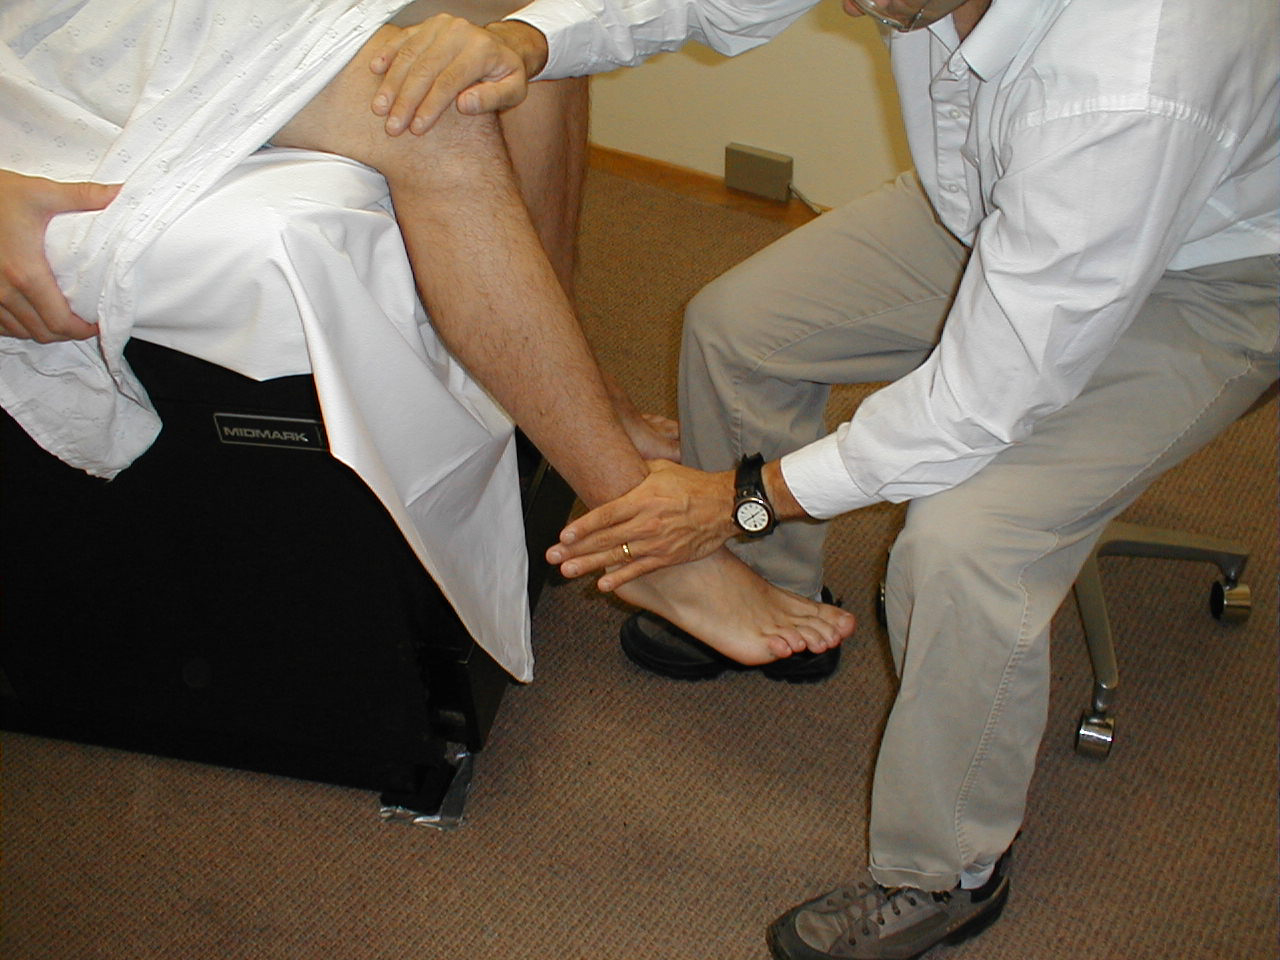
University of Washington, Anatomy of knee flexors 5 - Ankle Dorsiflexion (L 4, 5): Direct the patient to pull their toes upwards while
you provide resistance with your hand. Each foot is tested separately. The muscles which
mediate dorsiflexion are innervated by the deep peroneal nerve. Clinical Correlate: The
peroneal nerve is susceptible to injury at the point where it crosses the head of the fibula
(laterally, below the knee). If injured, the patient develops "Foot Drop," an
inability to dorsiflex the foot.
For more information about ankle dorsiflexors, see the following link:
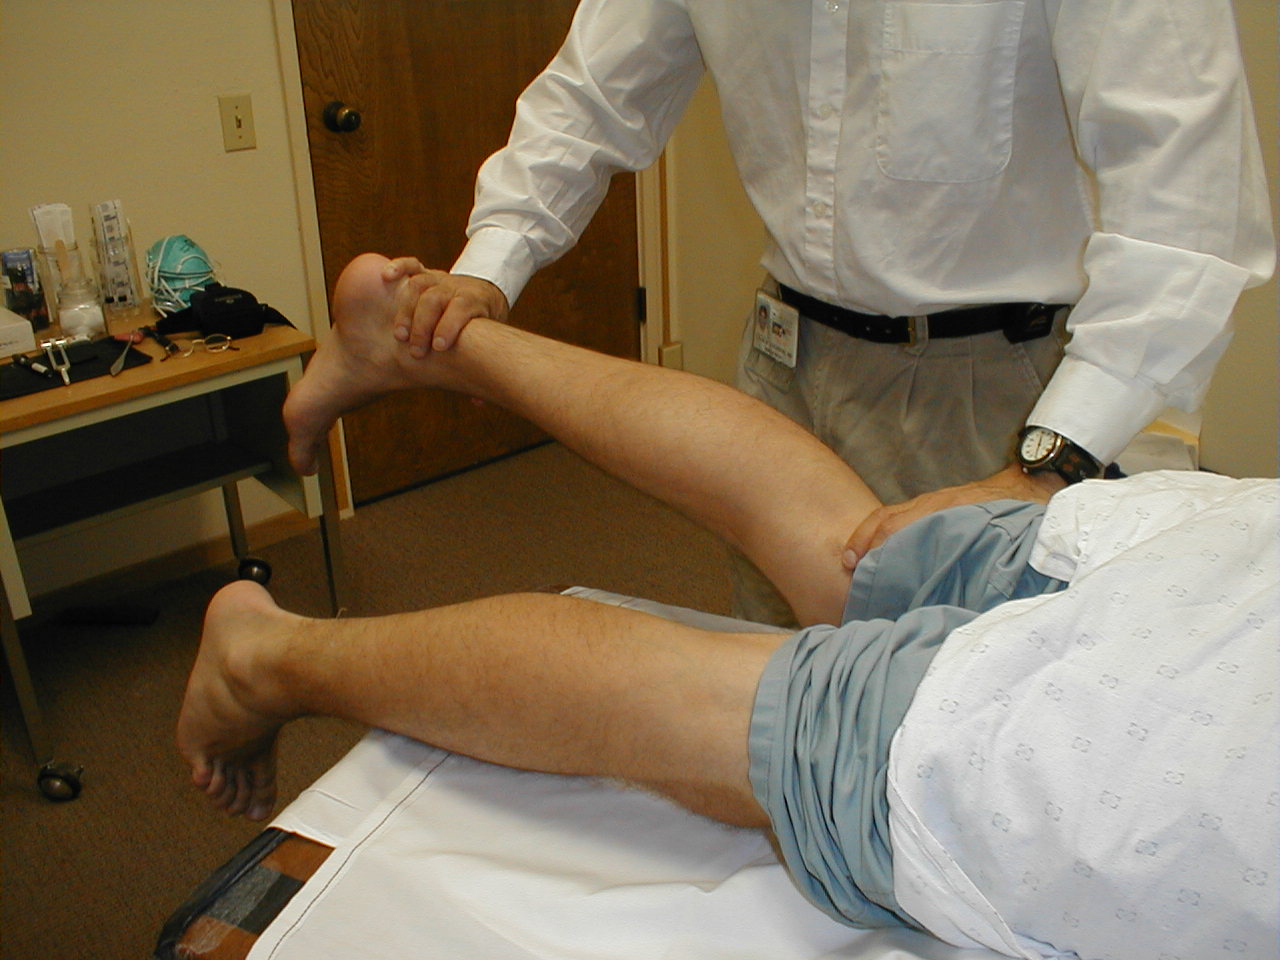
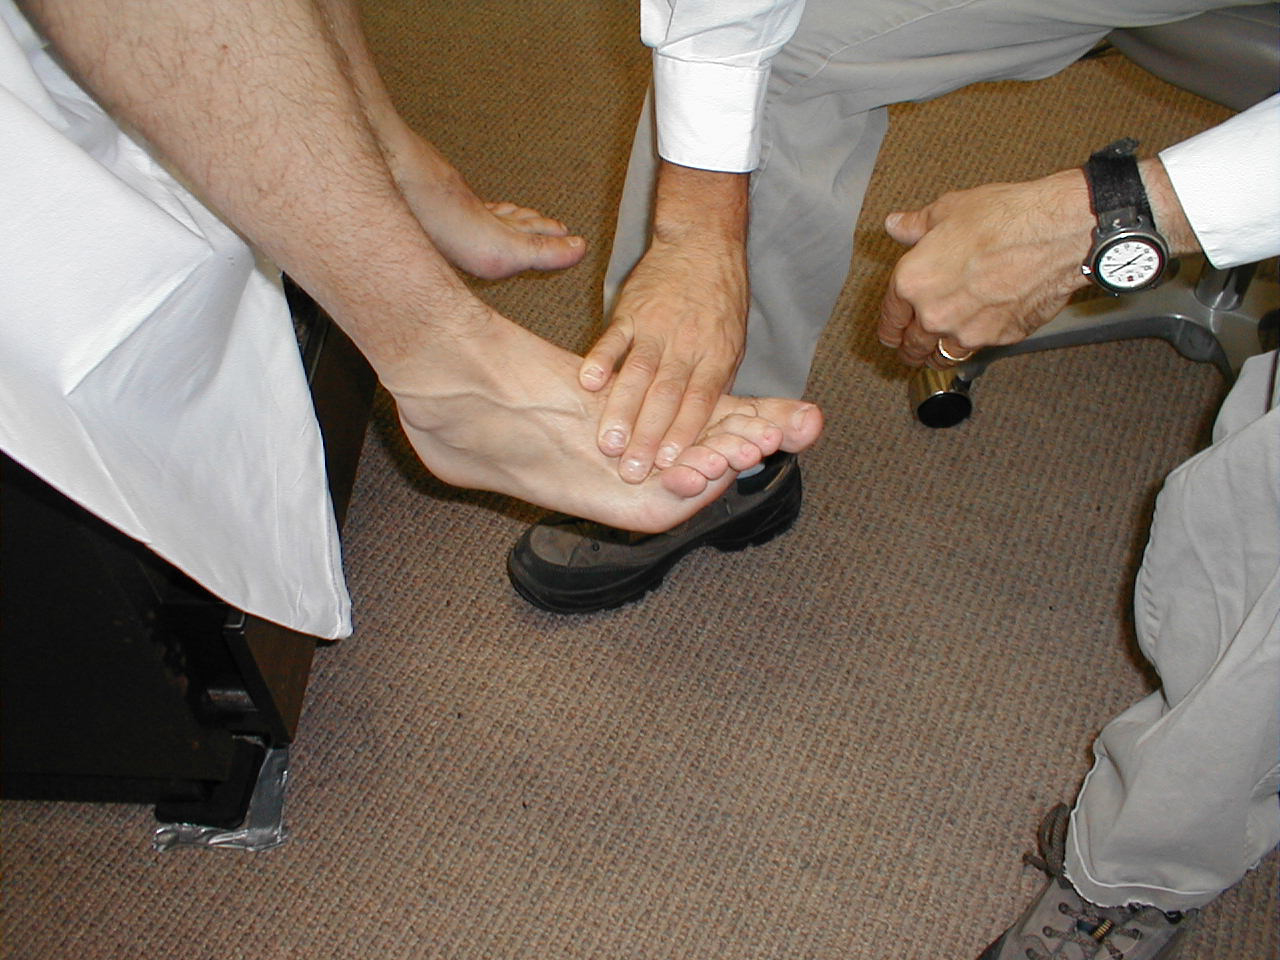
- Ankle Plantar Flexion (S 1, S 2). Have the patient "step on the gas"
while providing resistance with your hand. Test each foot separately. The gastrocnemius and
soleus, the muscles which mediate this movement, are innervated by a branch of the sciatic
nerve. Plantar flexion and dorsiflexion can also be assessed by asking the patient to walk
on their toes (plantar flexion) and heels (dorsiflexion).
For more information about ankle plantar flexors, see the following links:
University of Washington, Anatomy of ankle plantar flexors 1
University of Washington, Anatomy of ankle plantar flexors 2
University of Washington, Anatomy of ankle plantar flexors 3
It is generally quite helpful to directly compare right v left sided strength, as they should more or less be equivalent (taking into account the handedness of the patient). If there is weakness, try to identify a pattern, which might provide a clue as to the etiology of the observed decrease in strength. In particular, make note of differences between:
- Right v Left
- Proximal muscles v distal
- Upper extremities v lower
- Or is the weakness generalized, suggestive of a systemic neurological disorder or global deconditioning
Special Testing for subtle weakness: Subtle weakness can be hard to detect. Pay attention to how the patient walks, uses and holds their arms and hands as they enter the room, get up and down from a seated position, move onto the examination table, etc. Pronator drift is a test for slight weakness of the upper extremities. The patient should sit with both arms extended, palms directed upward. Subtle weakness in either arm will cause slight downward drift and pronation of that limb (i.e. the arm will rotate slightly inward and down).
Common peripheral nerves, territories of innervation, and clinical correlates.
| Peripheral Nerve | Sensory Innervation | Motor Innervation | Contributing Spinal Nerve Roots | Clinical |
|---|---|---|---|---|
| Radial Nerve | Back of thumb, index, middle, and 1/2 ring finger; back of forearm | Wrist extension and abduction of thumb in palmer plane | C6, 7, 8 | At risk for compression at humerus, known as "Saturday Night Palsy"
|
| Ulnar Nerve | Palmar and dorsal aspects of pinky and 1/2 of ring finger | Abduction of fingers (intrinsic muscles of hand) | C7, 8 and T1 | At risk for injury with elbow fracture. Can get transient symptoms when inside of elbow is struck ("funny bone" distribution) |
| Median Nerve | Palmar aspect of the thumb, index, middle and 1/2 ring finger; palm below these fingers. | Abduction of thumb perpendicular to palm (thenar muscles). | C8, T1 | Compression at carpal tunnel causes carpal tunnel syndrome |
| Lateral Cutaneous Nerve of Thigh |
Lateral aspect thigh | L1, 2 | Can become compressed in obese patients, causing numbness over its distribution | |
| Peroneal | Lateral leg, top of foot | Dorsiflexion of foot (tibialis anterior muscle) | L4, 5; S1 |
Can be injured with proximal fibula fracture, leading to foot drop (inability to dorsiflex foot) |
This table provides information about usual patterns of innervations. There is occasionally interindividual variation. In the setting of peripheral nerve dysfunction, the level of the lesion will determine the extent of the deficit. That is, proximal insults will cause the entire nerve distribution to be affected while more distal lesions will only impact function beyond the site of the injury.
More on carpal tunnel syndrome...
Reflex Testing
Reflex testing incorporates an assessment of the function and interplay of both sensory and motor pathways. It is simple yet informative and can give important insights into the integrity of the nervous system at many different levels.
Physiology of Reflexes
Assessment of reflexes is based on a clear understanding of the following principles and relationships:
- Tendons connect muscles to bones, usually crossing a joint. When the muscle contracts, the tendon pulls on the bone, causing the attached structure to move.
- When the tendon is struck by the reflex hammer, stretch receptors contained within it generate an impulse that is carried via sensory nerves to the spinal cord. At this juncture, the message is transmitted across a synapse to an appropriate lower motor neuron. An upper motor neuron, whose cell body resides in the brain, also provides input to this synapse.
- The signal then travels down the lower motor neuron to the target muscle.
- The sensory and motor signals that comprise a reflex arc travel over anatomically well characterized pathways. Pathologic processes affecting discrete roots or named peripheral nerves will cause the reflex to be diminished or absent. This can obviously be of great clinical significance. The Achilles Reflex (see below) is dependent on the S1 and S2 nerve roots. Herniated disc material (a relatively common process) can put pressure on the S1 nerve root, causing pain along its entire distribution (i.e. the lateral aspect of the lower leg). If enough pressure if placed on the nerve, it may no longer function, causing a loss of the Achilles reflex. In extreme cases, the patient may develop weakness or even complete loss of function of the muscles innervated by the nerve root, a medical emergency mandating surgical decompression. The specific nerve roots that comprise the arcs are listed for each of the major reflexes described below.
- A normal response generates an easily observed shortening of the muscle. This, in turn, causes the attached structure to move.
- The vigor of contraction is graded on the following scale:
| 0 | No evidence of contraction |
| 1+ | Decreased, but still present (hypo-reflexic) |
| 2+ | Normal |
| 3+ | Super-normal (hyper-reflexic) |
| 4+ | Clonus: Repetitive shortening of the muscle after a single stimulation |
Technique
The Reflex Hammer
You will need to use a reflex hammer when performing this aspect of the exam. A number of the most commonly used models are pictured below. Regardless of the hammer type, proper technique is critical. The larger hammers have weighted heads, such that if you raise them approximately 10 cm from the target and then release, they will swing into the tendon with adequate force. The smaller hammers should be swung loosely between thumb and forefinger.
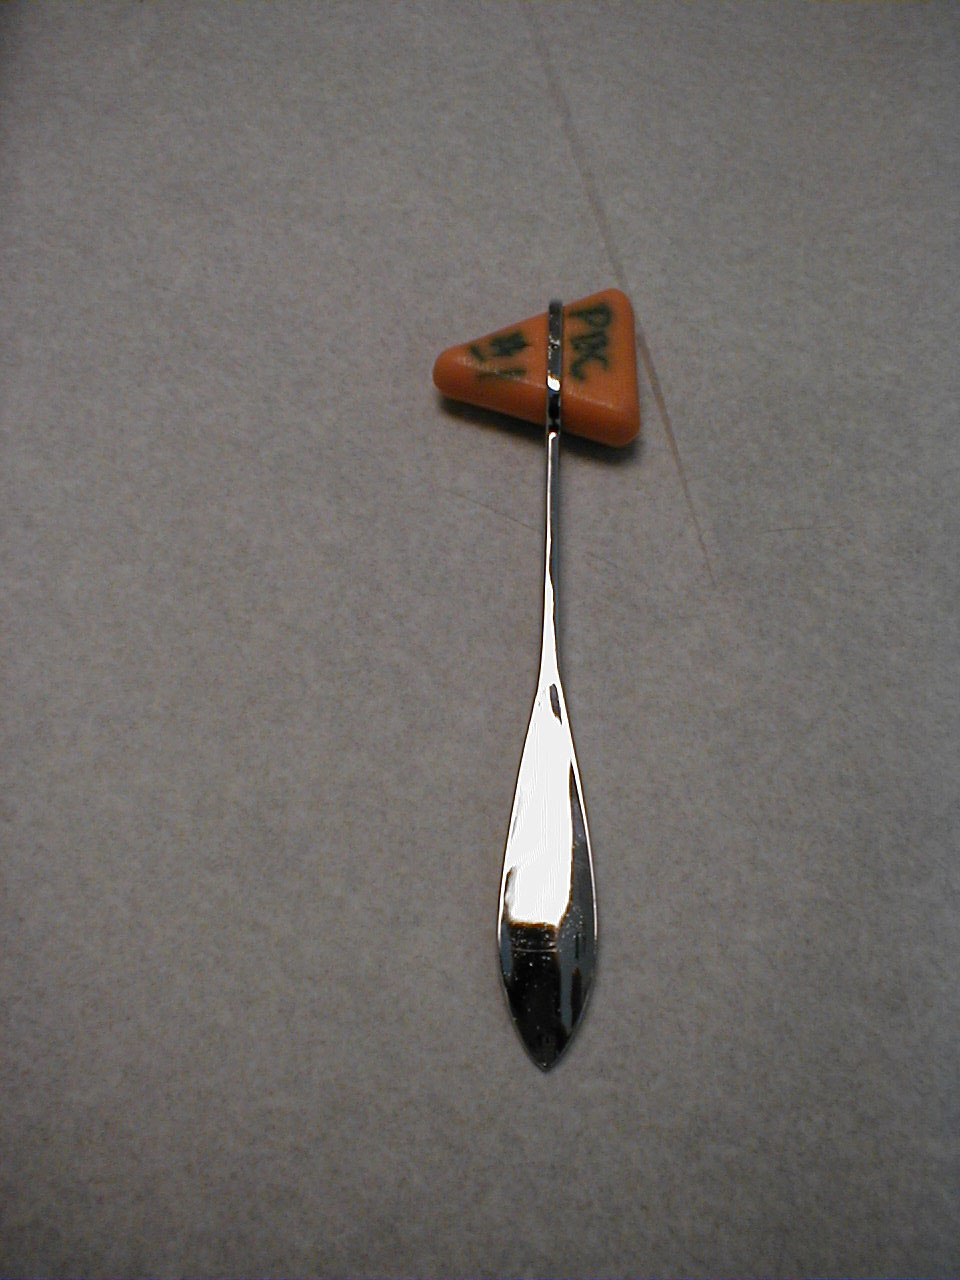
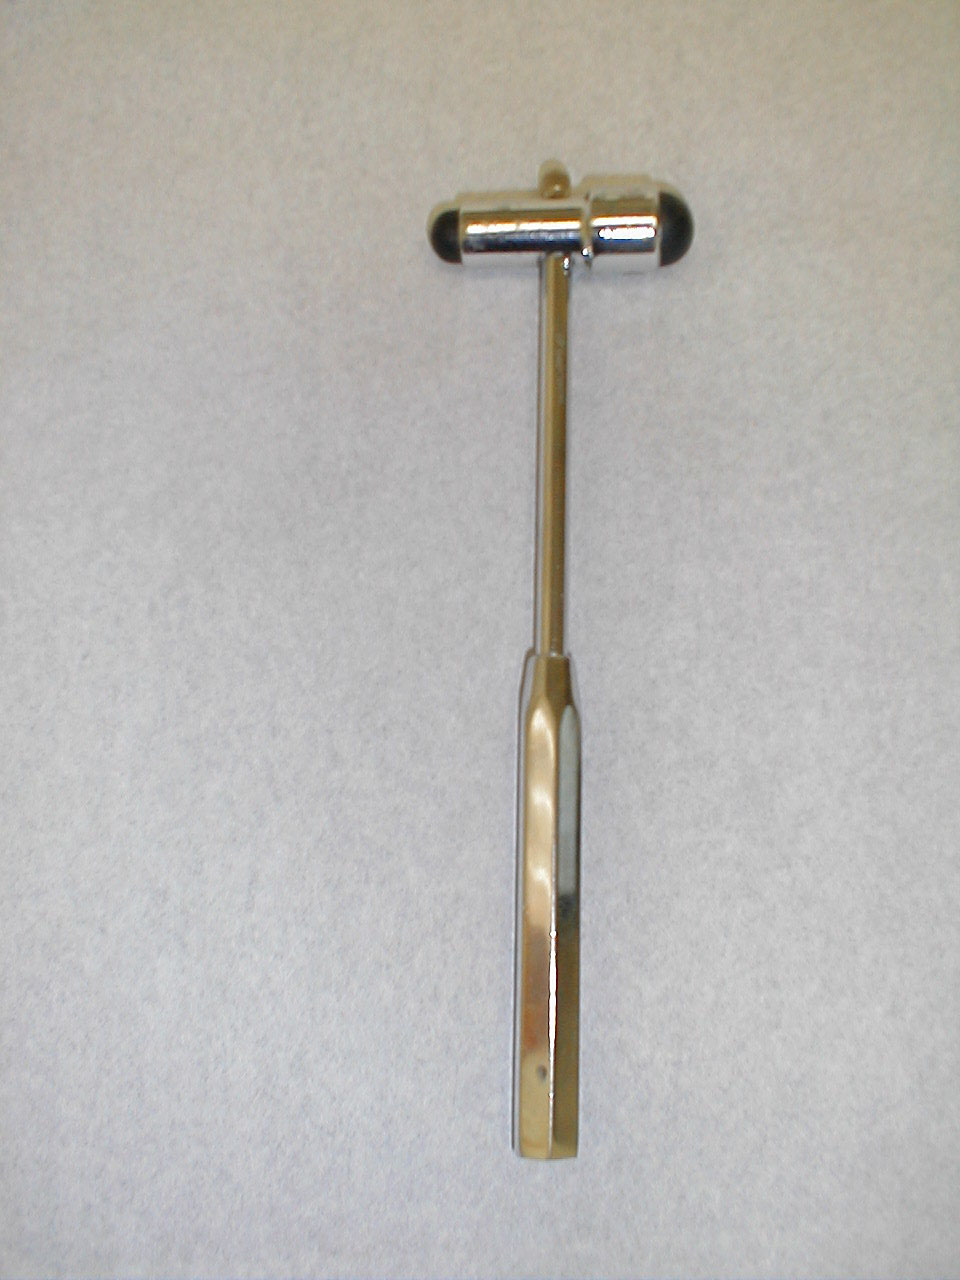
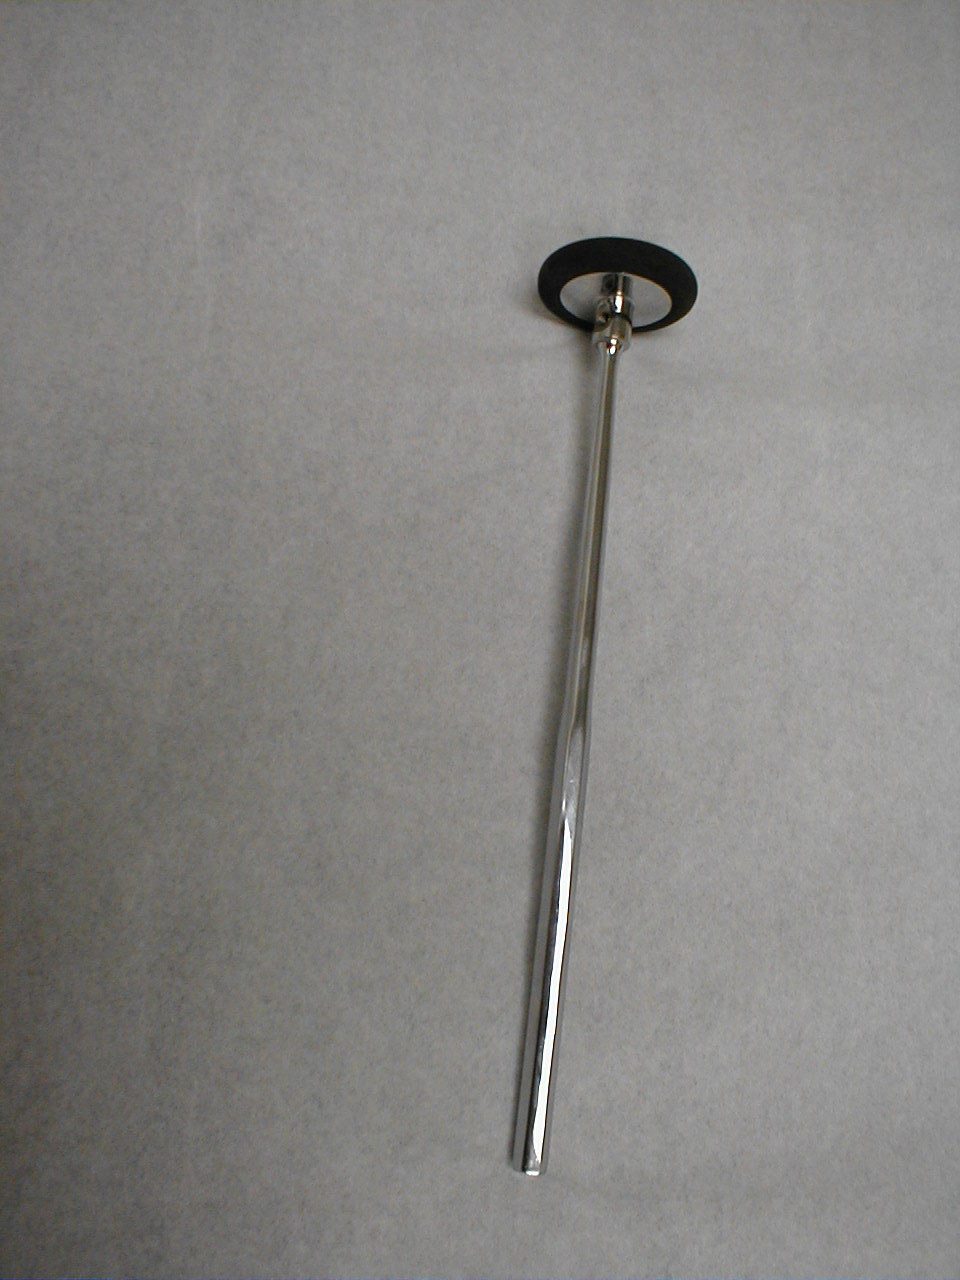
Head Oriented Horizontally
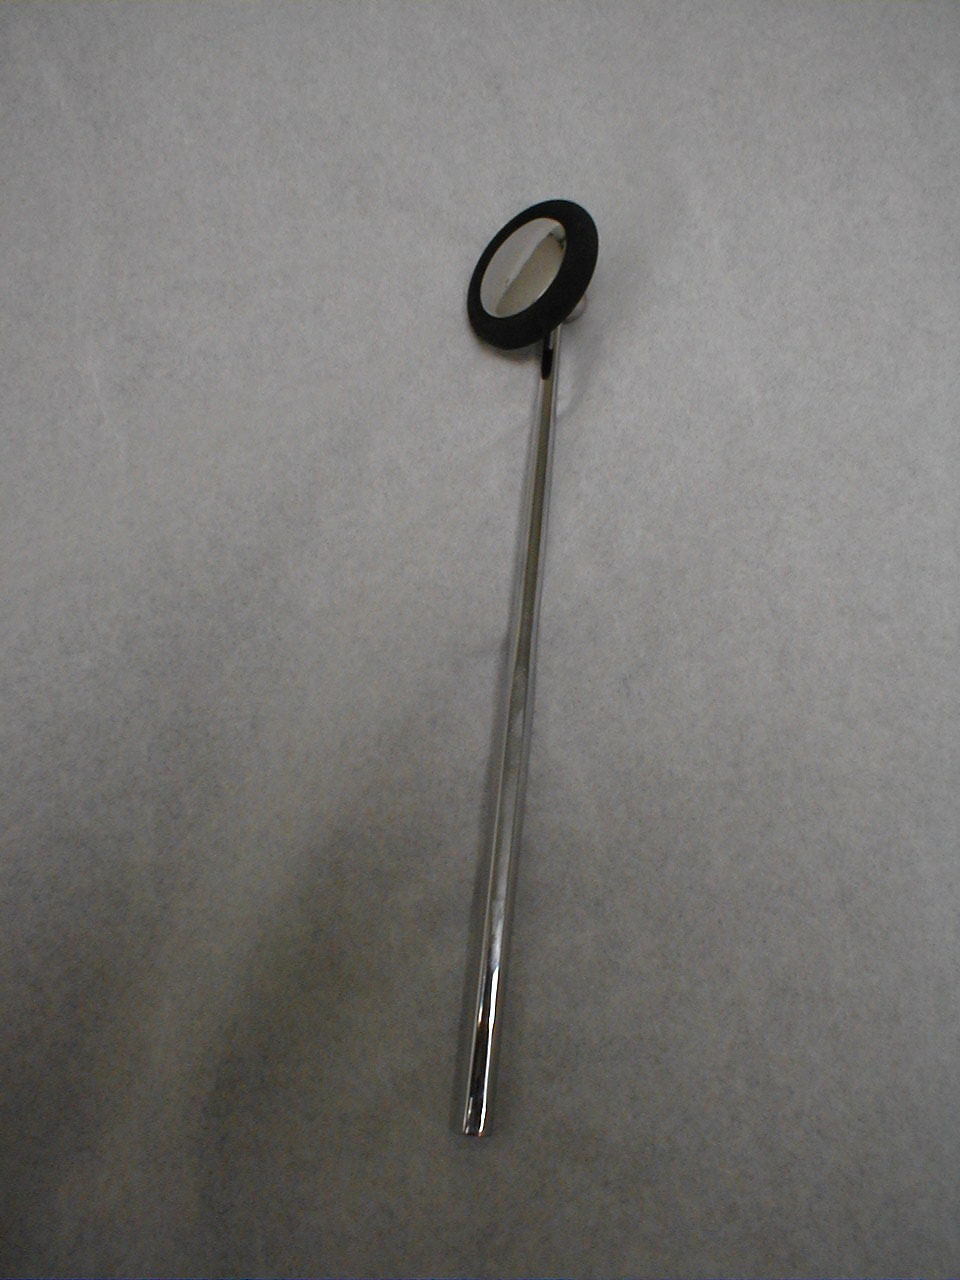
Head Oriented Vertically
Technique:
- The muscle group to be tested must be in a neutral position (i.e. neither stretched nor contracted).
- The tendon attached to the muscle(s) which is/are to be tested must be clearly identified. The extremity should be positioned such that the tendon can be easily struck with the reflex hammer.
- If you are having trouble locating the tendon, ask the patient to contract the muscle to which it is attached. When the muscle shortens, you should be able to both see and feel the cord like tendon, confirming its precise location. You may, for example, have some difficulty identifying the Biceps tendon within the Antecubital Fossa. Ask the patient to flex their forearm (i.e. contract their Biceps muscle) while you simultaneously palpate the fossa. The Biceps tendon should become taut and thus readily apparent.
- Strike the tendon with a single, brisk, stroke. While this is done firmly, it should not elicit pain. Occasionally, due to other medical problems (e.g. severe arthritis), you will not be able to position the patient's arm in such a way that you are able to strike the tendon. If this occurs, do not cause the patient discomfort. Simply move on to another aspect of the exam.
This grading system is rather subjective. Additional levels of response can be included by omitting the '+' or adding a '-' to any of the numbers. As you gain more experience, you'll have a greater sense of how to arrange your own scale.
Specifics of Reflex Testing - The peripheral nerves and contributing spinal nerve roots that form each reflex arc are listed in parentheses:
Achilles (S1, S2 - Sciatic Nerve):
- This is most easily done with the patient seated, feet dangling over the edge of the exam table. If they cannot maintain this position, have them lie supine, crossing one leg over the other in a figure 4. Or, failing that, arrange the legs in a frog-type position.
- Identify the Achilles tendon, a taut, discrete, cord-like structure running from the heel to the muscles of the calf. If you are unsure, ask the patient to plantar flex (i.e. "step on the gas"), which will cause the calf to contract and the Achilles to become taut.
- Position the foot so that it forms a right angle with the rest of the lower leg. You will probably need to support the bottom of the foot with your hand.
- Strike the tendon directly with your reflex hammer. Be sure that the calf if exposed so that you can see the muscle contract. A normal reflex will cause the foot to plantar flex (i.e. move into your supporting hand).
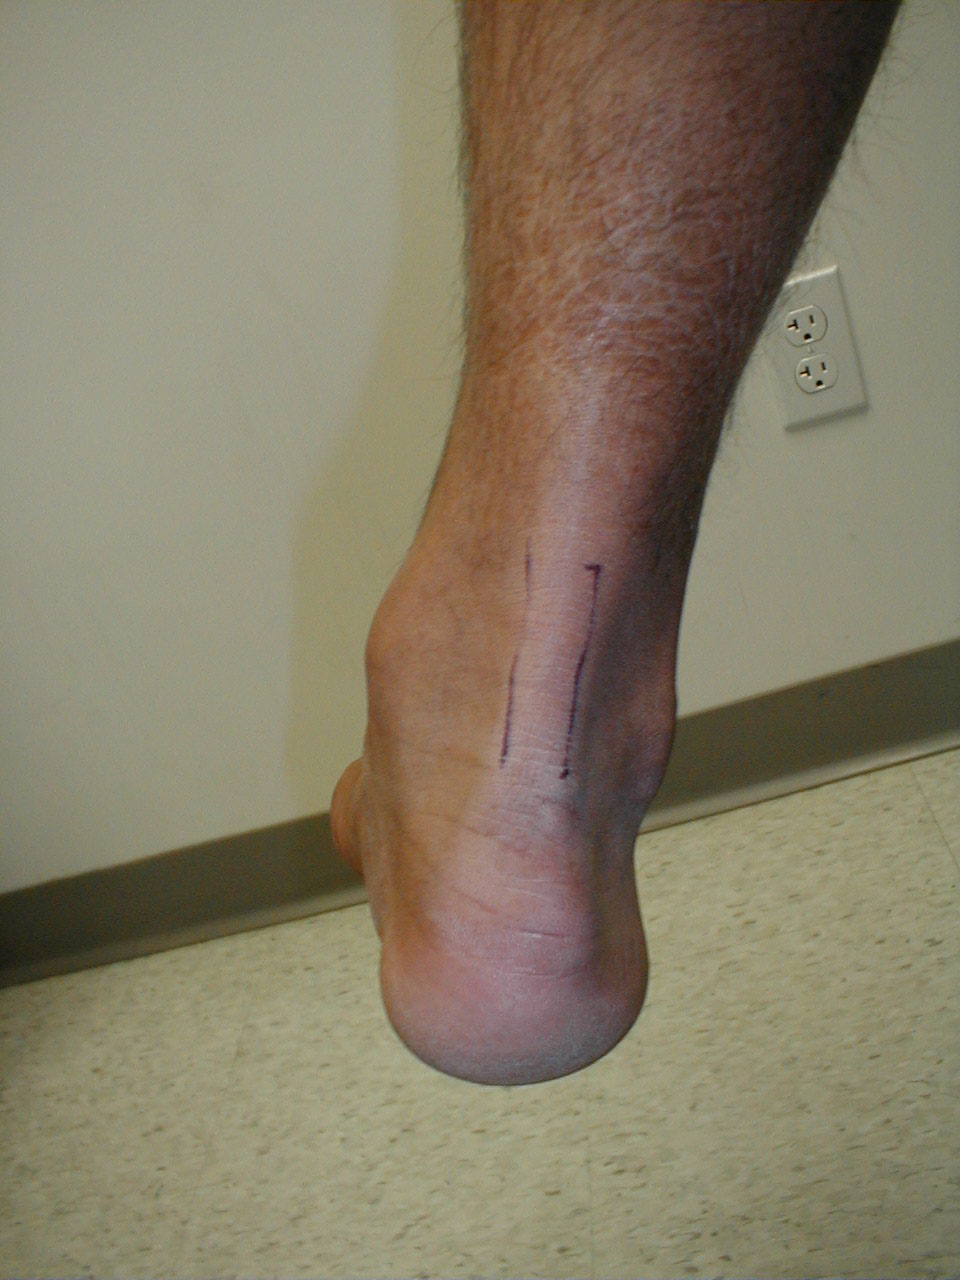
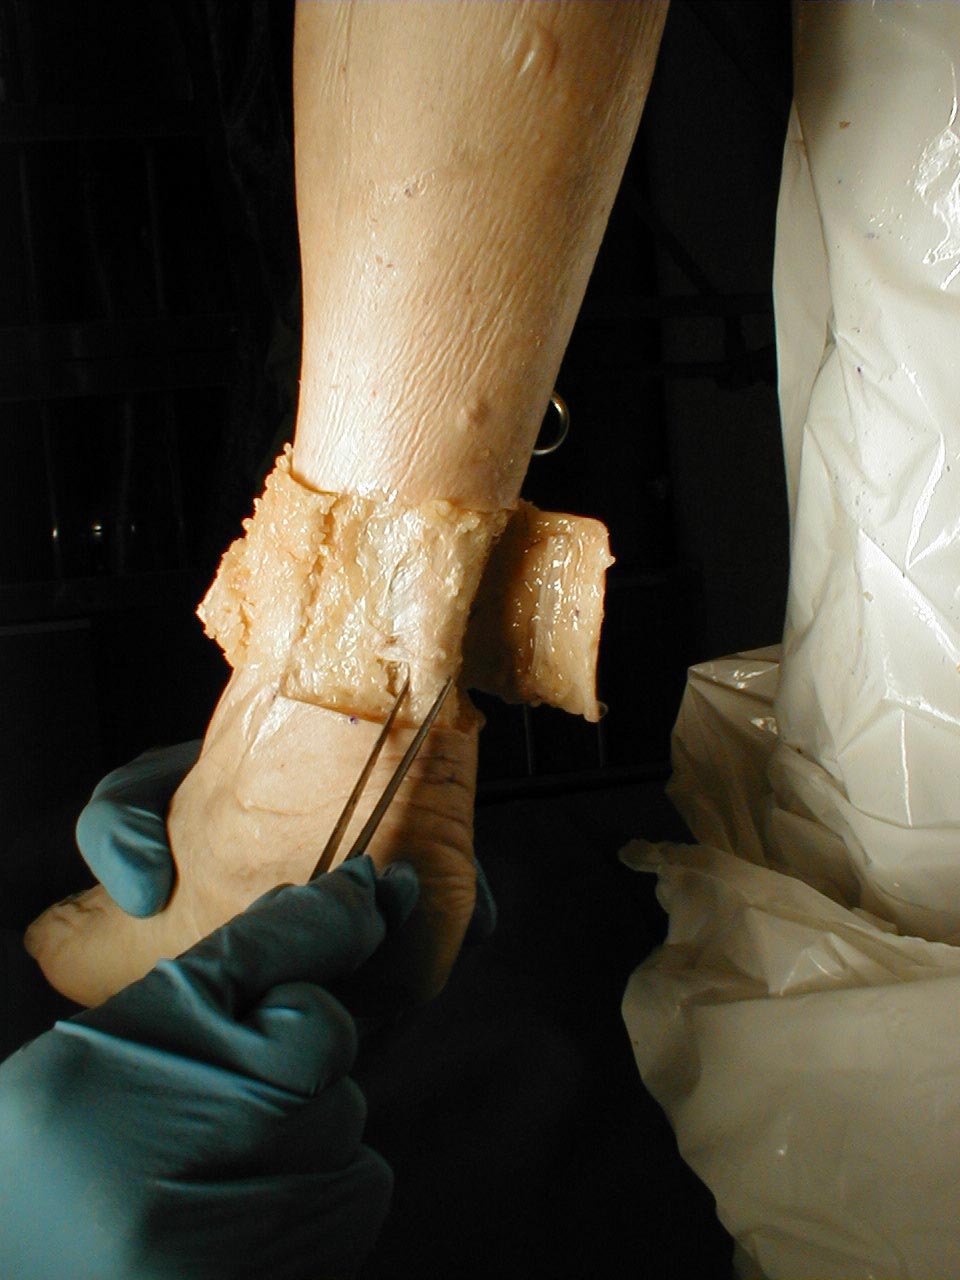
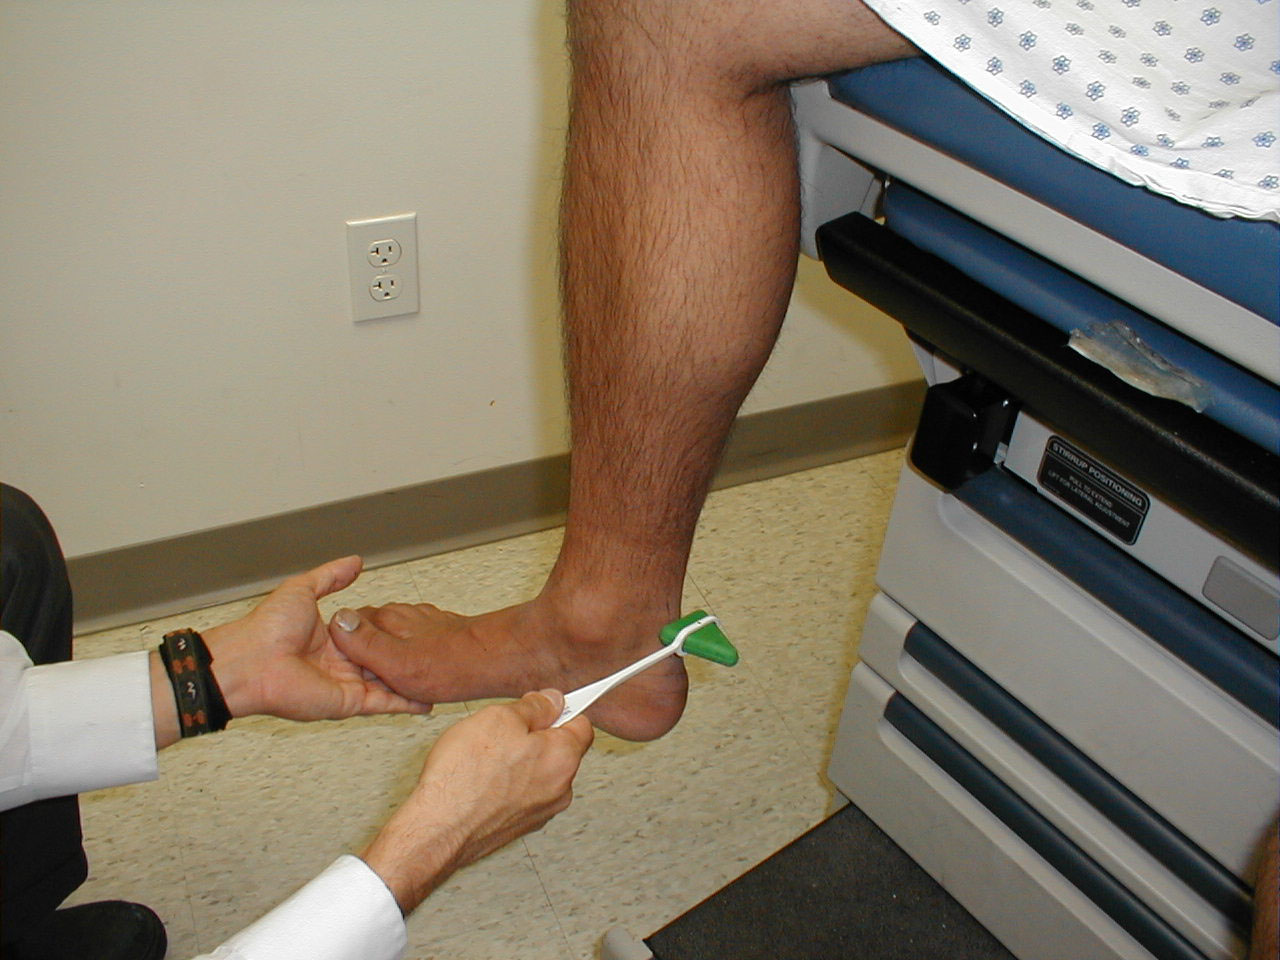
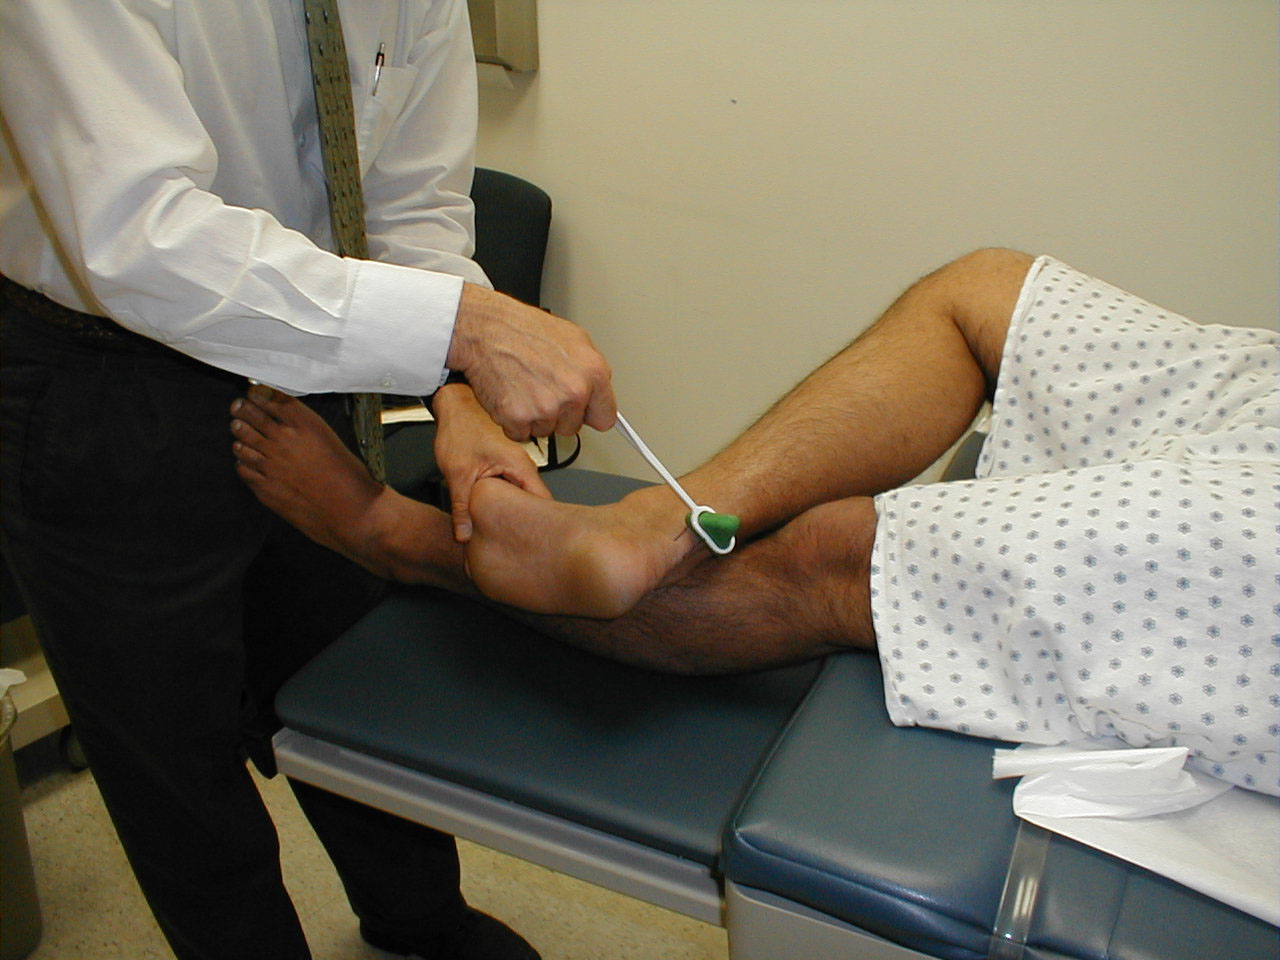
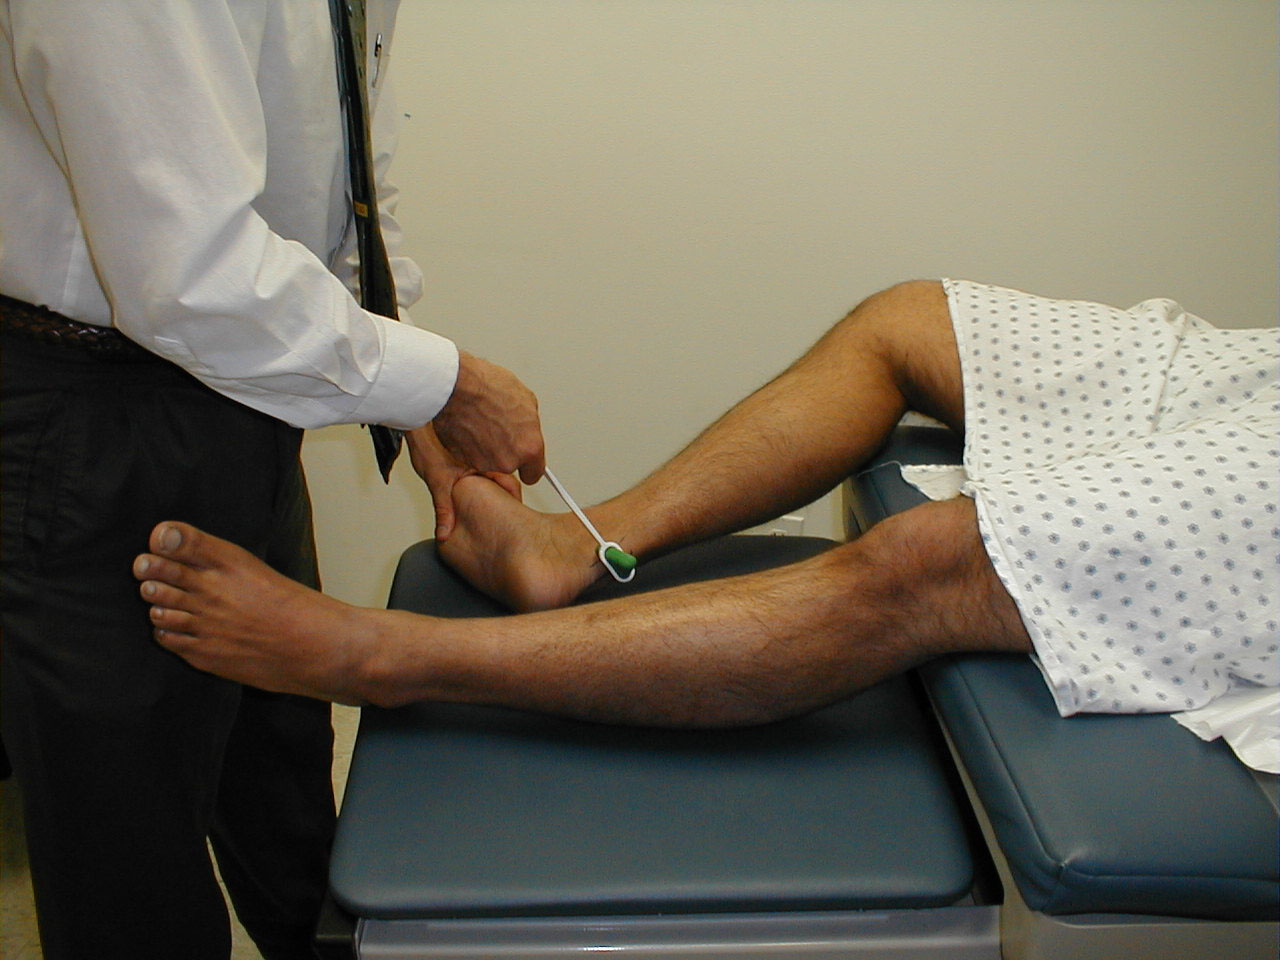
Patellar (L3, L4 -Femoral Nerve):
- This is most easily done with the patient seated, feet dangling over the edge the exam table. If they cannot maintain this position, have them lie supine (i.e. on their backs).
- Identify the patellar tendon, a thick, broad band of tissue extending down from the lower aspect of the patella (knee cap). If you are not certain where it's located, ask the patient to extend their knee. This causes the quadriceps (thigh muscles) to contract and makes the attached tendon more apparent.
- Strike the tendon directly with your reflex hammer. If you are having trouble identifying the exact location of the tendon (e.g. if there is a lot of subcutaneous fat), place your index finger firmly on top of it. Strike your finger, which should then transmit the impulse.
- For the supine patient, support the back of their thigh with your hands such that the knee is flexed and the quadriceps muscles relaxed. Then strike the tendon as described above.
- Make sure that the quadriceps are exposed so that you can see muscle contraction. In the normal reflex, the lower leg will extend at the knee.
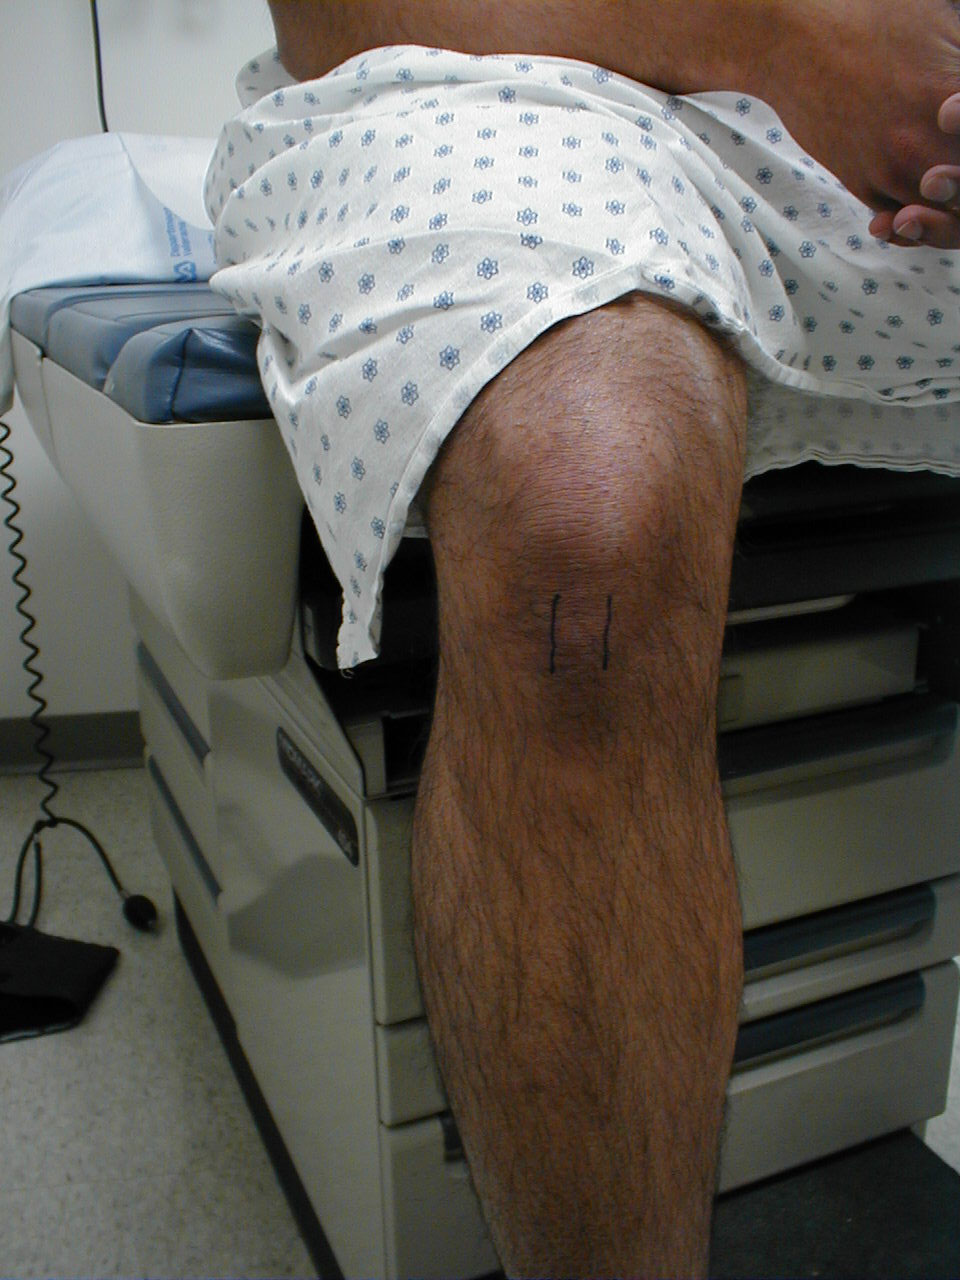
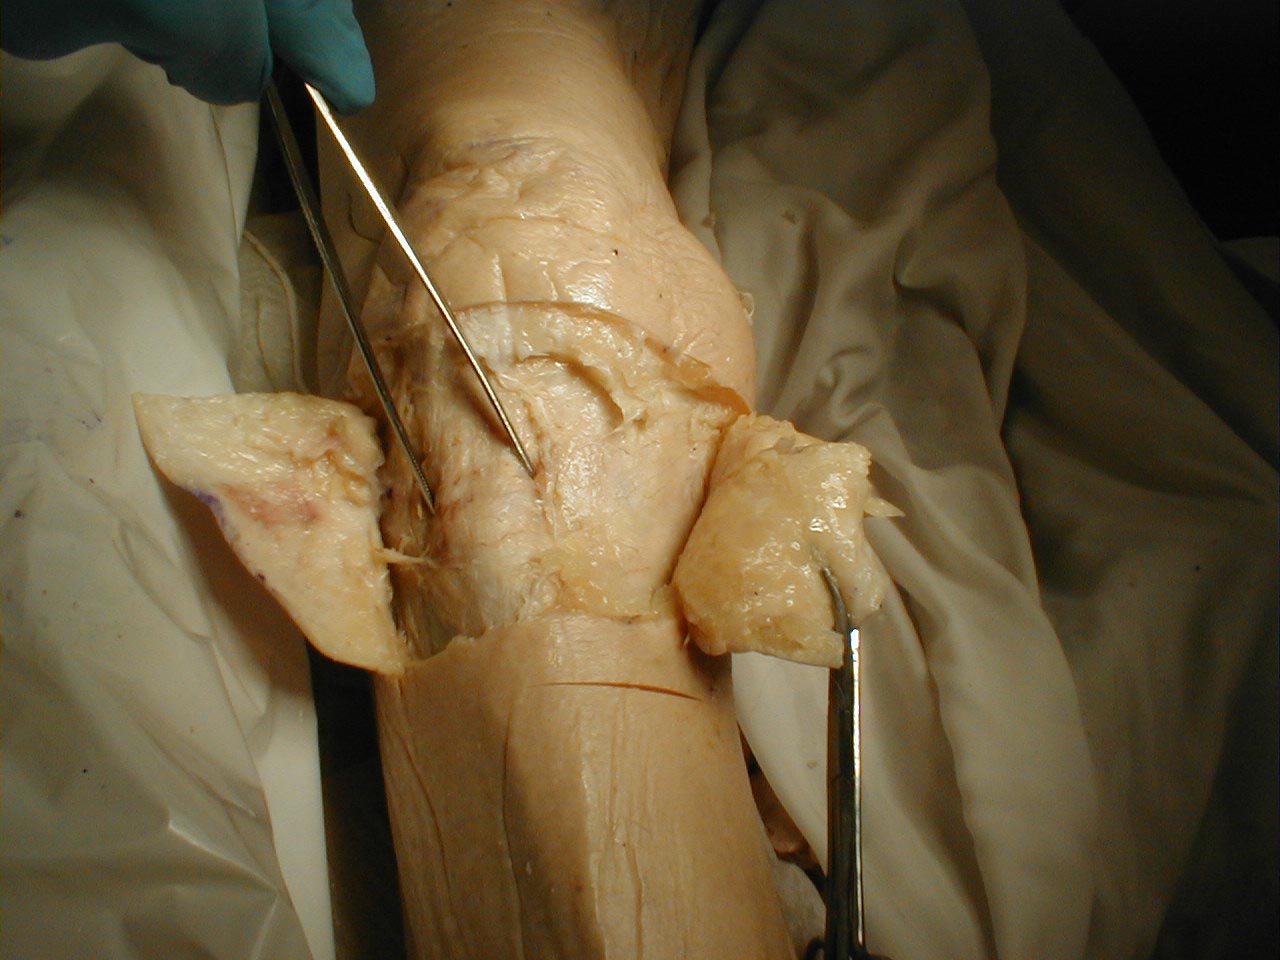
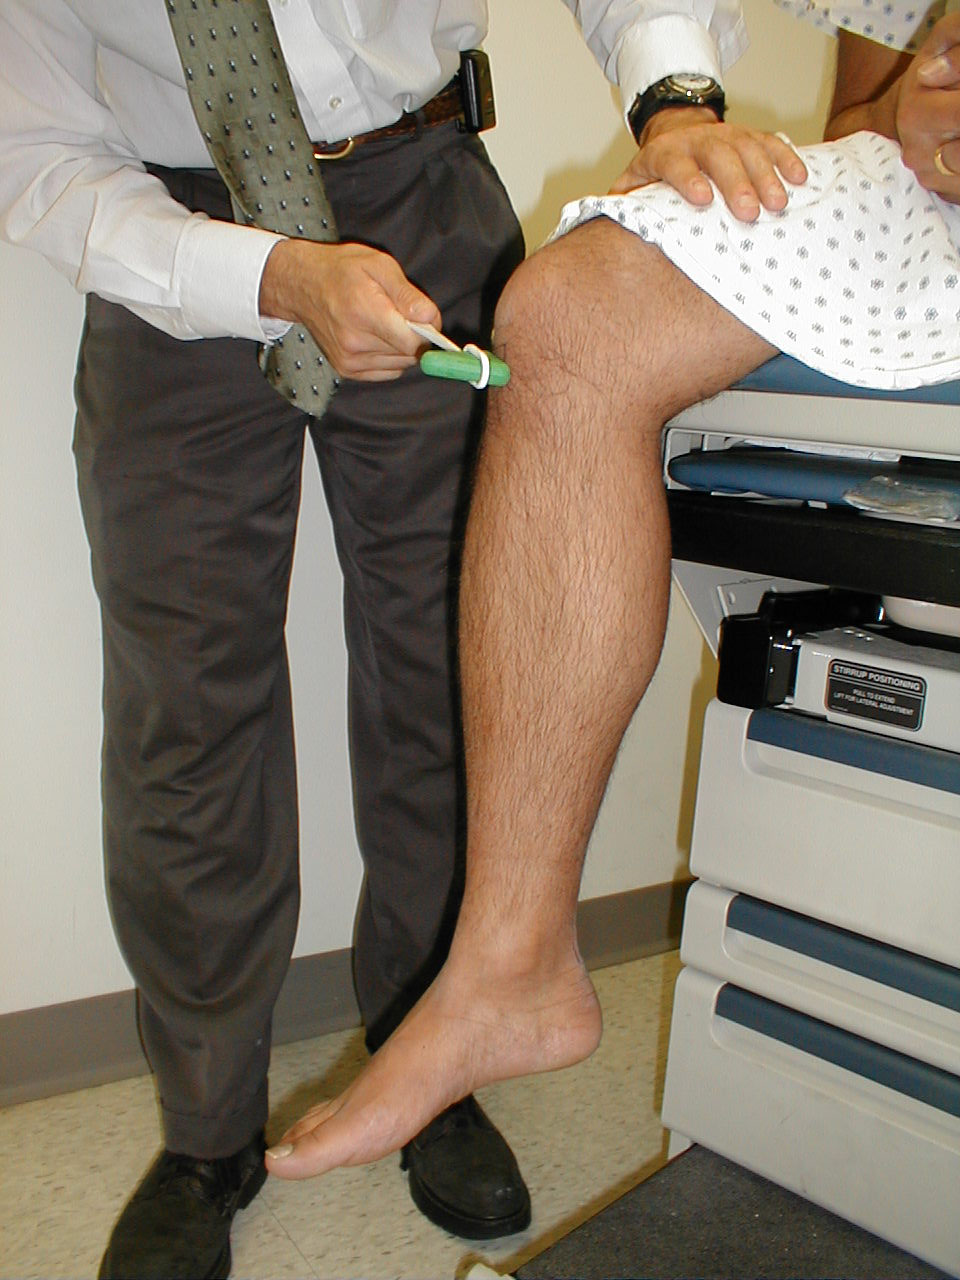
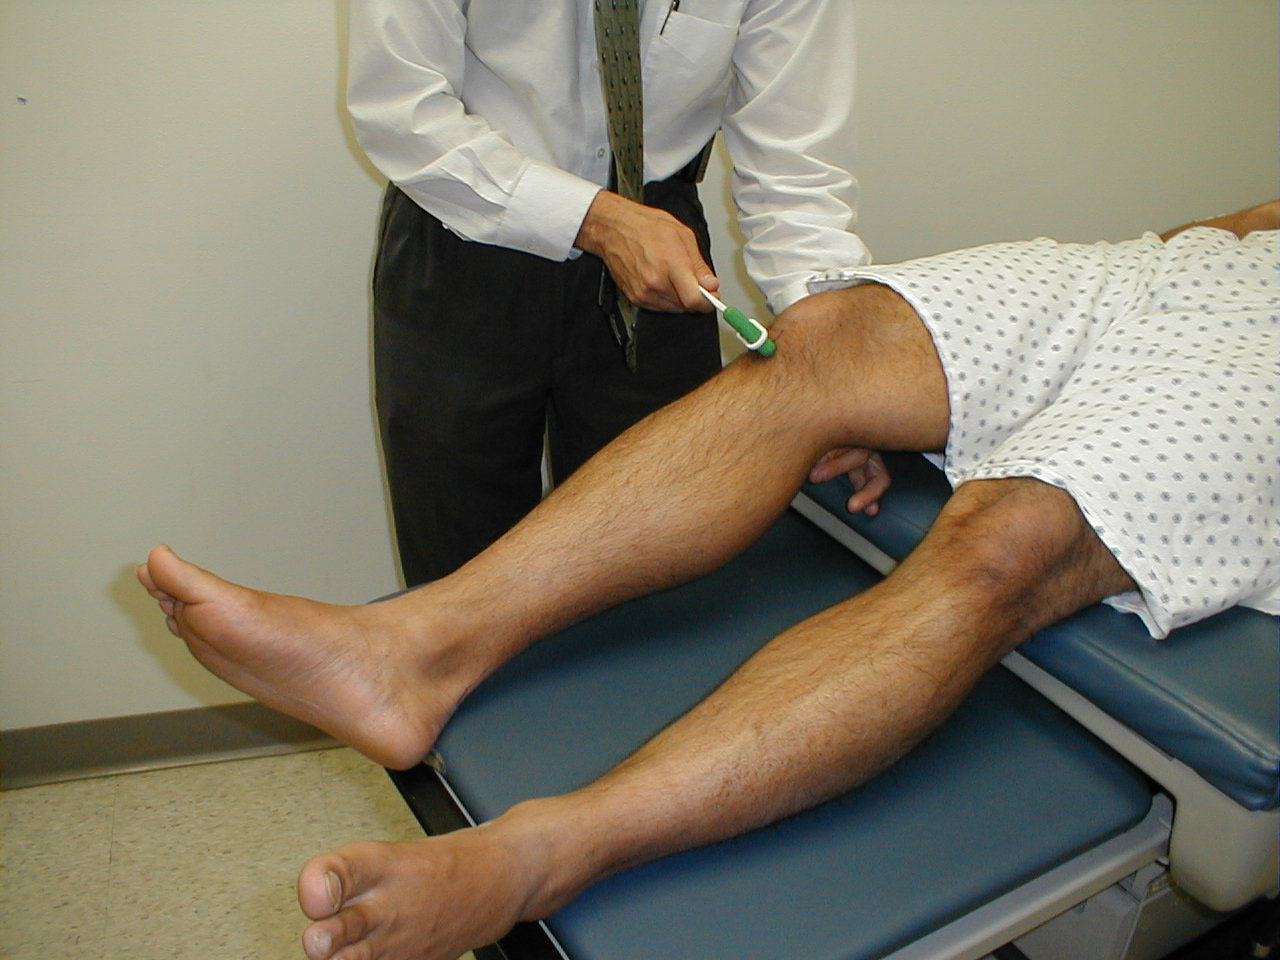
Biceps (C5, C6 - Musculocutaneous Nerve):
- This is most easily done with the patient seated.
- Identify the location of the biceps tendon. To do this, have the patient flex at the elbow while you observe and palpate the antecubital fossa. The tendon will look and feel like a thick cord.
- The patient's arm can be positioned in one of two ways:
- Allow the arm to rest in the patient's lap, forming an angle of slightly more then 90 degrees at the elbow.
- Support the arm in yours, such that your thumb is resting directly over the biceps tendon (hold their right arm with your right; and vice versa).
- Make sure that the biceps muscle is completely relaxed.
- It may be difficult to direct your hammer strike such that the force is transmitted directly on to the biceps tendon, and not dissipated amongst the rest of the soft tissue in the area. If you are supporting the patient's arm, place your thumb on the tendon and strike this digit. If the arm is unsupported, place your index or middle fingers firmly against the tendon and strike them with the hammer.
- Make sure that the patient's sleeve is rolled up so that you can directly observe the muscle as well as watch the lower arm for movement. A normal response will cause the biceps to contract, drawing the lower arm upwards.
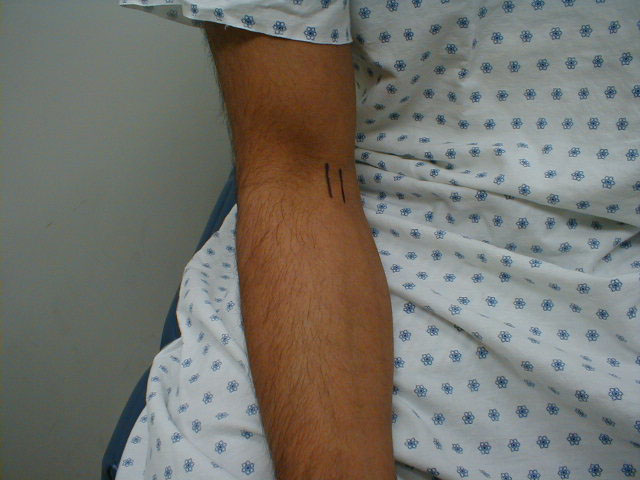
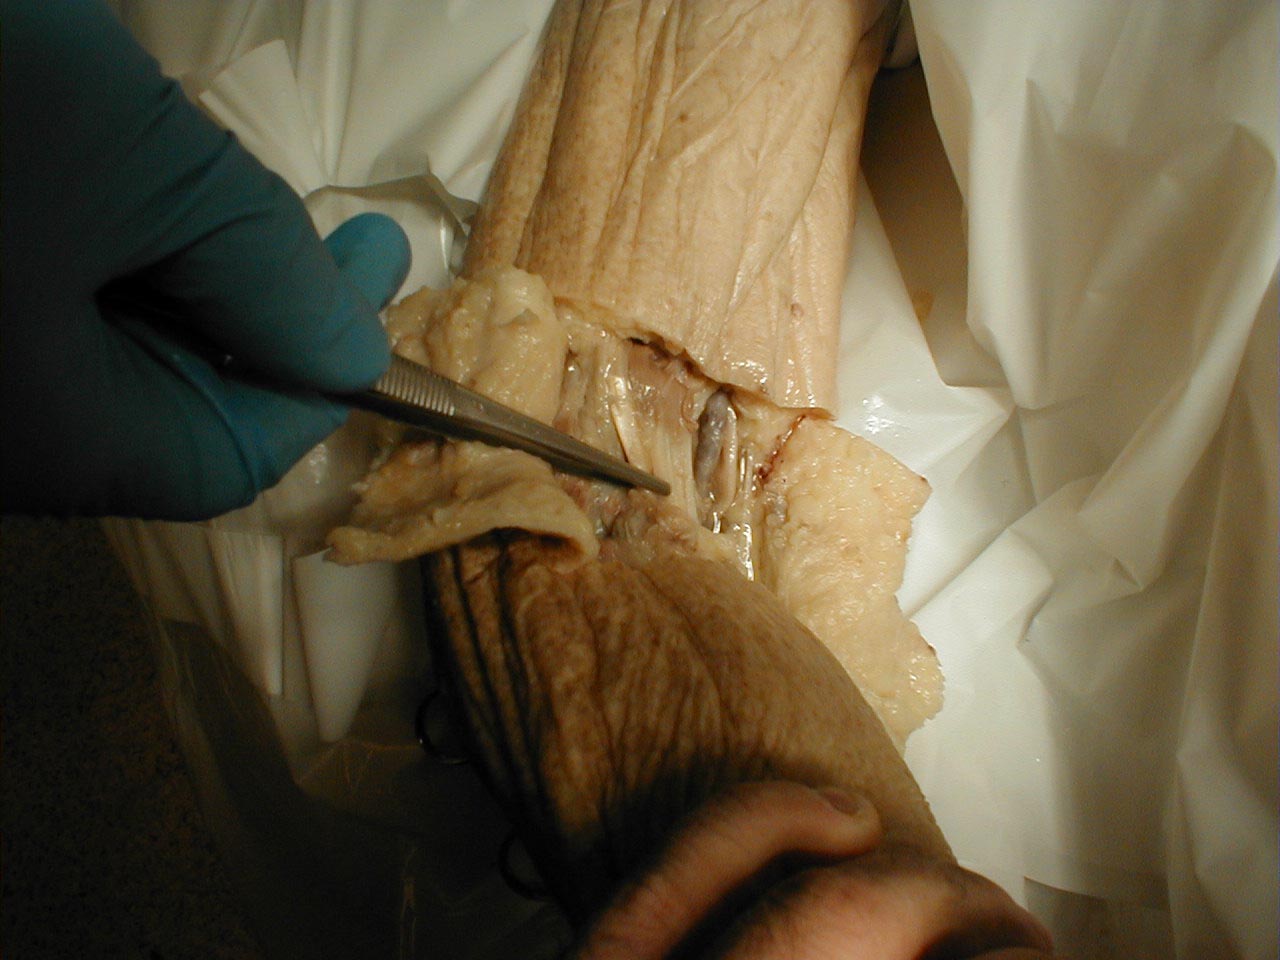
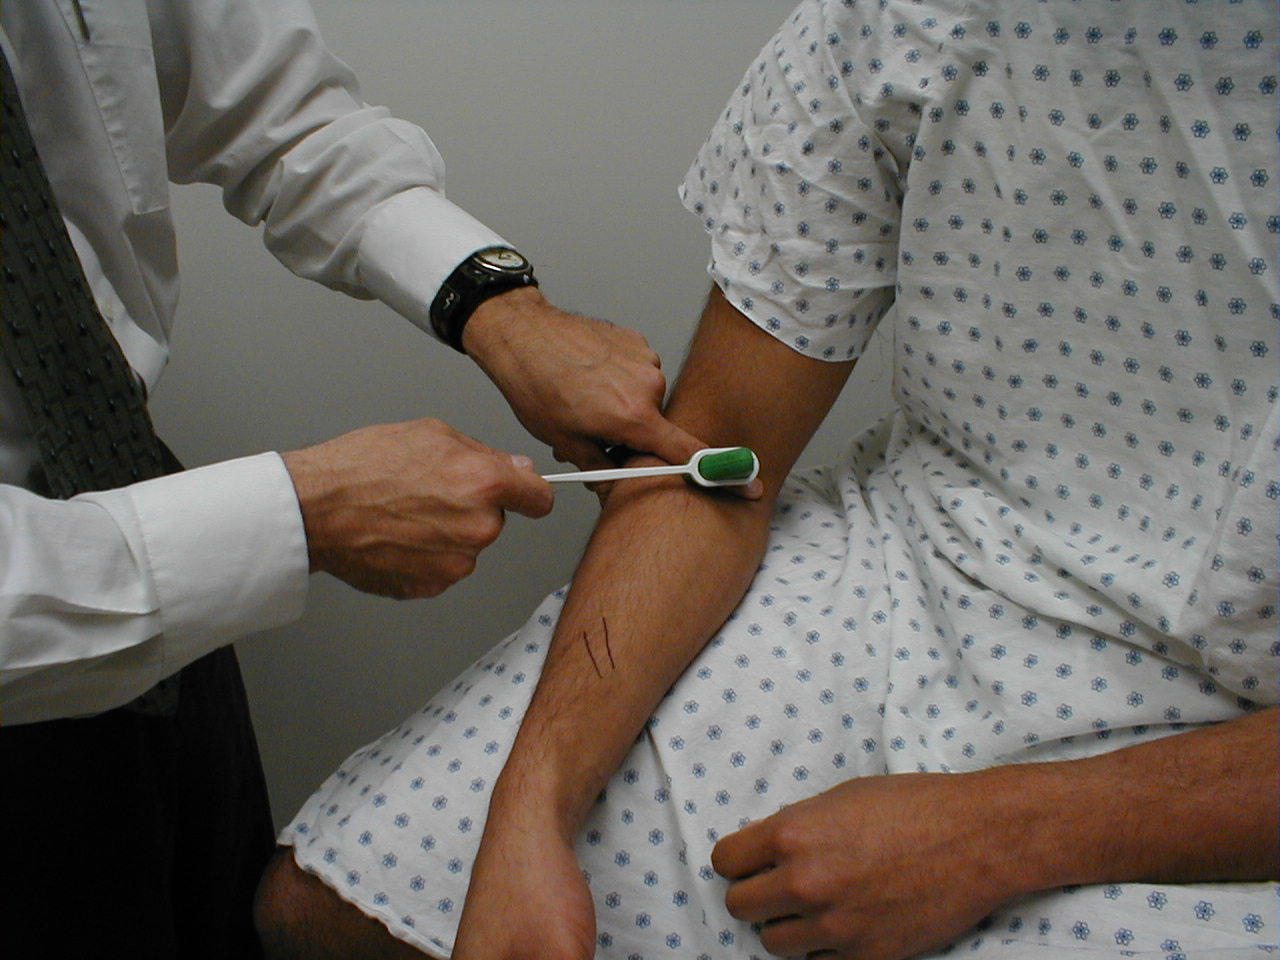
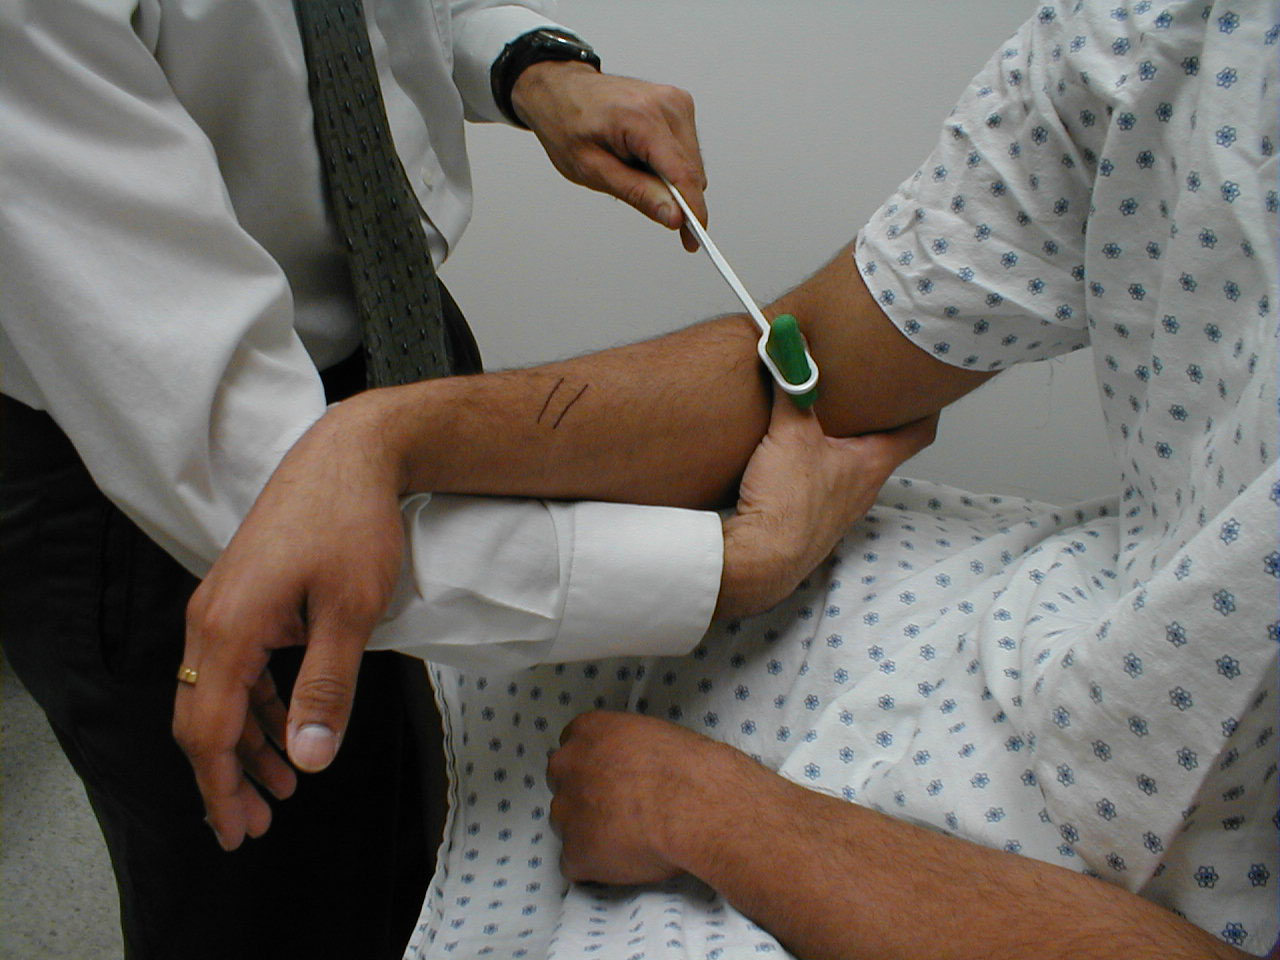
Brachioradialis (C5, C6 - Radial Nerve):
- This is most easily done with the patient seated. The lower arm should be resting loosely on the patient's lap.
- The tendon of the Brachioradialis muscle cannot be seen or well palpated, which makes this reflex a bit tricky to elicit. The tendon crosses the radius (thumb side of the lower arm) approximately 10 cm proximal to the wrist.
- Strike this area with your reflex hammer. Usually, hitting anywhere in the right vicinity will generate the reflex.
- Observe the lower arm and body of the Brachioradialis for a response. A normal reflex will cause the lower arm to flex at the elbow and the hand to supinate (turn palm upward).
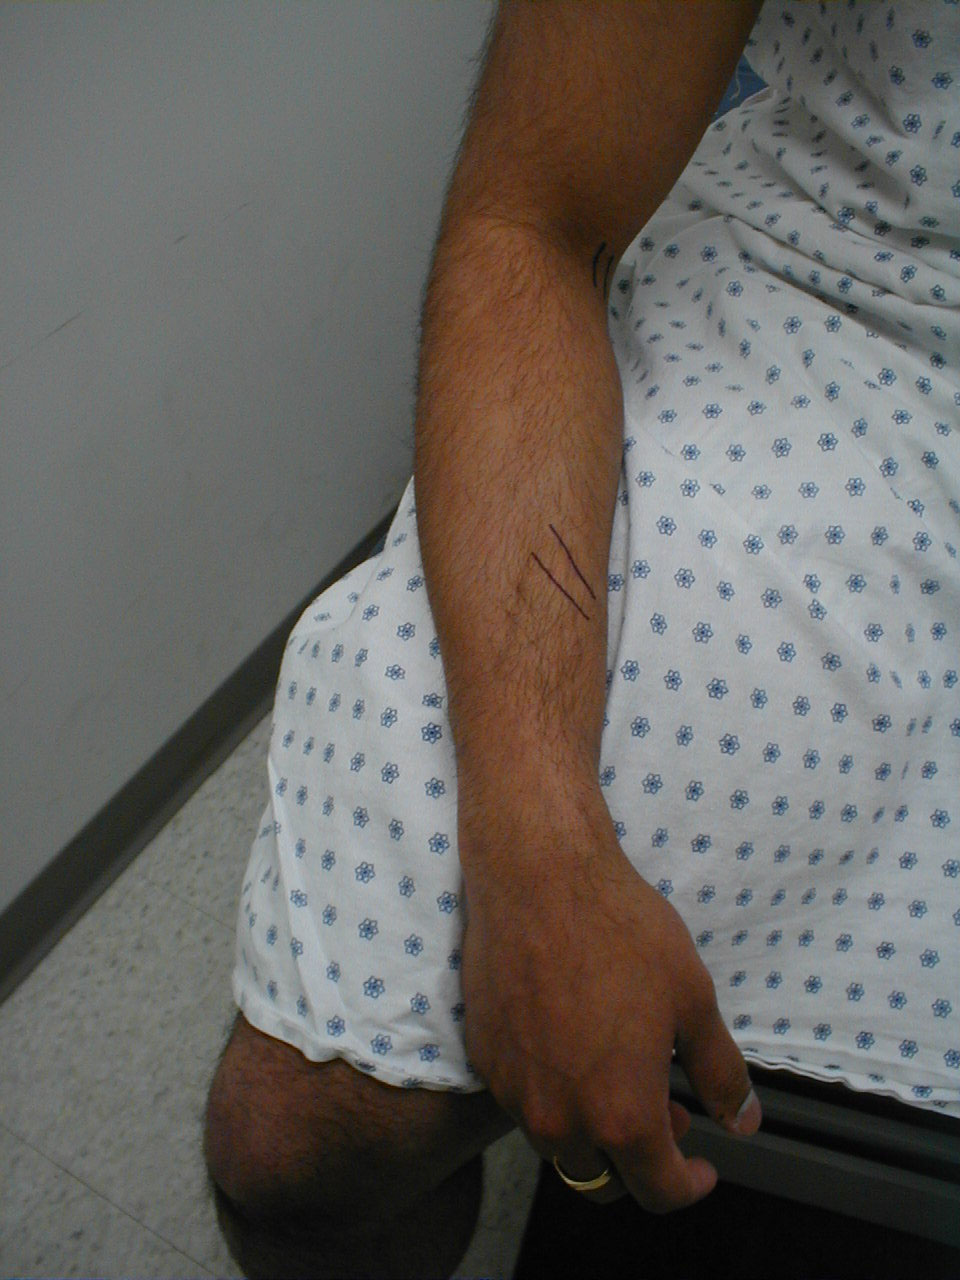
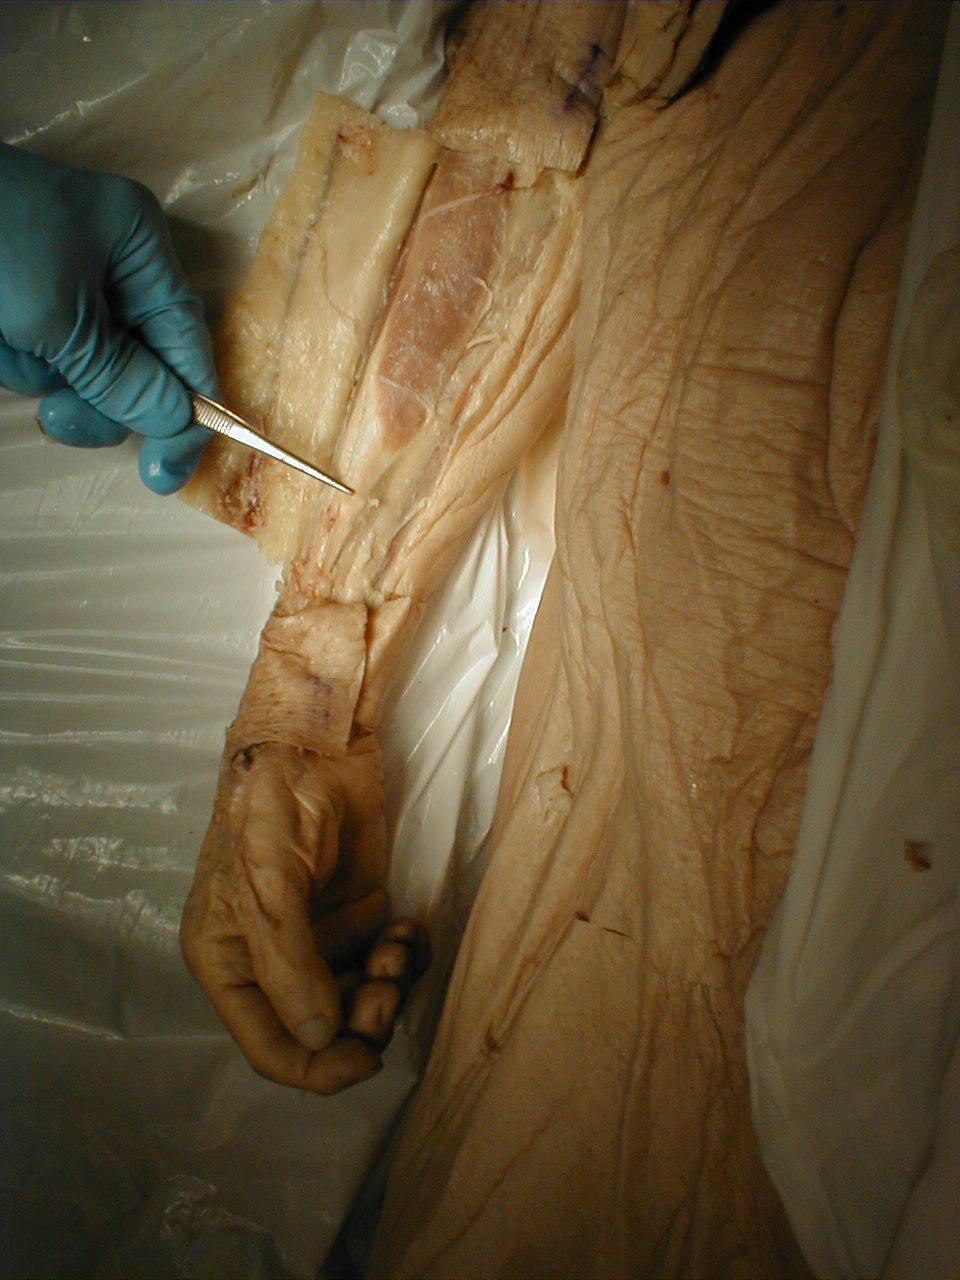
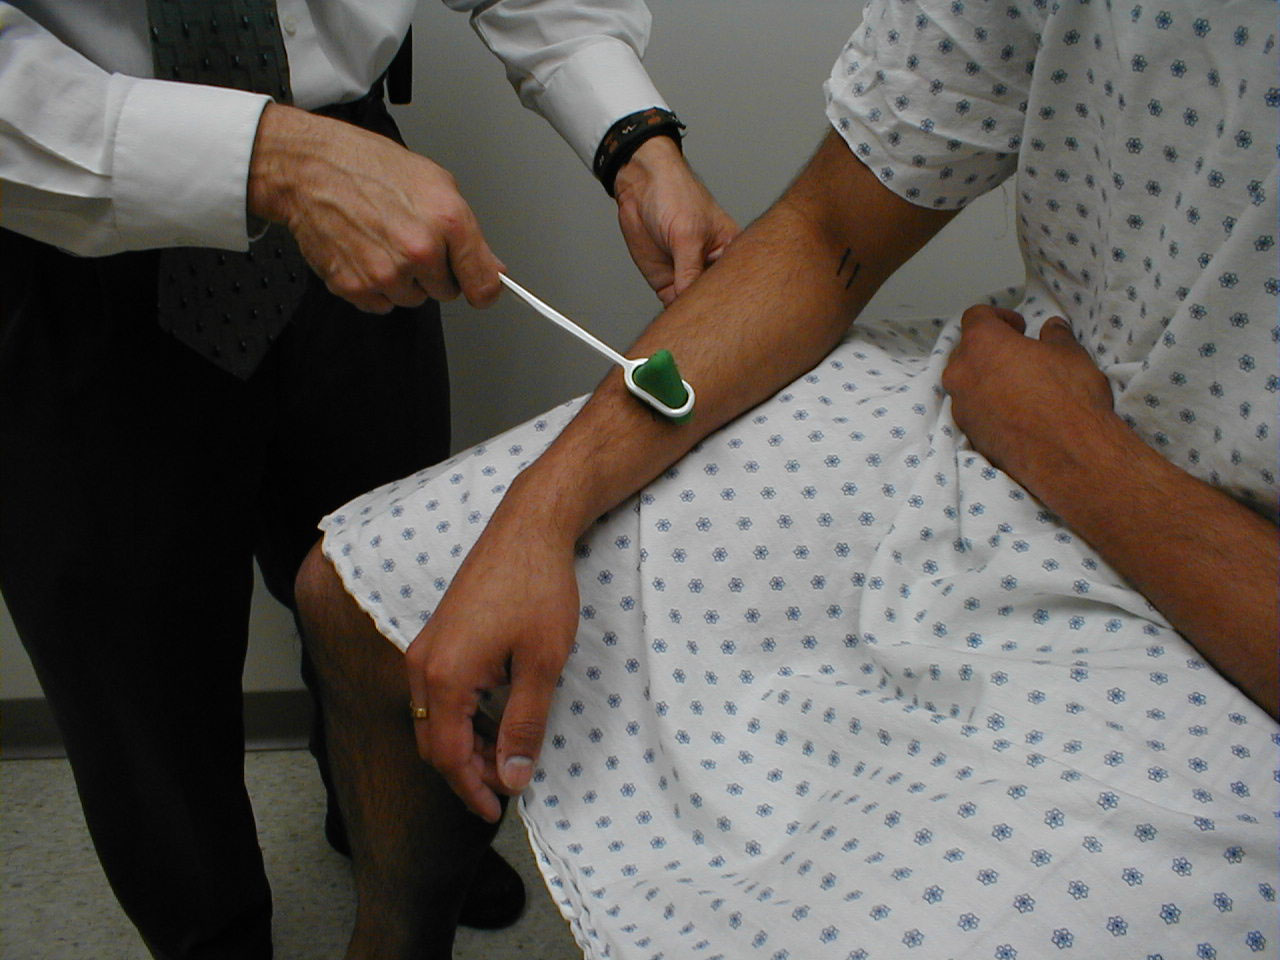
Triceps (C7, C8 - Radial Nerve):
- This is most easily done with the patient seated.
- Identify the triceps tendon, a discrete, broad structure that can be palpated (and often seen) as it extends across the elbow to the body of the muscle, located on the back of the upper arm. If you are having trouble clearly identifying the tendon, ask the patient to extend their lower arm at the elbow while you observe and palpate in the appropriate region.
- The arm can be placed in either of 2 positions:
- Gently pull the arm out from the patient's body, such that it roughly forms a right angle at the shoulder. The lower arm should dangle directly downward at the elbow.
- Have the patient place their hands on their hips.
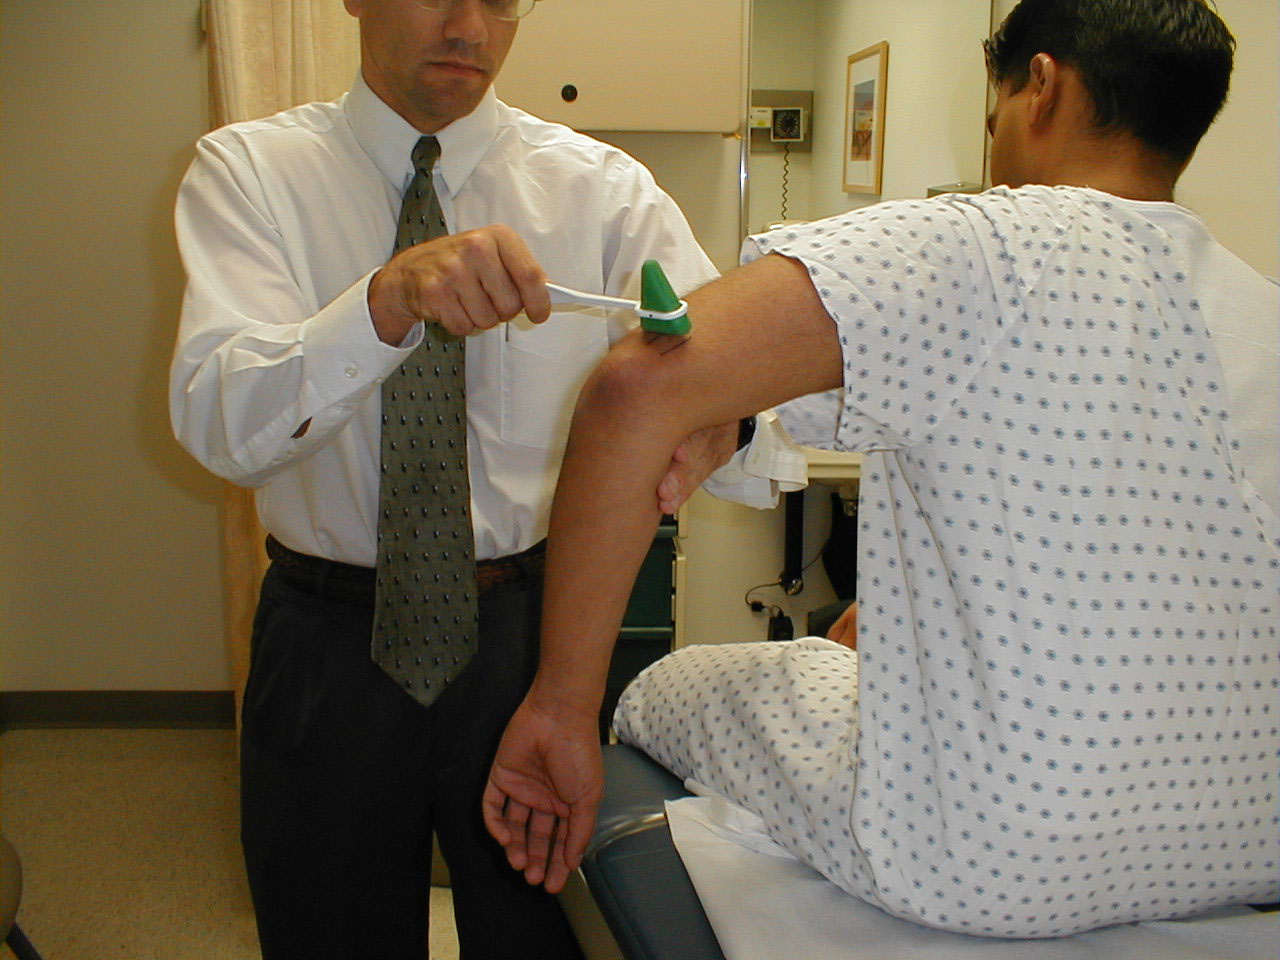 Triceps Reflex, arm supported
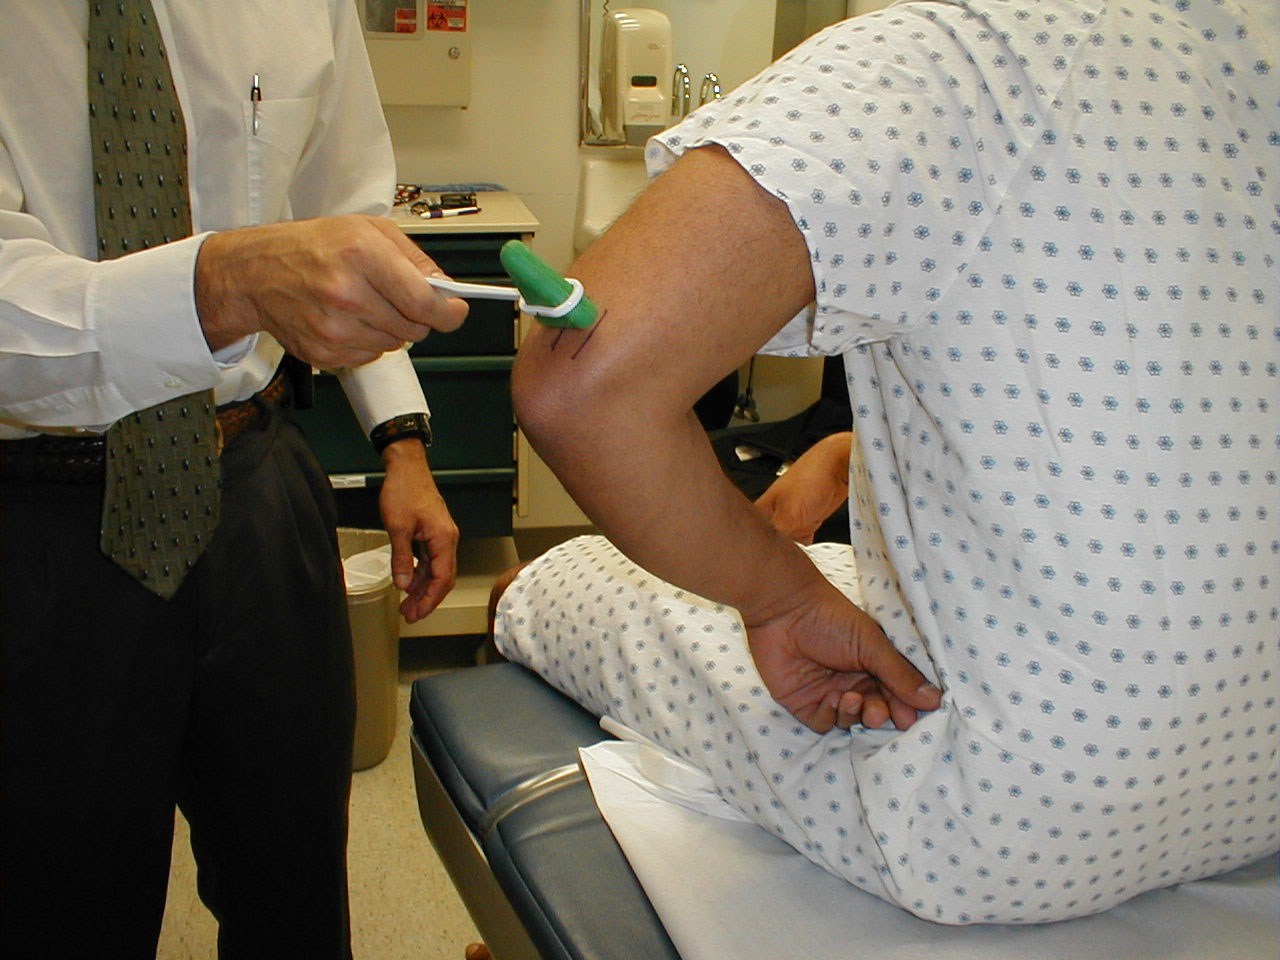 Triceps Reflex, arm unsupported
Either of these techniques will allow the triceps to completely relax.
- If you are certain as to the precise location of the tendon, strike this area directly with your hammer. If the target is not clearly apparent or the tendon is surrounded by an excessive amount of subcutaneous fat (which might dissipate the force of your strike), place your index or middle finger firmly against the structure. Then strike your finger.
- Make sure that the triceps is uncovered, so that you can observe the response. The normal reflex will cause the lower arm to extend at the elbow and swing away from the body. If the patient's hands are on their hips, the arm will not move but the muscle should shorten vigorously .
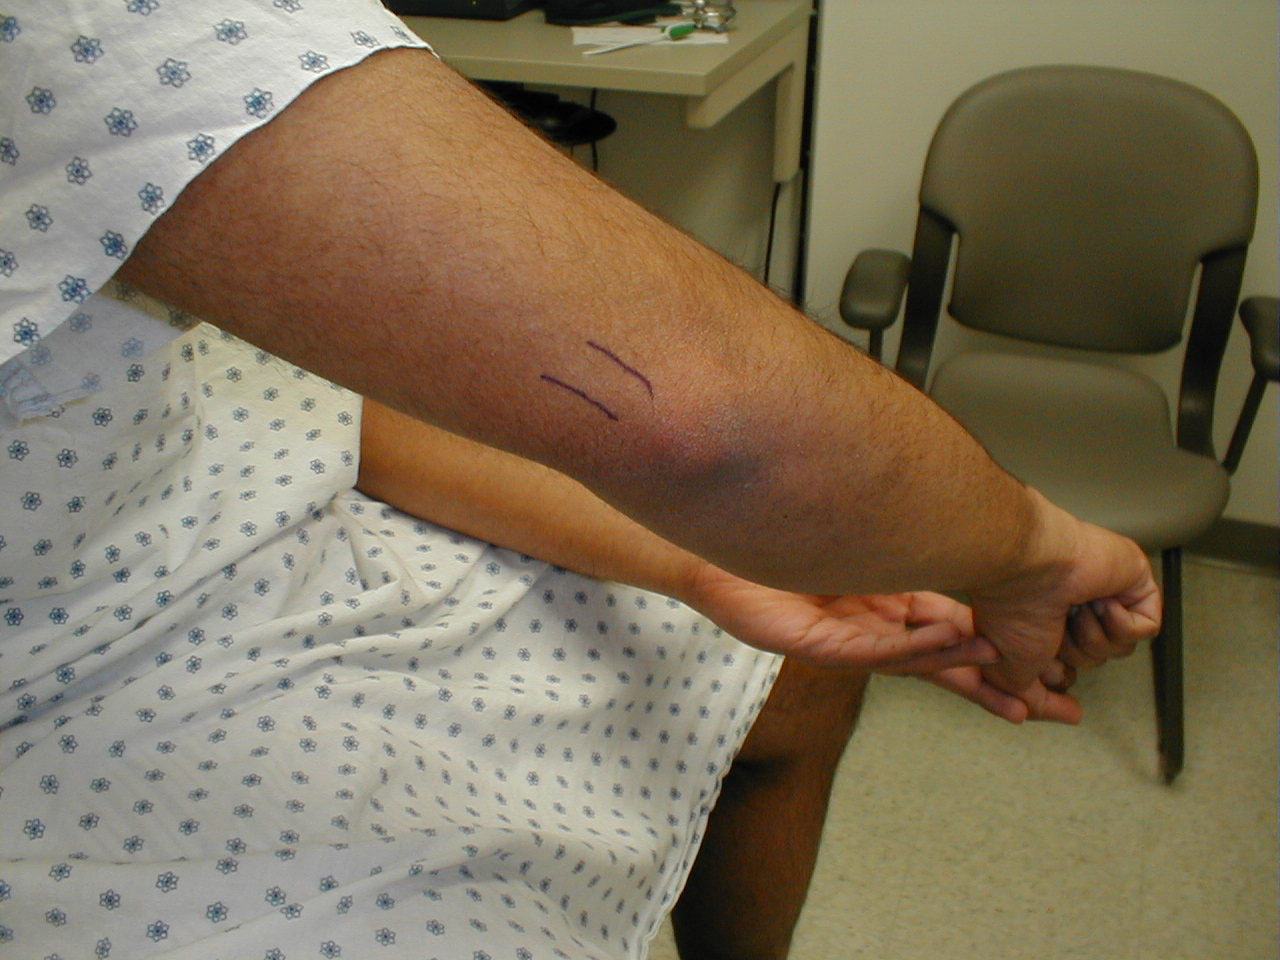
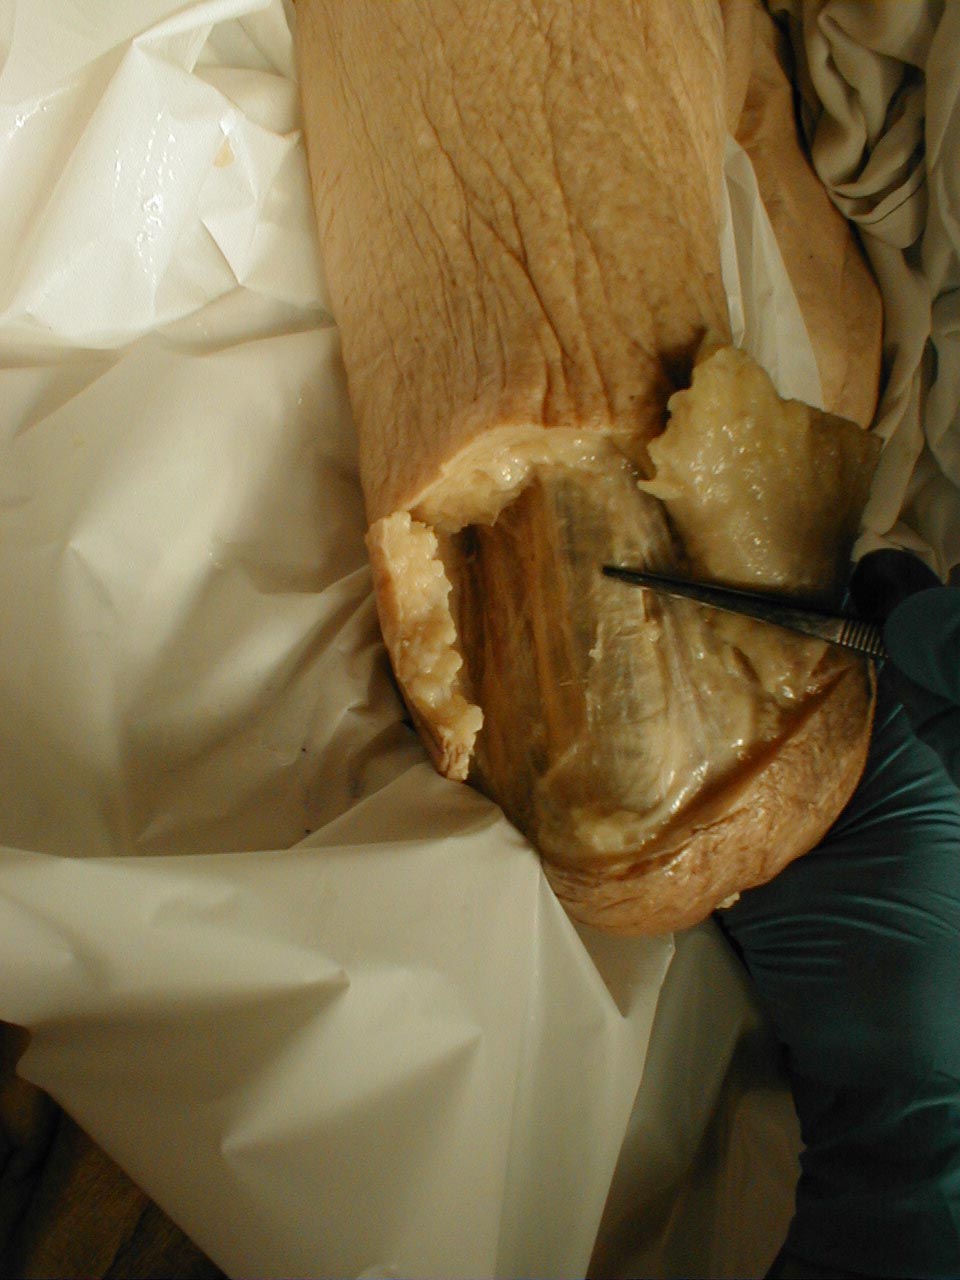
Making Clinical Sense of Reflexes:
Normal reflexes require that every aspect of the system function normally. Breakdowns cause specific patterns of dysfunction. These are interpreted as follows:
- Disorders in the sensory limb will prevent or delay the transmission of the impulse to the spinal cord. This causes the resulting reflex to be diminished or completely absent. Diabetes induced peripheral neuropathy (the most common sensory neuropathy seen in developed countries), for example, is a relatively common reason for loss of reflexes.
- Abnormal lower motor neuron (LMN) function will result in decreased or absent reflexes. If, for example, a peripheral motor neuron is transected as a result of trauma, the reflex dependent on this nerve will be absent.
- If the upper motor neuron (UMN)is completely transected, as might occur in traumatic spinal cord injury, the arc receiving input from this nerve becomes disinhibited, resulting in hyperactive reflexes. Of note, immediately following such an injury, the reflexes are actually diminished, with hyper-reflexia developing several weeks later. A similar pattern is seen with the death of the cell body of the UMN (located in the brain), as occurs with a stroke affecting the motor cortex of the brain.
- Primary disease of the neuro-muscular junction or the muscle itself will result in a loss of reflexes, as disease at the target organ (i.e. the muscle) precludes movement.
- A number of systemic disease states can affect reflexes. Some have their impact through direct toxicity to a specific limb of the system. Poorly controlled diabetes, as described above, can result in a peripheral sensory neuropathy. Extremes of thyroid disorder can also affect reflexes, though the precise mechanisms through which this occurs are not clear. Hyperthyroidisim is associated with hyperreflexia, and hypothyroidism with hyporeflexia.
- Detection of abnormal reflexes (either increased or decreased) does not necessarily tell you which limb of the system is broken, nor what might be causing the dysfunction. Decreased reflexes could be due to impaired sensory input or abnormal motor nerve function. Only by considering all of the findings, together with their rate of progression, pattern of distribution (bilateral v unilateral, etc.) and other medical conditions can the clinician make educated diagnostic inferences about the results generated during reflex testing.
Trouble Shooting
- If you are unable to elicit a reflex, stop and consider the following:
- Are you striking in the correct place? Confirm the location of the tendon by observing and palpating the appropriate region while asking the patient to perform an activity that causes the muscle to shorten, making the attached tendon more apparent.
- Make sure that your hammer strike is falling directly on the appropriate tendon. If there is a lot of surrounding soft tissue that could dampen the force of the strike, place a finger firmly on the correct tendon and use that as your target.
- Make sure that the muscle is uncovered so that you can see any contraction (occasionally the force of the reflex will not be sufficient to cause the limb to move).
- Sometimes the patient is unable to relax, which can inhibit the reflex even when all is neurologically intact. If this occurs during your assessment of lower extremity reflexes, ask the patient to interlock their hands and direct them to pull, while you simultaneously strike the tendon. This sometimes provides enough distraction so that the reflex arc is no longer inhibited.
- Occasionally, it will not be possible to elicit reflexes, even when no neurological disease exists. This is most commonly due to a patient's inability to relax. In these settings, the absence of reflexes are of no clinical consequence. This assumes that you were otherwise thorough in your history taking, used appropriate examination techniques, and otherwise identified no evidence of disease.
The Babinski response is a test used to assess upper motor neuron dysfunction and is performed as follows:
- Use the handle end of your reflex hammer, which is solid and comes to a point.
- The patient may either sit or lie supine.
- Start at the lateral aspect of the foot, near the heel. Apply gentle, steady pressure with the end of the hammer as you move up towards the ball (area of the metatarsal heads) of the foot.
- When you reach the ball of the foot, move medially, stroking across this area.
- Then test the other foot.
- Some patients find this test to be particularly noxious/uncomfortable. Tell them what you are going to do and why. If it's unlikely to contribute important information (e.g. screening exam of the normal patient) and they are quite averse, simply skip it.
Interpretation: In the normal patient, the first movement of the great toe should be downwards (i.e. plantar flexion). If there is an upper motor neuron injury (e.g. spinal cord injury, stroke), then the great toe will dorsiflex and the remainder of the other toes will fan out. A few additional things to remember:
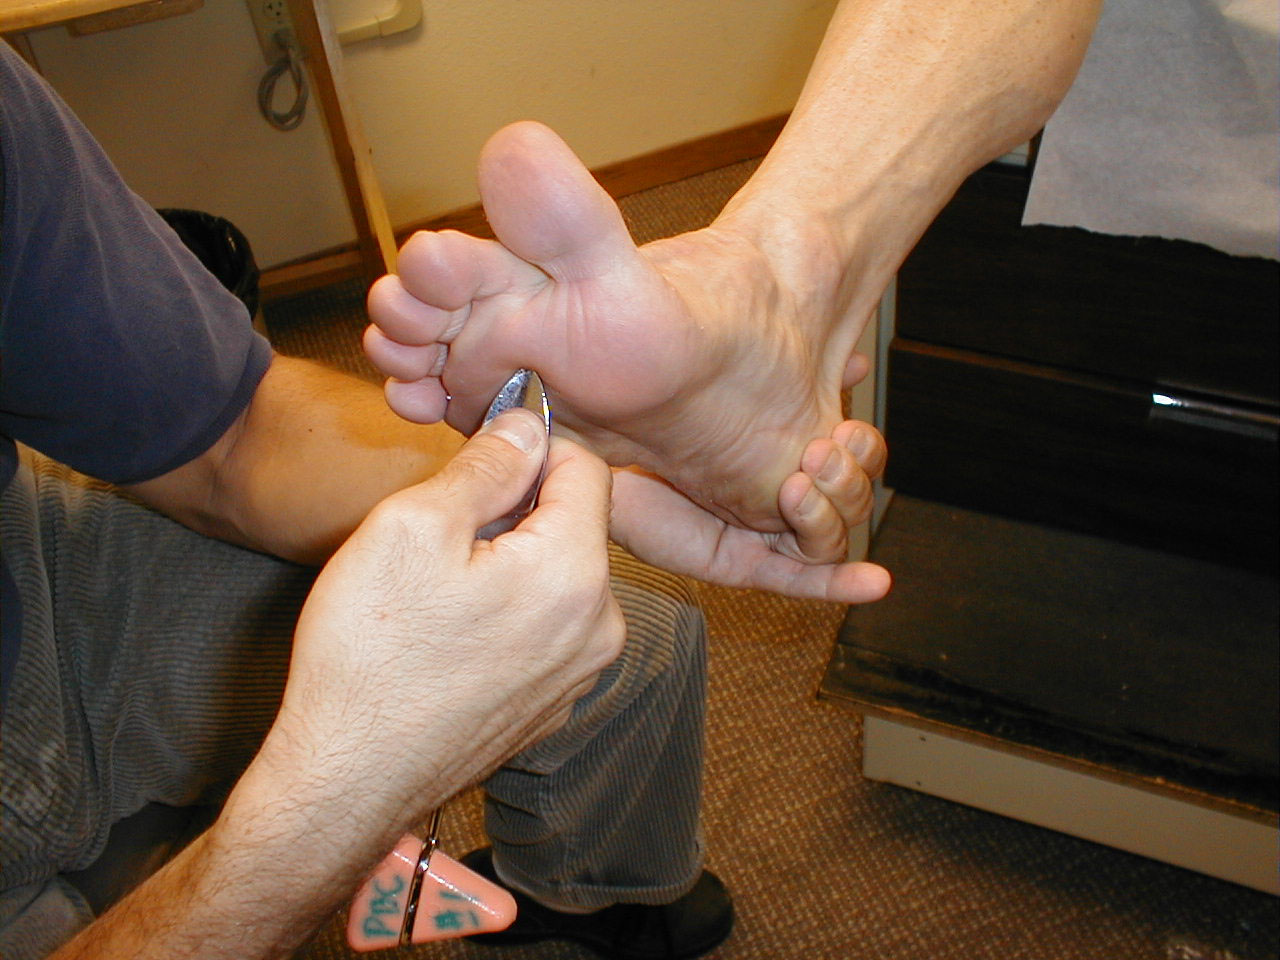
- Newborns normally have a positive Babinksi. It usually goes away after about 6 months.
- Sometimes you will be unable to generate any response, even in the absence of disease. Responses must therefore be interpreted in the context of the rest of the exam.
- If the great toe flexes and the other toes flair, the Babinski Response is said to be present. If not (i.e. normal), it is recorded as absent. For reasons of semantics, the Babinski is not recorded as '+' or '-'.
- Withdrawal of the entire foot (due to unpleasant stimulation), is not interpreted as a positive response.
Coordination
The cerebellum fine tunes motor activity and assists with balance. Dysfunction results in a loss of coordination and problems with gait. The left cerebellar hemisphere controls the left side of the body and vice versa.
Specifics of Testing: There are several ways of testing cerebellar function. For the screening exam, using one modality will suffice. If an abnormality is suspected or identified, multiple tests should be done to determine whether the finding is durable. That is, if the abnormality on one test is truly due to cerebellar dysfunction, other tests should identify the same problem. Gait testing, an important part of the cerebellar exam, is discussed separately (see next section).
- Finger to nose testing:
- With the patient seated, position your index finger at a point in space in front of the patient.
- Instruct the patient to move their index finger between your finger and their nose.
- Reposition your finger after each touch.
- Then test the other hand.
Interpretation: The patient should be able to do this at a reasonable rate of speed, trace a straight path, and hit the end points accurately. Missing the mark, known as dysmetria, may be indicative of disease.
- Rapid Alternating Finger Movements:
- Ask the patient to touch the tips of each finger to the thumb of the same hand.
- Test both hands.
Interpretation: The movement should be fluid and accurate. Inability to do this, known as dysdiadokinesia, may be indicative of cerebellar disease.
- Rapid Alternating Hand Movements:
- Direct the patient to touch first the palm and then the dorsal side of one hand repeatedly against their thigh.
- Then test the other hand.
Interpretation: The movement should be performed with speed and accuracy. Inability to do this, known as dysdiadokinesia, may be indicative of cerebellar disease.
- Heel to Shin Testing:
- Direct the patient to move the heel of one foot up and down along the top of the other shin.
- Then test the other foot.
Intepretation: The movement should trace a straight line along the top of the shin and be done
with reasonable speed.
If the movement is accurate and smooth but slow, the likely
problem is weakness.
Realize that other organ system problems can affect performance of any of these tests. If, for example, the patient is visually impaired, they may not be able to see the target during finger to nose pointing. Alternatively, weakness due to a primary muscle disorder might limit the patient's ability to move a limb in the fashion required for some of the above testing. Thus, other medical and neurological conditions must be taken into account when interpreting cerebellar test results.
Gait Testing
Ability to stand and walk normally is dependent on input from several systems, including: visual, vestibular, cerebellar, motor, and sensory. The precise cause(s) of the dysfunction can be determined by identifying which aspect of gait is abnormal and incorporating this information with that obtained during the rest of the exam. Difficulty getting out a chair and initiating movement, for example, would be consistent with Parkinson's Disease. On the other hand, lack of balance and a wide based gait would suggest a cerebellar disorder. In each case, finding elsewhere in the exam should help point you in the right direction.
For Additional Information See: Gait Disorders
A lot of information about neurological (and other) disorders can be gained from simply watching a patient stand and then walk. For the screening exam, simply observing while the patient walks into your office and gets up and down from the exam table will provide all of the relevant information. If there is suspicion of neurological disease (based on history, other exam findings, observation of gait) then more detailed testing should be performed. Proceed as follows:
- Ask the patient to stand. If they are very weak or unsteady, make sure that you are in a position and capable of catching and supporting them if they fall. Enlist the help of a colleague if you need an extra pair of hands. If you are still unsure as to whether standing/walking can be performed safely, skip this area of testing. No test result is worth a broken hip!
- Have the patient stand in one place. As mentioned above, make sure that you are capable/in position to catch and support them if they fall. This is a test of balance, incorporating input from the visual, cerebellar, proprioceptive, and vestibular systems. If they are able to do this, have them close their eyes, removing visual input. This is referred to as the Romberg test. Loss of balance suggests impaired proprioception, as it is this pathway which should provide input that allows the patient to remain stably upright.
- Ask the patient to stand from a chair, walk across the room, turn, and come back towards
you. Pay particular attention to:
- Difficulty getting up from a chair: Can the patient easily arise from a sitting position? Problems with this activity might suggest proximal muscle weakness, a balance problem, or difficulty initiating movements.
- Balance: Do they veer off to one side or the other as might occur with cerebellar dysfunction? Disorders affecting the left cerebellar hemisphere (as might occur with a stroke or tumor) will cause patient's to fall to the left. Right sided lesions will cause the patient to fall to the right. Diffuse disease affecting both cerebellar hemispheres will cause a generalized loss of balance.
- Rate of walking: Do they start off slow and then accelerate, perhaps losing control of their balance or speed (e.g. as might occur with Parkinson's Disease)? Are they simply slow moving secondary to pain/limited range of motion in their joints, as might occur with degenerative joint disease? etc.
- Atttitude of Arms and Legs: How do they hold their arms and legs? Is there loss of movement and evidence of contractures (e.g. as might occur after a stroke)?
- Heel to Toe Walking: Ask the patient to walk in a straight line, putting the heel of one foot directly in front of the toe of the other. This is referred to as tandem gait and is a test of balance. Realize that this may be difficult for older patients (due to the frequent coexistence of other medical conditions) even in the absence of neurological disease.
Making Sense of Neurological Findings
While compiling information generated from the motor and sensory examinations, the clinician tries to identify patterns of dysfunction that will allow him/her to determine the location of the lesion(s). What follows is one way of making clinical sense of neurological findings.
- Is there evidence of motor dysfunction (e.g. weakness, spasticity, tremor)?
- If so, does the pattern follow an upper motor neuron or lower motor neuron pattern?
- If it's consistent with a UMN process (e.g. weakness with spasticity), does this appear to occur at the level of the spinal cord or the brain? Complete cord lesions will affect both sides of the body. Brain level problems tend to affect one side or the other. It is, of course, possible for a lesion to affect only part of the cord, leading to findings that lateralize to one side (see below, under description of Brown Sequard lesion).
- Is it consistent with an LMN process (e.g. weakness with flaccidity)? Does the weakness follow a specific distribution (e.g. following a spinal nerve root or peripheral nerve distribution)? Bilateral? Distal?
- Do the findings on reflex examination support a UMN or LMN process (e.g. hyper-reflexic in UMN disorders; hyporeflexic in LMN disorders)?
- Do the findings on Babinski testing (assuming the symptoms involve the lower extremities) support the presence of a UMN lesion?
- Is there impaired sensation? Some disorders, for example, affect only the Upper or Lower motor pathways, sparing sensation.
- Which aspects of sensation are impaired? Are all of the ascending pathways (e.g. spinothalamic and dorsal columns) affected equally, as might occur with diffuse/systemic disease?
- Does the loss in sensation follow a pattern suggestive of dysfunction at a specific anatomic level? For example, is it at the level of a Spinal nerve root? Or more distally, as would occur with a peripheral nerve problem?
- Does the distribution of the sensory deficit correlate with the "correct" motor deficit, assuming one is present? Radial nerve compression, for example, would lead to characteristic motor and sensory findings.
Information from the sensory, motor and reflex examinations should correlate with one another, painting the best picture of where the level of dysfunction is likely to exist. A few examples of injuries resulting in characteristic patterns of motor and sensory loss are described below:
Example 1
In the setting of a suspected acute spinal cord injury at the T 10 vertebral level, for example, the following might be identified on detailed neurological examination:
| Sensation: | Absence of ability to sense pin prick, vibration or propriocetion below the level of the umbilicus. |
| Strength: | No movement of the lower extremities (e.g. paralysis). |
| Tone: | Initially, decreased. Over weeks, tone increases with progression to spasticity and contractures of the lower extremities. |
| Reflexes: | Initially, absent Achilles and Patellar reflexes. After a few weeks, these will become hyperreflexic and demonstrate clonus. |
| Babinksi | Toes will be up-going bilaterally (i.e. Babinski response will be present). |
Example 2
Partial Cord Transection - The Brown-Sequard Lesion: A knife injury, for example, might damage only the right half of the cord at the T 10 level. This would result in the following findings on detailed exam:
| Sensation: | The patient would be unable to identify the pin stimulus on the left side of his body (remember that the spinothalamacs cross soon after entering the cord) below the level of the injury. Vibratory sensation would be impaired on the right side of the body below the level of the injury, as these paths do not cross over until they reach the base of the brain. |
| Strength: | The patient would be unable to move their right leg. |
| Tone: | Initially, decreased in the right leg. Over weeks, tone increases, with progression to spasticity. |
| Reflexes: | Initially, absent at the right Patellar and Achilles. After a few weeks becoming hyper-reflexic. |
| Babinksi | Up-going toe on the right |
Several additional examples of specific patterns of nerve injury/dysfunction can be found via the following links:
University of Wisconsin, Anatomy and pathophysiology of spinal cord copression syndromes
University of Wisconsin, Anatomy and pathophysiology of motor weakness
University of Wisconsin, Examples of various radiculopathies
A few final comments about diagnosing neurologic disorders:
It is also important to note that the pace at which a particular disorder develops will have a dramatic effect on symptoms and exam findings. Acute dysfunction (as might occur with a stroke) generally causes obvious symptoms as the loss of function is abrupt, allowing the patient no time to develop compensatory mechanisms. Patient presentation will also be affected by the size and location of the lesion. Larger lesions or those affecting critical areas of function tend to generate more overt problems. Additionally, patients with pre-existing medical or neurological dysfunction may well tolerate new lesions poorly. In contrast, disorders which occur more slowly tend to cause relatively subtle symptoms. For example, toxin induced damage to the cerebellum can result in profound atrophy of this region of the brain. While imaging may reveal significant volumetric loss, exam findings can remain relatively minimal. These same principles apply to most other aspects of the physical examination.