The Pelvic Examination
- OB/Gyn History
- Indications and Getting Started
- Observation
- Speculum Exam
- Bi-Manual Exam
- Recto-Vaginal Exam
- Conclusion
Obtaining the OB/GYN History:
The core elements of the Obstetrics and Gynecologic (Ob/Gyn) history include:
- Menstrual History
- Age at menarche (onset of menstruation) and/or menopause (end of menstruation)?
- Last menstrual period (LMP)?
- Frequency, duration and quantity of menses?
- Any specific premenstrual symptoms or pain with menses (dysmenorrhea)?
- Any vaginal discharge or discomfort?
- Sexual History
- Engagement in sexual activity? If so, with partners of same sex, opposite or both?
- Pain with sexual activity (dyspareunia)? Level of sexual satisfaction?
- Number of sexual partners?
- Any history of sexually transmitted infections (STIs), including: gonorrhea, chlamydia, syphilis, HIV, Hepatitis B, HPV, HSV, Trichomonas?
- Contraception (if/when sexually active)
- Any specific method used in past or currently?
- Any specific method to guard against STIs?
- History of pap smear screening - recognizing that this might have been done in a different
health system with results otherwise unknown to you.
- Last pap smear and frequency of exams?
- Any prior abnormal pap smears? If so, what was done?
- History of breast cancer screening - recognizing that this might have been done in a
different health system with results otherwise unknown to you.
- Mammogram screening done? If so, when? What frequency? Results?
- Self breast examination? If yes, with what frequency? And should review technique during that part of the exam.
- Obstetric History
- Terminology (GTPAL): Gravida (G) = total number of pregnancies; Term deliveries (T) = total number or deliveries after 37wks; Preterm deliveries (P) = number deliveries prior to 37 wks; Abortions (A) Spontaneous miscarriage or elective termination prior to 20 wks; Living Children (L) live births
- Previous pregnancies? Any complications? Outcomes?
- If prior pregnancies, mode of delivery (vaginal or cesarean section)?
- Rest of history (PMH, PSH, Social, etc.) is similar to the general form taught elsewhere,
with a few things to highlight:
- Family History: Should include specific questions about breast cancer and gynecologic cancers (i.e. cervix, uterus, ovaries, vulva and vagina) - as these have a particularly strong heritable component.
- Review of systems
- If there is a Chief Concern (CC) related to an Ob/Gyn topic, define this as you would any other CC. Note that gynecologic processes and pathology can cause GI or GU symptoms.
Pelvic Exam
Indications: The pelvic exam is typically done in a number of settings:- As part of cervical cancer screening, which involves a PAP smear. For an average risk woman,
this is offered starting at age 21, and is repeated every 3 years if the findings are
normal.
- Beginning at age 30, adding testing for HPV can allow the interval to be extended to every 5 years (assuming everything is normal). This is due to the fact that almost all cervical cancer cases are related to HPV infection. Thus, if no infection is detected, the interval between tests can be lengthened. It's worth noting that it takes years for HPV to cause the changes that lead to cancer. And most HPV infections will be cleared by the host without sequelae. Comparison of recommendations for cervical cancer screening.
- Some abnormal PAPs will necessitate additional testing (e.g. colposcopy, biopsy) and treatments. ASCCP Guidelines on Management of Abnormal PAPs.
- F/U for higher risk patients (e.g. HIV+, past abnormal PAP) are described in other guidelines.
- In the setting of lower abdominal or vaginal symptoms (e.g. vaginal bleeding or discharge, lower abdominal pain, vaginal based masses/ulcers, and several other symptoms or exposures).
- Pregnancy
- In the setting of a gynecological procedure or surgery, to further understand the size and shape of the uterus (e.g. prior to IUD placement).
Preparation: Pelvic exams are invasive and require discussion with the patient
prior to beginning. This should include the rationale for the exam, the steps involved so that
they know what to expect, and obtaining their verbal consent prior to proceeding. Even if
someone has had a pelvic exam in the past, it's important to not make assumptions. The patient
can opt out, though it's relevant to try to understand why. A chaperone should be present,
serving as both an observer and 2nd pair of hands. All necessary equipment should be present and
the table used should have foot rests and be adjustable to maximize patient comfort. Provide the
patient with privacy so that they can put on a gown and remove any undergarments. Allow them the
opportunity to urinate prior to starting as a full bladder can make the exam uncomfortable. All
maneuvers should be done gently, with clear explanations provided about what to expect prior to
each step.
Many patients have experienced physical or sexual trauma in their lifetime that they may or may
not disclose. Survivors of trauma report that speculum and pelvic exams can be stressful,
causing pain and anxiety. Providers can create a safer space for trauma-informed care if they
take their time, move slowly, and allow the patient to stop the exam at any time.
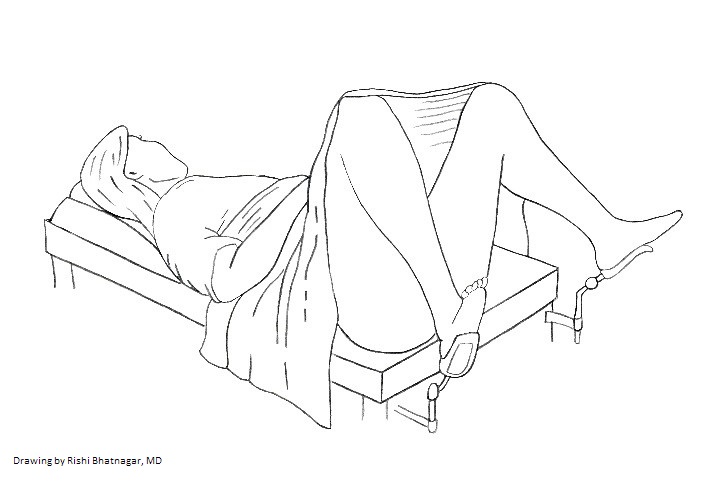
Positioning: The patient should be supine. Elevating the head of the table to 30 degrees usually makes the exam more comfortable (check with the patient). Extend the foot rests, ask the patient to place their feet in them, and then have them scoot towards the end of the table so that their bottom reaches the edge (you can put your hand there so that they have a target to reach). Arrange the sheet so that that it covers up to their knees.Ask the patient to position their legs so that there is space for you to sit and perform the exam. Use verbal cues to assist them in positioning their legs and avoid pushing them open with your hands. It's helpful if the room is warm and has good lighting.
Observation and Visual Inspection:
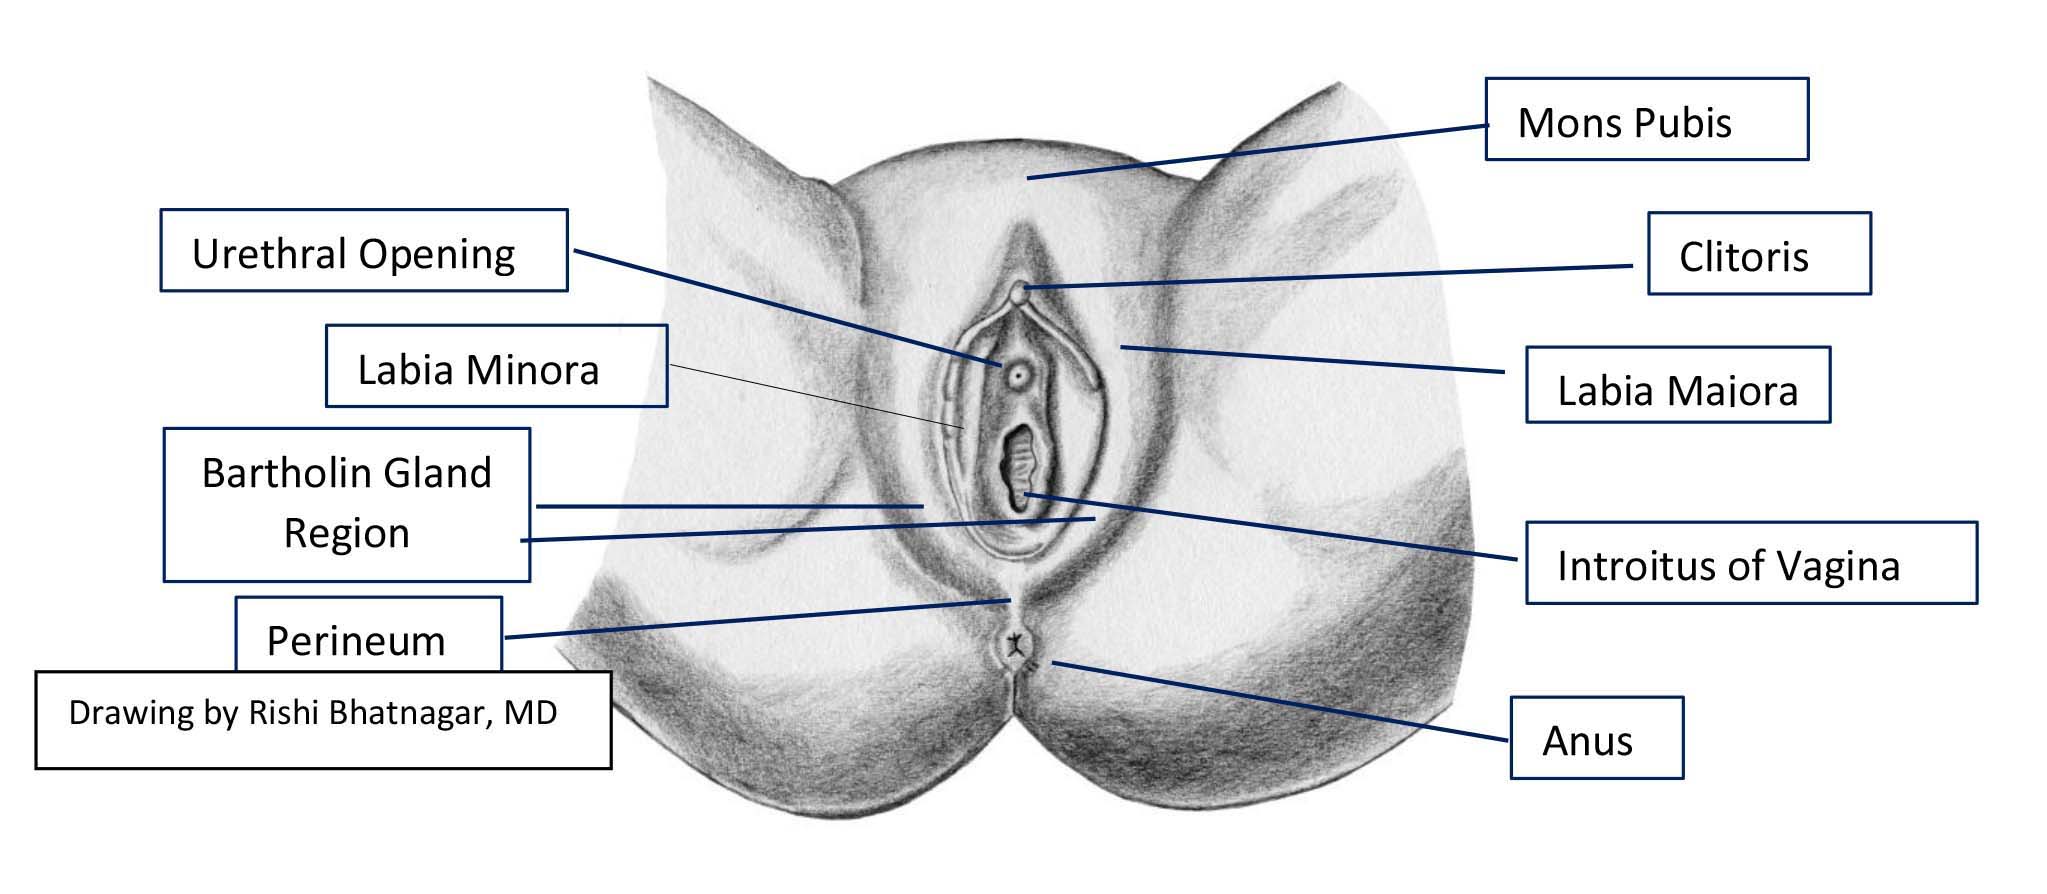
Explain what you're doing at each step. Identify the following external structures:
Mons Pubis
Labia Majora
Labia Minora (has no hair)
Clitoris and clitoral hood
Urethral opening
Vaginal opening (introitus)
Bartholin glands area
Perineum
Anus
Palpation of discrete structures can be done as indicated by the presence of observed
abnormalities or symptoms.
A few common abnormalities that might be noted include:
- Mucosal appearance can be thin, reflecting atrophy that can occur post-menopausal. Also, level of lubrication, which can also decrease post-menopausal.
- Any discharge, noting that a small amount of thin d/c, without odor is normal
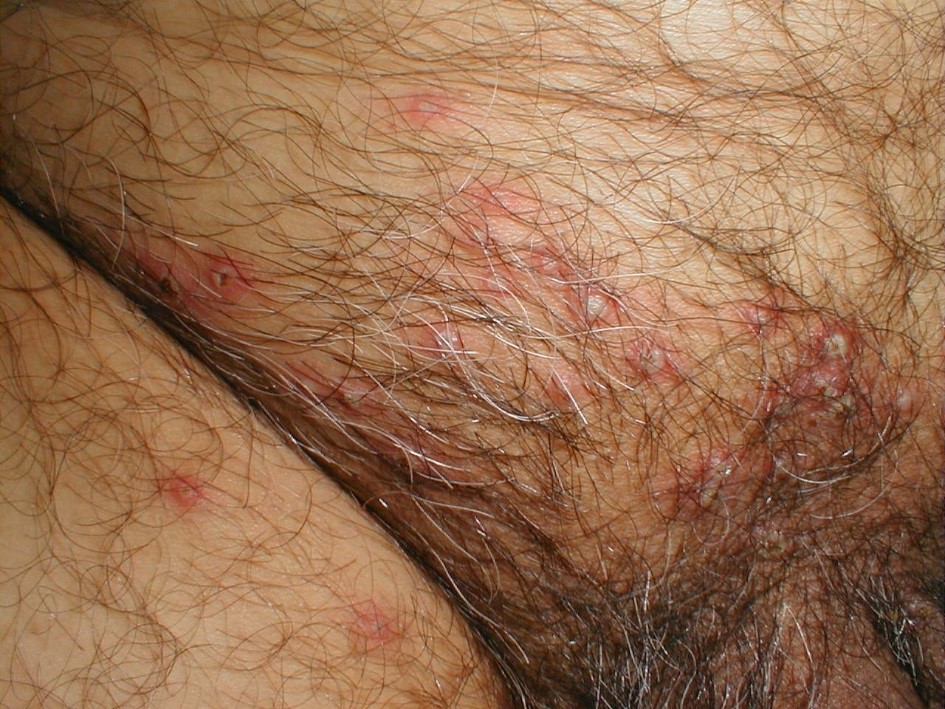
- Evidence of HSV infection. Typically clusters of vesicles on a red base. Often
associated w/itching or burning sensation.
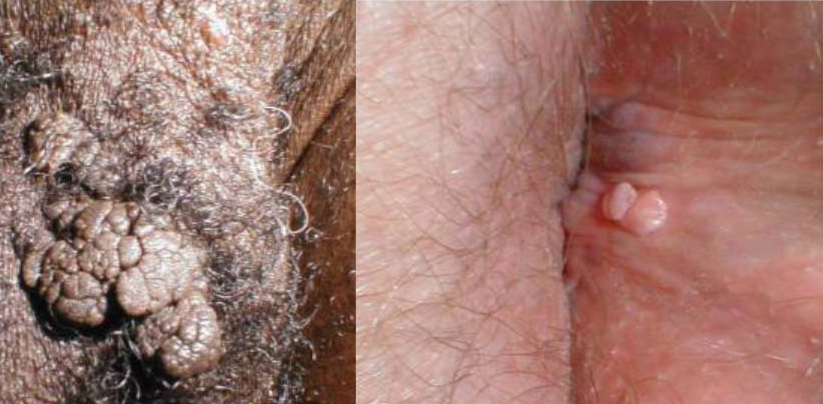
- Evidence of HPV infection, typically genital or perianal area. Can be isolated or
clusters of bumps, which often have cauliflower-like appearance.
- Any other ulcers, masses, skin or mucosal findings. More info: Digital DDx: Vaginal Ulcers/Masses
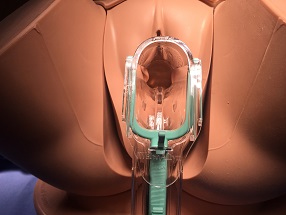
Speculum Exam:
Gain comfort with the speculum prior to using it with a patient. Show it to the patient and describe what you're going to do prior to starting.
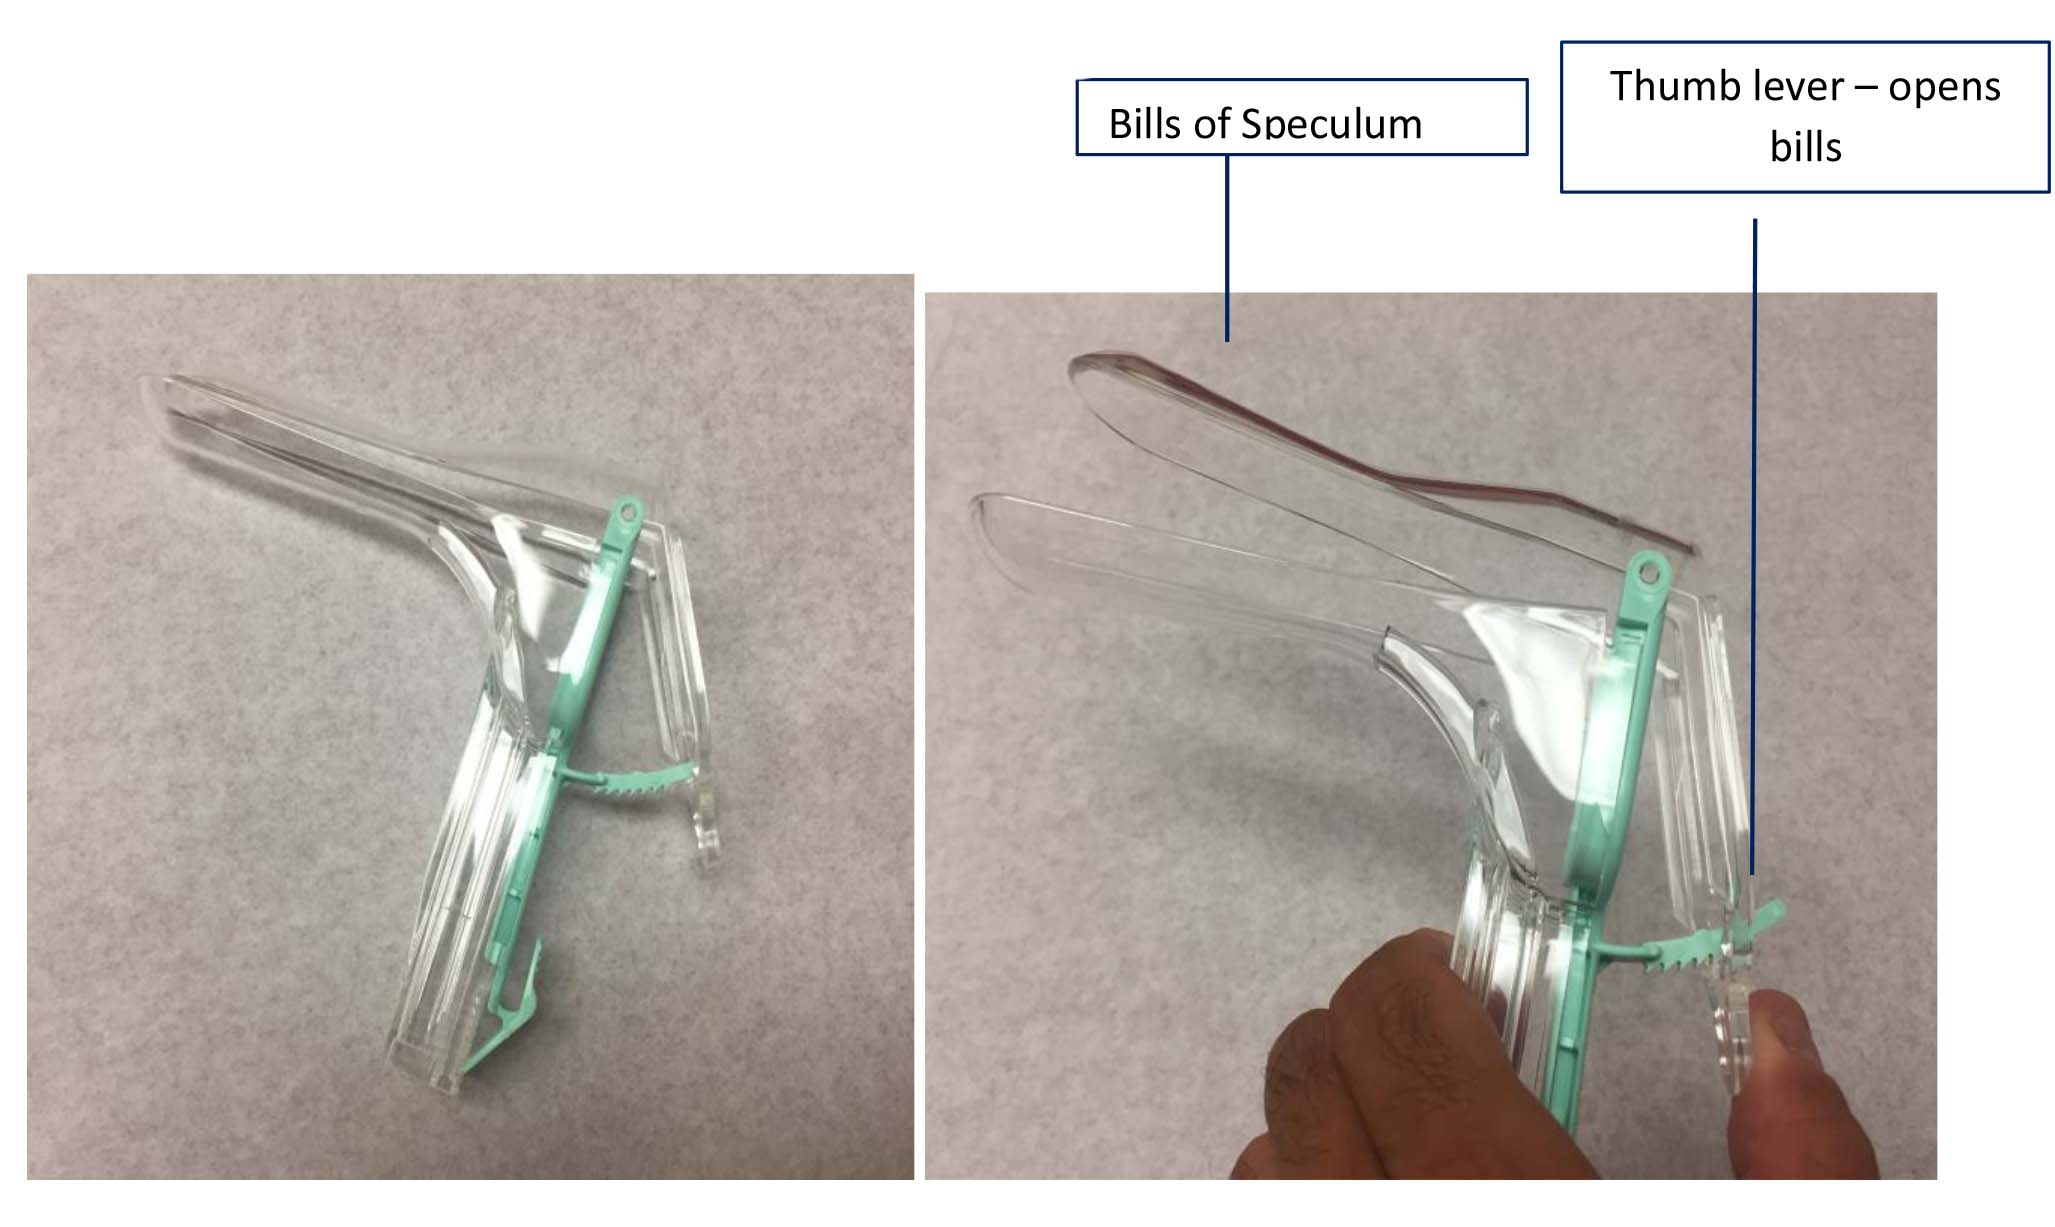
The light sourced attached to the plastic version should make for easy visualization. For metal specula, use an external light (typically on a goose-neck) to visualize the inside of the vagina and cervix.
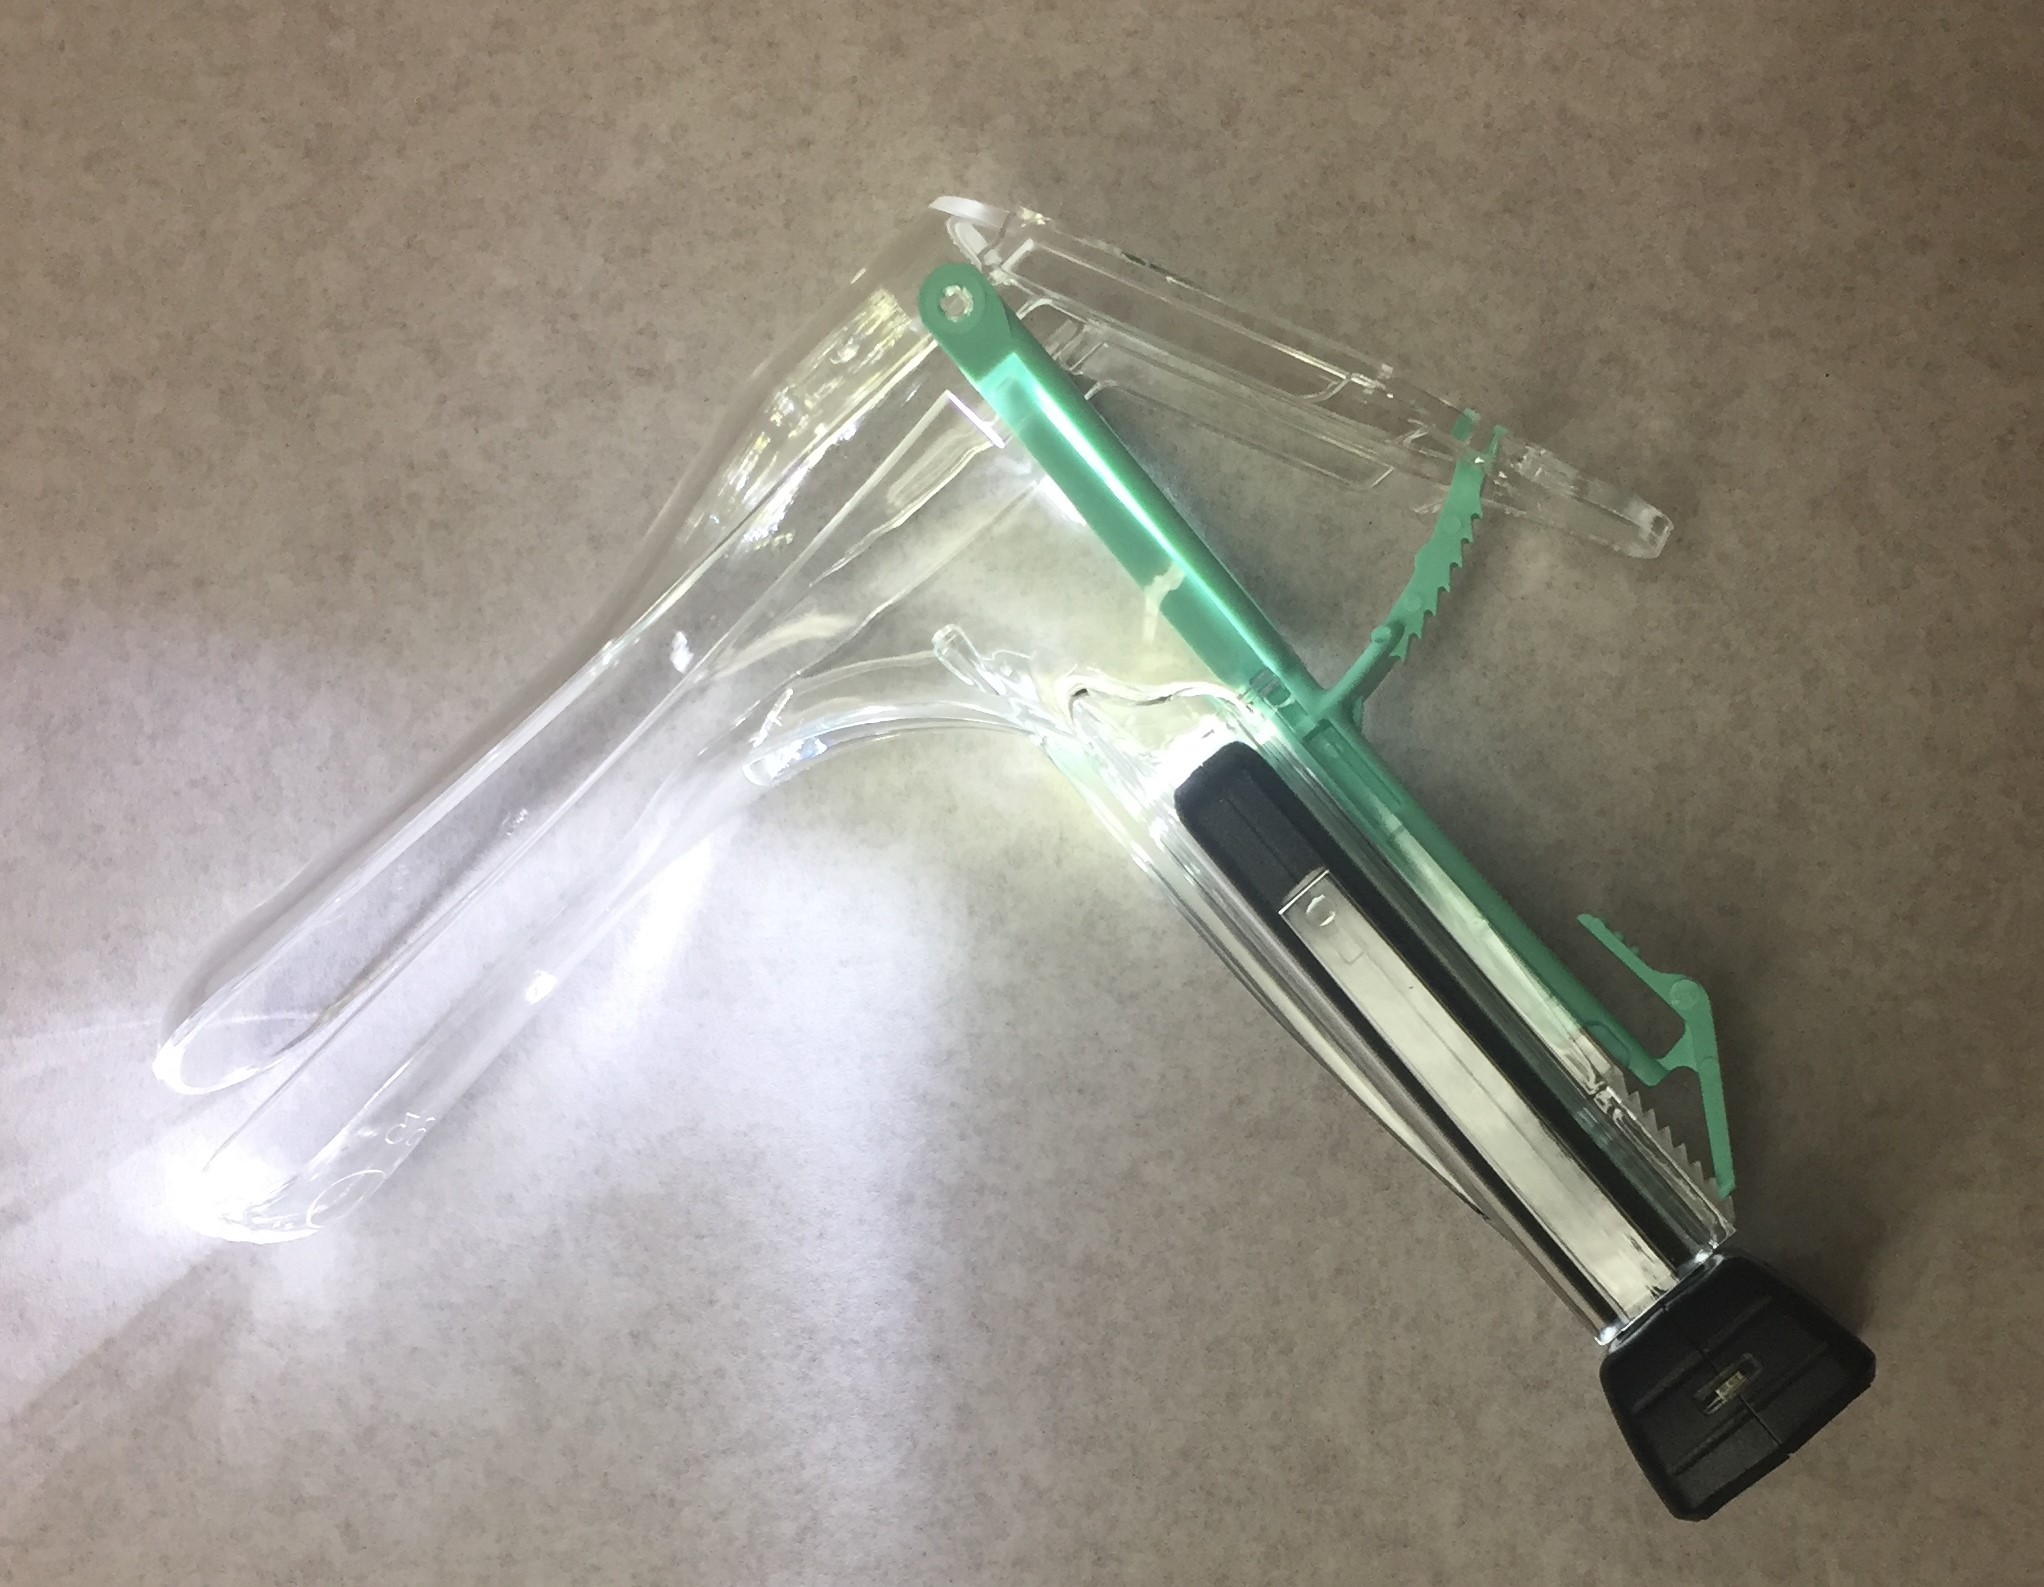
Note that specula come in various lengths and widths, allowing a range to fit the anatomy of your patient.
- Prior to starting the exam, lubricate the specula with a water-soluble agent (typically available in all clinics where this is done). Metal specula should be warmed with water prior to use.
- Make sure that you've fully explained the process to the patient and continue to explain the steps prior to initiating each one. Inform them that you're going to start and touch their inside thigh (letting them know they you're doing this) as a way of getting started and preparing them for the beginning of the exam.
- Use the fingers of your non-dominant hand to expose the introitus. You can use 2
fingers of that hand to apply downward pressure on the vaginal floor, and then
gently place the speculum over those fingers and into the vagina. Or you can use 2
fingers of that hand in an upside-down peace sign to spread the labia and expose the
introitus in this fashion.

- Apply steady downward pressure and downward angling while placing the specula in the vagina, keeping away from the clitoris and urethra, which are highly innervated.
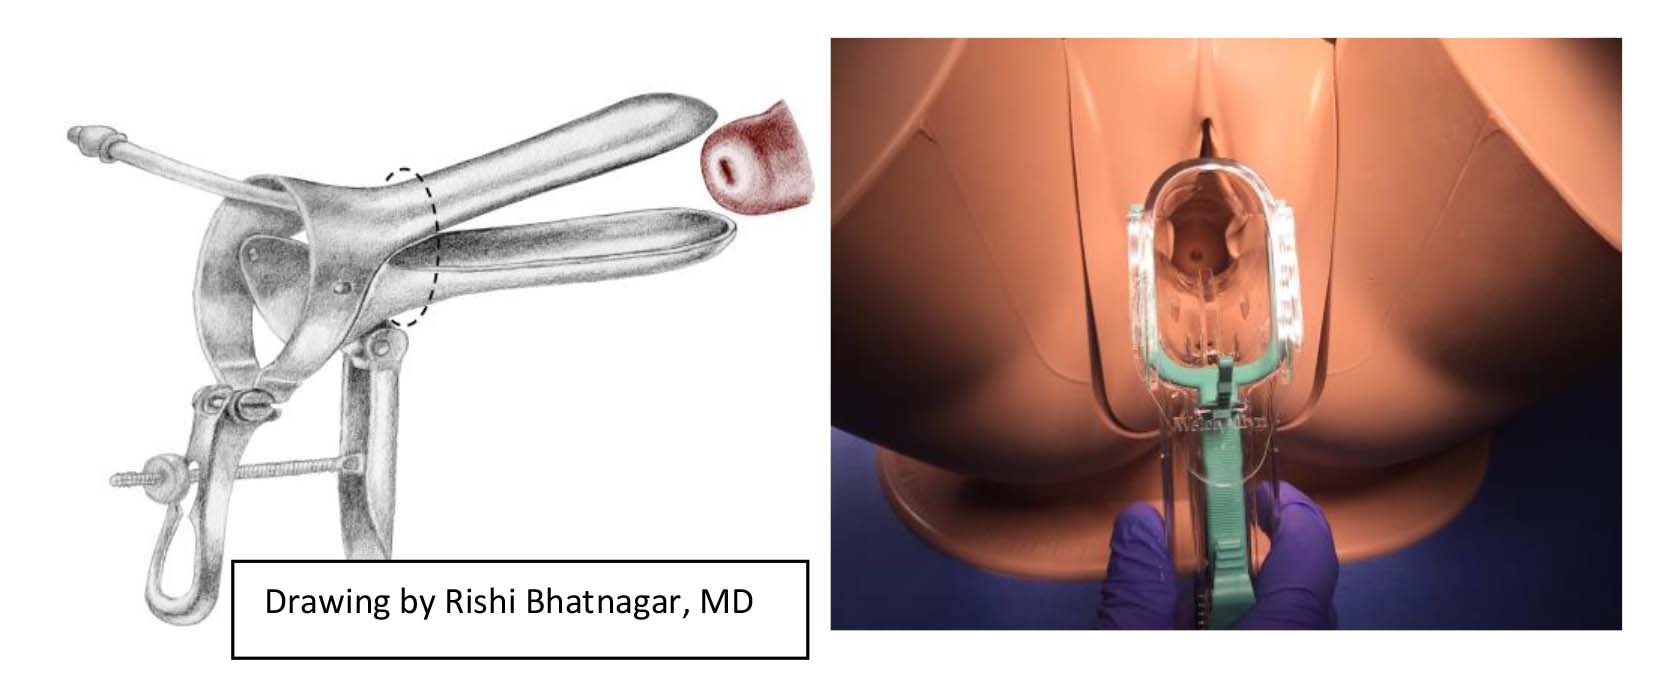
- Don't open the bills until the speculum is fully inserted. Once fully inserted, use
the thumb lever to open the bills while observing thru the opening of the speculum.
The cervix should (hopefully) be visible.
- If the cervix is visible, plastic specula will maintain that position. For metal specula, you'll need to tighten the thumb-screw to keep the bills in place.
- If the cervix is not visible, you are either off to one side or not in deep enough.
To address this situation, close the bills, withdraw the speculum
slightly/reposition, and open them again.
- If finding the cervix remains challenging, consider performing the bimanual exam first (see below) - which will allow you to feel the position of the cervix. Then go back to perform the speculum exam, using the information gained from the bimanual to assist in locating the cervix.
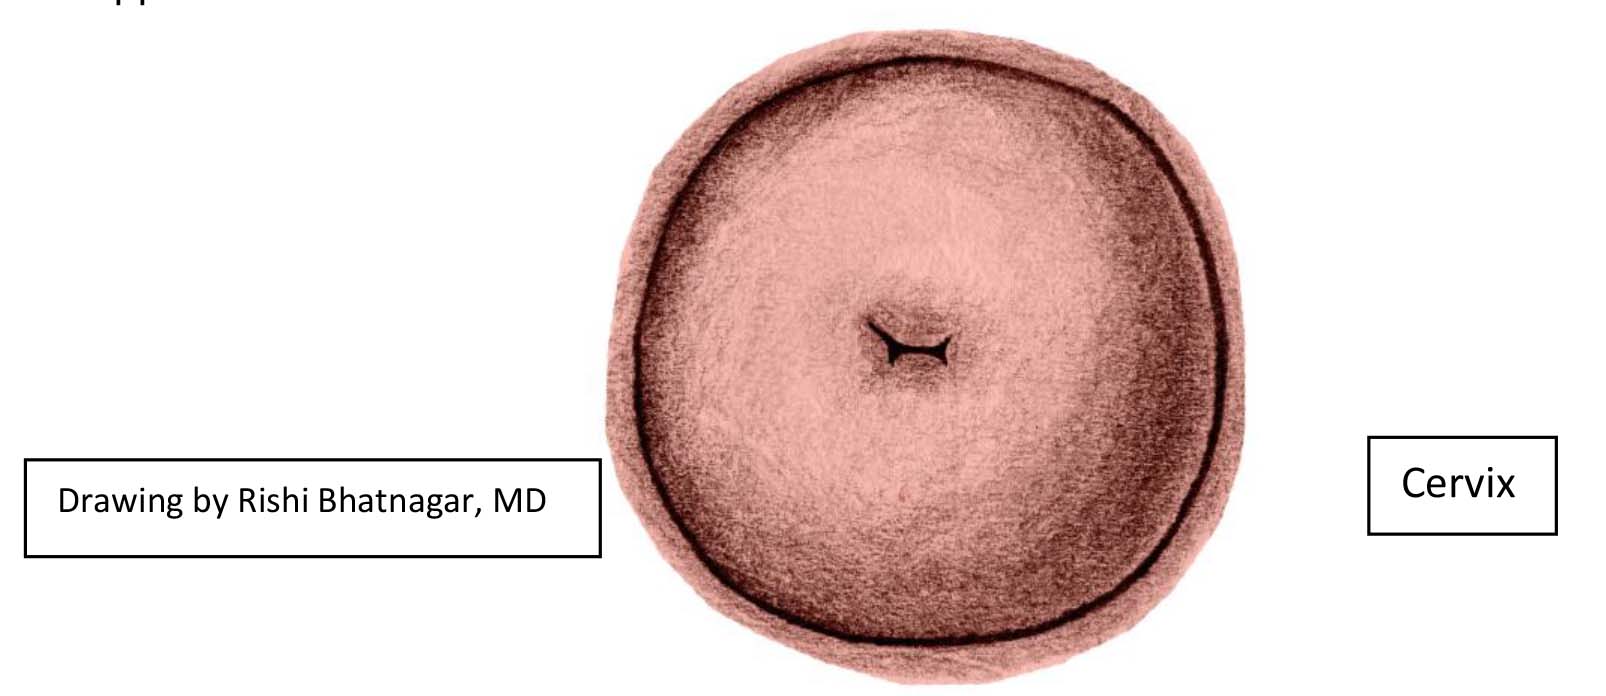
Once the cervix is visualized, pay attention to:
- General appearance of cervix. You can sometimes see the squamo-columnar junction
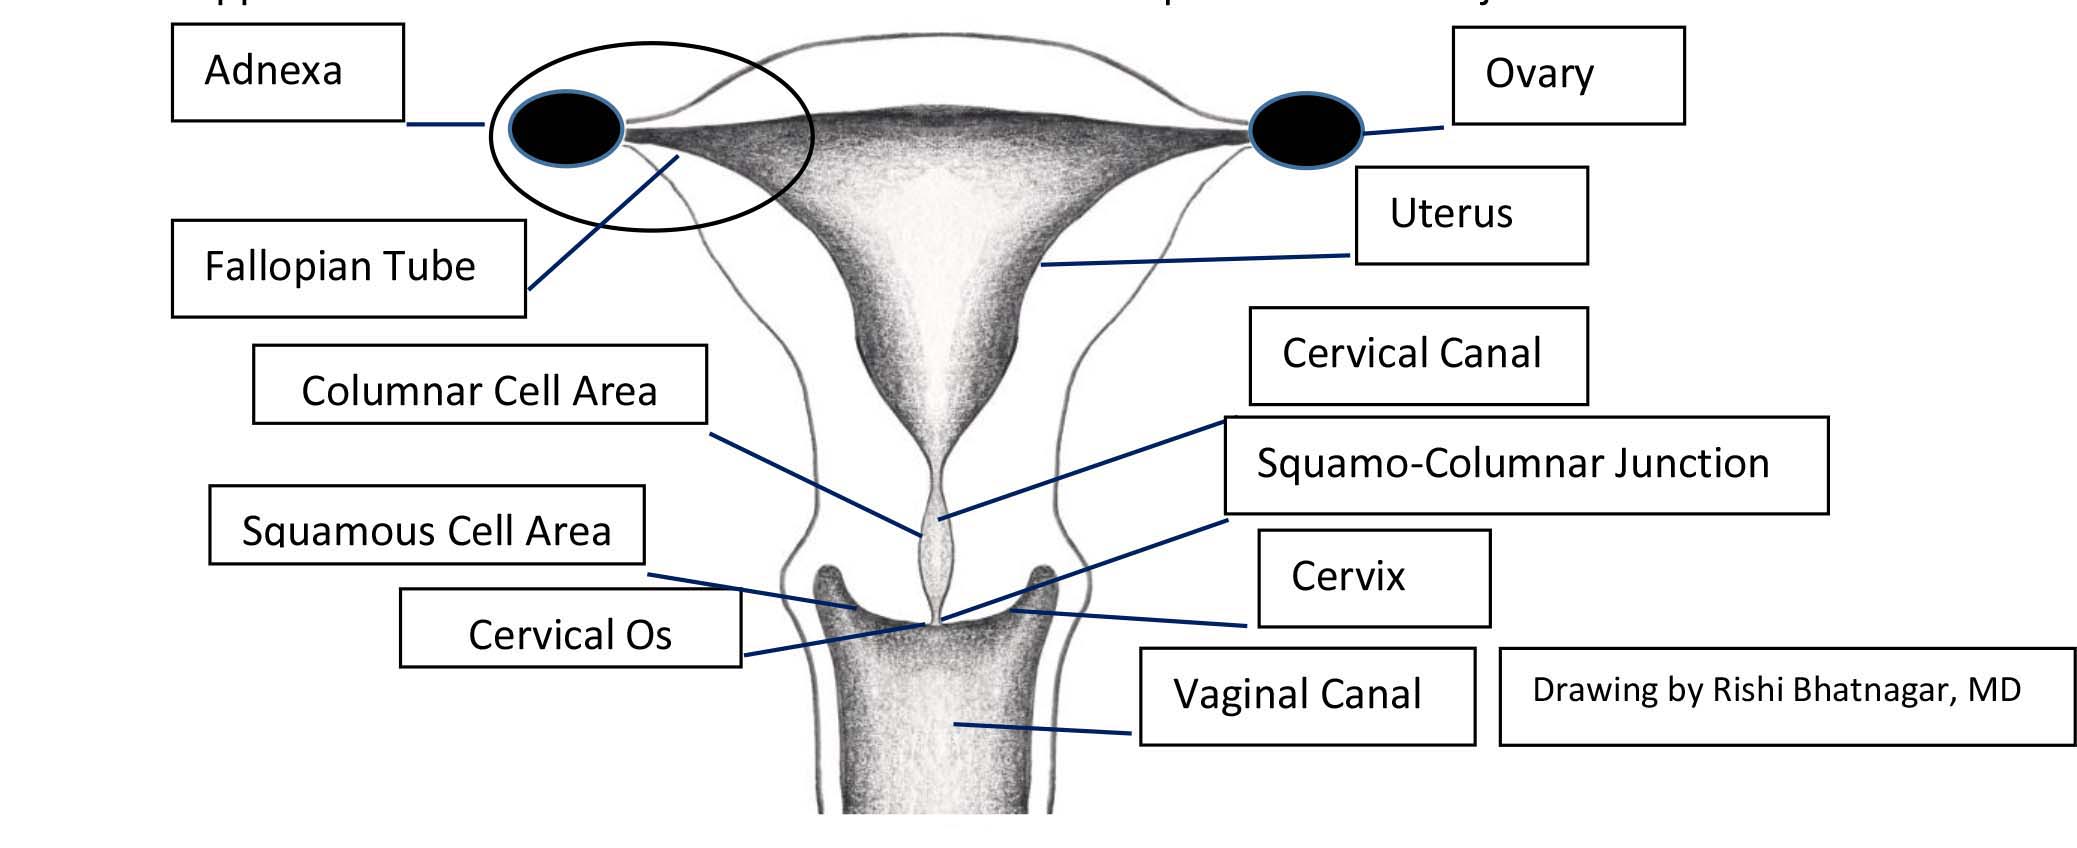
- Following a vaginal delivery, the OS will appear slit-like. Otherwise, the OS has a round
appearance.
- Discharge that's thin and without odor is normal.
- A few common types of abnormal discharge (and their cause) include:
- Blood: Most commonly from menstruation (in correct age population). Other considerations: infection, cancer (cervical, endometrial, vaginal, vulvar), fibroids, polyps, peri-menopausal, coagulopathy, pregnancy related (e.g. ectopic, threatened abortion, spontaneous abortion, placenta previa, placenta acreta), other. More info: Digital DDx: Vaginal Bleeding.
- Candida: white, cottage cheese consistency. Causes itching, soreness and sometimes pain with intercourse.
- Trichomonas: yellowish/green, frothy, malodorous discharge. Can cause itching and pain with intercourse
- Bacterial vaginosis: Thin, grayish, malodorous discharge. Can cause pain with intercourse
- Cervicitis/PID: yellowish discharge. Cervix may appear red/inflamed. Pain on manipulation of cervix (see below) may also be present.
- Polyps may be visible at the OS.
- Collect specimens if indicated (e.g. pap specimen, HPV assessment, specimens for culture/pcr and/or wet mount).
For more info on the differential for vaginal discharge Digital DDx: Vaginal D/C or vaginal bleeding Digital DDx: Vaginal Bleeding.
Removing the speculum:
- Do this with care so as not to cause discomfort.
- First pull speculum back a bit, so that the cervix is no longer in between the bills. This will prevent you from pinching the cervix.
- Once you've cleared the cervix, close the speculum half way.
- Observe the walls of the vagina as you withdraw the speculum, noting any abnormalities (e.g. growths or ulcers suggestive of cancer, appearance of mucosa).
- Before you fully remove the speculum, close the bills and take pressure off the thumb piece - otherwise it will snap open when it exits the vagina. Avoid touching the urethral or clitoral areas.
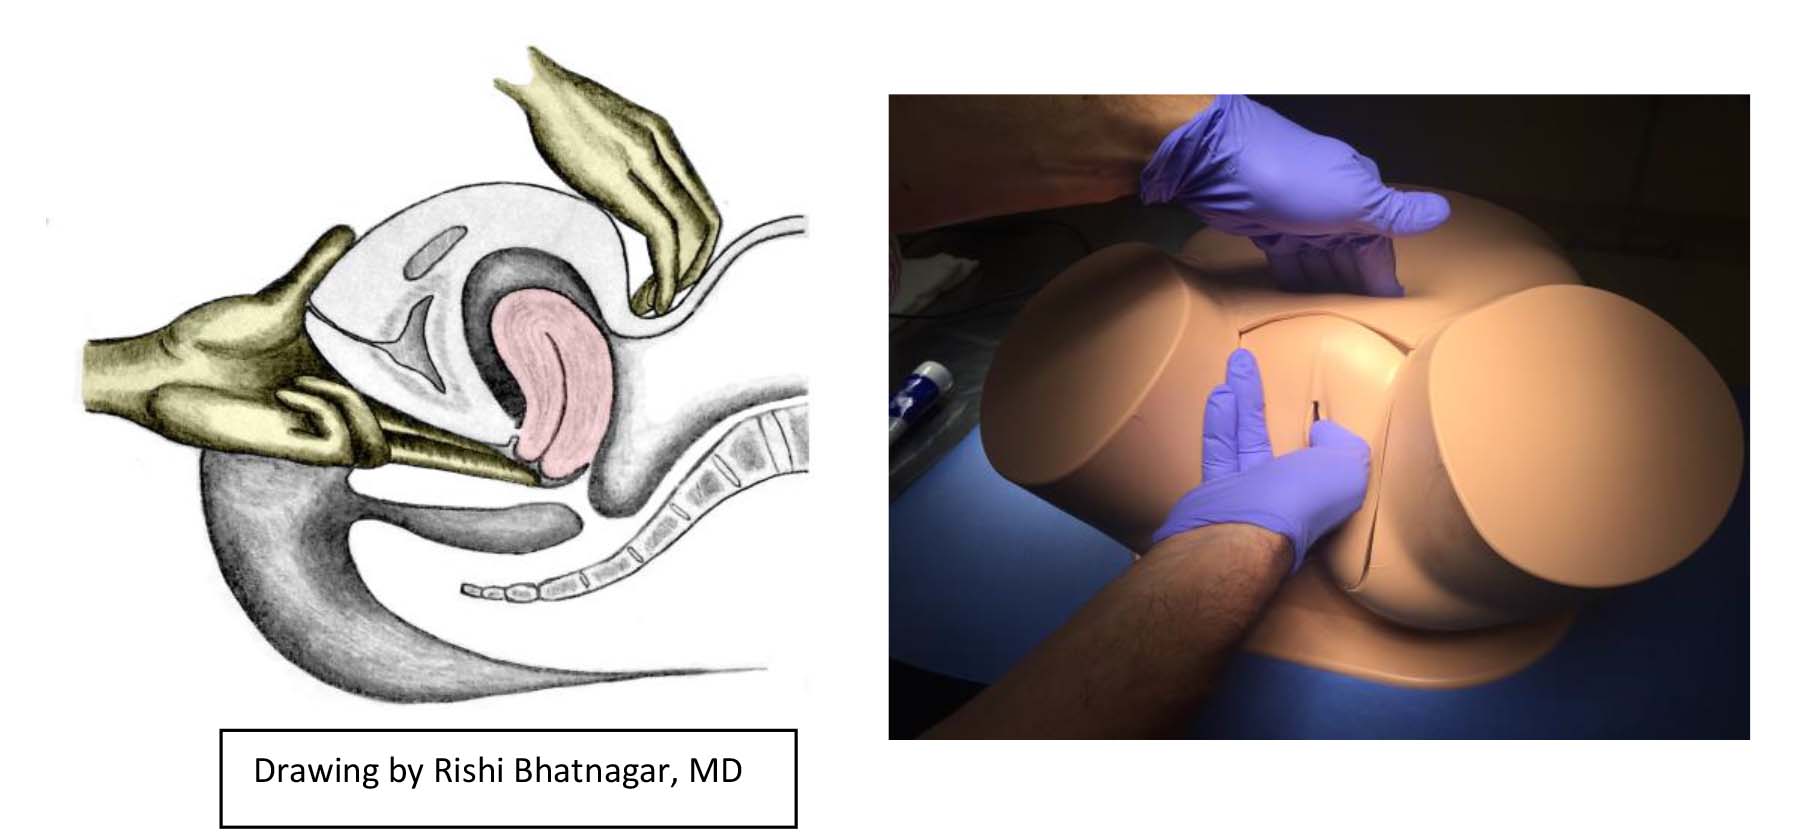
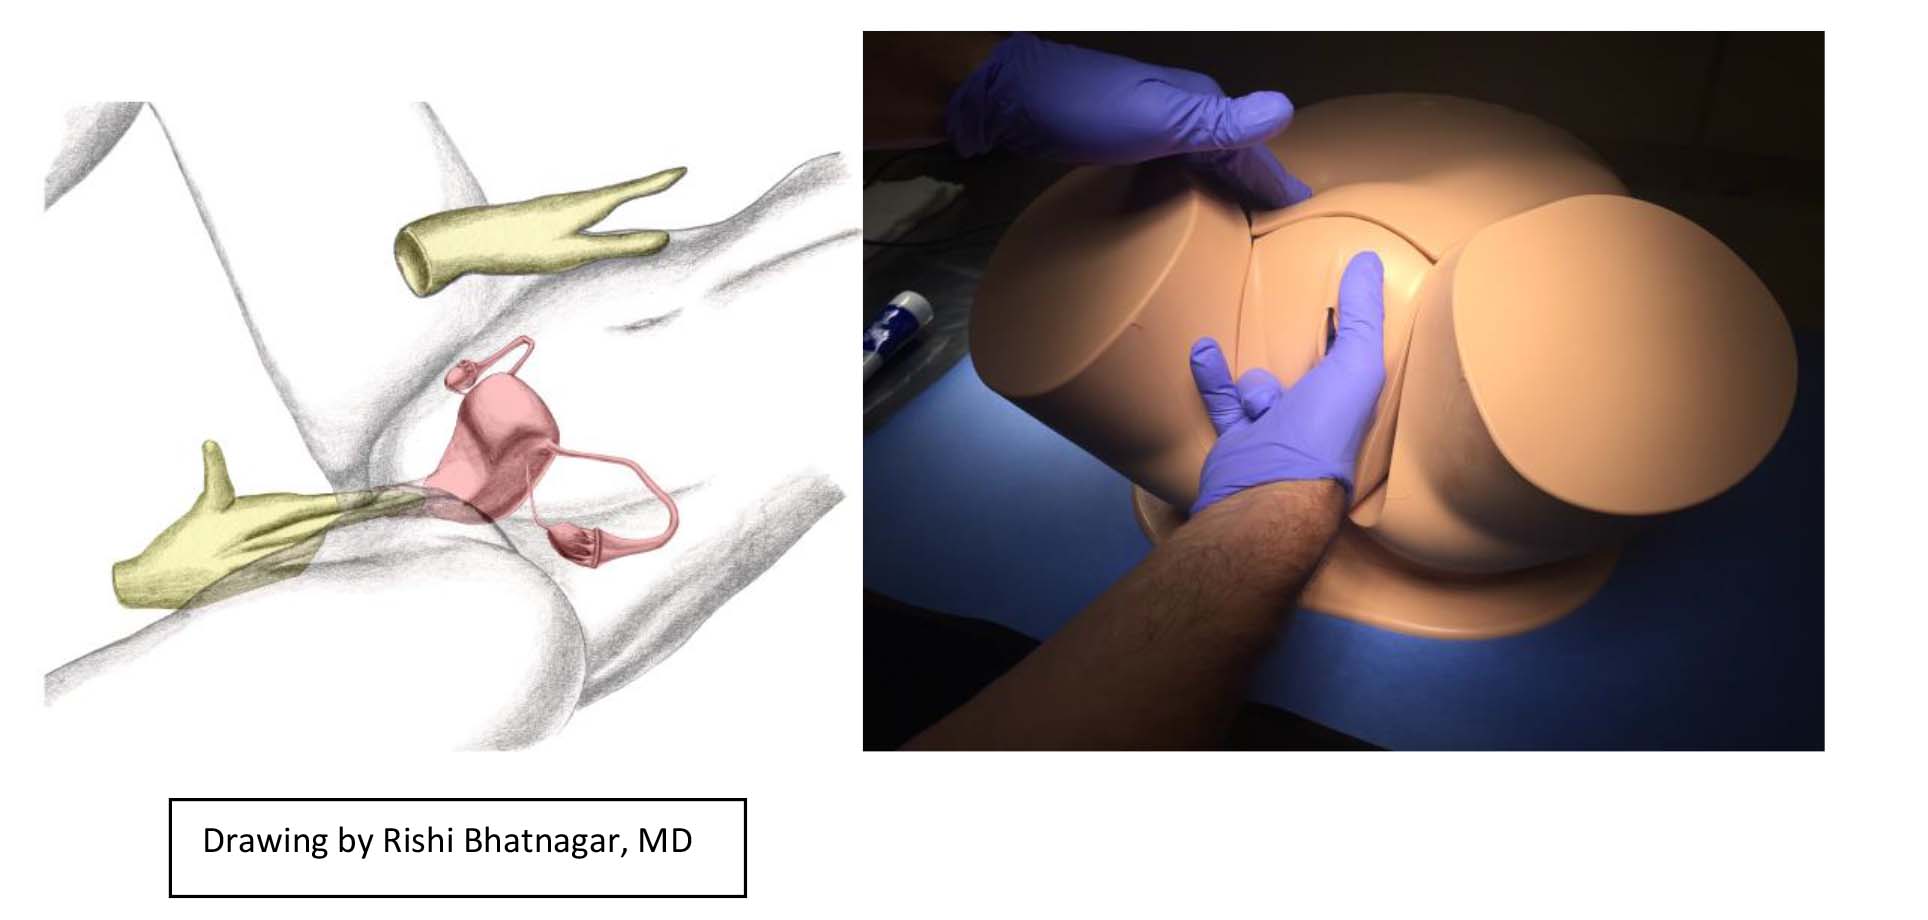
Bi-Manual Exam (to palpate uterus and adnexa/ovaries)
- Explain what's going to occur next.
- Place a small amount of lubricant on the middle and first finger of your dominant hand.
- Touch the patient's inner thigh as a way of preparing for the start of this exam.
- Separate the introitus and introduce the lubricated fingers of the dominant hand into the vagina. Apply posterior pressure to keep your fingers away from the urethra and clitoral areas.
- Place your fingers under/on the sides of the cervix and gently move it, noting if this causes any pain. You should also note the general consistency of this structure.
- Then, with your fingers beneath the cervix (in the posterior fornix), gently lift up. At the same time, place your other hand on the lower abdomen, immediately above the symphysis pubis. Imagine that you are pushing the uterus up from the vaginal hand to the abdominal hand. Try to move the uterus between your two hands. Note its size, shape, consistency and if manipulation causes any pain.
- The position of the normal uterus is variable and can be:
- Anteverted (tipped towards the abdominal wall), in which case the fundus will be palpated along the abdominal wall.
- Midposition
- Retroverted, in which case the fundus will be palpated behind the cervix in the posterior fornix.
- Pull you hand back slightly (to clear your fingers of the cervix) and then move the fingers into the right fornix (the space on the side of the cervix). Use the external hand try to sweep the ovary toward the inner hand, as you try to identify the ovary/adnexal structures. Recognize that the ovary is quite small and learning to identify it takes practice. Also note that palpation of the ovary can cause discomfort.
- After palpating on one side, slightly withdraw your hand and move the fingers into the
left fornix. Repeat your efforts, this time trying to palpate the left ovary and adnexa.
Selected findings that can be Identified during the Bi-manual exam:
- Pain on palpation/movement of the cervix might indicate cervical infection. There is often discharge noted during the speculum exam. If the infection ascends (PID, Tubo-ovarian abscess), there will also be discomfort upon examining the adnexa and the patient typically is more ill. More info: Digital DDx: Cervicitis/PID
- The uterus becomes palpable during normal pregnancy, with the top emerging above the pelvic brim at approximately 12-14 weeks gestation.
- Large fibroids can sometimes be identified during palpation of the uterus. Large uterine cancers may also be palpable and may also cause vaginal bleeding.
- Ovarian masses (e.g. cysts, cancer) can sometimes be identified during palpation of the adnexal region. More info: Digital DDx: Ovarian Cancer and Digital DDx: Benign Ovarian Processes
Recto-Vaginal Exam:
This exam is sometimes performed to examine the ovaries/adnexa, uterus and to assess for pathology between the vagina and the rectum. The lubricated and gloved index and middle fingers of the dominant hand are placed in the vagina and rectum while the other hand simultaneously palpates the lower abdomen. Structures are assessed in a sequential fashion.
Concluding the exam:
At the end of the exam, provide the patient with privacy so that they can clean themselves up (e.g. wipe away any excess lubricant) and get dressed. Then return to answer questions, review findings and discuss next steps (if any).